
Adobe Lightroom is the most popular digital organization and editing software on the market today. It caters to both complete beginners and seasoned professionals, successfully balancing a simple interface with a wide range of features.
We have dissected the photo editing software to provide you with the ultimate guide to Lightroom. So, if you need to learn any processes or want to get the most out of this application, you have come to the right place!
The Ultimate Lightroom Tutorial
Adobe Lightroom has been on the market since 2007 and has grown with the development of digital photography. It was created by the digital editing specialists Adobe, who continue pushing digital image and video editing capabilities.
Our extensive guide covers almost all of the important features that Lightroom has to offer. Here, you can learn the very basics of advanced photo editing processes.
Here is a list of the topics we cover. Click on the highlight to go to your relevant section:
- Navigating the Interface
- Helpful Tips and Techniques
- Master Exposure and Tonal Range
- Working With Color
- Creating Effects in Lightroom
- Brushes and Filters In Lightroom
- Correcting Problems in Lightroom
- Special Techniques and Processes
- Advanced Techniques
- Lightroom Presets
- Tips for Specific Genres of Photography
- Alternatives to Adobe Lightroom
What is Adobe Lightroom
Adobe Lightroom is one of the best RAW processing and organizing programs. It covers the whole range of digital editing, except for complex manipulations meant for Photoshop. Lightroom consistently sets the bar for similar software.
Lightroom is popular with amateurs and professionals because it’s easy to use. The program performs well, from organizing to exporting. But these excellent features come at a price, as the latest versions are only available with a subscription.
Adobe keeps improving Lightroom by adding AI features. Users can now do edits that were once only possible in Photoshop. This means advanced adjustments are getting simpler, giving photographers an easier way to edit their images.
Lightroom is a great choice if you want an all-in-one program with advanced tools. It will help you organize and edit your photos from start to finish.

How to Buy Adobe Lightroom
Adobe Lightroom is a powerful photo editor and management tool used by millions worldwide. It comes in two main versions: Lightroom CC and Lightroom Classic.
Lightroom CC stores your photos in the creative cloud, allowing you to access your work from anywhere. Lightroom Classic focuses on a single user editing and storing files locally on their desktop machine.
Both versions require a subscription, with options for an annual plan or a monthly fee. You can also get Lightroom as part of the Adobe Creative Cloud Photography plan, which includes Photoshop. If you want to simplify your purchasing process, read our article on Buying Adobe Lightroom.
Navigating the Interface
One of Lightroom’s biggest strengths is that it provides a space to sort and organize our photographs. This is helpful as we cannot rely on normal computer programs to provide a way to sort our images.
In this section, we will cover the basics of how to import and export your images. We will also cover how the Catalog system works, helping you to understand the software better. There are also some helpful tips to streamline your workflow!
Importing Photos
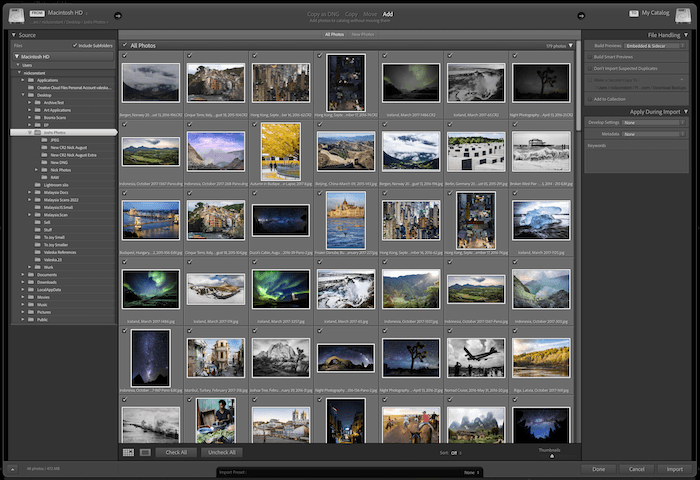
Importing photos into Lightroom is simple. Connect your camera to your computer using a USB cable and turn it on. Click the Import button to bring up the import dialogue box.
In the left window of the dialogue box, select your camera. The photos will appear as thumbnails in the center window. Choose Copy or Copy as DNG at the top center of the screen.
Select the destination folder for your photos in the right window. You can also choose to rename the files, add copyright information, and apply develop settings during import. Once you’ve adjusted the settings, click the Import button to bring the photos into your Lightroom catalog.
Learning how to import photos into Lightroom is an essential first step in mastering this powerful editing software. With a solid understanding of the import process, you’ll be well on your way to organizing and enhancing your images like a pro.
Organizing Your Photos
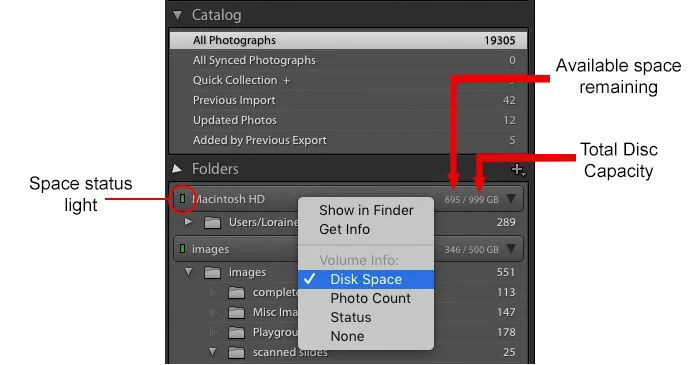
We have gathered the top tips for organizing your photos in Lightroom. Lightroom allows you to choose where to store your images, such as on external hard drives. You can create a master catalog to easily search your entire photo library. You can also adjust catalog settings and preferences to optimize performance and suit your workflow.
Lightroom allows you to use metadata presets to quickly add copyright info and keywords to every imported photo. You can also create a rating system with flags, stars and color labels to mark your best images. And delete rejected photos to save space and reduce clutter.
Another helpful tip is to make Collections to group your favorite or most important photos for quick access. By organizing photos in Lightroom, you’ll have a streamlined system for managing and finding all your images.

Undertanding the Lightroom Catalog System
The Lightroom catalog system is a database that stores your photos and tracks the changes you make to them. It makes it easy to find and edit any photo in your library.
The catalog also stores metadata about your photos, like camera make and model, lens information, and camera settings. It can even store GPS location data for photos taken with a GPS-enabled camera.
Lightroom uses catalogs to organize photos. A single catalog can hold a huge number of images. You can sort photos inside a catalog using collections and smart collections.
To learn more about how the lightroom catalog works, check out this in-depth guide that explains it in just 10 minutes.
Mastering Your Workflow
Setting up a good Lightroom workflow will save you time and ensure your images are consistent. Editing is just half the battle – you also need to import, select and export your photos. Metadata and keywording are important to use Lightroom to its full capacity.
A Lightroom workflow is a sequence of tasks you complete to reach your goal, from setting up your camera to publishing your images. Lightroom is a popular photo editing program, so we’ll go through sections of a Lightroom workflow step-by-step to help you create an efficient editing process.
By organizing your photos, adding metadata, using auto-advance and selection tools, assigning keywords, and using the right tools in the Develop module, you can greatly improve your editing speed. Finally, exporting your images with the right settings will complete your workflow. Learning how to create an effective Lightroom workflow is highly personal, but with some exploration you can save time during editing.

Exporting Photos
Exporting photos from Lightroom is an important step in sharing your edited images. To export, select the photo and go to File > Export. Choose your export settings like file type, size, and quality.
You can export multiple photos at once by selecting them before starting the export process. The export settings will apply to all selected images.
Save time by creating export presets for common settings like web or print. To learn more about how to export photos from Lightroom, check out this in-depth guide.

Back Up Your Lightroom Catalog
Lightroom doesn’t actually store your photos. It simply stores information about them in a catalog. To avoid losing your edits, you need to regularly backup your Lightroom catalog.
Lightroom catalogs function as a database that references where your images are stored. Any information added to an image, such as edits, presets, stars, labels, or metadata, gets stored with the image file. Lightroom backs up your catalog, but not your photos or previews of them.
Backing up your photos and Lightroom catalogs are two separate processes that you should do regularly. Ideally, have two external backups and a backup in a cloud-based program. If you want to learn more about lightroom backup, there are great resources available to help you develop a solid backup strategy.

Moving Your Catalog to A New Computer
Transferring your Lightroom catalog to a new computer is a simple process. First, organize your folders in Lightroom on your old computer. Then, back up your photos, catalog, previews, templates, presets, preferences, and plug-ins.
Install Lightroom on your new computer and transfer the backed up files, making sure to put them in the same paths as the original locations. Open the catalog on the new computer and relink any missing files by right-clicking on the parent folder and selecting “Find Missing Folder”. Finally, check that your preferences, presets, and plug-ins are all there.
If you’d like to learn more about how to transfer a lightroom catalog to a new computer, there are many great resources available online that provide step-by-step instructions and helpful tips to make the process even easier.
Helpful Tips and Techniques
Now, we have a wide range of tips and techniques to speed up your editing. Some features here are even helpful for experienced Lightroom users.
Here, we cover the basics, from cropping your photographs and histograms to flipping an image and changing its aspect ratio.
Learning different approaches to editing is beneficial for different situations. You may need to edit a wide range of photos simultaneously. This is where batch editing comes in handy.
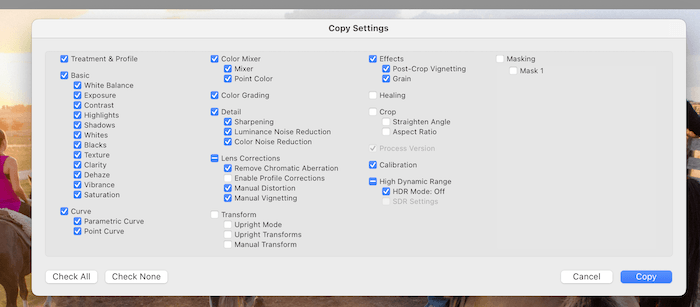
Batch Editing
Batch editing in Lightroom lets you apply adjustments to multiple images at the same time. This can save you hours, especially if you edit photos from an event or photoshoot with similar lighting.
There are several methods for batch editing in Lightroom. You can batch edit during import, in the Library module, using the Sync or Auto Sync tools, with presets, or by editing metadata. The Auto Sync tool is particularly useful as it automatically applies any settings you edit to all selected photos.
The easiest way to batch edit is to create your own preset. Apply your favorite edits to one photo, then save those settings as a preset. You can then apply the preset to any photos in your library. To learn more about how to batch edit in Lightroom, these techniques can help speed up your editing workflow.
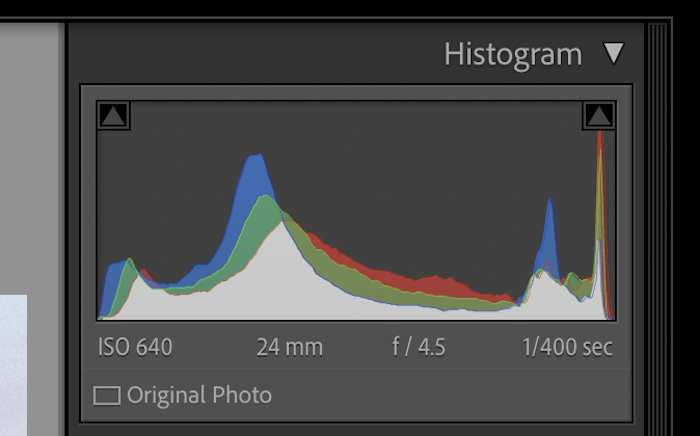
Reading the Histogram
The Lightroom histogram is a graph that shows the tonal distribution of your image. It displays the number of pixels for each tonal value, from black on the left to white on the right. The histogram also shows the distribution of colors in your image, with red, green, and blue overlaid on top of each other.
By looking at the histogram, you can learn a lot about your photo. A histogram with most pixels in the middle indicates an image with mostly midtones and no blown-out highlights or dark shadows.
If the histogram is skewed to the left, your image has more shadows and may be underexposed. A histogram skewed to the right means more highlights and possible overexposure.
The histogram is also useful for finding clipped areas in your image. Clipped shadows will appear as a peak on the left edge, while clipped highlights peak on the right.
Lightroom can mark clipped shadows in blue and clipped highlights in red. You can then use the Basic panel sliders to decrease clipping and recover detail. To learn more about the lightroom histogram, check out this in-depth guide.
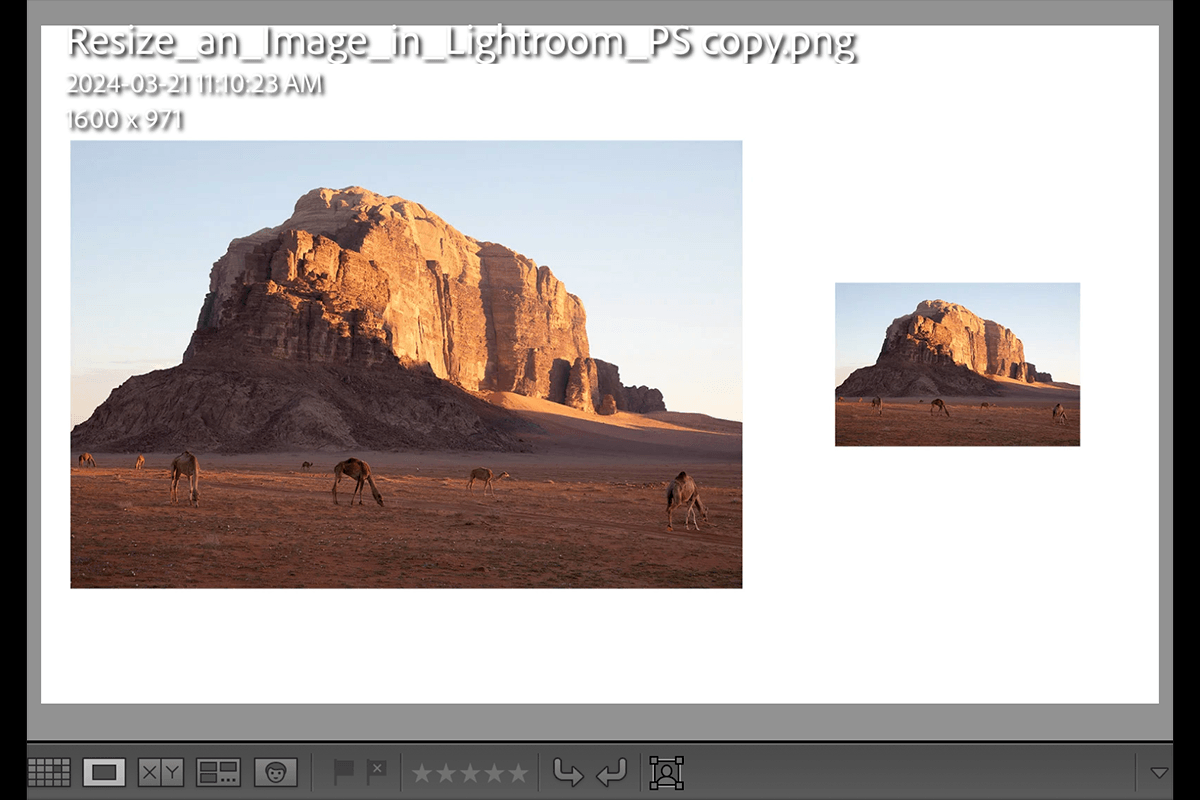
Resizing an Image
Resizing images in Lightroom is an important skill for photographers. It lets you adjust photo dimensions for different uses like printing, websites, or photo contests.
Lightroom offers several ways to resize photos. You can set the width and height, long edge, short edge, megapixels, or percentage. The process is simple and gives you full control.
When resizing, consider the best resolution for your needs. Use 72 PPI for digital images and 300 PPI for high-quality prints. Lightroom makes it easy to resize an image in Lightroom for any purpose.
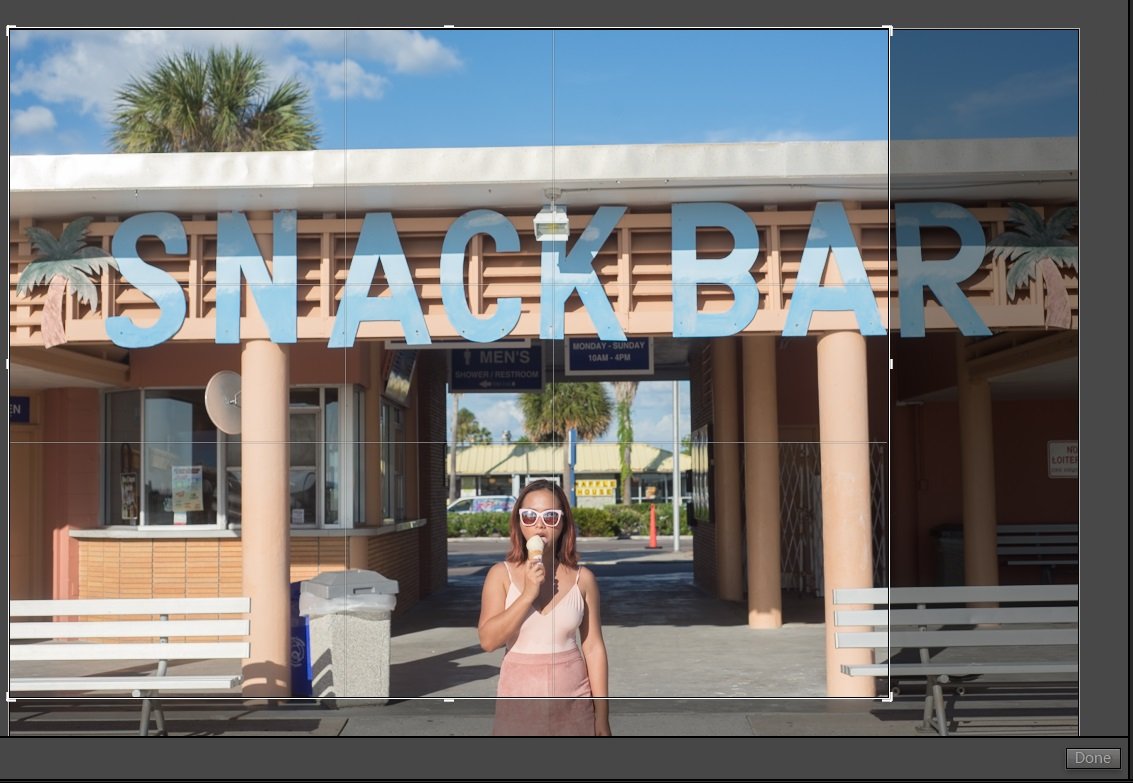
Crop and Straighten Your Images
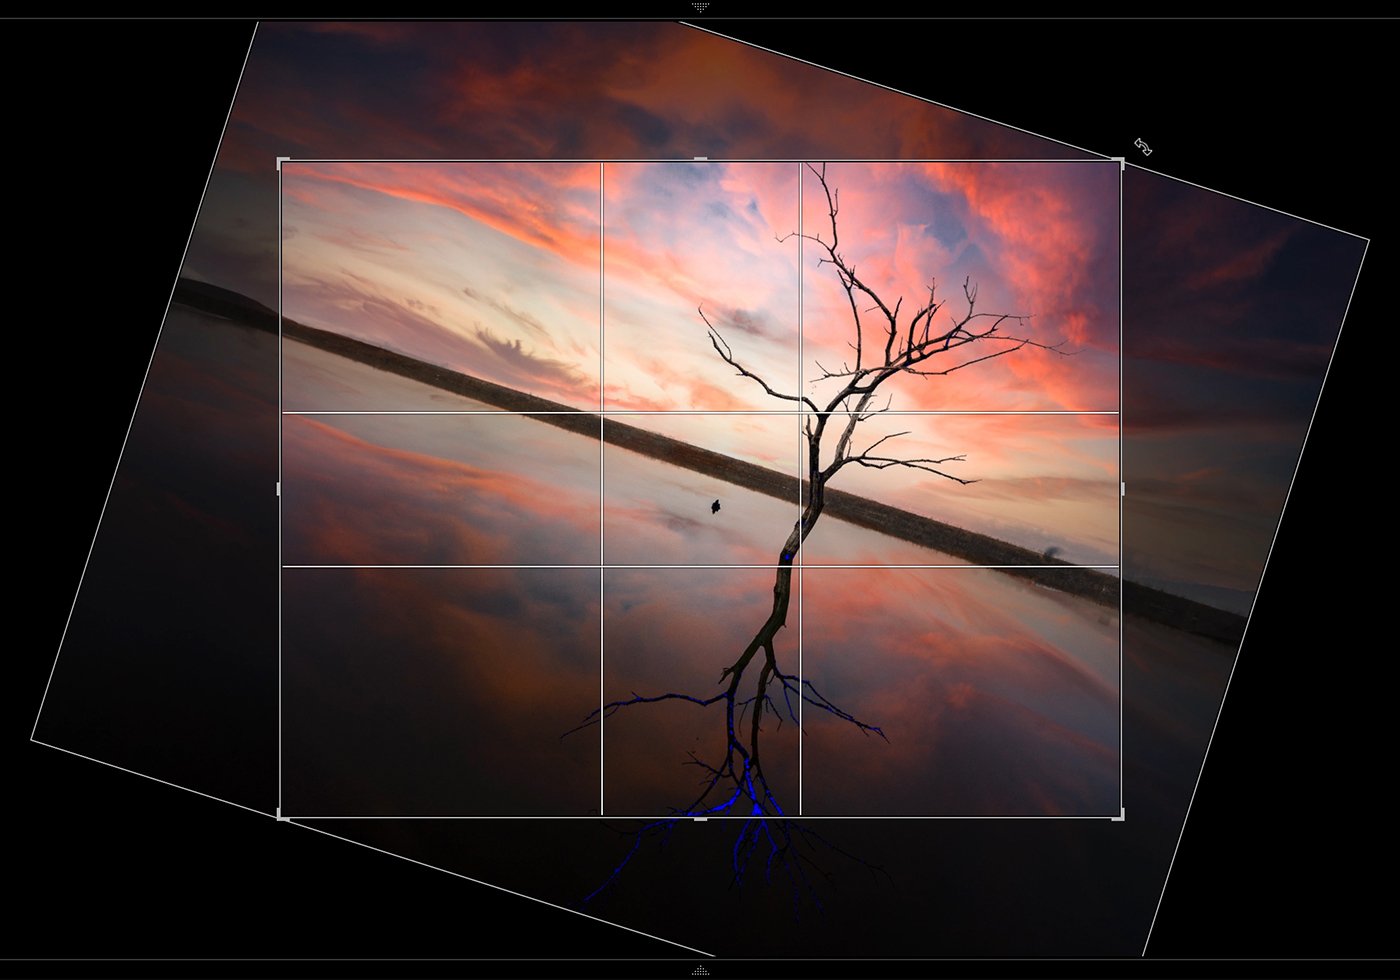
Cropping and straightening photos in Lightroom is simple. Access the Crop tool by clicking the grid icon or pressing R. Adjust the aspect ratio, angle, and overlay to suit your needs.
To crop, drag the handles at the corners of the grid. Use the lock icon to maintain the aspect ratio while resizing. Recompose your image using the overlay as a guide.
Straighten photos by using the Angle slider or by moving your mouse near a corner until a curved double arrow appears. Drag left or right until the photo looks straight. If you want to learn more about how to straighten photos in Lightroom, there are many helpful tutorials available online.
Rotating or Flipping an Image
Rotating photos in Lightroom is quick and easy with the rotate shortcut. Simply press Command-R (Mac) or Control-R (Windows) to rotate your image 90 degrees clockwise. Press the shortcut again to keep rotating the image in 90-degree increments.
You can also find rotation arrows on the toolbar below the image in Lightroom Classic’s Loupe view. Click the left arrow to rotate counterclockwise or the right arrow to rotate clockwise.
If you want to create a mirror image of your photo, Lightroom can flip it vertically or horizontally. This changes the direction of lines in the frame, giving your composition a different look. Be aware that any text in the photo will appear backwards. Lightroom rotate shortcut makes it simple to adjust your images to the perfect orientation.
Changing Aspect Ratio
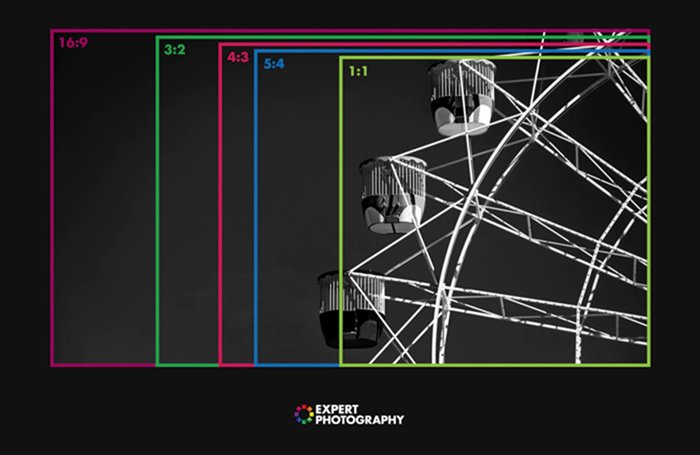
Changing the aspect ratio in Lightroom is a useful skill for photographers. It lets you adjust the proportions of your image for printing or sharing online. Lightroom makes it simple to change the aspect ratio with presets for common sizes like square (1:1), 4:5, 3:2, and 16:9.
To change the aspect ratio, open the Crop Tool in the Develop Module. Click the drop-down menu and choose from the preset options. You can also enter custom dimensions if needed.
When you select an aspect ratio, Lightroom will show the areas that will be cropped with an overlay. You can adjust the crop by dragging the overlay to get the composition you want while keeping the set proportions. Learning to change the aspect ratio in Lightroom will help you print your photos exactly as you envision them.
Master Exposure and Tonal Range
One of the most important aspects of photography is having a well-exposed image. If you cannot achieve this in-camera, Lightroom provides ways to save your image.
Editing the exposure allows you to achieve the perfect exposure and apply your own style. Read on below to learn more about how you can control your photograph’s tone in Lightroom.
Correct Exposure
Exposure is one of the most important aspects of photography. Underexposed images are too dark, while overexposed images are too bright. A well-balanced photo has details in both the shadows and highlights.
Shooting in RAW gives you more flexibility when editing exposure in Lightroom. The Exposure, Highlights, Shadows, Whites, and Blacks sliders in the Basic panel are the main tools for adjusting exposure.
To fix overexposed photos, start by lowering the Exposure slider. Then, recover lost details by pulling the Highlights and Whites sliders to the left. For underexposed photos, increase the Exposure and bring up the Shadows if needed.
You can also make local adjustments using the Brush tool. If you want to learn more about exposure in Lightroom, there are many helpful resources available.

Contrast and Tonal Controls
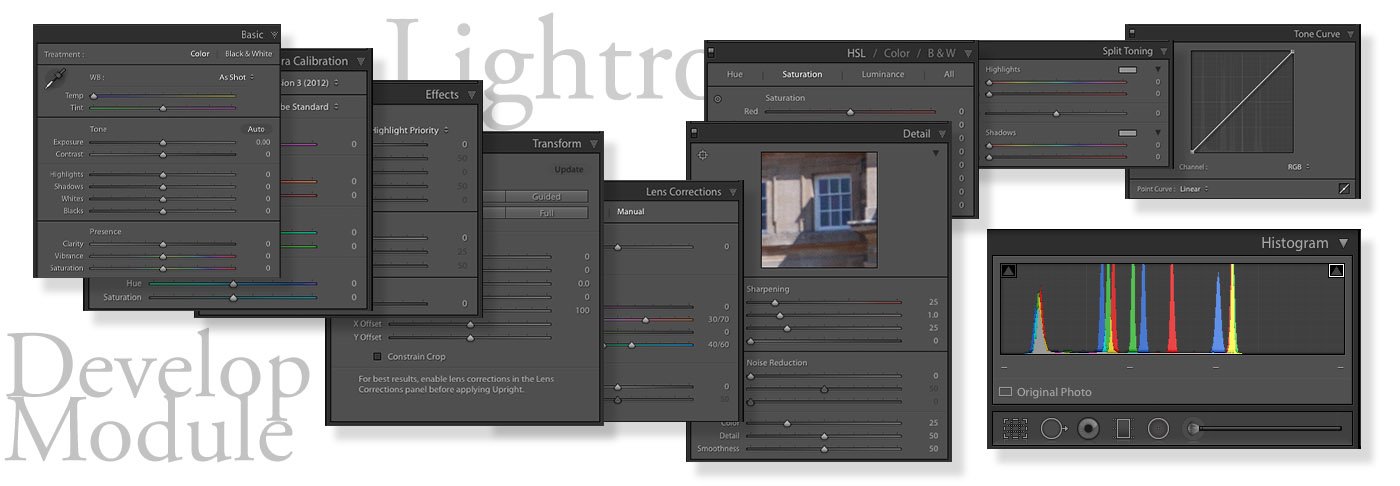
Contrast and Tone are among the most important aspects of photo editing in Adobe Lightroom. The Develop Module includes several settings to adjust these, which can greatly improve your photos.
The Exposure slider brightens or darkens the image, mainly affecting the mid-tones. The Highlights and Shadows sliders help recover details in very bright or dark areas. Use the Blacks and Whites sliders to set the black and white points, ensuring the image has the maximum dynamic range.
The Contrast slider splits the tonal range and moves each half in opposite directions. Increasing contrast can add more “punch” to an image, while decreasing it can create a softer look.
To quickly adjust all the tone settings at once, click the Auto button. If you’d like to learn more about lightroom contrast, check out our in-depth article.
Shadows and Blacks
Removing shadows in Lightroom is a basic but important task in post-processing. The Shadows slider, Fill Light slider, and Dehaze slider are three methods to remove shadows.
The Blacks slider sets the blackest points in the image, while the Shadows slider adds or removes details in dark areas. It’s best to set the black point first with the Blacks slider, then adjust shadows.
To remove shadows from specific areas, use the Brush tool or Radial Filter. Brush over the shadowed area, then adjust the Shadows slider. The Radial Filter works similarly – draw a circle around the area, check “Invert Mask,” and adjust the Shadows slider.
For a faded film look, use the Tone Curve tool. Place a control point around 25-35% on the curve and drag up the edge. The higher the edge, the more faded the blacks will appear. To learn more about removing shadows in Lightroom, check out this in-depth article.

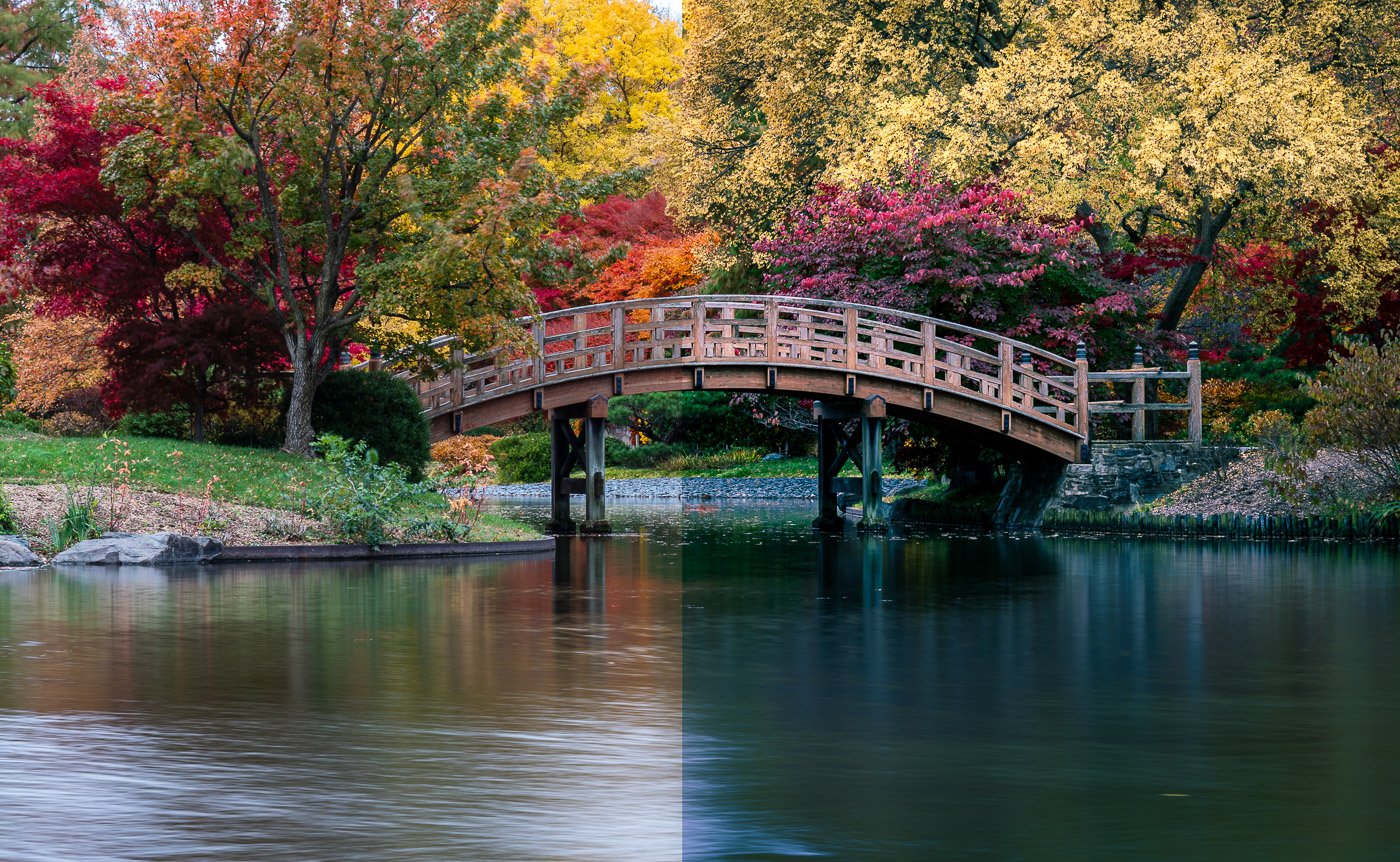
Working With Color
Lightroom offers several ways to edit color in your photos. The Vibrance and Saturation sliders are the quickest options, letting you boost colors with a single adjustment. You can also use the White Balance tool to fix color casts and make the image look more natural.
For more control, try the Tone Curve, HSL/Color Mixer, and Color Grading tools. The Tone Curve lets you adjust colors in specific tonal ranges. The HSL/Color Mixer allows precise tweaks to individual colors. Color Grading is great for adding creative color tints.
Lightroom also includes a Color Calibration section to fix common color issues. With these tools, you can improve colors and get the look you want in your images. Editing color in Lightroom is a powerful way to take your photos to the next level.
Color Temperature and Presence
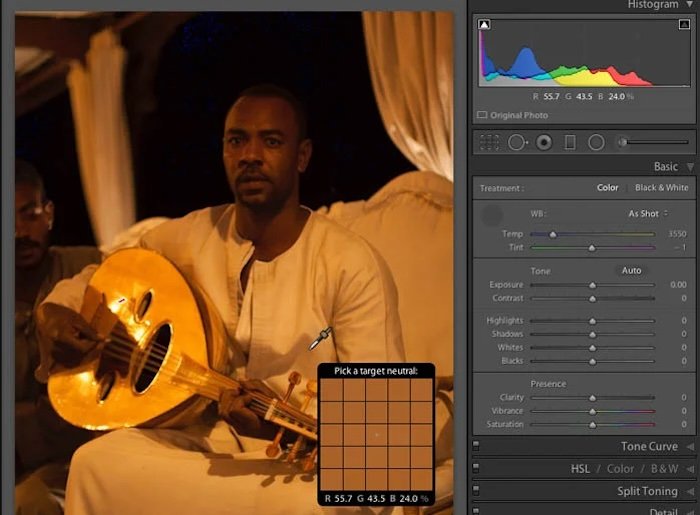
Adjusting the color temperature in Lightroom changes the white balance of your photo. This is a great way to remove unwanted color casts and make your photos look more natural.
The Lightroom color temperature tools are simple to use. Click on the eye-dropper icon next to the Temperature and Tint sliders, then sample a neutral grey area in your image. Lightroom will adjust the colors to force the sampled point to be a neutral grey.
If you can’t find a neutral point to sample, try using one of the white balance presets like Daylight or Cloudy. To learn more about lightroom color temperature, check out this in-depth article.
Color Correction
Color correction is an important step in photo editing. Lightroom offers several tools to fix incorrect colors and improve the overall look of your photos. The Basic panel has intuitive options like the Temp and Tint sliders, the Dropper tool, and Brush filters for adjusting specific areas.
The Tone Curve panel lets you modify color channels individually. Small changes can have a big impact, so be subtle with your edits. The Camera Calibration section allows you to change your camera’s default color settings, but use it sparingly.
For precise color adjustments, the HSL panel is your best option. Here you can tweak individual colors without affecting the rest of the image. Move the Hue, Saturation and Luminance sliders to get the exact look you want. With practice, you’ll be able to turn good photos into great ones using Lightroom’s color correction tools.

Using the Tone Curve to Correct Colors
The Tone Curve in Lightroom is a powerful tool for adjusting the tonal range of your photos. It affects tone and contrast, two major components of an image. Even small adjustments can have a big effect.
The Tone Curve is manipulated via the Point Curve or Region Curve. The Region Curve works on a slider system and is more forgiving, while the Point Curve allows for more precise adjustments by adding anchor points to the curve. You can also adjust individual colors using the RGB options.
The most common curve is the “S-Curve,” which adds contrast to the mid-tones at the expense of highlights and shadows. A gentle s-curve is usually better, but it depends on what you shoot and your post-processing style. Learning more about tone curve in Lightroom can help you take your photo editing skills to the next level.

HSL Sliders
The HSL color sliders in Adobe Lightroom are a powerful tool for improving your photos. HSL stands for Hue, Saturation, and Luminance. These sliders allow you to adjust the colors in your image to get the best results.
The Hue slider changes the actual color, shifting it to a neighboring color on the color wheel. The Saturation slider adjusts the strength of the color, making it more or less prominent. The Luminance slider changes the brightness of the color, making it lighter or darker.
You can use these sliders individually or together to fine-tune the colors in your image. For even more control, use the Targeted Adjustment Tool to click and drag directly on the colors in your photo.
With the HSL sliders, you have the power to subtly improve your colors or completely transform them. To learn more about hsl in lightroom, check out this in-depth article.
Color Grading
Color Grading is a powerful tool in Lightroom that lets you add unique colors to the highlights, midtones, and shadows of your image. It’s a great way to set the mood and give your photos more personality.
The Color Grading tool uses color wheels to select the tint for each light range. Move the target around the wheel to choose a color, and adjust the luminance sliders to control the brightness. The further you drag the target from the center, the more saturated the color.
Lightroom’s Color Grading tool also has Blending and Balance sliders that control how the colors transition between light ranges. Color grading in Lightroom is a simple yet effective way to get creative with your photo editing and make your images stand out.

Vibrance and Saturation
Vibrance and saturation are two important tools in photo editing. Saturation enhances the intensity of all colors in an image, while vibrance targets the dullest colors and makes them pop without affecting already saturated areas.
Using vibrance is great for portraits as it avoids oversaturating skin tones. Landscape photographers may prefer saturation to make all colors in a scene look brighter and more intense.
The key is to use these tools in moderation for the best results. Excessive vibrance or saturation can ruin a photo, but when used carefully, they’ll add the perfect colorful spark to your images. To learn more about vibrance vs saturation, check out this in-depth article.
Creating Effects in Lightroom
The Lightroom Effects panel offers a range of adjustments that replicate effects from different photographic tools and techniques. These include Texture, Clarity, Dehaze, Vignette, and Grain. Each effect can help you achieve a particular style or aesthetic in post-production.
Vignetting is a popular effect that draws attention to the center of the photograph by creating a gradual fade into the edges of the frame. Grain adds a gritty, rough aesthetic to a photograph, particularly effective in black-and-white photography.
The Texture adjustment subtly boosts the texture of specific details, while Clarity makes finer details more visible by affecting the contrast in the mid-tones.Dehaze is another useful tool that reduces atmospheric haze apparent in photos, allowing you to extract more detail.
By mastering these adjustments in the Lightroom Effects panel, you can take your photo editing to the next level. To learn more about the lightroom effects panel, check out our in-depth article.
Vignette
Adding a vignette in Lightroom is a simple way to draw attention to the center of your image. It can create an artistic or dramatic look. Lightroom offers several tools for adding a vignette effect.
The Post-Crop Vignette Tool provides the most dramatic results. Use the sliders to adjust the midpoint, roundness, feather, and highlights. The Lens Corrections panel offers a subtle vignetting option with limited control.
You can also use the Radial Filter. Place the filter over the area where you don’t want the vignette effect. Adjust the exposure slider to darken or lighten the edges. You can also use Lightroom to remove a vignette by sliding the vignette slider to the right.

Clarity
The clarity tool in Lightroom is a powerful way to add extra punch to your photos. It affects the mid-tones, emphasizing the edges to bring out texture and detail. Increasing clarity can make certain elements like buildings, eyes, and lips stand out.
Decreasing clarity can create a dreamy or smooth effect, which works well for things like flowers or skin. The brush and radial filter tools let you selectively apply clarity to specific parts of the image.
Clarity is different from contrast and sharpening. It has a more targeted effect on mid-tones and edges. When using clarity, moderation is key to keep the image looking natural. The clarity tool is a great way to enhance texture, but pushing it too far can make photos appear fake or over-edited.

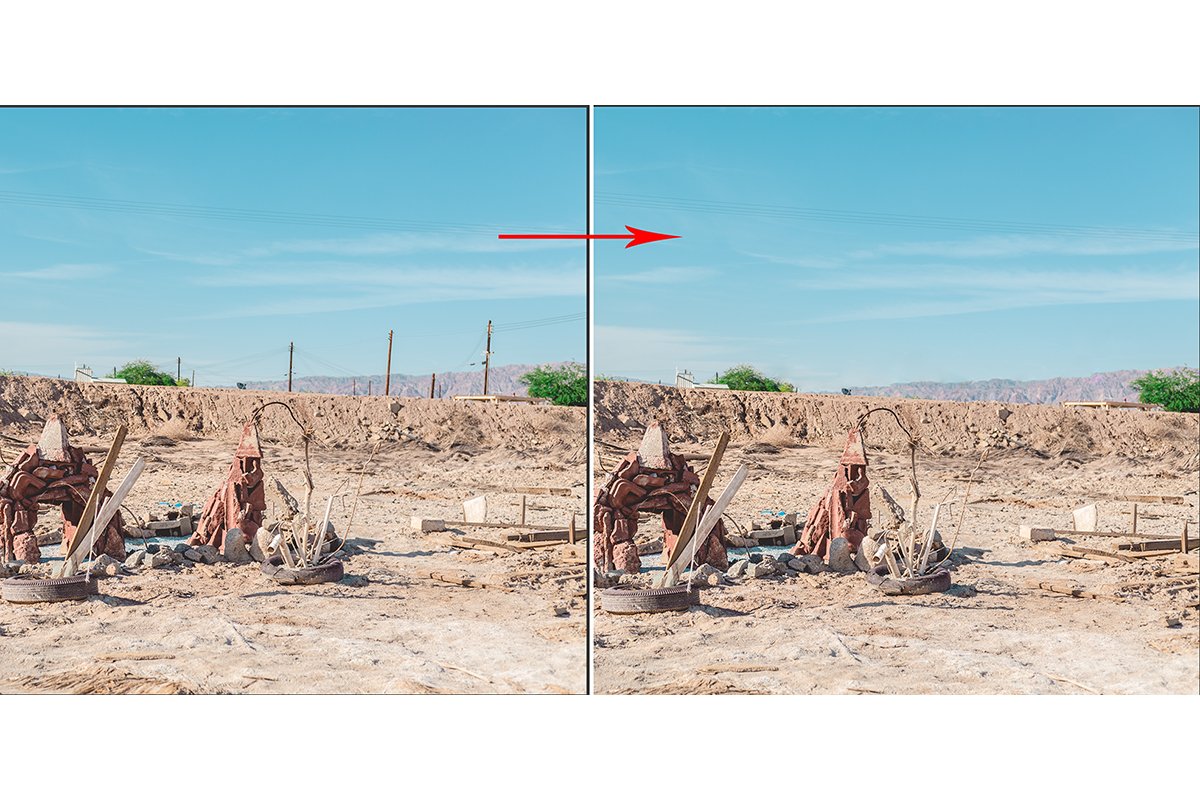
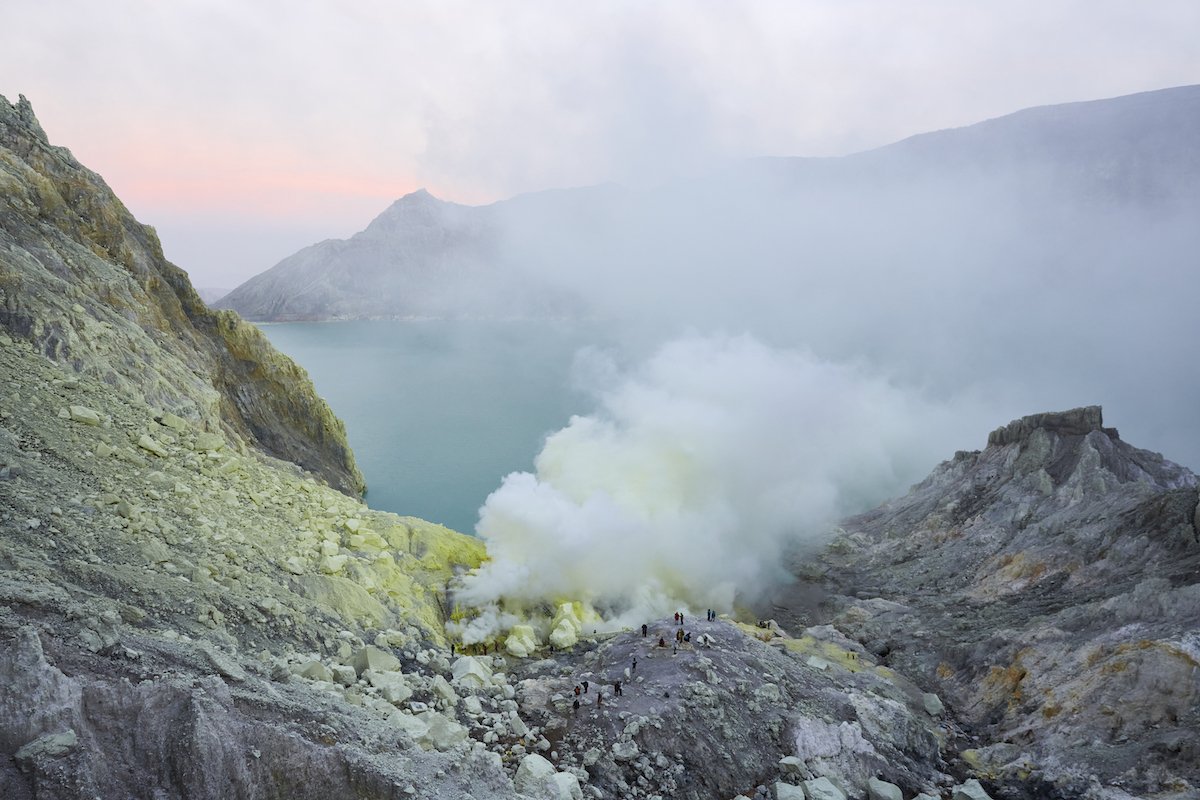
Dehaze
The Dehaze slider in Lightroom is a powerful tool that can improve your photos. It removes atmospheric haze, fog, or smog that can make images look blurry or muddy. This simple slider can give you magical results.
You can find the Dehaze slider in the Basic panel. Use it globally on the whole image or locally with adjustment tools. Try combining it with Contrast, Clarity, and Tone Curve for the best effect.
Dehaze is useful for landscape, aerial, food, still life, and portrait photography. It’s also helpful for night shots, condensation on lenses, and bringing out sky details. Get creative by using Dehaze selectively on different parts of the image. Dehaze is a versatile tool that can add dreamy effects or remove unwanted haze.

Texture Control Slider
The new Texture slider in Lightroom is a powerful tool for editing photos. It can smooth skin in portraits without making it look plastic. The slider also enhances eyes and beards.
Texture is great for macro photography too. It brings out details in close-ups of things like fruit. In landscapes, the Texture slider improves rocks and buildings while reducing noise in skies and water.
Using Texture with Clarity and Sharpening gives you basic frequency separation editing in Lightroom. This lets you edit different details in your image separately for the best results.

Brushes and Filters in Lightroom
Lightroom filters and brushes give you more control over your photo edits. Filters like gradients and masks let you adjust specific parts of a photo. Brushes work like those in Photoshop, letting you edit by clicking or painting on certain areas.
The Clone, Heal and Remove brushes are in the Heal section. The Radial and Gradient filters, along with the custom editing brush, are in the Masks section. Learning to use all these tools well can help you make advanced edits without needing Photoshop.
To learn more about lightroom filters, check out our in-depth guide that covers each tool and how to use them effectively.
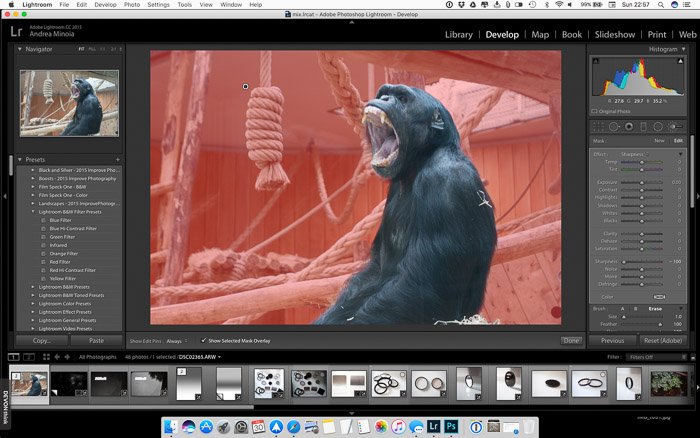
Adjustment Brush Tool
The Lightroom Brush tool lets you select specific areas of your photo to edit. You can apply a wide range of adjustments to just the selected region without affecting the rest of the image. This gives you complete control over your photo editing.
To use the Brush tool, find it in the Mask section of the Develop or Edit mode. Adjust the brush size, feather, flow, and density to get the perfect brush stroke. Then click and drag over the areas you want to edit.
After making your selection, you can use all of Lightroom’s adjustment tools on just that area. This includes adjusting the tone, color, texture, and more. The lightroom brush tool is a powerful way to make complex, precise edits to your photos.
Clone Tool
The Lightroom clone tool, also known as the Spot Removal tool, is a powerful feature for editing photos. It allows you to remove small or large portions of your image while keeping the original file intact. This non-destructive approach to editing is ideal for photographers who want to experiment without permanently altering their photos.
To use the clone tool effectively, start by zooming in to the area you want to edit. This will help you see more precisely where you need to make changes. You can then choose between the cloning brush and the healing brush, depending on the desired effect. The cloning brush makes an exact copy of the selected area, while the healing brush takes into account the surrounding color and texture.
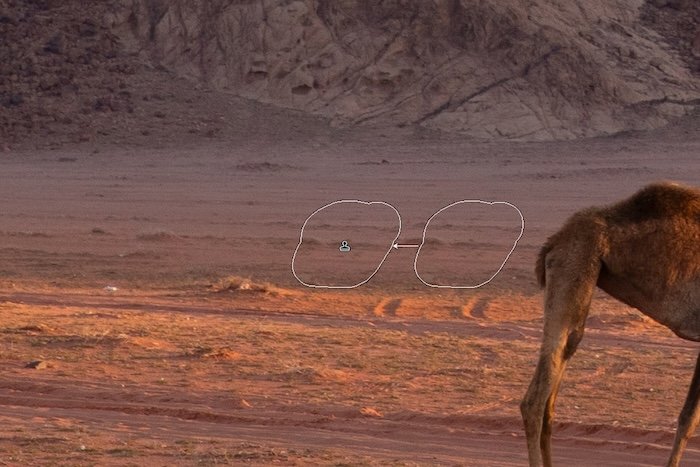
Other tips for using the clone tool include adjusting the opacity and feathering of your brush, changing the brush size, and hiding the marker pins to avoid distractions. You can also custom select the area to copy from by dragging the displayed area to a different location.
With practice and experimentation, you can master the Lightroom clone tool and take your photo editing skills to the next level. To dive deeper into the capabilities of the lightroom clone tool, be sure to explore our comprehensive guide.
Graduated Filters
The Graduated Filter tool in Lightroom is a powerful way to improve your photos. It lets you adjust exposure, contrast, and color in specific areas of an image. This is great for enhancing skies, correcting uneven lighting, or adding creative color effects.
To use the Graduated Filter, select the tool and drag it across the image. You can rotate the filter, change the transition softness, and erase parts of the filter mask. Experiment with the sliders to adjust exposure, contrast, saturation, and more.
You can also use the Graduated Filter to add blur effects or duplicate filters for stronger adjustments. With a little practice, you’ll find many creative ways to use this versatile tool. To learn more about graduated filters in Lightroom, check out this in-depth guide.

Radial Filter
The Lightroom radial filter is a simple way to apply local adjustments to a circular part of an image. It can blend the edit seamlessly or create a striking look. The radial filter affects the area outside the circle by default, but checking the invert option applies the effect inside the circle instead.
The radial filter is useful for custom vignettes and drawing attention to parts of a photo. It can create spotlight effects, brighten subjects without affecting the background, and even “turn on” lights in the image.
To use the radial filter, select the tool in the Develop module. Click and drag to draw the circle, then use the sliders to adjust exposure, white balance, sharpness and more. The effect can be fine-tuned with the range mask and brush tools. To learn more about using the radial filter, check out this in-depth tutorial.

Split Toning
Split toning is a great way to add color and interest to your photos in Lightroom. You can find the split toning options in the Develop module. Start by choosing a color for the highlights using the hue slider or color picker. Then, adjust the saturation to control how strong the color appears.
Next, choose a color for the shadows using the same process. You can add color to just the highlights, just the shadows, or both. Use the balance slider to control how much of the image is considered highlights vs shadows.
Split toning works well on both color and black and white images. On color photos, it can help correct white balance or add a creative effect. On black and white, it replaces the blacks and whites with the chosen colors, creating looks like sepia or cyanotype. Split toning in Lightroom is a simple yet powerful way to get creative with your photos.

Correcting Problems in Lightroom
As Lightroom has progressed with digital technology, it is familiar with all the weaknesses of this medium. Thankfully, Adobe has created smart ways to combat these issues. This section will look at the different tools that can help fix our camera’s mistakes.
One of the most common issues is dust or scratches on our lens. The Spot Removal tools can clear this up in just a few clicks! Noise is another big issue. Thankfully, Adobe provides one of the best denoise programs on the market!
Spot Removal
The Lightroom spot removal tool is a powerful way to remove unwanted spots from your photos. You can use it to fix skin blemishes, dust spots, imperfections in portraits, or to remove distracting elements like tree branches or people in landscapes.
The spot removal tool has two options: clone or heal. When set to clone, the brush stamps an exact replica of the reference spot. When set to heal, the brush takes the sample area and matches the lighting and texture so that it’s blended more.
To use the spot removal tool, find it in the Develop module of Lightroom. Click on the spot to be touched up, and a white outline will appear. This is the area that will be corrected. You can then adjust the brush size, feathering, and opacity using the sliders. If you’d like to learn more about lightroom spot removal, there are many great resources available.
Correcting Lens Distortion
Lightroom’s lens correction tool is a simple way to fix common lens distortions. Open the Lens Correction panel in the Develop module and check the boxes to remove chromatic aberration and enable profile corrections.
Lightroom uses your image metadata to automatically apply a lens profile and fix distortions like barrel or pincushion distortion. You can also use the manual tab to adjust distortion and vignetting yourself.
Save time by applying lens correction on import. Edit one photo, create a preset with your lens correction settings, then apply the preset when you import new photos. If you want to learn more about using lightroom lens correction, there’s a detailed guide available.
Removing Chromatic Aberration
Chromatic aberration is a common issue in photography that causes unwanted color fringes along high-contrast edges. It occurs when a lens fails to focus all colors onto the same point, resulting in distracting purple, red, blue, or green fringes.
There are two types of chromatic aberration: longitudinal (LoCA) and transverse (TCA). LoCA appears as a blurred fringe in front of or behind the object in focus, while TCA shows up as sharp color fringes along the edges, especially towards the frame’s periphery.
To minimize chromatic aberration, use high-quality lenses, avoid high-contrast scenes, and stop down the aperture. If chromatic aberration still persists, it can be corrected in post-processing using Adobe Lightroom’s automatic or manual tools under the Lens Corrections panel.
For a more in-depth look at chromatic aberration and how to deal with it effectively, be sure to explore our comprehensive guide.

Reduce Noise
Lightroom’s noise reduction tool, Denoise, uses AI to automatically remove noise from images. It’s incredibly effective, allowing photographers to shoot at higher ISOs without worrying about noise ruining their photos.
Comparing Lightroom’s noise reduction to other software like Luminar Neo, DxO PhotoLab 7, ON1 Photo RAW, and others shows that Lightroom is among the best. While some other programs are effective at reducing noise, they may also soften the image or affect sharpness more than Lightroom.
Lightroom’s noise reduction is particularly helpful for event photographers who shoot without a flash or street photographers. If you want to learn more about lightroom noise reduction, there are great resources available that dive deeper into the topic.

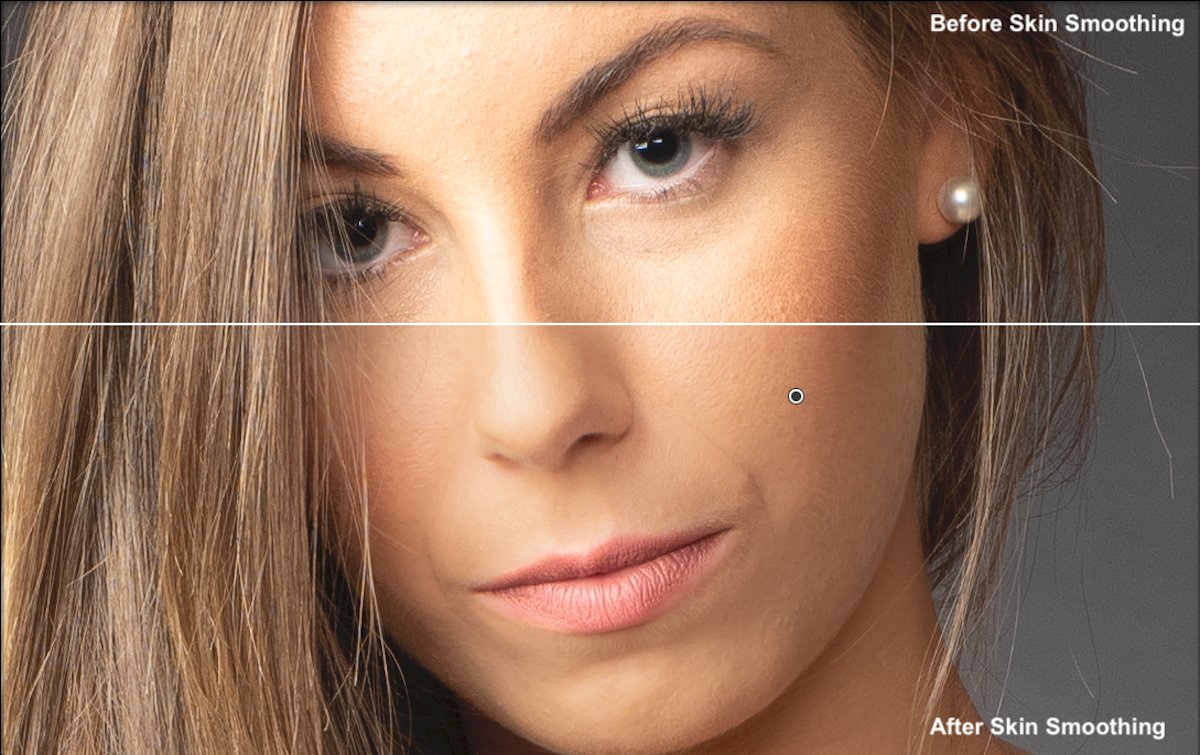
Create Smooth Skin
Smoothing skin is an important part of portrait editing in Lightroom. The Brush and Clone tools are the best options for targeting specific areas. Use the Clone tool to remove blemishes, pimples, and small scratches.
The Brush tool softens skin texture with sliders like Clarity, Texture, Sharpness, and Noise. The Texture slider is designed for editing skin and leaves more detail than Clarity.
Combine the sliders and tools for the most natural results. Avoid smoothing eyes, eyelashes, eyebrows, and lips. If your model has very bad acne or scars, Photoshop may be a better choice than Lightroom. To learn more about smooth skin in lightroom, check out this in-depth article.
Sharpen Images
Blurry photos can be frustrating, but Lightroom makes it easy to fix them. Start by shooting in RAW mode to save more image data. This gives you more flexibility when sharpening your photos later.
In Lightroom’s Develop module, use the Amount, Radius, Detail and Masking sliders to improve sharpness. The Masking slider is especially useful because it only sharpens important parts of the image, avoiding noise in blurred areas.
For even more control, use the Adjustment Brush tool to selectively sharpen specific details in your photo. With these simple techniques, you can quickly improve blurry photos in Lightroom. If you want to learn more about how to fix blurry photos, there are many helpful tutorials available.

Special Techniques and Processes
Lightroom allows us to create different ways of presenting or dealing with our photographs inside and outside the application. These special techniques may not be for everyone but may be perfect for particular processes.
Creating a contact sheet isn’t needed much in digital photography, but it’s a great way to showcase a large sum of photos. Techniques like Smart Previews allow Lightroom users to save space and produce a range of edits for a single image.
It is recommended that you become familiar with these processes even if you won’t use them. You never know when one of them may come in handy!
Create a Contact Sheet
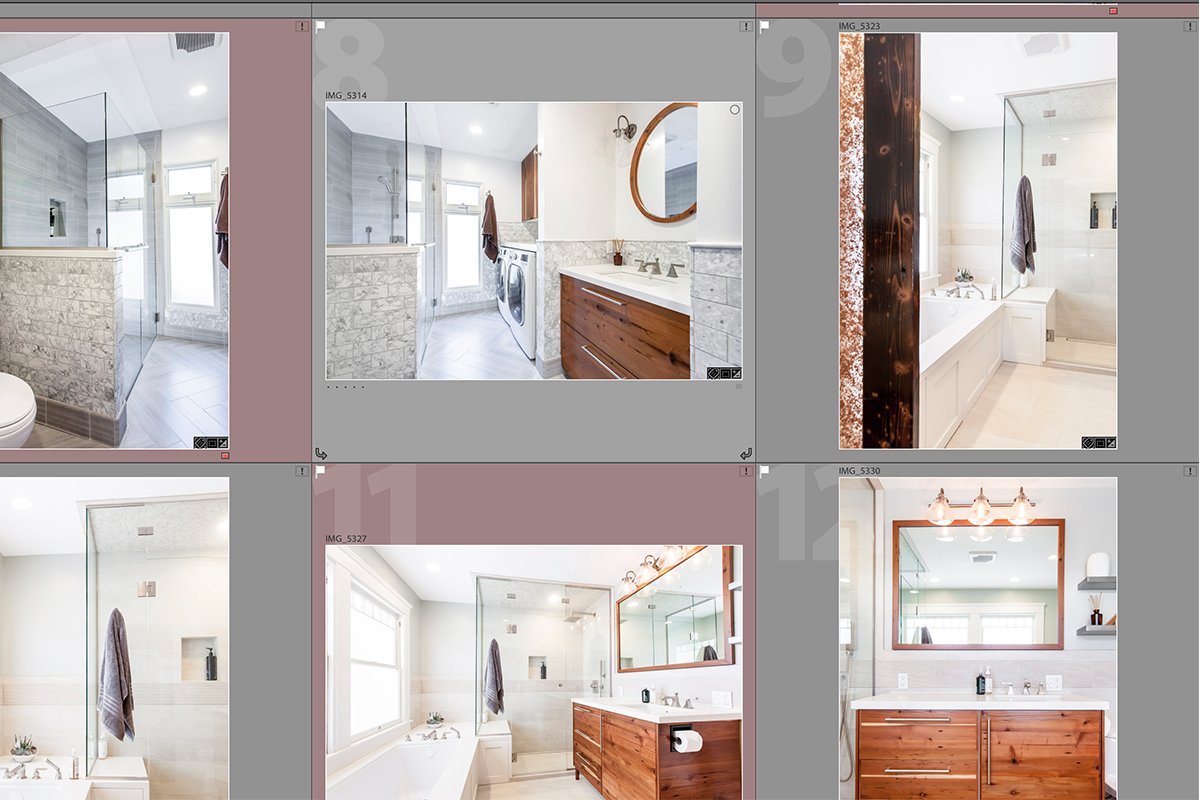
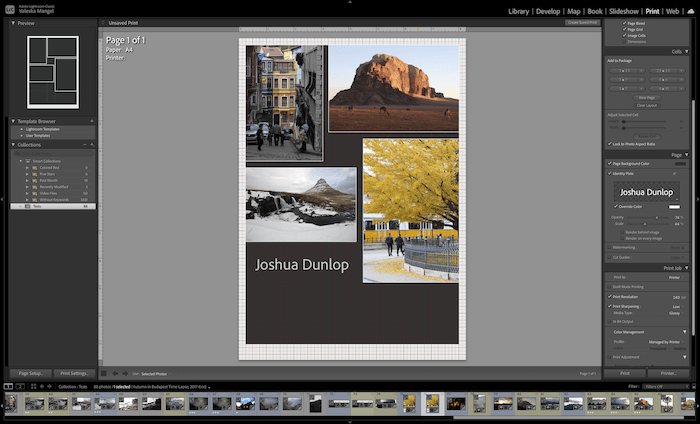
Creating a contact sheet in Lightroom Classic is a simple process that lets you view multiple photographs in a single document. To start, select the images you want to include by Shift-clicking or Command-clicking (Ctrl-clicking for Windows) them in the Library module.
Next, go to the Print module and choose a template from the Template Browser that best matches your desired style. You can customize the layout using the options in the Layout and Page panels, such as adjusting the number of rows and columns, cell spacing, and cell size.
Finally, export your contact sheet as a JPEG file or print it directly from Lightroom. You can also save the contact sheet in your Lightroom catalog for future reference. If you’d like to learn more about creating lightroom contact sheets, there are many helpful resources available on our site.

Lightroom Mobile on Your Smartphone
The Lightroom app is a great way to edit photos on your smartphone. It’s free to download on Android and iPhone. The app has a camera mode that lets you take photos right in the app.
You can adjust settings like exposure, shutter speed, and ISO. There are also options for aspect ratio, timer, and grid overlays. The editing tools are where the app really shines.
You can crop, adjust light and color, and apply filters. The selective tool lets you edit specific parts of the photo. If you want to learn more about using the lightroom app, there are plenty of tutorials available online.
Smart Previews
Lightroom smart previews are a great way to speed up your workflow. They are small, compressed DNG files that Lightroom creates from your original RAW files. This means you can edit your photos without having the RAW files connected to your computer.
Smart previews take up much less space on your hard drive than RAW files. They also allow Lightroom to run faster when you’re editing in the Develop Module. You can even create HDR images and panoramas using smart previews.
To see if an image has a smart preview, look under the histogram in the right-hand panel of the Develop Module. Lightroom smart previews give you the flexibility to edit your photos remotely without needing to transport large RAW files.

Create a HDR
Sometimes you’ll find yourself in a situation where it’s impossible to get the best exposure. You could be photographing a landscape during sunset and end up with both silhouettes and blown-out skies in the same shot. Thankfully, you can quickly solve this problem by using the HDR technique in Lightroom.
HDR stands for high dynamic range. It allows you to improve your exposure by equalizing the shadows and highlights of any particular image. To use HDR, you need to take multiple shots of the same scene at different exposures using your camera’s bracketing function.
Once you have your shots, load them into Lightroom and select Photo Merge > HDR. Lightroom will then combine the files to create a properly exposed image. You can make further adjustments to perfect the final HDR photo. If you’d like to learn more about lightroom hdr, there are many great resources available.

Advanced Techniques
Lightroom offers advanced editing techniques that go beyond basic adjustments. One of the most useful is the Photo Merge tool, which lets you create HDRs, panoramas, and even HDR panoramas with just a few clicks. Lightroom makes the process simple and saves the merged image right into your library.
Another powerful feature is the ability to create masks. This lets you apply edits to specific areas of your photos using brushes, gradients, or even AI. Lightroom’s AI masking can identify different parts of a portrait, like the subject’s face, body, and hair, making it quick and easy to apply targeted adjustments.
Lightroom also includes tools for blurring backgrounds to draw more attention to your subject. This is great for portraits or product shots where you want to simulate a shallow depth of field. By creating a mask, you have precise control over which parts of the image are sharp or blurred.
To dive deeper into advanced lightroom editing techniques, check out our in-depth guide.
Merge
Lightroom’s Photo Merge tool makes it easy to combine photos right in the app. You can quickly make high-quality HDRs and panoramas with just a few clicks.
The Photo Merge tool has three options: HDR Merge, Panorama Merge, and HDR Panorama Merge. Each one has settings to fine-tune the final image, like Auto Align to line up the photos perfectly and Deghost Amount to fix any ghosting.
Panorama Merge also lets you choose from three projection styles – Spherical, Cylindrical, and Perspective – to get the most natural-looking result. And with extra tools like Boundary Warp and Auto Crop, you can fill the frame and remove empty space. Merging photos in Lightroom is a powerful way to make stunning images with ease.
Masks
Lightroom masking is a powerful tool that lets you select specific areas of your photo to edit. Adobe has made masking simple with AI features like Subject, Sky, and Background masking. These tools automatically identify and mask the main subject, sky, or background in just a few seconds.
For more precise control, Lightroom also offers manual masking options. The Brush tool lets you paint a mask by hand, while the Linear and Radial Gradient tools create gradual fades. You can also mask by color, luminance, or depth range.
The new People mask is a game-changer for portrait editing. It automatically detects people in your photo and provides detailed masks for skin, eyes, lips, teeth, and clothes. With Lightroom’s comprehensive masking tools, both beginners and pros can make complex, targeted edits with ease. Lightroom masking gives you the control to take your photos to the next level.

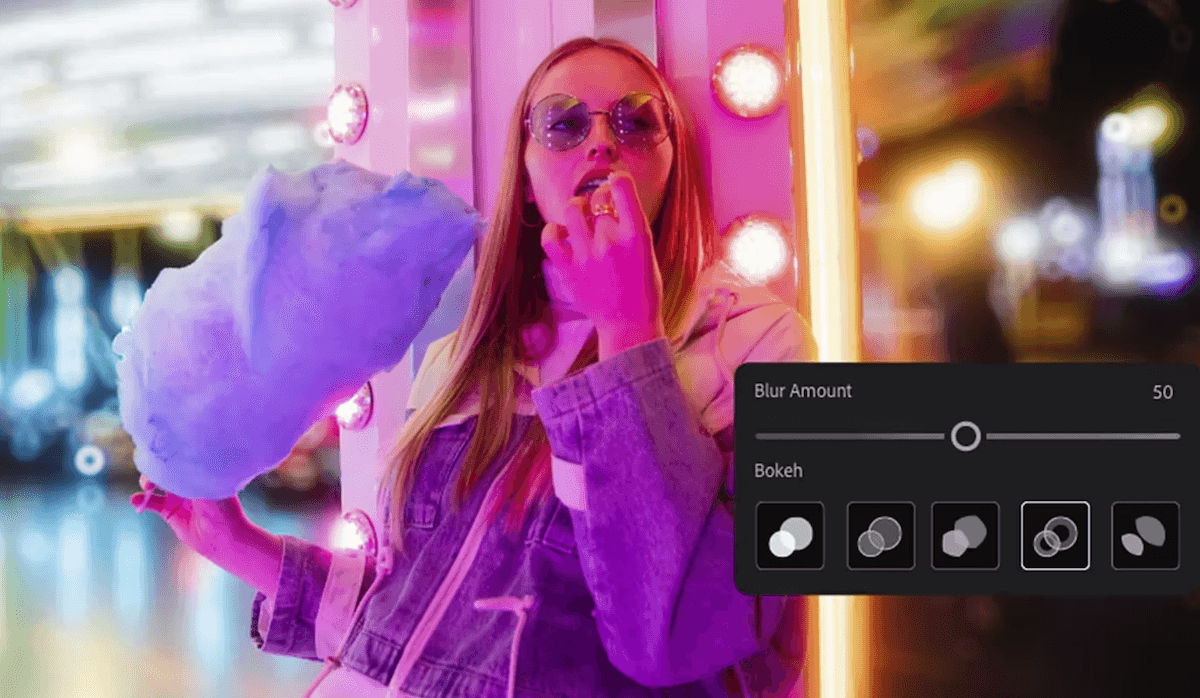
Blur Photo Background
Blurring the background in Lightroom is a useful technique to make your subjects stand out. Lightroom offers several methods to achieve this effect, depending on your version. The Lens Blur tool uses AI to identify key features and apply different bokeh styles, allowing you to visualize and edit the focal range.
Another option is to use AI masks, such as the Subject or Background mask, to quickly select the areas you want to keep sharp or blur. Fine-tune your selection using the Brush tool to get the desired result.
For older versions of Lightroom, you can use the Brush tool to paint over the background and adjust the Sharpness slider to introduce blur. Duplicate the brush and gradually increase the blur amount to create a realistic effect. To learn more about blurring the background in Lightroom, check out this in-depth guide.
Stack
Stacking photos in Lightroom is a great way to organize similar images and save hard drive space. To stack photos, select the images you want to group in the filmstrip or Grid view, then go to Photo > Stacking > Group into Stack. The top thumbnail will show a number indicating how many images are in the stack.
You can easily add or remove photos from a stack, split a stack into two groups, or re-order the images within a stack. Lightroom Classic also offers an Auto-Stack by Capture Time feature, which automatically groups photos based on the time between shots. This is useful for organizing burst mode, bracketed, or panoramic images.
Lightroom CC has a simplified stacking feature, accessible through the Edit menu or by right-clicking on selected images. If you’d like to learn more about stacking photos in Lightroom, there are many in-depth resources available online.

Collage
Creating a Lightroom collage is simple. First, go to the Print module and choose a collage template. You can find pre-made templates or make a custom one.
To make your own template, adjust the page settings on the right. Set your units to inches and grid snap to cells. Choose your file resolution, print sharpening, and JPEG quality. Then set your custom file dimensions.
Add photos to your collage by dragging and dropping them into the cells. You can also add a watermark or logo using the Identity Plate or Watermarking options. When you’re done, click “Print to File” to save your collage. With practice, you can quickly make collages for any need. If you want to learn more about lightroom collage, we have a detailed guide.
Slideshow
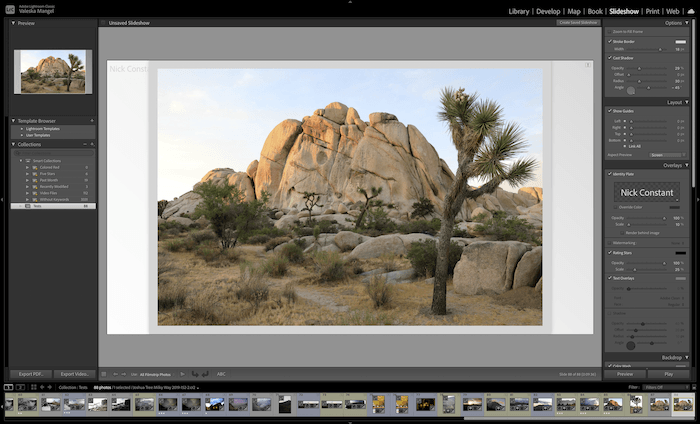
Creating a cool Lightroom slideshow is easy. First, select the photos you want to include in the Library module. Drag and drop them into the order you want in Grid View.
Next, click on Slideshow in the top menu and choose a template. Customize your slideshow by adjusting options like layout, overlays, backdrop, titles, and music in the right-hand panel.
The Playback panel is important for controlling slide transitions and timing. Experiment until you get the right flow. When you’re done, export your slideshow as a video or PDF. Lightroom slideshows are a great way to share your best photos.
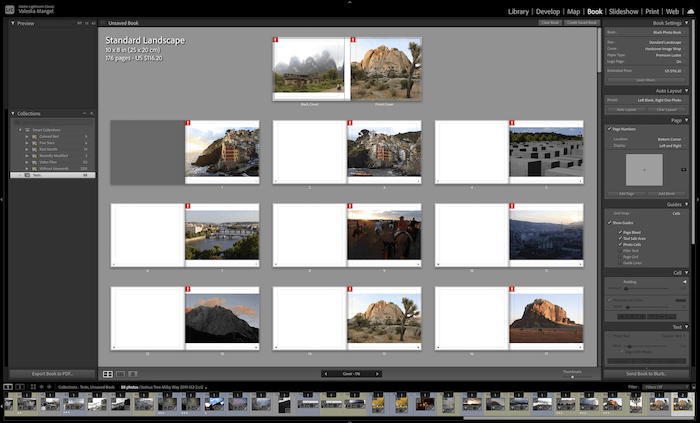
Photobook
The Lightroom Book Module is a powerful tool for designing photo books and magazines. You can create stunning layouts with your images, add text and captions, and even upload them to Blurb.com for professional printing.
To get started, organize your photos in the Library Module and create a Collection. Then head to the Book Module, choose your book settings like size and format, and begin designing your layouts with the various templates and customization options.
You can fine-tune your images right in the Book Module, or hop back to the Develop Module for more in-depth edits. When you’re happy with your design, print a proof copy before placing a full order.
With the Lightroom Book Module, it’s easy to create beautiful photo books to share with clients, friends, and family. To dive deeper into using the lightroom book module, check out this detailed guide.
Lightroom Presets
Presets are a godsend for any photographer working with large numbers of images. They are crucial for photographers who shoot in a stylized fashion sought after for fashion or wedding shoots.
Luckily, Lightroom allows us to create and share presets inside the application. Another great feature is that many content creators use Lightroom, so acquiring a preset is easy. You can find a photographer you love and get their particular style!
How to Use Presets
Lightroom presets are pre-made edits that you can apply to your photos with just one click. They’re a big time saver and help keep your editing style consistent.
To create your own preset, first edit a photo how you like it. Then go to the Presets panel and click the plus icon. Choose which adjustments to include in the preset, give it a name, and click Save.
You can apply presets to multiple photos at once too. In Lightroom Classic, select the photos in Library view and choose the preset from the Quick Develop panel. In Lightroom CC, copy the edit settings from the first photo and paste them onto the others.
Presets are also easy to import and export so you can share your editing style or use presets from your favorite photographers.

Best Free Lightroom Presets
Using presets is simple and non-destructive. You can always go back to the original RAW image with a single click. Presets also help you learn how to achieve different effects in Lightroom.
There are many free Lightroom presets available online for various photography genres like landscapes, portraits, street, food, and more. These presets can help bring out colors, improve contrast, and add unique looks to your images. Free Lightroom presets are a great starting point for exploring the possibilities of photo editing.

Make and Sell Your Own Presets
If you have a knack for editing in Lightroom, you can create and sell your own presets. To make the most marketable presets, focus on creating a unique look that others will want to achieve.
When pricing your presets, research what similar packs are selling for and price competitively. Remember that photographers value quality presets that save them time in their editing workflow. Busy professionals who have many photos to edit are often willing to pay for presets that help them work more efficiently.
To market your presets, share before and after photos on social media platforms like Instagram. This showcases the specific look of your presets and how easy they are to use. If you want to sell lightroom presets successfully, creating a distinct style and effectively promoting their benefits is key.
Tips for Specific Genres of Photography
Now, let’s look at different ways Lightroom allows us to approach different genres of photography. Of course, you can edit your images however you like. But there are a few features that may make your editing much easier.
Read our guides below for tips on approaching different photographic genres in Lightroom.
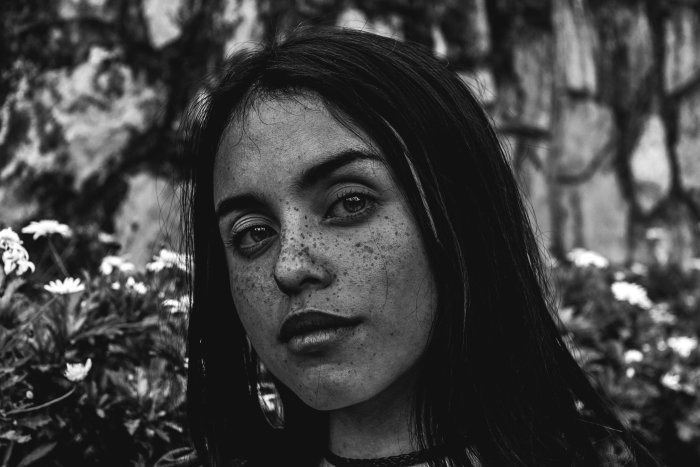
Portraits
Editing portraits in Lightroom is simple with the right steps. Start by using the Auto edit button for quick improvements. Lightroom presets are another easy way to apply popular portrait styles with one click.
For more control, use Lightroom’s AI masks to accurately select the subject’s face, hair, and clothes. This lets you adjust specific areas without affecting the rest of the image. You can also manually edit using Lightroom’s tools for light, color, and texture.
When editing portraits, watch for harsh shadows or bright highlights on the face. Use the crop tool to frame your subject well and remove any distractions. The heal brush is great for removing blemishes, while AI masks make it easy to editing portraits in lightroom by brightening eyes and teeth or adding color to lips.
Street
Lightroom offers plenty of great options to edit street photography. Start by adjusting the white balance to get the right color tones. Then, work on the exposure and contrast to bring out the details in your image.
Use the highlights, shadows, whites, and blacks sliders to add contrast and volume to your photo. The tone curve tool is also useful for adjusting the overall contrast and tone of your image. In the HSL panel, you can adjust the hue, saturation, and luminance of specific colors to make certain elements pop.
Split toning allows you to color correct the highlights and shadows separately. Finally, add some sharpening, vignetting, and grain for a more polished look. Editing street photography in Lightroom is a powerful way to improve your images and create a unique style.

Macro
Editing macro photography in Lightroom can take your close-up shots to the next level. Start by cropping tight to your subject or placing it off-center for more impact. Use the sharpening tools to ensure crisp details, and try the texture slider to make your subject stand out even more.
Vignetting can add drama by darkening the edges of your photo. Use the vignetting tool for center subjects, or brushes for more control. Vibrant colors will make your subject pop, so adjust them using the vibrancy slider instead of saturation to retain detail.
To learn more about editing macro photography, check out this in-depth guide that covers everything from basic adjustments to advanced techniques.

Alternatives to Adobe Lightroom
Adobe Lightroom is a brilliant all-in-one photo editor. If you are not convinced or want to save money, we have reviewed all the best photo editing software on the market today!
In our dedicated reviews, we have dissected each software program to see how it truly benefits the photographer. We have found that different software offers different features, making some more attractive to photographers of different expertise levels or genres.
If you want to learn more about each software, click the link at the end of the short review to access our in-depth article. To see a roundup of our top choices in order, click here.
Luminar Neo
Luminar Neo is a powerful photo editing software that uses AI to quickly improve your images. It has a simple workspace that’s easy to navigate. The software offers a wide range of tools, from basic adjustments to advanced AI features.
Luminar Neo’s AI tools are very useful. They can replace the sky, add sun rays, or remove powerlines with just a click. The software also has great tools for editing portraits, like skin smoothing and face adjustments.
While Luminar Neo is good at complex edits, it still has all the important basic tools photographers need. It’s a good choice for both beginners who want fast results and pros who want to save time. If you want to learn more about Luminar Neo, we have our own in-depth review.

Capture One
Capture One is a high-end photo editing software. It focuses on color editing, tethered shooting, and collaboration. This makes it perfect for studio and editorial photography.
Capture One offers a customizable workspace and in-depth editing tools. Its color editing is the best on the market. You can adjust colors with great precision using simple controls.
The software also has helpful AI features. These include automatic face detection and image grouping. It can even remove dust spots with one click. Capture One Live lets clients view and comment on photos in real-time through a web browser.
Capture One is expensive but worth it for professional photographers. To learn more about Capture One, capture one has a detailed review.
DxO PhotoLab
DxO PhotoLab 7 is a RAW editing software that focuses on getting the most detail from your photos. It has advanced features like AI denoising and color correction. The newest version improves color handling and adds retouching tools to make editing easier.
PhotoLab 7 uses AI to remove noise and show hidden details. It also has a feature that lets you print photos with accurate colors by simulating paper and ink. The software supports a wide range of cameras and lenses.
One of the best things about PhotoLab 7 is the simple layout that gives you quick access to complex adjustments. It aims to be a one-stop shop for photographers by providing high-quality RAW processing. If you want to learn more about DxO PhotoLab, there is a detailed review available.

ACDSee PhotoStudio
ACDSee Photo Studio for Mac 10 is a RAW processing and editing software for Macs. It provides a space to store, sort, and adjust digital photos. Photo Studio for Mac 10 prioritizes accessibility, making sorting and editing actions simple.
The software includes facial recognition to speed up sorting processes. It has a wide range of basic features and pushes some functions into more advanced editing modes. This is evident in color editing, with a Color Wheel and Tone Wheels that help fine-tune photo colors.
ACDSee Photo Studio for Mac 10’s biggest highlight is its price. It’s available as a one-time purchase for a great cost, ideal for photographers who want a cheap option without sacrificing too much in terms of features and quality. To learn more about ACDSee Photo Studio, check out the full review.

inPixio
inPixio Photo Studio Pro is a simple photo editing software for beginners. It has a clean interface that is easy to navigate. The software focuses on basic editing tools and one-click adjustments.
While it lacks advanced features, inPixio is good for quick edits. The program can be slow at times, especially with the Photo Eraser and Photo Cutter tools. But overall, it gets the job done for those who want a no-fuss editor.
If you want to learn more about inPixio Photo Studio, check out our full review. We cover all the features, pros, and cons to help you decide if it’s right for you.

ON1 Photo RAW
ON1 Photo RAW is a great photo editing program. It uses AI to make advanced edits automatically. This saves time and makes it easier for beginners to edit like a pro.
The AI features are impressive. They let you select parts of your photo with one click and apply effects to just that area. You can even replace the sky in seconds!
ON1 Photo RAW has a simple interface that’s easy to learn. And if you need help, there are plenty of video tutorials. While not as powerful as Lightroom, it’s a good choice for photographers who want to spend less time editing. ON1 Photo RAW is worth checking out if you want creative control without a steep learning curve.
Aftershot Pro 3
Corel AfterShot Pro 3 is a simple photo editing software that focuses on speed. It takes up little space on your computer and provides basic editing tools. The software is easy to navigate, with all actions placed around the edges of the interface.
AfterShot Pro 3 lets you view and sort images before importing them. You can rate photos using color coding, star ratings, or flags. The program also provides basic search and filter tools to help manage your files.
While AfterShot Pro 3 may be lacking some advanced features, it still delivers good results for basic edits. The software produces smooth detail in RAW files and offers effective highlight recovery. You can also find lens correction options and simple watermarking tools. AfterShot Pro is a solid choice for photographers who need a quick and affordable editing solution.
CyberLink PhotoDirector
CyberLink PhotoDirector 365 is an affordable photo editing software packed with AI features. It has tools for basic adjustments, layered editing, and even AI image generation.
The software is simple to use with its one-click approach. Most functions are controlled by a single slider or button. PhotoDirector 365 also has an extensive rating system for organizing your photos.
While it may not match the professional level of Adobe Lightroom, PhotoDirector 365 is a good choice for beginners who want to explore all aspects of digital photo editing. It’s especially useful if you want to create unique images using AI. PhotoDirector is a budget-friendly option that lets you dive into the future of photo editing.