Corel’s AfterShot Pro 3 is photo editing software with speed and simplicity at the forefront. The result is a program for photographers who don’t want software that takes up too much space or has features they may never use. So, if you want stripped-back software, AfterShot Pro 3 could be perfect for you!
This app hit the market in 2016 (its last update in 2021). So, our AfterShot Pro 3 review explores whether this software is still relevant today. We put its performance to the test. And we see if it can hold up to other software that releases new versions every year and new updates almost quarterly.
I have used Adobe Lightroom since its first iteration and have experience with various editing software. I have tested the top options available on the market. This testing has included everything from high-end software to entry-level programs.
You can look through all our other software reviews to find the best editing software for you!


Corel AfterShot Pro 3 Review: Key Features and Benefits
Corel AfterShot Pro 3 is a RAW image processor with a range of basic adjustments and layered editing. It can perform camera corrections and has simple brush tools, like a Blemish Remover.
A standout feature is that the program takes little processing power to perform its actions. It also takes up little space on your hard drive, ideal for people with smaller, less powerful laptops.
AfterShot Pro has no unique features you cannot find in other software. If anything, they have scaled back basic features, only leaving the ones they view as essential. But we still find good file management and data handling in these vital functions.
Corel provides an application that can handle the whole digital editing process. AfterShot Pro 3 helps you with everything from importing to a final, edited image. This process feels like the bare minimum for software, but this may be its winning quality for some photographers.


Overview of Specifications
| Minimum Computer Requirements |
Minimum Computer Requirements
2 GB RAM, 400 MB (Windows) 250 MB (Mac) disk space
|
| Minimum Software Requirements |
Minimum Software Requirements
mac OS X 10.9 (Mavericks) or later (64-bit edition), Microsoft Windows 7 with latest service pack (64-bit editions)
|
| Tethered Shooting |
Tethered Shooting
No
|
| Mobile / Tablet Option |
Mobile / Tablet Option
No
|
| Keyword Tagging |
Keyword Tagging
Yes
|
| Camera and Lens Corrections |
Camera and Lens Corrections
Yes
|
| Brush Tools |
Brush Tools
Blemish Remover
|
| Layered Editing |
Layered Editing
Yes
|
| AI Editing |
AI Editing
No
|
| Noise Reduction |
Noise Reduction
Yes
|
| Export Options |
Export Options
JPEG, TIFF
|
| Best For |
Best For
Photographers on the go, on a budget, or who need speedy photo culling or basic edits
|
AfterShot Pro 3 provides photographers with basic editing adjustments in a simple and condensed form. Despite its simplicity, this software doesn’t miss out on essential actions. But do not expect to find features that make a dramatic one-click difference. All the adjustments are as simple as they get.
AfterShot Pro framed itself as the fastest RAW photo editing program in 2016. AfterShot Pro boasted it was 4x faster than Adobe Lightroom (2015). But technology has grown dramatically since then. So, how does it compare now?
There isn’t much difference between the two with RAW processing. And AfterShot Pro 3 is still clearly quicker than Lightroom. But AfterShot Pro tends to be a little slow when navigating the application.
Recently, some programs like Luminar Neo have decided to take out rating systems. This culling can be crucial to photographers who use digital editing software to sort through photos rather than edit them. Even though it is dated software, AfterShot Pro 3 gets marks for not glossing over its file management features.


Main Strengths
The main strength of AfterShot Pro 3 comes from its simplicity. It has an interface that is easy to navigate. And all actions are put in convenient places with clear icons.
This simplicity can go a long way, especially when working remotely where timing is key. This means software like this is ideal for photographers who may have to work in transit on a train or plane. And it’s for photographers who want to carry as little as possible, like a compact laptop.


Workspace and File Management
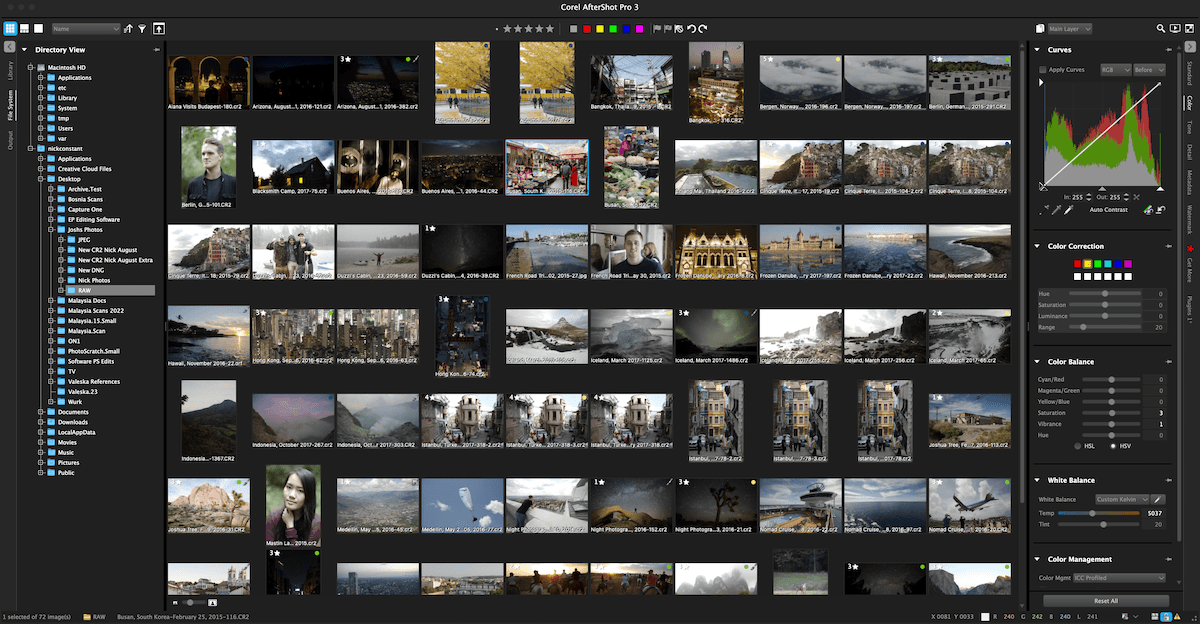
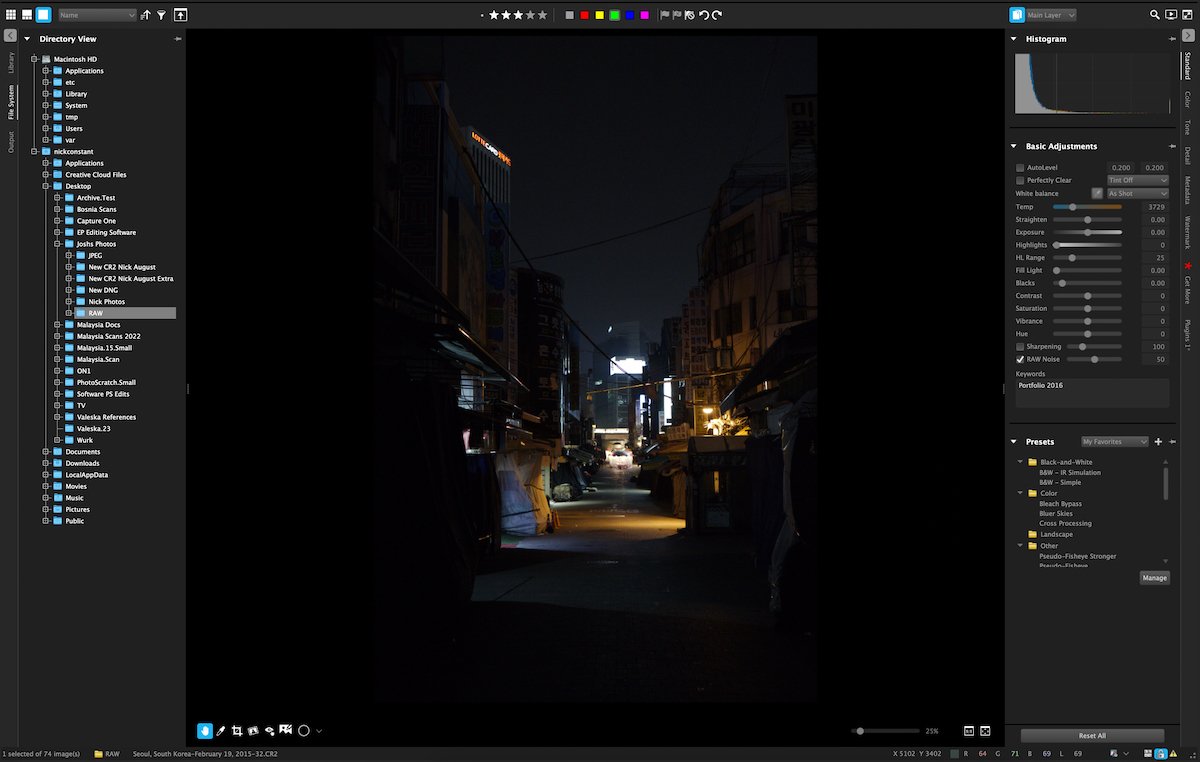
AfterShot Pro 3 is easy to navigate for photographers who have previous experience with other editing software. Every set of actions is placed around the edges of the software, a familiar approach found in other programs.
The Library, File System, and Output panels are on the left-hand side. Above these key panels, you find icons that dictate how you view the images in the program’s center. Having the program based around the images makes complete sense. It helps keep our attention focused on the image or series of images.
On the right-hand side, you will find all the adjustment actions. It has Standard, Color, Tone, Detail, Metadata, and Watermark adjustments. These are easy to swap between and don’t affect how the rest of AfterShot Pro 3‘s workspace is laid out.
Importing and Organizing Photos
AfterShot Pro 3‘s speed stems from the import-less processing that lets you view and sort your images before importing. This is now found in many software because it is such a useful feature. It allows a quicker editing process and gives you access to rating systems.
You can find all rating options available in AfterShot Pro 3. This includes color coding, a star rating, and a flag system. You can apply the ratings with hotkeys or conveniently find them in the top middle of the interface.
AfterShot Pro 3 lets you sort each file by several different criteria. These options span from the image name, date, or rating to its f-stop or white balance mode. Detailed sorting options like this can make it easy to find the right photo in a large volume of images.
Overall, although AfterShot Pro 3 may be outdated, the organizing features operate at a good standard. But it would be nice to have some more “smart” features added.

Viewing Photos
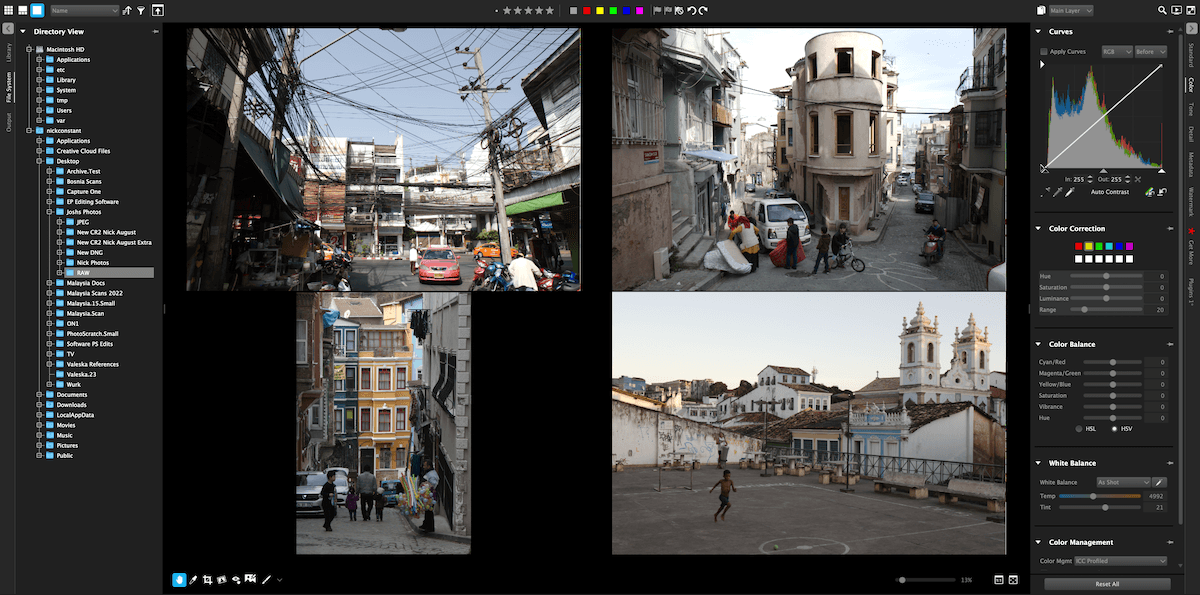
AfterShot Pro 3 does not provide an extensive range of viewing options to help with editing or selecting. You get the most crucial ones, like Grid, Filmstrip, and Fullscreen views.
On top of this, you do get a Multi-Image view. This lets you get several images up in Filmstrip or Fullscreen view. There is no compare view, but you can create a virtual copy of your photo and pull up the edited and unedited versions side by side.
An easier compare view option would go a long way. This is a feature that photographers will miss if they have used other programs. This could be why someone might feel AfterShot Pro 3‘s file management is lacking.
Search and Sorting Tools
AfterShot Pro 3 provides basic but helpful tools for searching and sorting. As mentioned before, you can sort each folder in an order according to various parameters. You also have a filter tool that helps cull your images into a more manageable sequence.
The filter tool is simple and easy. It lets you single out the images that have gone through your culling process. Here, you can choose between star, color, and flag ratings or images with all these ratings combined.
There is room for more advanced search and sorting tools in AfterShot Pro 3. A simple search bar would be helpful. But this is unsurprising from a dated software.
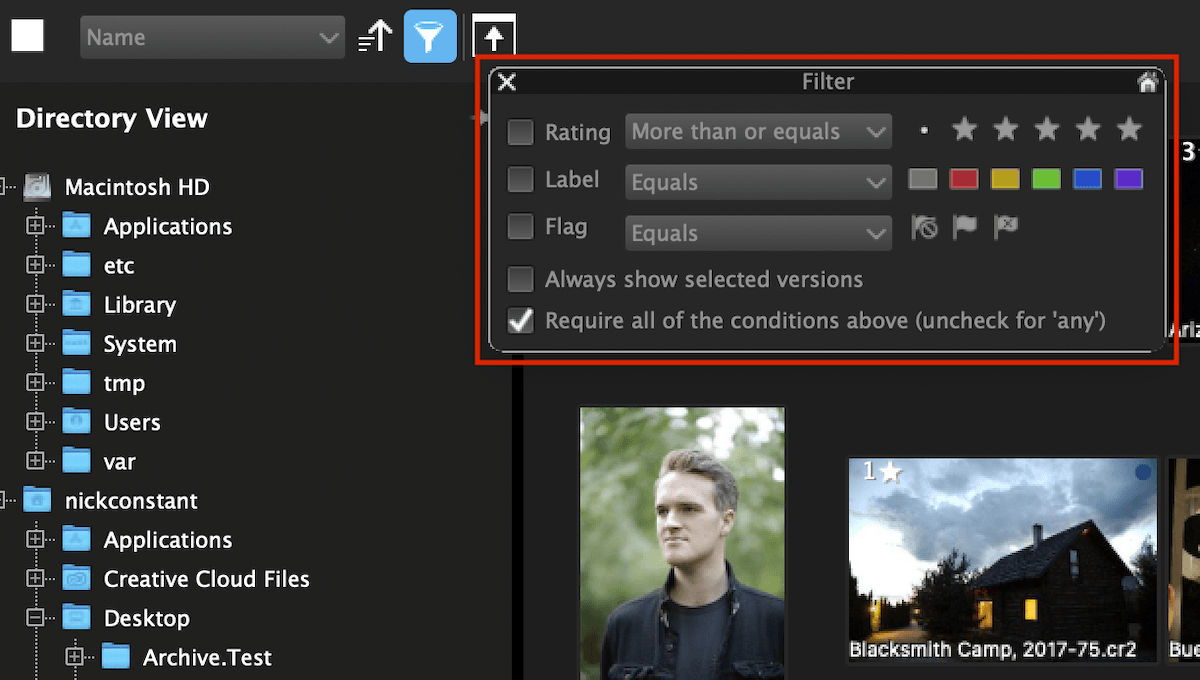
Image Development
RAW File Processing
Now, let’s look at how AfterShot Pro 3 deals with RAW files. RAW processing is an important part of editing software. It determines the base quality, tones, and definition of our photos.
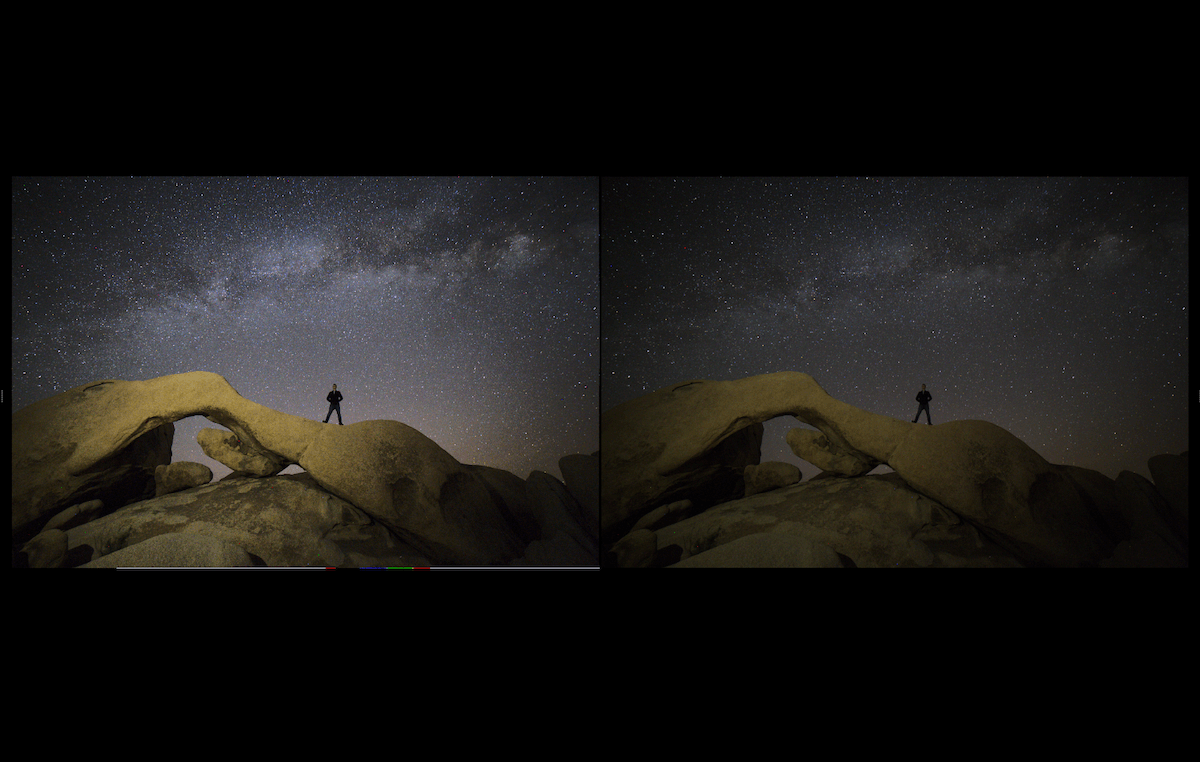
AfterShot Pro produces good results. The image looks slightly more flat when comparing these results to other software, like Lightroom. On top of this, there is more of a warm, green cast over the image.
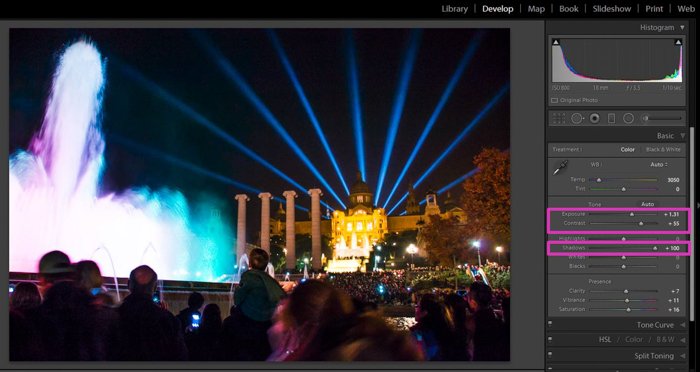
The lights and highlights are the most affected. The reduction of contrast isn’t such a bad thing, though. Professional editors sometimes favor starting with a flatter image. In the image below, we can see slightly more detail in the highlights thanks to this.
If we zoom in to 500%, we can see that AfterShot Pro 3 produces nice, smooth detail. The results are even smoother and less pixelated than Lightroom’s results. This does mean you get less sharpness and finer detail, though.


Basic Editing Tools
Editing tools are found in the right-hand panel of the interface. You have all the basic adjustments under Standard, Color, and Tone. You also get a choice to edit under Detail, Metadata, and Watermarks.
AfterShot Pro 3 uses sliders to make all adjustments. You even have a value box where you can type in the desired number to be more exact. Under the color section, you find a large Tone Curve adjustment. I am a big fan of these, especially large and clear ones. This specific section can give you a great amount of control.
You quickly notice that AfterShot Pro only provides a few singular adjustments. They seem to have missed some basic adjustments crucial to digital photo editing.
Regardless, let’s see how its Exposure Compensation tools perform. A noticeable shortcoming is that the Exposure Compensation only goes to plus or minus three stops of light (+/-3). This is not a huge issue, as it is quite unlikely you want to push an edit further than this.
The tool works well. It shows an accurate rendition of how a reduction or addition of stops would act on the scene. If we compare a minus three (-3) stops to Lightroom, we can see that both programs act similarly.
They both are around the same tone, but Lightroom is slightly darker. Lightroom also has better color retention. But, AfterShot Pro 3 has kept more details in the highlights and almost washed out areas.


Normally, we compare the Shadow adjustments to see how other tonal edits work on this software. But AfterShot Pro 3 does not include a shadow adjustment, which is a huge oversight.
You could use the Tone Curve to do this yourself, but beginners would have to learn about this. Instead, the closest adjustment is to move the Blacks.
We adjusted the AfterShot Pro 3 Blacks slider to 30 for this test and the Lightroom Blacks slider to – 75. This is because AfterShot Pro’s adjustment is much harsher. If we look at the results, we can see they treat the tones fairly similarly.
The biggest difference comes from how they act with the colors. AfterShot Pro 3 emphasizes the color cast we find in the original RAW processing. Even though the tones are similar, Lightroom does better to keep the tonal range defined and separate.


Key features missing from AfterShot Pro 3 are tools that give complete control over the tonal range. This is a big oversight as, for many photographers, this is the area that may need the most attention. The Tone Curve allows for fine-tuning, but it does not give much guidance.
Also, pushing the color edits (saturation, vibrancy) results in digital artifacts. So you may want to only consider this software if you plan on producing work that isn’t super vibrant.
Preset Support
AfterShot Pro 3 provides a small range of presets preinstalled in the software. You can find these in the right-hand panel in the Standard section. AfterShot Pro puts each of its presets into separate categories. These presets aren’t amazing, and I can’t see many people using them, but at least they are there.
The big plus (+) icon at the top of the Preset panel is a helpful addition. This lets you quickly make a preset based on your current adjustments. It lets you select all the adjustments you want to carry over.
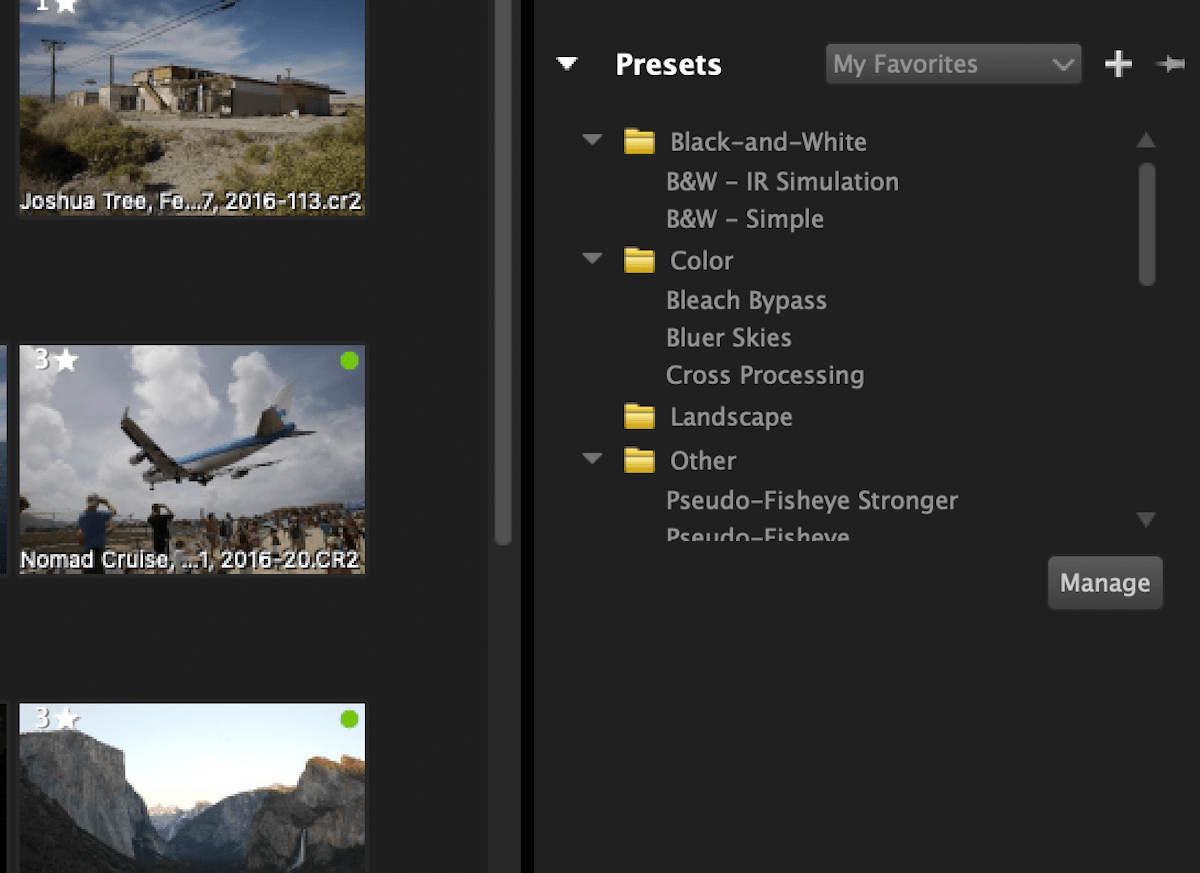
Photo Manipulation Tools
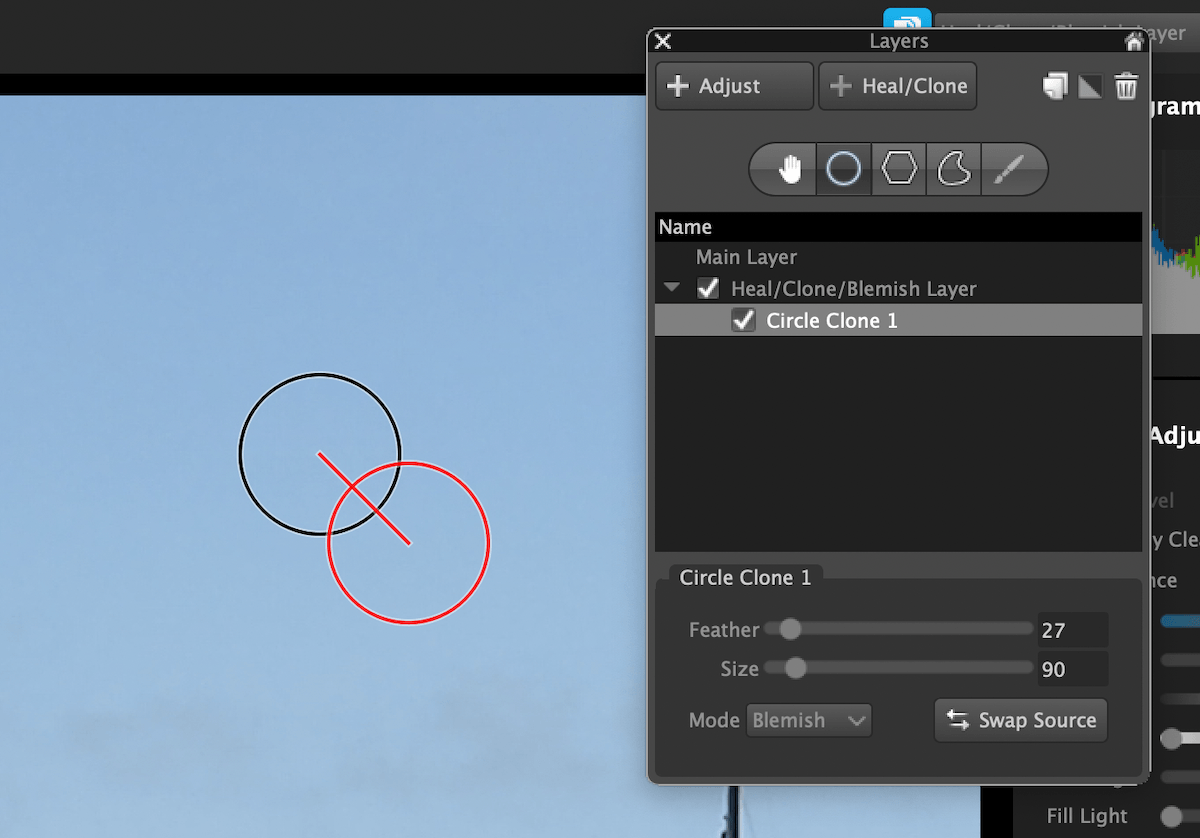
You can find a Heal/Clone tool in the layers section. This is the icon with one page on top of another just above the right-hand panel. The Heal/Clone tool creates a new layer for the tool, and each click becomes a sub-layer inside this.
This approach is lengthy, but it gives you a high level of control if you want to go back and adjust individual points. One detail I do not like is that AfterShot Pro 3 does not provide a brush size icon for your mouse. You have to click on the spot you want to remove and then adjust its size and position after your click.
You also cannot draw lines in this manner. So this means you are restricted to the Heal/Clone for spots only. This is annoying as it makes object removal much harder.
Variety of Image Editing Views
There are no specialist views to help with the editing process in AfterShot Pro 3. The only option is to create a virtual copy and then bring up both images side by side. This is slightly long-winded for a simple comparison view, especially as this feature is now found in most photo editing software.
AfterShot Pro 3 provides one useful feature—an icon that takes you directly to 100% zoom. This is particularly useful for people editing photos to be printed. You can find this icon in the bottom right corner.
Advanced Editing Features
RAW Noise Reduction
The RAW Noise Reduction tool consists of the RAW Impulse Noise Removal button and a RAW Noise and Threshold slider. The tool works well and does a good job of smoothing over noisy images without adding digital artifacts.
But, as AfterShot Pro 3 was released in 2016, there have been vast improvements in denoising technology. Most denoise software now uses AI to remove noise, with incredible results.
If we compare the before and after of the noise reduction in AfterShot Pro 3, we can see a good difference between the two. But, if we look at the difference between a Lightroom before and after, there is an incredible difference.
So, if noise reduction is crucial to your work, especially for low-light photographers, you may want to look elsewhere.


Highlight Recovery
Highlight recovery is a feature that AfterShot Pro 3 performs very well. This lets you draw as much detail as possible out of overexposed areas in your photo. This is a feature that can save washed-out skies on overcast days.
When looking at the results that AfterShot Pro 3’s highlight recovery produces, I was blown away. For such old software, this is one of the top-performing highlight recovery adjustments on the market.
AfterShot Pro 3 does an incredible job of drawing out as much as possible from the edge of the image information in the highlights. If we compare this to Lightroom, we can see that it performs in a different manner.
Lightroom can reduce the whole sky to grey. AfterShot Pro 3 defines details better but still leaves blown-out highlights.


Lens Corrections
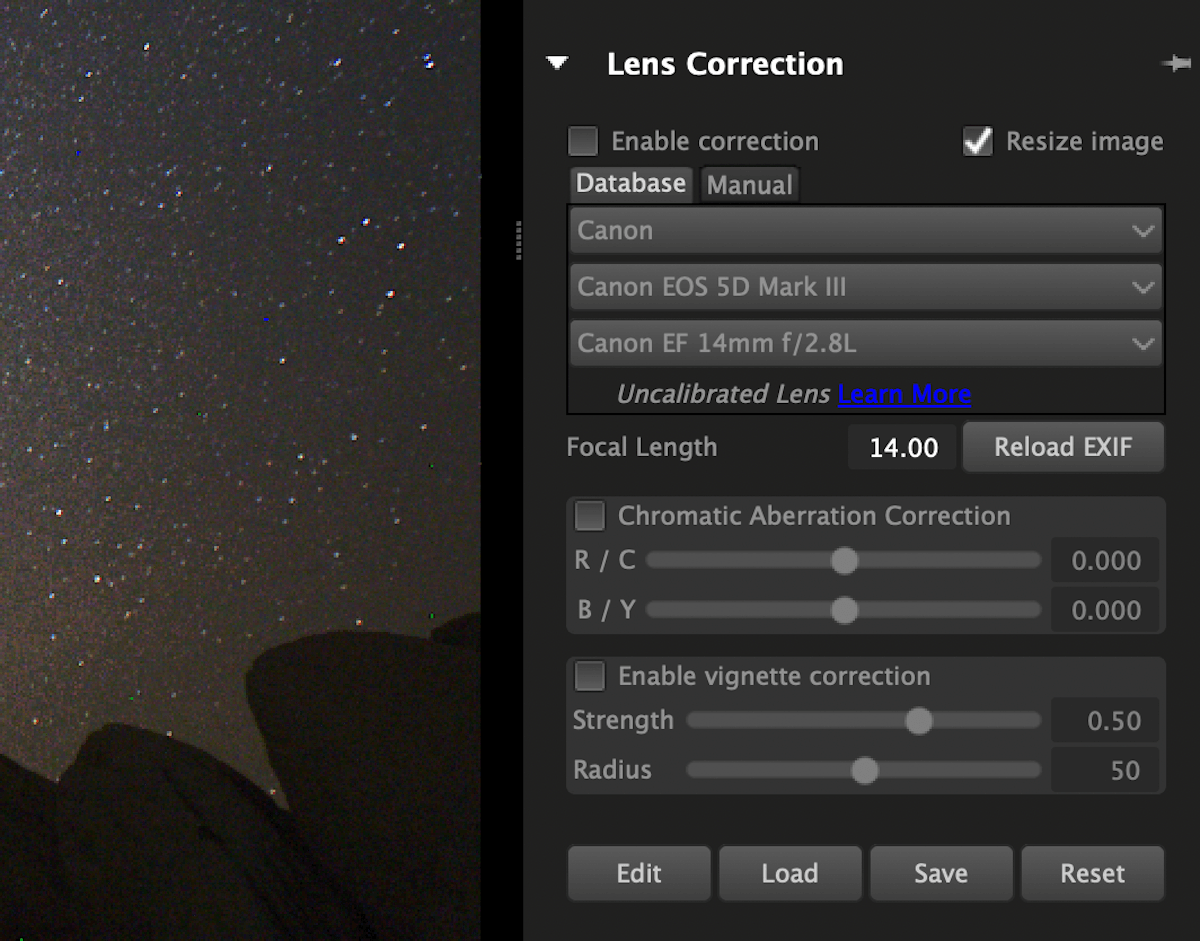
In this software, you also find an adept lens correction interface. The program automatically reads your metadata and applies corrections for your lens and camera. You can also download extra camera and lens information if your equipment is not featured.
On top of this, AfterShot Pro 3 has a custom lens correction development kit. This lets you make your own adjustments for equipment that may not have any. This is particularly useful for photographers who may shoot with rare or unique lenses.
You can manually correct chromatic aberration and vignettes in the same section in your images. This is fantastic as it lets you get as perfect an image as possible.
Watermarking
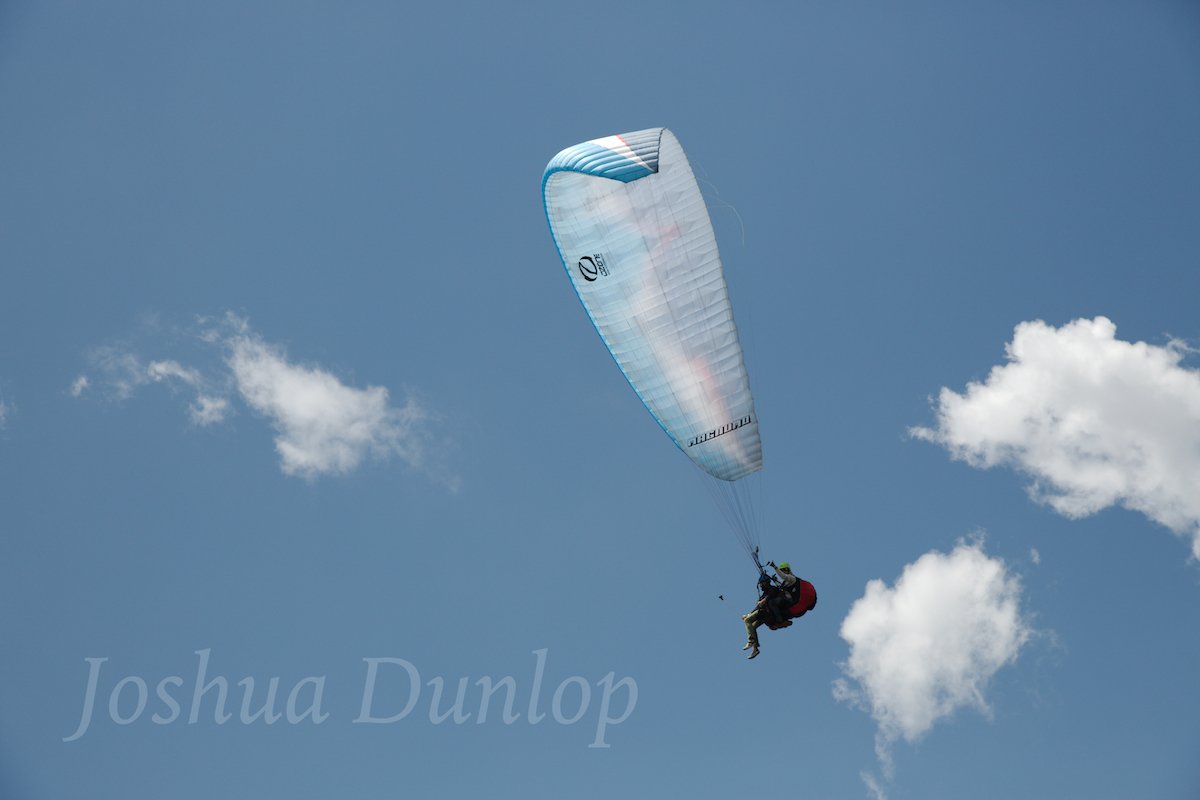
AfterShot Pro 3 provides simple and easy watermarking features for your photos. Watermarking has a section in the right-hand panel. In this section, you can add image or text watermarks and place them anywhere around your image in any size and rotation.
After deciding on your watermark’s positioning and size, you can save it as a preset. This is very helpful as you can apply the watermark throughout the exporting process.
Exporting and Sharing Images
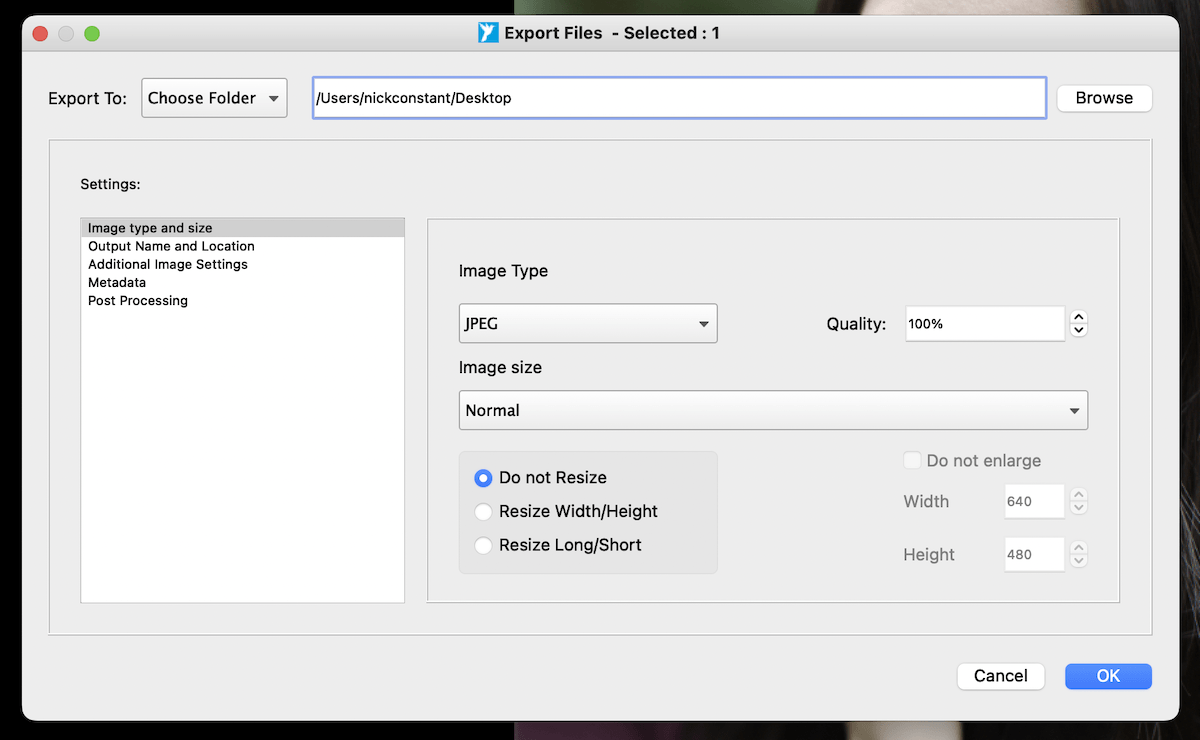
AfterShot Pro 3‘s exporting interface is simple but covers all necessary adjustments to give you full control of your images. I prefer export interfaces like this. They clearly outline each step and keep the main information front and center. This is ideal if you are looking for a quick export.
You can resize the image, choose the relevant metadata attached, and even apply sharpening adjustments at this stage. You can also apply presets here. It lets you add watermarks or other functions right at the end in an easy manner.
The downside is that AfterShot Pro 3 only lets you export in JPEG and TIFF file formats. These are the most common types of image files for photographers, but a wider variety is always preferable.
Overall, the exporting process is easy and provides good customization, which are the two most important factors.
Smartphone and Tablet Compatibility
AfterShot Pro 3 provides no options to use the app on smartphones or tablets. This is an oversight, but it is not surprising with old software.
AfterShot Pro 3 Pricing Plans
Corel AfterShot Pro 3 is available as a one-time purchase and is the cheapest option available on our list of photo editing software. Its low price point makes it extremely attractive to photographers. It’s best for those who want a basic editing and file management app for as cheap as possible.
Corel prides itself on AfterShot not having a monthly or annual subscription. So, you save more and more money as time goes on. AfterShot Pro 3 is an option if you are looking for subscription-free software.


Alternatives to AfterShot Pro 3
Adobe Lightroom
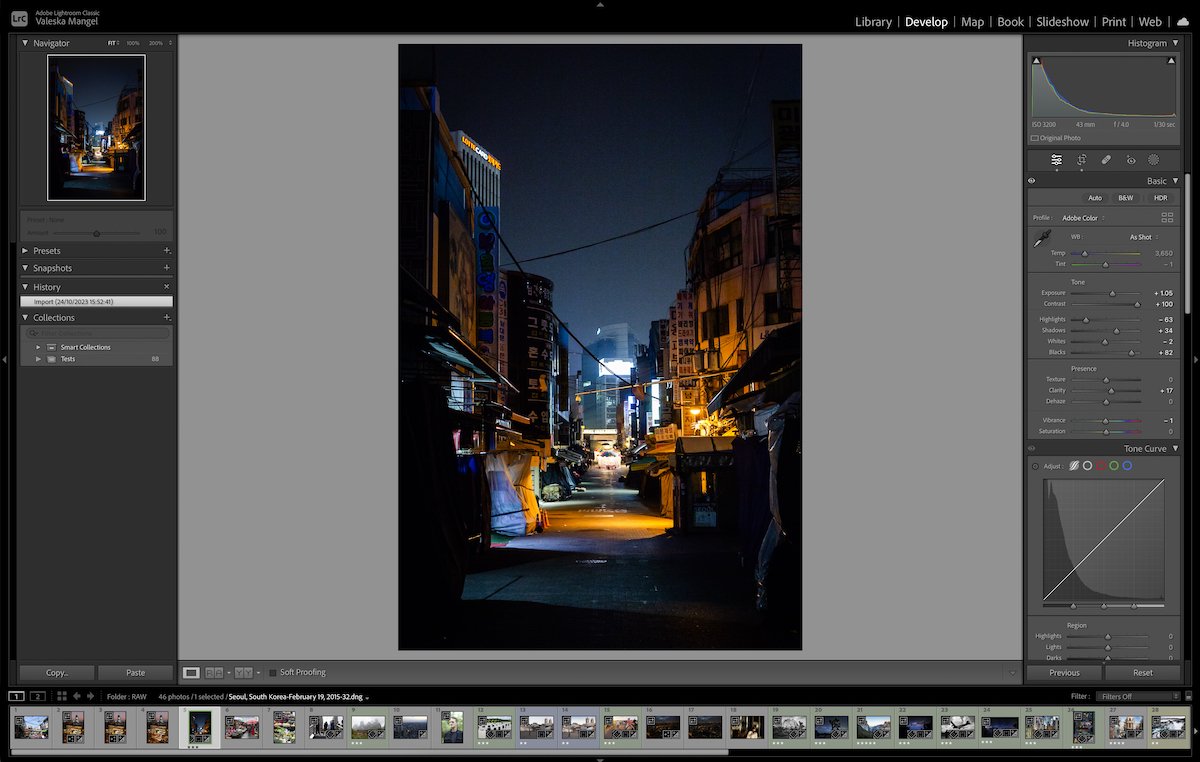
We see a vast difference if we compare AfterShot Pro 3 to Adobe Lightroom, the top-performing digital editing software on the market. Both programs provide a service that starts with RAW processing and features editing and exporting options. This is where the similarities between the software ends.
A notable comparison that AfterShot Pro 3 advertises is its speed difference. AfterShot Pro 3 is much older than the constantly updated Lightroom series. Even so, it imports, converts, and exports RAW files more quickly. This is surprising from old software but could be useful for photographers on the go.
AfterShot Pro 3 also takes up little room on your computer compared to Lightroom. This is obviously because of the amount of features in Lightroom compared to AfterShot Pro 3. After looking at the features available on each, I would rather take up more space and have all relevant features available.
If we compare the interfaces, AfterShot Pro 3 provides a simpler and more efficient workflow. Again, this stems from the lack of features that the software provides. Having a singular window where you edit the panels rather than the workspace is useful.
Overall, the comparison comes down to Lightroom, which has abundant features, and AfterShot Pro 3, which is stripped down but great on the go. So, if you must choose between the two, it’s a choice between more expensive, comprehensive software or a cheaper, basic option.
Our thorough Lightroom review has more information if you need it.
Final Verdict for AfterShot Pro 3
| Measurement |
Measurement
Score
|
| Workspace |
Workspace
|
| File Management & Organization |
File Management & Organization
|
| RAW Processing |
RAW Processing
|
| Importing & Exporting |
Importing & Exporting
|
| Basic Editing Tools |
Basic Editing Tools
|
| Manipulation Tools |
Manipulation Tools
|
| Advanced Editing |
Advanced Editing
|
| One-Click Editing |
One-Click Editing
|
| Range of Tools |
Range of Tools
|
| Value for Money |
Value for Money
|
| Total Score |
Total Score
|
AfterShot Pro 3 finds its niche in the digital editing software market. It attempts to tick off all the basic features and goes a long way, but it only makes it part of the way.
As a file management and editing software, you would think it would establish a good basic set of adjustments. Instead, the software prioritizes providing a range of functions while not diving too deep into each one.
AfterShot Pro 3 was designed to use little space and processing power while providing a fast and efficient editing service. These points have both been met.
But in doing so, the software has sacrificed key features. And some photographers may see them as essential to their digital editing process. These include missing features like tonal adjustments and an easy comparison view.
For such old software, the user experience doesn’t feel too outdated. Its features and lack of AI do make it feel old. But, AI has only recently been widely incorporated into digital editing software. Still, AfterShot Pro 3 cannot be considered up-to-date technology.
Who Do We Recommend AfterShot Pro 3 For?
AfterShot’s real strength lies in its quick handling of large sums of files. This is particularly helpful when you are not fussed about uploading every photo but want to see the images as quickly as possible.
This feature works well for any photographer who shoots large amounts of photos and needs a culling process to remove 90% of these images. For instance, photojournalists and event or wedding photographers would benefit from this.
I also recommend this software to photographers who want to keep expenses minimal. First, use free trials that other software may offer. But if you have exhausted those and need a cheap, permanent option, AfterShot Pro 3 could be for you.
But if you want to take photography seriously, I suggest looking at other more comprehensive software we recommend.