
Our article will show you how to extract frames from a video in Adobe Photoshop. Extracting frames from a video is a great way to create custom images for your projects.
You can use Photoshop to extract individual frames or even small sections of a video and save them as separate images.
Extract Frames From a Video in Photoshop: What You’ll Need
- A video file
- Adobe Photoshop
That’s all!
How to Capture a Still Image From a Video Step By Step in Photoshop
Here are four steps to extracting frames from a video in Photoshop.
Step 1. Open the Video in Photoshop
First, open the video file in Photoshop. Lightroom will not let you export the video to Photoshop for editing. So you will have to open it directly.
Go to the File drop-down menu in Photoshop and select File > Open (Ctrl or Command+O). Navigate to your video file. The video will also open if you drag the video file directly into Photoshop.
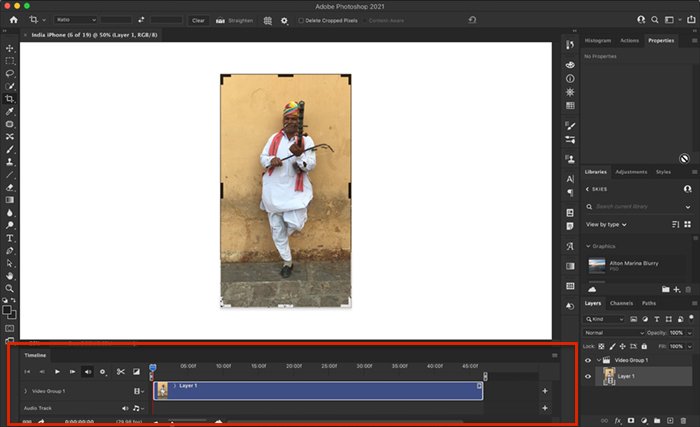
Photoshop recognizes the video and opens new features on your workspace. A Timeline appears below the video. This panel lets you trim and do some simple edits to the video.
Below, I’ve opened an iPhone video of a street musician in Jaipur, India. I will use Photoshop to make a still picture from the video.
Step 2. Select Frames
Photoshop will separate your video into individual images. But this can result in hundreds or thousands of frames.
A video shooting at 24 fps (frames per second) will create 240 images in 10 seconds. So it is best if you can limit this.
Drag the playhead (slider above the vertical red line) along the time ruler along the top until you find the frame you want to make into a still image.
Move the beginning and endpoint sliders (grey tabs) to either side of the red line to reduce the number of selected frames.

To see a selection of images, you can expand the area by moving the beginning and endpoints.
Move the beginning a little to the left and the end a little to the right. This will give you more individual images.

Quick Tip: If you know which frame you want as a still, place the red line on it. Then from the File drop-down menu, select File > Save (Ctrl or Command+S). Save images as a JPEG or TIFF file.
Step 3. Separate the Images
The next step is to tell Photoshop to separate the images that make up the video.
Click the Render Video button in the lower left-hand corner of the timeline. (It looks like an arrow.) This will open a Render Video dialog box.
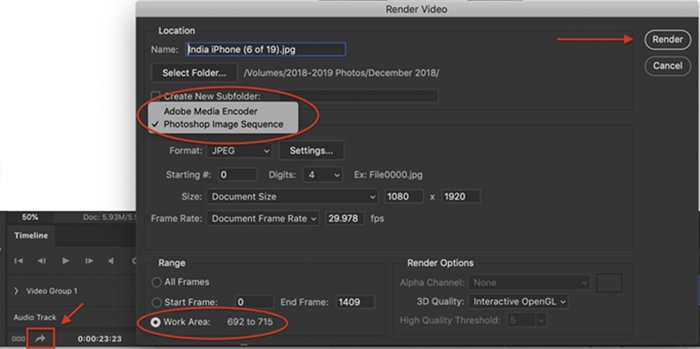
With the Render Video dialog box open, go through the following steps (highlighted above):
- Switch Adobe Media Encoder to Photoshop Image Sequence.
- Select the format of the images. I have selected JPEG, but TIFF is another option. Settings let you adjust the image quality and size.
- Select the Work Area radio button. This enters the frame or frames that you selected in Step 2. You can also select All Frames or enter a smaller range of frames.
- Click the Render button.
Depending on the selections you made, another dialog box may appear. Save at the highest resolution possible and click OK.
Quick Tip: You can specify a different folder to save the images in the Render Video dialog box.
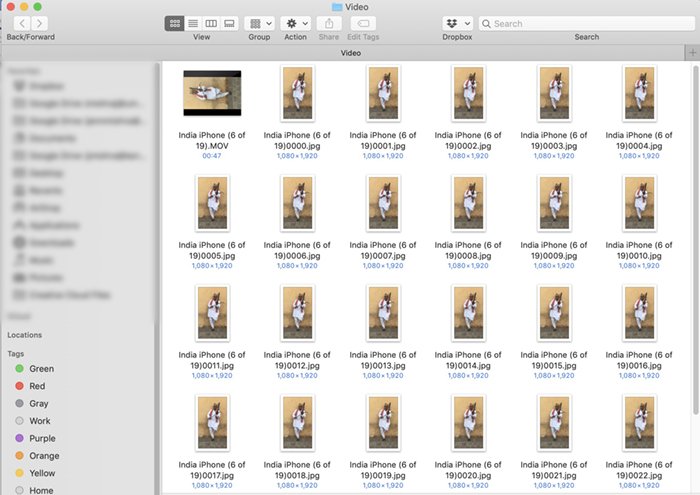
Step 4. Navigate to Saved Images
Photoshop quickly extracts the individual images from your video. But Photoshop will not send you a notification when the process is complete. The images will save in the background.
To find the images, go to the folder containing your video. You can then import the images to Lightroom or open them in Photoshop.
Conclusion: How to Extract Frames From a Video in Photoshop
Now you’ve learned how easy it is to use video mode to capture action stills! This is a great trick to add to your growing Photoshop skills.
After you’ve created your JPEG or TIFF image, you can edit it like any other image. Check out our Effortless Editing with Lightroom course to learn more about this process!
