It’s no surprise that you’ll want to take photos of a solar eclipse. A total solar eclipse is a rare event. And even when it happens, you can only see it from certain locations and for a short period of time. So how do you photograph a solar eclipse?
Knowing how to photograph a total solar eclipse well in advance is key. This article will show you how to bring home great images of this rare phenomenon.
How to Take Photos of a Solar Eclipse: What is a Solar Eclipse?
A solar eclipse is when the Moon comes between the Earth and the Sun, blocking the Sun at least partially. Eclipses depend on the relative location of the Earth, Moon, and Sun.
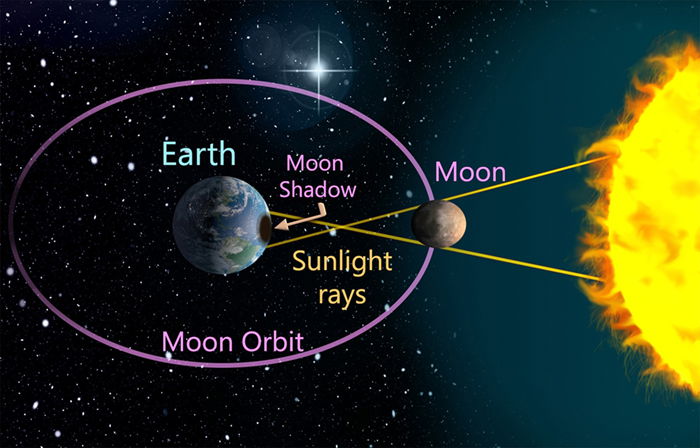
If this celestial alignment is perfect, and if you are in the right location, the Moon will totally cover the Sun. This plunges you into darkness. No wonder people in ancient times saw a solar eclipse as a bad sign.
A total solar eclipse is possible because the apparent size of the Moon in the sky is almost the same as the Sun. If the alignment is less than perfect, we see a partial eclipse. This is where the moon only partially covers the Sun.
If you haven’t taken an astronomy class recently, you may not be familiar with words associated with solar eclipses. Here are a few terms that might help you plan and photograph this rare celestial event.
- Annular Solar Eclipse – This is like a total eclipse except the Moon isn’t large enough to completely cover the Sun.
- Baily’s Beads – Beads of light appear that on the Moon’s surface just before totality.
- Corona – The outer layers of the Sun’s atmosphere.
- Diamond Ring – This is the last flash of light just before totality. It is named because the effect looks like a piece of jewellery in profile.
- Partial Solar Eclipse – The Moon passes in front of the Sun, but does not fully cover it.
- Totality – Point where Moon entirely obscures the Sun during a total eclipse.
- Total Solar Eclipse – The Moon passes in front of the Sun completely obscuring it from view.
How to Take Photos of a Solar Eclipse
There are a few considerations you’ll need to take into account to get the best photos of a solar eclipse.
When and Where to Photograph the Solar Eclipse
Scientists predict solar eclipses based on orbital cycles. These are popular astronomical events, so they are generally well publicized.
Solar eclipses don’t happen that often, so a bit of planning is needed to make the most of the experience.
First, find the eclipses. You may be waiting for the next eclipse in your area or looking to travel. NASA has a good website for finding the next eclipse in your area. The site gives you the date and time of the eclipse. It also tells you the region and which countries will have the best visibility.
This gives you a general idea, but the eclipse traces a path across the sky. Not everyone in the same country sees the eclipse the same way at the same time. For instance, the August 21, 2017, total eclipse in the U.S. was seen in Oregon at 5:24 PM (UTC), Missouri at 6:16 PM (UTC), and North Carolina at 6:46 PM (UTC). States like Texas saw only a partial eclipse.
You’ll need to scout your location in advance and be in place and set up well in advance. In order to take photos of a solar eclipse, planning when and where to be to see the eclipse is very important.
How to Time Your Shoot Perfectly
Totality or the time of the greatest eclipse is the highlight of the eclipse. It’s the point of maximum eclipse. On their table, NASA gives us the time of the greatest eclipse. But this isn’t usually when photographers start shooting. The eclipse begins to happen when the Moon first covers the Sun.
In 2017, the partial eclipse started about 90 minutes before totality.
An eclipse happens in five major steps. Each one lasts for a short amount of time and has exciting characteristics you can photograph.
Check out the graphic below for more details.
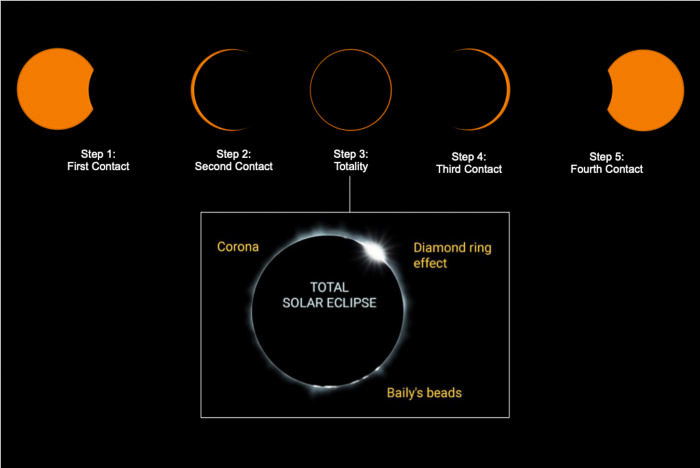
Here’s a brief description of what happens during each phase.
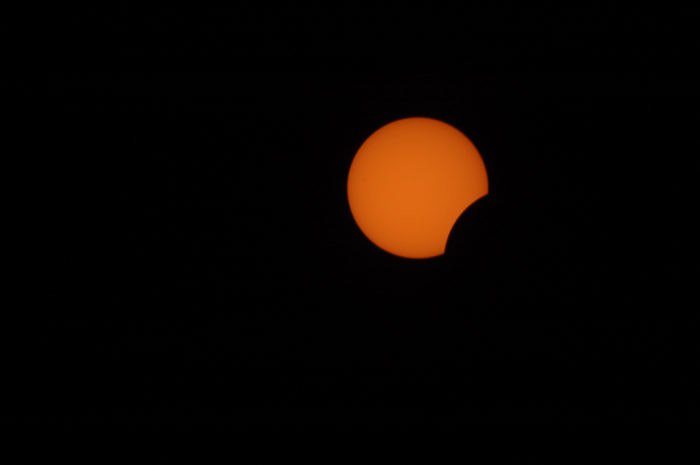
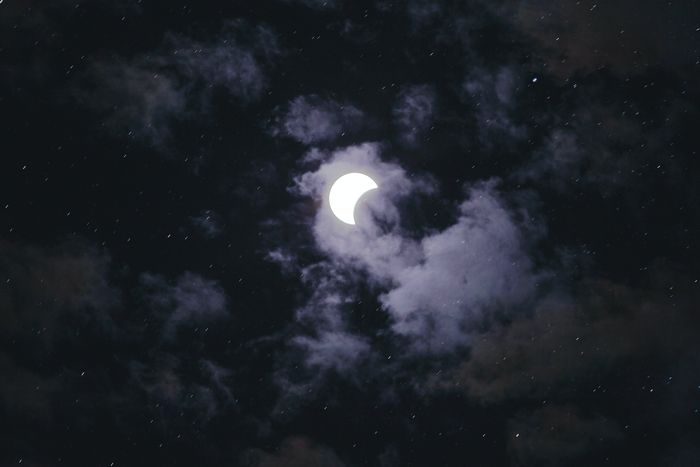
Partial Phases of an Eclipse
During a partial eclipse, the Moon only partially blocks the Sun. Because the Sun is bright compared with the Moon, you will only be able to see the shape of the Moon as it passes in front of the Sun. The Moon will be in silhouette, obscuring all detail of the Moon’s surface.
During a total or annular eclipse, partial phases will precede and follow totality.
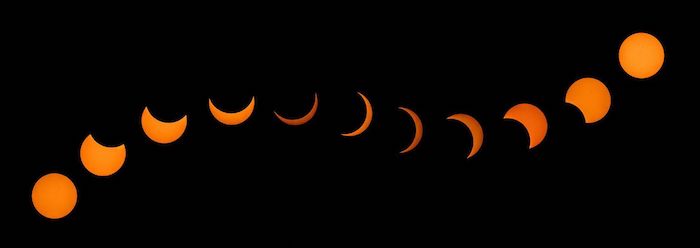
Taking a series of photos during the entire eclipse is popular. This shows the progression of the Moon across the Sun.
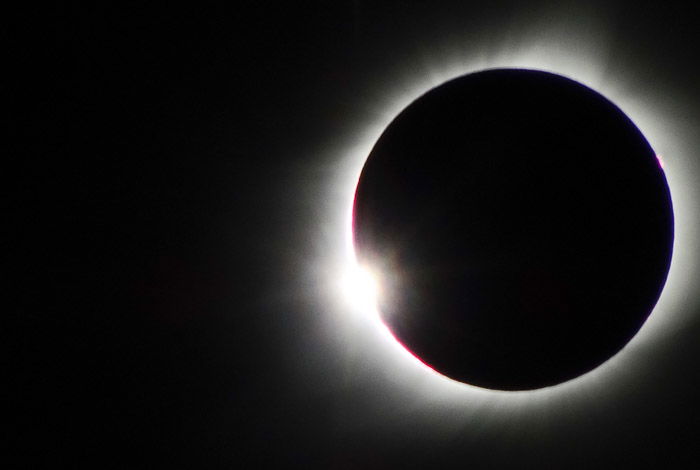
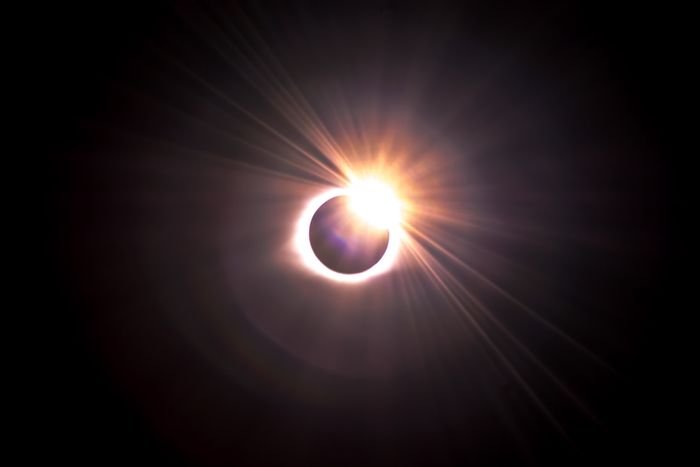
Baily’s Beads & Diamond Ring
The moment of most excitement is just before totality. This is when you can photograph Baily’s Beads and the Diamond Ring effect. These last only seconds, so photographers have to be ready!
Baily’s Beads the Diamond Ring are the result of the Sun shining through the uneven Moon’s Limb (the edge of the lunar disk). This forms a series of bright “beads.”
In this phase, you can have a hint of the Solar Chromosphere too. This is a reddish line around the still visible solar edge.
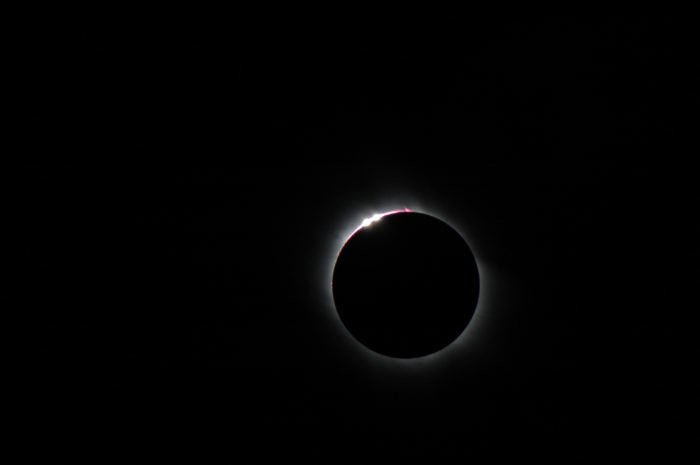
When the total eclipse is almost reached, only a single bead will shine. This looks like a shiny diamond on a ring (hence, its name).
Solar Corona
The eclipse itself, where the Moon is covering the Sun, may last one minute or ten minutes. Each eclipse is different.
The Moon will then move and begin to uncover the Sun. If you didn’t get your time-lapse photos before the eclipse, here’s your second chance.
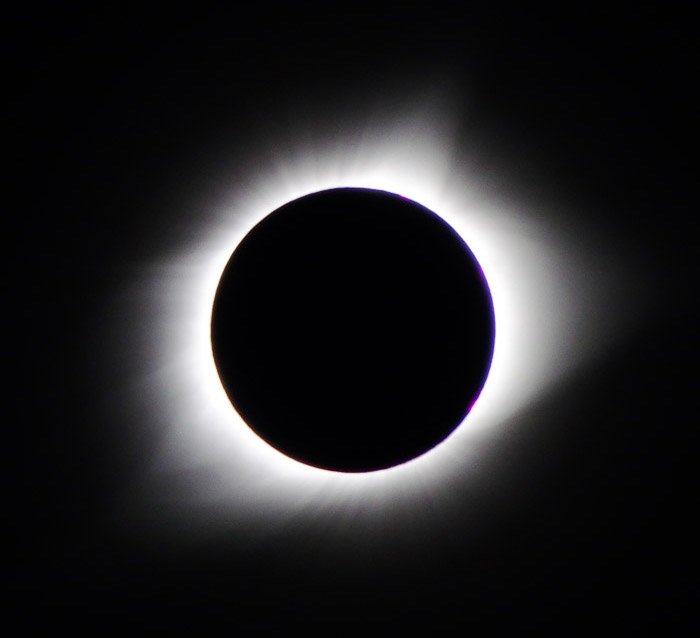
The corona is very faint and can be seen only during totality. When the New Moon covers the Sun, the outer corona is the only visible part of the Sun. It often appears as a halo.
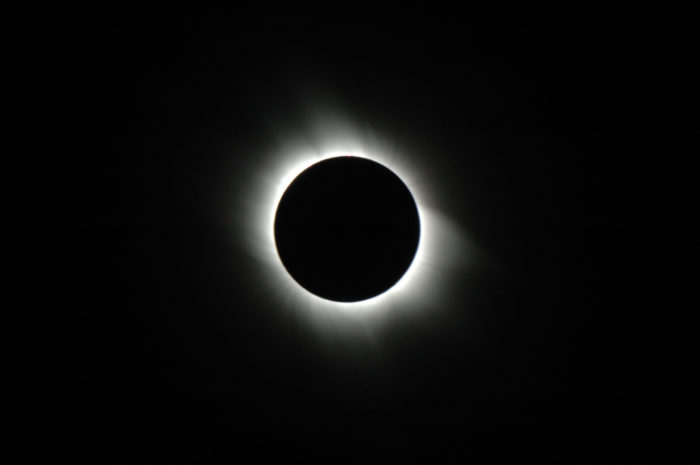
On Earth, the Solar corona can only be seen during totality. It doesn’t matter how good, large, or expensive your equipment is. With less than totality, the remaining sunlight will overpower the much fainter halo of the Sun’s corona.
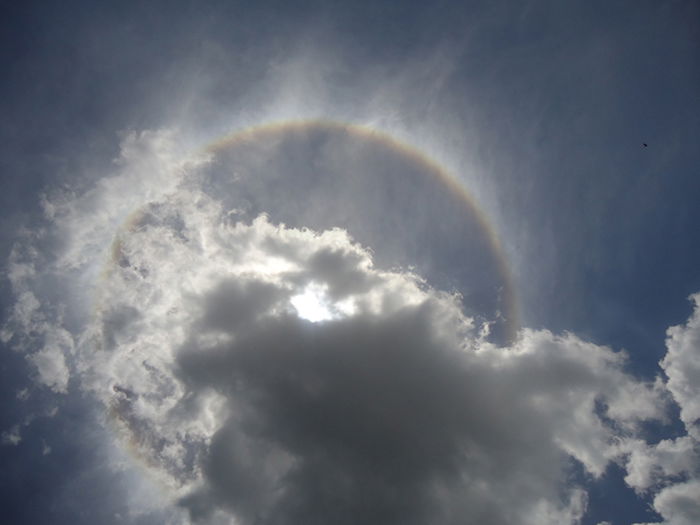
During an annular solar eclipse, the Moon only covers the center of the Sun. This leaves the Sun’s visible outer edges to form a “ring of fire.”
A prominence is a bright, gaseous feature extending outward from the Sun’s surface. This is often in a loop shape.
Prominences can be seen and photographed all year by using special narrow-band telescopes. These telescopes allow you to see only a particular kind of light.
During a solar eclipse, you might be able to photograph a prominence with the white light filter.

Weather Watching
If you want to take photos of a solar eclipse, you need clear skies—at least around the Sun itself. Cloud cover at the wrong time will completely ruin your eclipse photography.
Apps that help astrophotographers plan Milky Way photoshoots will also help plan for the eclipse.
The Best Location to Take Photos of a Solar Eclipse
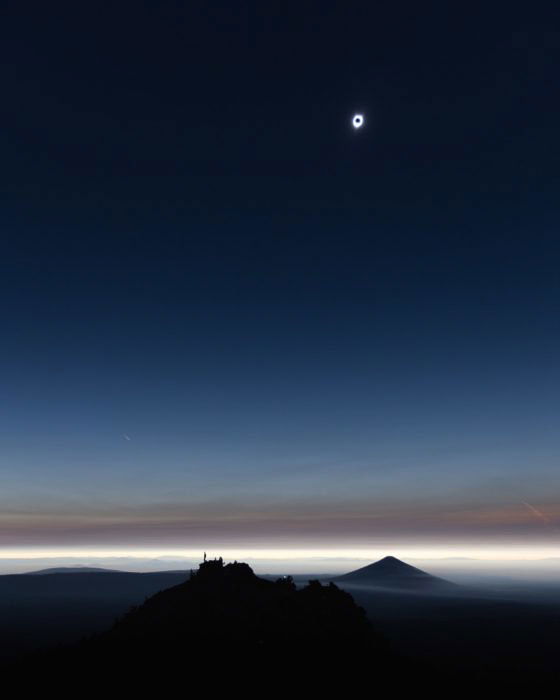
Find a place where trees or buildings won’t obscure your view of the Sun. If the eclipse happens at mid-day, you probably won’t have a problem finding a location, though your compositional opportunities may be limited.
If the eclipse happens with the Sun low on the horizon, you will need to find a place with a good foreground element.
Use apps like PhotoPils or The Photographer’s Ephemeris to help you plan where to photograph. These apps contain virtual reality tools that let you see exactly where the Sun will be at a specific time of day on a set date. You can plan exactly where a foreground element will be when the eclipse happens.
You might have to compete for your photography spot. Particularly if you want to photograph the eclipse and the landscape using a wide-angle lens, so plan to be at your location well in advance.
The Best Gear to Photograph a Solar Eclipse
Solar eclipses are rare events. You will get news of the incoming eclipse weeks in advance, even if you aren’t into astronomy.
Use this time to ensure you have the right gear to photograph a solar eclipse, and that you know how to use it.
Safety First!
Photographing the Sun should be done with caution. There is a reason we’re not supposed to look directly at the Sun. It can damage your eyes and your camera.
Eye Protection
You will need eye protection to view a solar eclipse. You should be able to purchase specially-designed eyewear in advance of an eclipse. Regular sunglasses won’t protect your eyes when looking directly at the Sun.
Eclipse glasses are coated with a special material to block the Sun’s rays. To make sure you’re purchasing authentic gear, make sure they are ISO-approved. ISO stands for International Organization for Standardization (rather than the camera setting). You can also view the eclipse with welding goggles.
During totality, you remove your glasses and look directly at the Sun. Otherwise, the lenses are too dark for you to see anything.
EVF vs Optical Viewfinder
It’s important to know whether your camera has an Electronic Viewfinder (EVF) or an optical viewfinder. It is VERY important not to look through an optical viewfinder when composing an image of the Sun. There is no protection on an optical viewfinder.
There’s debate about whether it’s safe to look through an EVF. If you do look through your EVF, make sure you have a solar filter in place on your lens.
It’s generally recommended to use live view to compose shots of the Sun.
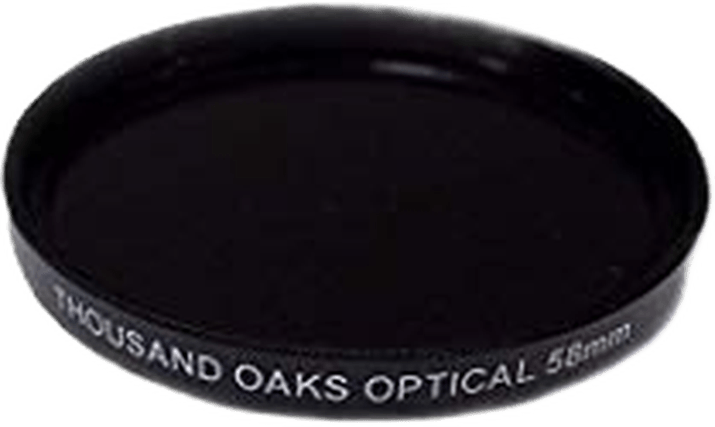
Solar Filter
A solar filter is by far the most essential piece of equipment when it comes to photographing the Sun. This solar filter is not there to create nice photographic effects. It’s there to prevent irreparable damage to your camera. The lens, a telescope, or a binocular will concentrate sunlight. Failing to photograph the Sun with the proper filter may burn a hole in your sensor.
You can buy a proper solar filter (white light solar filter) online. It’s worth looking on astro-related websites as well. They start at $50 or so and will cut down not only the visible light but also the IR and UV radiations.
There are ways of making a DIY filter with solar safety film to photograph the solar eclipse. You can also stack neutral density filters to block sunlight coming into your camera. Sixteen stops is the minimum you should use. But be very careful with these solutions. Getting it wrong can permanently damage your camera.
This video below shows quite well the point I’m trying to make.
Before using the solar filter, inspect it for deep scratches, cuts or holes. Change it if you are not sure about its integrity. Having a damaged filter is like looking directly at the Sun with your naked eye.
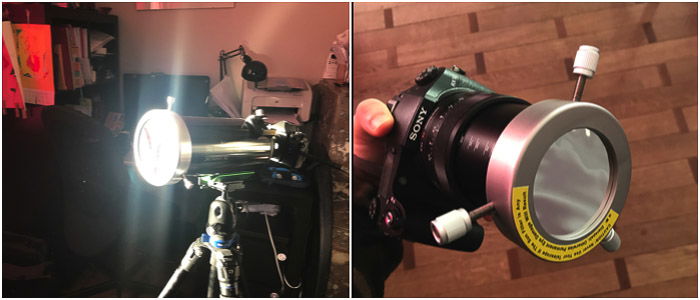
Once you’re sure it’s okay, slide it on the camera lens and tighten the thumbscrews to lock it in position. Check the filter is stable and be careful not to knock it off the lens.
Here’s the filter mount on a Skywatcher Skymax 90/1250 telescope (left) and on the Sony RX10 (right).
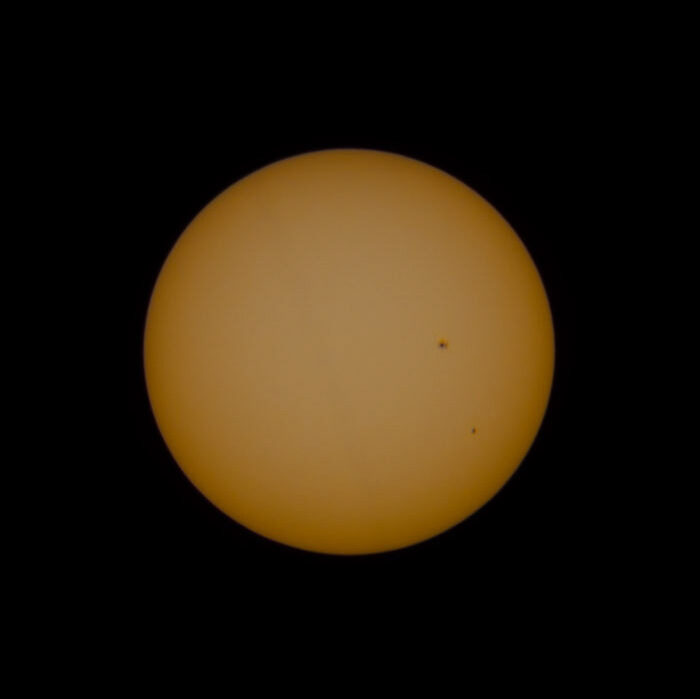
You can use white light solar filters all year long to observe and photograph Sun Spots. These are regions of the solar surface that are colder than the rest.
Your filter must be properly mounted before you point the camera at the Sun. Also, don’t allow children to manipulate your equipment to observe or photograph the Sun on their own.
If you’re photographing a total eclipse, you’ll remove the solar filter during totality.
Choosing the Best Camera Gear
Now, let’s go over the camera equipment that will help you take photos of a solar eclipse. If you take photos of the Moon, landscapes, or wildlife, you’ll probably already own this gear.
What Camera Should You Use?
You can photograph an eclipse using any camera. The best is to use a long focal length lens. Low light, high ISO performance, and camera lens performance are not an issue here. So cameras with crop sensors have the advantage. They fill the frame better at any given focal length than full frame cameras.
For example, 1-inch or point-and-shoot digital cameras, such as the Nikon P900 or Sony RX100 give great reach in a smaller package.
You can photograph an eclipse using your smartphone, but the telephoto capabilities may be limited. The Sun will appear small in the frame.
What Lens Should You Use?
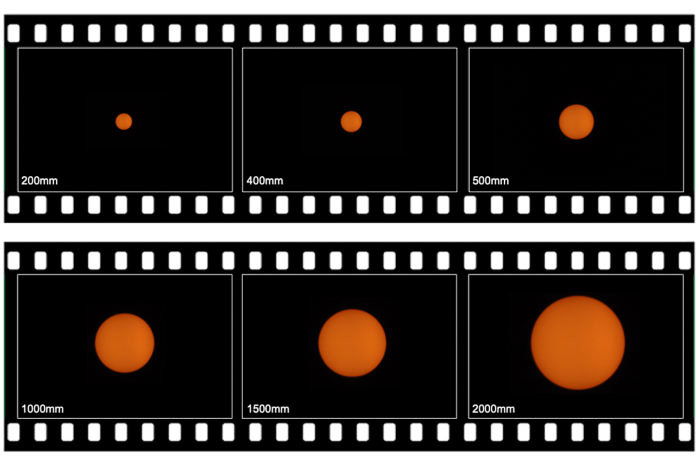
As mentioned before, the Sun appears in the sky as big as the full Moon. This means that you can use the same telephoto lenses you would use in Moon photography. Unlike Moon photography, there isn’t a lot of detail in the Sun. But you may capture sunspots on the surface with a long lens.
If you want to isolate the Sun, a telephoto lens starting about 300 mm is a good focal length. But a longer telephoto lens with a teleconverter will let you get even closer.
If you want to photograph the landscape too, you’ll instead opt for a wide-angle lens. Solar eclipses don’t happen often, so I bring both!
Tripod
A tripod is a must-have. It will allow you to set up your camera before the beginning of the phenomenon and keep it trained on the Sun during the eclipse. If you’re using a long telephoto lens, a tripod helps you stabilize the lens.
The Sun moves in the sky at about 15 degrees per hour. You will have to readjust the frame periodically. A tracking device like the Skywatcher Star Adventurer will help you follow the Sun.
If you don’t have a tracker, a 3-way pan head may be a more comfortable option than a ball head. That way you can re-center the Sun in the frame easily.
Remote Shutter
A remote shutter/intervalometer is optional, but it will allow you to create a time-lapse of the event easily. Remote shutter release will also prevent camera shaking.
Once you have your camera trained on the Sun, a remote shutter lets you take photos without fussing with your camera during the event.
How to Find the Best Solar Eclipse Camera Settings
You have a lot of flexibility in your settings when photographing a solar eclipse.
First of all, set your camera to shoot in RAW. Use the lowest possible ISO (typically ISO 100 or ISO 200). If you are on a tripod, remember to disable any image stabilization. Because the Sun is bright even with a solar filter installed, your auto-focus should work well. Once you have your camera focused to infinity, turn the auto-focus off. You won’t need to change focus during the eclipse.
Select an aperture around f/5.6 to f/8. During most of the eclipse, you’ll have plenty of light even though your solar filter limits light. During totality, you’ll remove your solar filter and may want to open your aperture for more light.
The amount of Sun blocked by the Moon varies during the eclipse. This means that you will have to adjust your shutter speed or your solar eclipse exposure. During a total eclipse, you will basically be shooting night photography, which will need a slower shutter speed.
Here are some shutter speeds you should consider during the phases of the solar eclipse. This is assuming you are using a white light solar filter, ISO 200 and f/5.6.
- Full Sun: 1/1000th of a second or faster
- Partial Solar Eclipse: 1/500 – 1/250th of a second
- Diamond Ring: 1/250th of a second
- Totality: 1/25th of a second
Please note that those settings are more of a solar eclipse exposure guide or a starting point. You may fine-tune your exposure settings considering your gear and weather conditions (haze, fog, clouds, etc.).
Tips for Solar Eclipse Photography
Having photographed several solar eclipses, here are a few tips I picked up along the way. Eclipses happen fast, and there aren’t a lot of opportunities to practice.
Remove Solar Filter During Totality
When photographing a total or annular solar eclipse, remember to remove your solar filter at the point of totality. Solar filters protect your sensor from the Sun, but at the point of totality, the Sun is covered by the Moon. This means you’re essentially photographing at night.
You may want to practice this in advance to speed up the process.
Shoot in Burst Mode During Totality
Just before totality, switch your camera into burst mode. Baily’s Beads and the Diamond Ring will happen quickly. Burst mode gives you the best chance at capturing this unique phenomenon.
Bracket Your Shots During Totality
It’s also a good idea to bracket your shots during totality. The dynamic range is huge between the Sun’s surface, the edges of the corona, and the Moon’s surface. With bracketed images, you will be able to pick up fine details and light variation.
This will also ensure you won’t blow out the highlights.
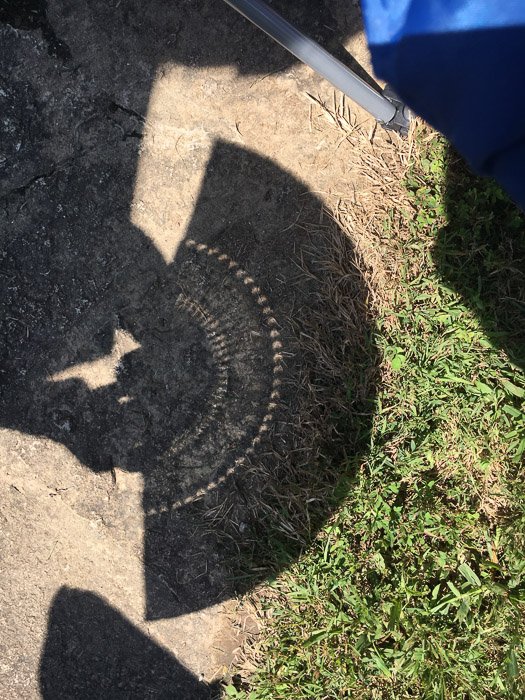
Photograph More Than the Sun
During an eclipse, there are more things to photograph than just the Sun.
Take a look at the shadows around you. Shadows will start to change during an eclipse. The shape of the partial phases will show as little crescents. You can see the crescents in dappled light through tree leaves, or you can use a pinhole camera.
You may also see shadow bands just before totality.
If you’re photographing a total eclipse, you may want to dedicate one camera to shooting video.
Experiencing a total solar eclipse is unique. Don’t underestimate how amazing it is to experience day-to-night without a period of sunset or sunrise. The world is simply plunged into darkness. People around you will react in amazement. If you are in nature, you will immediately hear the sounds of the night.
Practice in Advance
It’s a good idea to practice in the days leading up to the eclipse.
Visit the site at the time of day that the event will happen. Check for any obstructions.
Practice photographing the Sun with the specialized gear you’ll need. Know how your solar filter attaches and detaches from your lens.
If you’re photographing a total solar eclipse, you’ll have to make a lot of changes at the point of totality. You’ll be removing your solar filters, changing the shutter speed for night photography, and possibly manipulating multiple cameras.
Enjoy the Experience
Many photographers get the photo but miss the experience. Solar eclipses are special events. Take time to enjoy them. For total eclipses, totality will last at least a couple of minutes. Photograph for a minute or two and then stop and enjoy the show.
Conclusion
A solar eclipse is a unique event that not everyone gets to experience. If you’re lucky enough to take photos of a solar eclipse, know what to expect in advance. It’s important to be ready with the correct gear and camera settings.
In this article, you have learned the basics of solar eclipse photography. The main thing to remember is to stay safe and use eye protection and solar filters. No shot is worth hurting your eyes or melting your camera!
Once you have your shots, you can create a composite to show the progression of this rare and breathtaking event.
Interested in learning more about astrophotography? Why not try our Milky Way Mastery course!