The Lightroom radial filter is one of the simplest ways to apply local effects to only a part of the image. And we’ll show you how to use it.
The Lightroom radial filter applies a local adjustment to a circular portion of the image. Lightroom’s different controls and sliders affect whether that edit blends seamlessly or creates a striking, obvious look.
With a few modifications, the tool can even go beyond just editing everything outside or inside a basic circle.
What Is the Lightroom Radial Filter and What Can You Use It For?
Simply put, the Lightroom radial filter applies an effect to a circular area of the image. It’s feathered so that the remainder of the image remains untouched.
Using the radial filter in the default settings, the different Lightroom controls adjust what’s outside that original circle. Or, using the invert radial filter Lightroom option, the effect can be applied within that circle.
With extra tools like the brush and range mask, the tool can even work beyond just a simple circle or oval.
The radial filter can be used to create a number of different effects. Lightroom has tools for creating or eliminating a vignette. The radial filter tool allows for a more custom vignette to be added to a photograph.
The tool can also be used to draw more attention to an area of the image by creating a sharper or more vibrant area of the photograph.
The possibilities are nearly endless. These include creating a spotlight-like effect, to brightening the subject but not the background, ‘turning on’ lights that are off in the photograph, and many more effects.
If you want the effect to be applied only to a circular or oval portion of the image (or only outside that portion), then the radial filter should be your go-to tool.
Before using the Lightroom radial filter, you should understand how it works. First, the effects sliders are applied to the area outside the circle, not inside.
That, to many, seems counterintuitive. If you want to affect only the circle of the image, you can invert the filter with a simple checkmark.
Second, the radial filter uses many of the same sliders found when editing a completed image, only those effects aren’t applied to the entire image anymore. Finally, Lightroom has a few tools to adjust exactly where the effect falls in the photo.
To use the Lightroom radial filter, all you need is the Lightroom software, a computer to run it on, and a photo to edit.
How to Use the Lightroom Radial Filter Tool
1. Start by Adding the Radial Filter
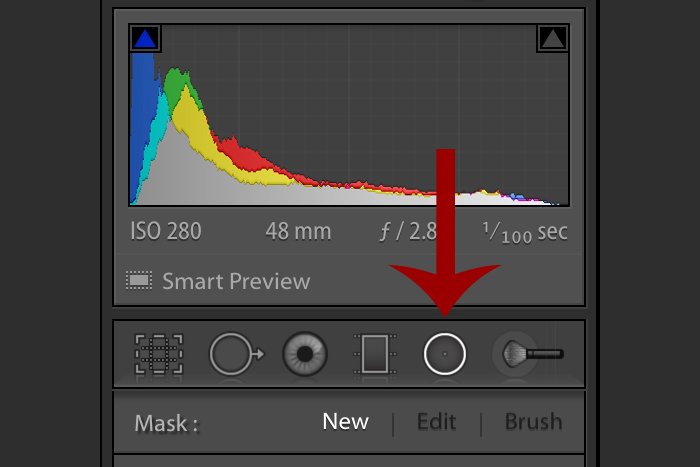
Lightroom’s radial filter tool is located inside the Develop module, in the tool panel that’s just underneath the histogram.
In the current version of Lightroom, the radial filter is the fifth tool from the left. It is designated by a simple circle. Do not confuse the radial dial with the healing tool, which is a circle with an arrow.
The same tool can also be accessed via the keyboard shortcut. Hit shift and M inside the Develop module.
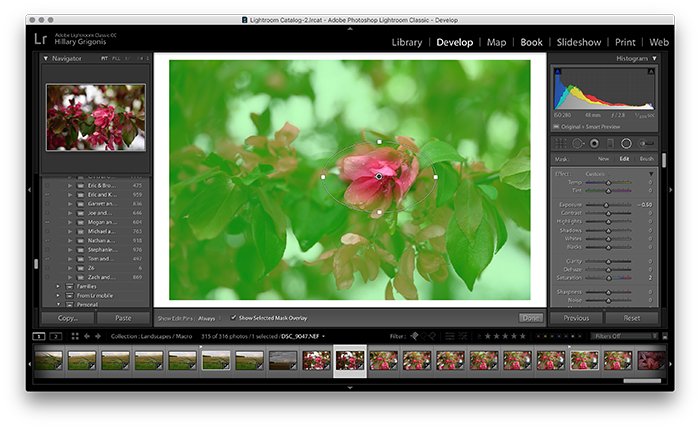
Once the radial dial is selected, the cursor turns into a plus icon that will draw the circle over the area of the image to adjust.
Click on roughly the center of where you would like that circle to go. Without letting go of the mouse button, slide the cursor back to increase the size of the circle.
If you’d like a perfectly round circle, hold the shift key while drawing the circle.
2. Fine-Tune Where the Adjustment Will Be Applied
The circle area isn’t set in stone once you let that mouse button go. After drawing the circle, click and hold on the middle dot to drag the entire circle to a different part of the image.
To adjust the size and shape, click on one of the four squares on the outside edge of that circle and drag to reshape, or use the shift key to resize without affecting the original shape.
The shift key will create a perfect circle when drawing the radial filter. Once drawn, the shift key will allow the circle to maintain the current shape to resize instead of stretching one side.
To see what areas of the image are affected by the tool, check the “show selected mask overlay” box or use the “O” keyboard shortcut to see the areas affected highlighted in red.
To change the color of the shortcut — such as when your image contains a lot of red and the mask is difficult to see — use shift and O at the same time.
By default, the effect will be applied to the outside of the circle, not the inside.
You can keep that in mind as you edit. You can darken the exposure when you really want to lighten the subject. Or you can invert the mask if it’s simpler to think in terms of the inside of the circle being affected.
To invert the filter, simply check the box at the end of the tool that says invert.
You can further adjust where the effect is applied by using feathering. Like with other tools, feathering photos adjusts how quickly the adjustment falls off.
No feather would leave a hard line between the edits and not edited. A large feather would subtly blend the effect in.
To adjust the feathering, use the slider towards the end of the radial mask section.

3. Add in the Effects
Time to get creative. The Lightroom radial filter can be used to build a number of different effects all through the various slider options. Use the sliders in the tool section to lighten, darken, add sharpness, adjust saturation and more.
Most of Lightroom’s various slider tools are available as part of the radial filter, from white balance to sharpness.
You can also use your brush presets by choosing from the effect drop-down menu. Lightroom includes a dodge and burn preset that can be used for both brushes and the radial filter.
The exact edits will depend on what you’d like to adjust with the tool. For a vignette, move the exposure slider to the left.
The tool isn’t limited to a single slider at a time. To make an unlit lantern appear to be on, for example, you’d use the white balance and exposure slider to make an orange glow.
Remember, Lightroom is a non-destructive photo editor, so there’s nothing to lose except for perhaps a few minutes of your time by experimenting. Double click on a slider to return the value back to zero.
You can also continue to fine-tune the size, placement, and feathering of the radial filter. And if you want to delete the entire radial filter, just hit the delete key with the center of the filter selected.
You can also add more than one radial filter. Tap on new at the top of the tool panel, instead of the edit option.
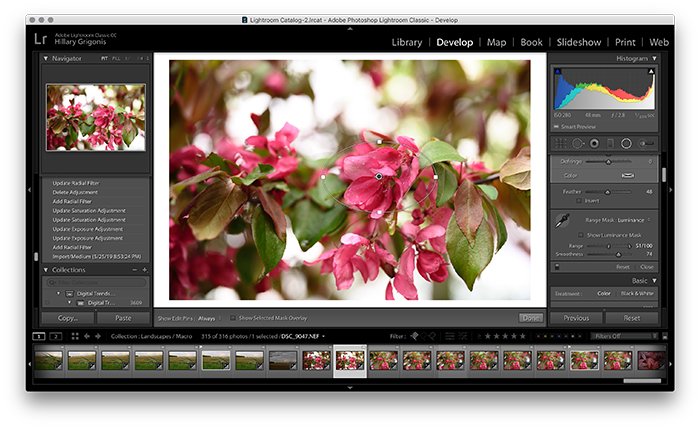
4. Optional: Fine-Tune With the Range Mask
While the radial filter works best for circular (and oval) effects, Lightroom has a few tools for going beyond that circle. The range mask tool allows you to select a color or brightness to apply the effect only to that area.
Lightroom still applies the adjustments to the colors or brightness outside the circle by default. Use the inverse tool to work within the circle.
To select only the colors outside (or inside, using inverse) the filter tool, choose colors from the range mask drop-down menu, which is set to off by default. Then, click on the eyedropper tool next to the range mask.
Holding the shift key, click on as many colors in the image that you’d like to include. The adjustments made to the filter will now only apply to those selected colors.
You can use also the luminance range mask, which limits the effects based on the light or dark areas of the image instead. With the luminance option selected from the range mask drop-down menu, narrow the range that’s selected using the range slider.
If you move the point that’s to the left towards the center, Lightroom will exclude the darker areas of the image. Moving from the right, Lightroom will work on only the lighter spots of the photograph.
Use the smoothness slider to adjust the transition between those lights and darks — right for a smoother transition, left for a more abrupt one.
If you decide you don’t like the range mask effect, just go back to the “off” option in the dropdown menu.

5. Optional: Use the Brush Tool for Exact Fine-Tuning
For subjects that are mostly, but not quite round, try using the brush tool to fine-tune the mask. This option is great for adjusting the shape even when the shape doesn’t include all the same color or luminance values.
At the very top of the radial filter options where it says new, edit and brush, select brush. This turns the cursor into a brush to paint the effect into areas of the circle excluded from the adjustments. Or outside the circle, if inverse is selected.
With the brush option selection, options to adjust the size, feather, and flow show up at the bottom of the radial mask panel. Now, click over the areas of the photo where you’d like to add the effect.
You can also erase parts of the mask. Right above the brush options, instead of selecting brush A or B, choose the erase option.
You can erase the mask from any area of the image just by painting over it with the cursor.
Conclusion
The Lightroom radial filter makes it easy to make local adjustments on only circular areas of the image. With the brush and range mask tools, the tool even works for adjustments that aren’t perfectly circular.
Using Lightroom’s range of different options for the tool, the radial filter simplifies many different types of photo edits, from dodging and burning to adding a vignette.
For more great Lightroom tutorials, why not check out how to use the texture control slider or split toning next!