
Night landscape photography can be challenging to get right straight away. Most photographers find the difference in available natural light difficult.
But with the right knowledge, you’ll get the hang of it in no time. Continue reading for all of the tips and tricks you need to master nighttime landscape photography.


Astrophotography vs Night Landscape Photography
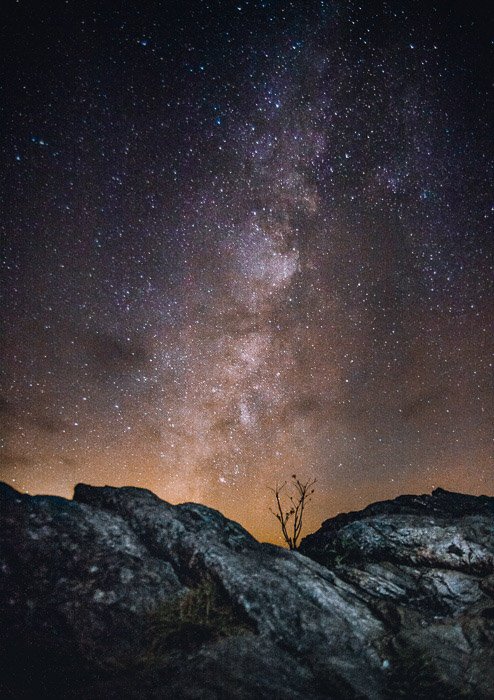
When I talk about “night landscape photography,” I mean shooting the starry sky with nighttime scenery. I do not mean astrophotography.
Astrophotography has its own set of challenges. But I still consider it easier than shooting night landscape photography for one simple reason. Exposure time is not an issue.
What makes night photography so challenging is the nighttime landscape. Following the stars blurs the landscapes. Following the nighttime landscapes will blur the stars. To record stars as fixed points rather than trails, you are forced to use a short exposure time.
How to Escape Light Pollution
It’s becoming more and more difficult to find a really dark sky. This is due to increased light pollution. It comes from city lights almost everywhere across the world.
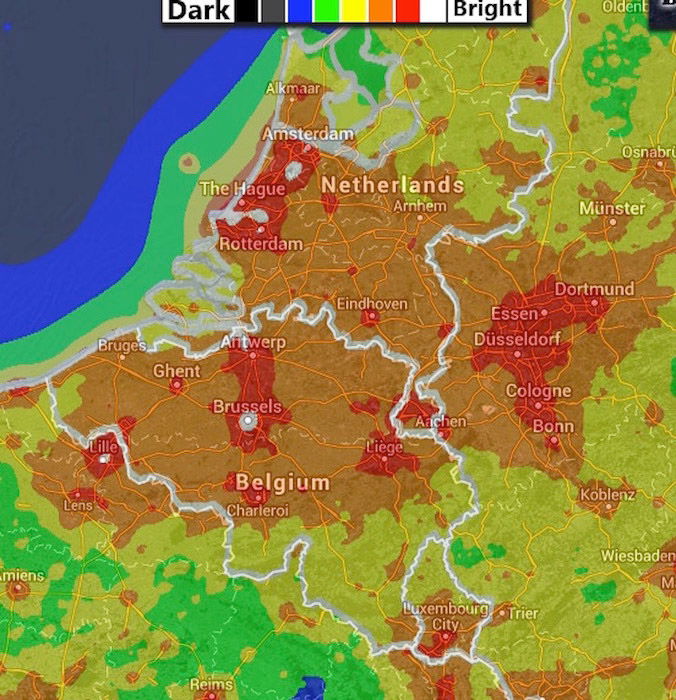
The best thing you can do is to travel as far as possible from large cities and towns. Look for dark countryside. To get an idea of the light pollution in the world, visit the Light-Pollution Map website. There you can also see how light pollution has changed over the last five years.
I live in Belgium, under one of the most polluted skies in Europe. Even when I travel far away from the major cities, the darkest sky I can achieve will score a 5 or 9 on the Bortle scale. Still, as we will see, there is hope. You can capture satisfying night landscapes, even in light-polluted locations.
What’s the Best Location for Nighttime Landscape Photos?
Unfortunately, the universe is quite indifferent to your photography needs. Which stars and how much of the Milky Way you can see depends on the time of the year. It also depends on your location on Earth.
In the Northern Hemisphere, the galaxy core is visible in the night sky from April until late September. How much of it you can see, and its height above the horizon will depend on your latitude. The closer you are to the Equator, the better.
Moving north, the core becomes lower and lower in the sky until it reaches a point just above the horizon. This is where the orange glow from light pollution is at its max.
During winter, the nights are longer. The core appears below the horizon, visible from the Southern Hemisphere only.
There are plenty of websites and mobile apps that calculate the location of the core. They will let you know in advance if, when, and how much of the core you will see from a given location.
You should also focus some of your attention on the nighttime landscapes. A good location isn’t only about the stars but also the nighttime scenery you will include.
Gear and Camera Settings for Shooting a Perfect Night Landscape
If you are on a budget like most of us, fear not. You will still get plenty of amazing shots of that majestic starry night. You just have to follow some simple rules.
Gear does contribute to amazing shots. It’s not all about it, but it does play a role. The night landscape image comprises planning, composition, editing skills, and gear.
Here are the things you need to be able to wet your feet in night photography.
Camera
Full-frame cameras are the best here. This is because of the low noise at high ISOs. But modern APS-C or Micro Four Thirds cameras work too.
Let’s be honest here: you can take amazing shots even with one of the latest high-end compact cameras. Make sure it’s sporting a wide, fast lens and a 1-inch sensor.
There is much more than “pixel” quality when it comes to making a photo a good photo. More important than the sensor size are the following:
- The possibility to shoot in RAW
- An in-camera long-exposure noise reduction and good performances at moderate ISO
- Remote trigger for the shutter and an intervalometer
- Bulb mode
- Decent battery life (or allow for using a battery grip)
For compact cameras, you need a wide and fast lens as well as manual focus. Some form of focus peaking or live view magnification is a nice feature. It will help you to focus properly on the stars.
Lenses
The most important feature of a good lens is the “speed.” An aperture in the f/1.4 to f/3.5 range is a “fast” lens. That’s because the aperture is big and lets enough light in to use a fast shutter speed.
It should allow you to focus manually. And it should have good optical performance such as sharpness, vignetting, chroma, and astigmatism when used wide open.
As for the choice of the focal length, for night landscape photography, the wider, the better. I would not go longer than 50mm on a full-frame camera. And the option to mount filters is a plus.
Tripod
Let’s be clear here. You cannot shoot a night landscape without a tripod. You will need a sturdy one to avoid camera shake.
A good choice is one that allows you to shoot from down low to up above your head. This will give you maximum flexibility when composing your shot.
A loop or hook where you can attach a weight can be beneficial. This will help stabilize the tripod in windy conditions. These are common in coastal and mountainous locations.
Other materials:
- Spare batteries
- Spare memory cards
- Remote triggers
- Headlamps (with a red light to keep your eyes in “night mode”)
Filters
Yes, filters. This is an important lesson on how to shoot at night to get the image you want.
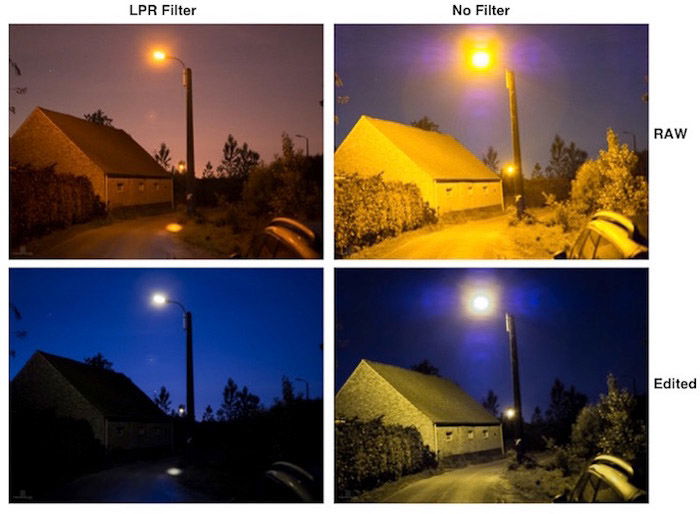
These are by no means a substitute for a dark sky. But filters can help fight the evil orange glow present due to light pollution.
Here is the transmission spectrum for my Skywatcher LPR (Light Pollution Reduction) filter. See where the line drops? The filter will absorb that wavelength of light and will not reach the sensor.
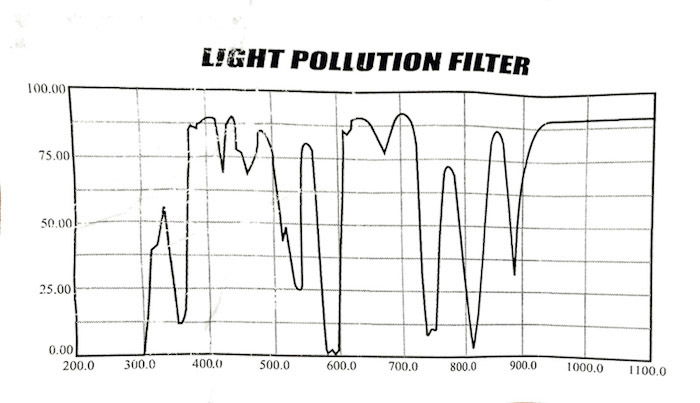
In short, the filter will reduce or remove lights of specific wavelengths and prevent that light from hitting the sensor. You can’t create this in editing software. These filters are worth investing in if you live in a light-polluted area.
All filters will reduce your exposure by 1 stop. A good LPR filter will reduce the pollution from sodium lamps by about 4EV and about 2EV from mercury lamps.
This allows for longer exposures (or increased ISO). But you won’t burn the highlights or the sky above the horizon in your night photography.
The images below show two examples. The images are straight-out-of-camera with and without the Skywatcher LPR filters.
Because LPR filters are broadband filters, they’re unable to reduce moonlight. To achieve this, a better choice would be an H-alpha filter or another narrowband filter.
These are interference filters, like the polarizer. This is one negative aspect. They will produce nasty color banding in the photo when mounted on ultra-wide angles. This is because of how they affect light entering from different angles.
My Gear
To give you an idea of my equipment at the moment, I am using the following gear:
-
- Olympus OM-D EM-10
- Samyang 7.5 f/3.5 UMC fisheye (Micro Four Thirds) – 15mm on full-frame
- Samyang 12 f/2.0 NCS CS
- Sony DSC-RX100 Mk2 | 28-100mm f/1.8-f/4.9 on full-frame
- Peak Design Travel Tripod
- Spare SD memory cards and batteries
- Remote shutters with an intervalometer
- CLS and LPR filters
Simple Night Sky Photography Rules to Remember
There are a few simple empirical rules to learn so you know how to properly look at the night sky. As I mentioned above, stars move across the sky at about 15 degrees per hour.
If you’re not interested in recording star trails, your exposure time should be short. But how short should it be exactly?
A simple way to estimate what the exposure time (ET) should be is to solve the following equation:
ET = N / ( CF * FL )
N (the detail in which your image will be displayed) can be 400, 500 or 600. CF is the crop factor for your camera. And FL the focal length of your lens. The choice of N depends on what you want to do with your photo.
For a website, go with N=600. You will get short trails with the stars appearing as dots in a small image with a low resolution. Do you want to print your photo in large format? Go with N=400, and you will have pretty much no trails at all.
I tend to use N=500 as I find it to be a good compromise. For example, for my Olympus EM-10, the CF=2, and I have the following max ETs for the following lenses:
1) Samyang 7.5 f/3.5, ET = 500 / ( 2 * 7.5 ) ~ 33 sec.
2) Samyang 12 f/2, ET= 500 / ( 2 * 12 ) ~ 21 sec.
If I used my old Zuiko 50mm f/1.4, my exposure time would be just 5 seconds. This is why telephoto lenses are less useful than wider ones.
Once you know your ET (exposure time), work with the ISO to expose your photo correctly. Keep an eye on the histogram.
A good starting point is given by using an ISO value calculated with the following equation:
ISO = (6000 * f 2) / ET
Here, f2 is the f-number (aperture value) squared.
Let’s take my Samyang 12mm f/2.0 on my Olympus OM-D (CF=2). With an ET of 21 seconds, a good value for the ISO should be ISO = 6000 * (22) / 21 = 1142, rounded up to ISO 1150.
If, say, the aperture was set to f/4.0 instead of f/2.0, the ISO would need to be: ( 6000 * (4.0 2) / 21, OR ( 6000 * 16 ) / 21 = 4571.
With digital sensors, it is better to expose to the right (ETTR) of an image. Overexpose it a bit to register the maximum amount of data possible in the camera. Then correct the exposure in post. This way, you don’t lose out on detail.
Another welcome effect of the ETTR method is that there will be less digital noise due to the high ISO settings. Underexposing overexposed photos results in considerably less noise in the final image. Don’t increase the exposure of an underexposed one.
Don’t be afraid to use high ISO settings (3200 and above) if that’s what you need. There are methods for dramatically reducing digital noise in post.

How to Get the Best Night Landscape Shot
What to Do Before Heading Out
1. Make a checklist: you don’t want to arrive at the location and discover you are without batteries or memory cards.
2. Find the location: if you have no idea where to go, start looking at one of the light pollution maps available online. Find a dark region. Use social networks such as G+ or photo-sharing websites like Flickr and 500px. You can see if there are any worthy night landscapes within your chosen dark region.
Use Google Maps. Move around and zoom in and out to see if anything catches your attention. Once you have a location, learn about it.
Is the sky dark enough? Are there major cities visible or nearby? Will the Milky Way and the galaxy core be visible from that location, and at what time? In which phase will the moon be? What will the weather be like?
You can answer all these questions from the comfort of your couch long before you head out. Use apps and software such as Dark Sky, Stellarium, Skywalk, PhotoPills, PlanIt! for photographers, and The Photographer’s Ephemeris.
Look up the latest weather report, the forecast, and a moon calendar on the internet. Most software and apps cannot show you the real horizon. Be careful when determining whether the galaxy core will be visible.
3. Know your lens’ field of view: this is important if you plan to shoot for panorama stitching. It enables you to rotate the camera at night, relying on the graduated scale on the head of your tripod.
4. Know where the infinite for your lens is: in broad daylight, manually focus your lenses to the infinite. Mark the position on the lens barrel. More often than not, the factory mark for the infinity is off. Doing this during the day avoids wasting time struggling to do so in your dark location.
5. Clean your lenses: another job that is better to get done in daylight and at home.
6. Arrive early at your destination: so as to be able to explore the location in daylight. Look for possible compositions to create great daytime landscapes. Use the night augmented reality in apps like PhotoPills. You can preview how the sky will appear for the chosen night landscape composition.
Composing the Shot
It’s just like daylight landscapes. You can follow or break the composition rules. The only challenge you have here is lighting the landscape in front of you with limited focal lengths. Long telephotos will reduce your exposure time, as discussed above.
Framing an interesting composition with the Milky Way (or the Polar Star) is not hard. It’s like including the sun at a particular point in the sky in a daylight landscape. All you have to do is wait for the right period of the year and time of day.
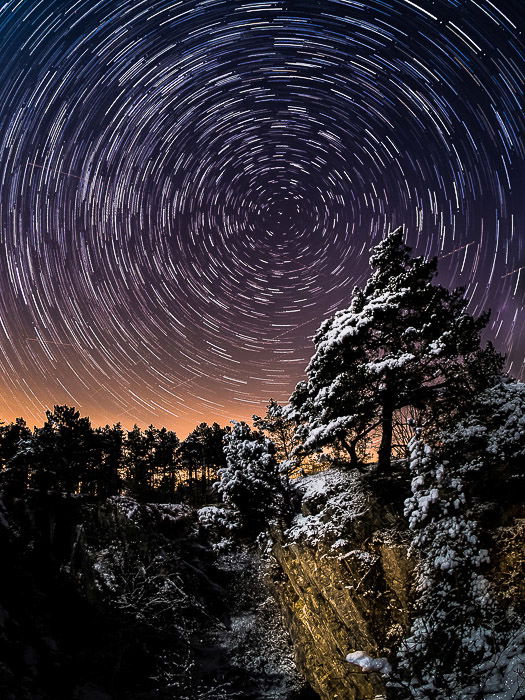
If you are composing your image with star trails in mind, here’s a good rule of thumb. Try to have Polaris (northern hemisphere) or Sigma Octantis (southern hemisphere) in the frame.
Trails will appear as concentric circles centered on these stars. Star trails will look different depending on what direction you’re pointing your camera in.
You may want to experiment a bit to work out which kind of trails will best suit your composition. Another thing to consider when composing your shot is the following
A magnificent sky with a pitch-black landscape as a foreground tends not to work unless you are aiming for a silhouette against the sky.
You’ll want to avoid a pitch-black or dark and very noisy foreground. Try to shoot when you have a low to moderately bright moon above the horizon. It should be low in the sky and behind you. This lights the foreground and the scene in front of you.
Or you may want to consider bringing some lamps or flashguns with you. This allows for light painting or making the foreground visible.
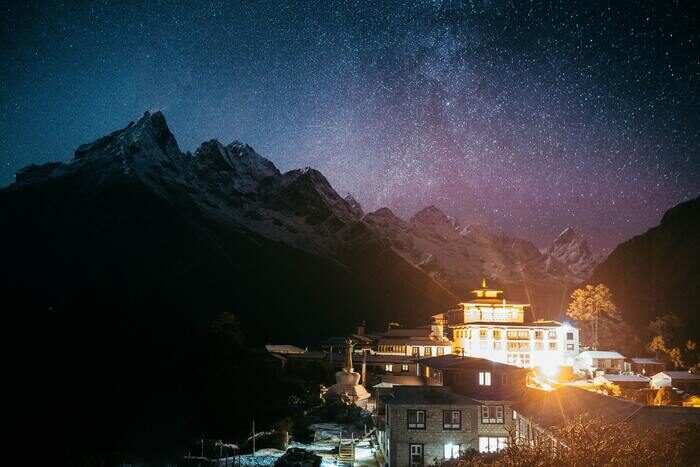
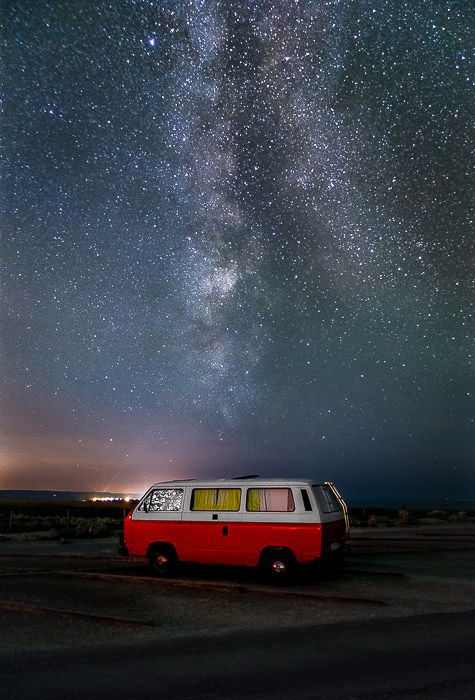
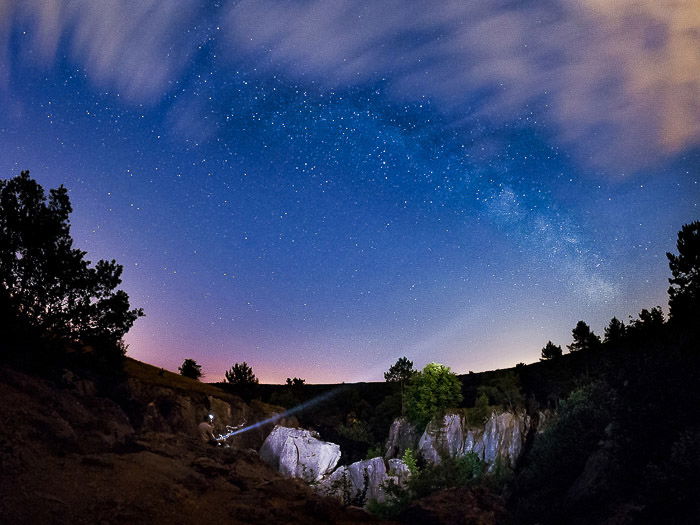
One way to frame more interesting landscapes is to exploit objects in the foreground. Those can fill the frame, adding interest. Try using isolated trees, mountain peaks, vehicles, buildings, roads, or rocky formations.
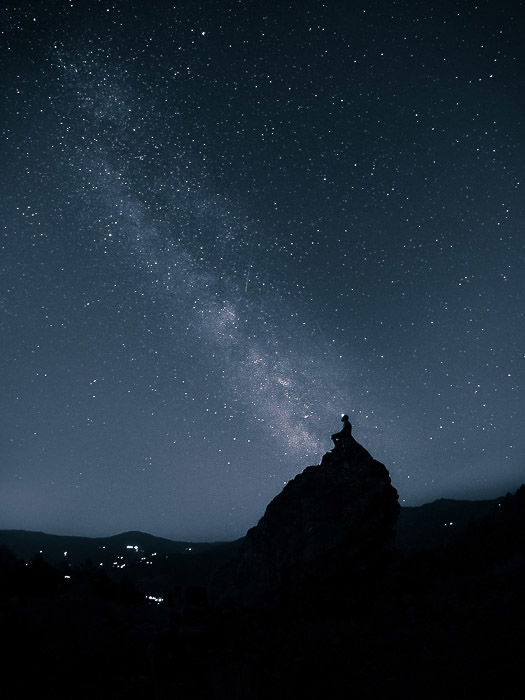
Or introduce some objects in the frame. This will stage a more eye-catching landscape at night. Consider placing tents lit from the inside, or include a person in the frame, either as a silhouette or holding lights pointed at the sky.
You can also light a campfire or create light trails by driving a car into the scene.
Sometimes, you can improve an image by intentionally allowing some movement in the sky against a fixed landmark.
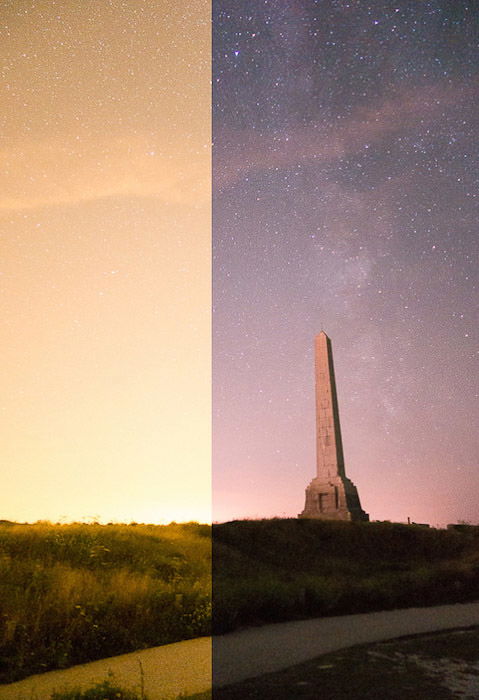
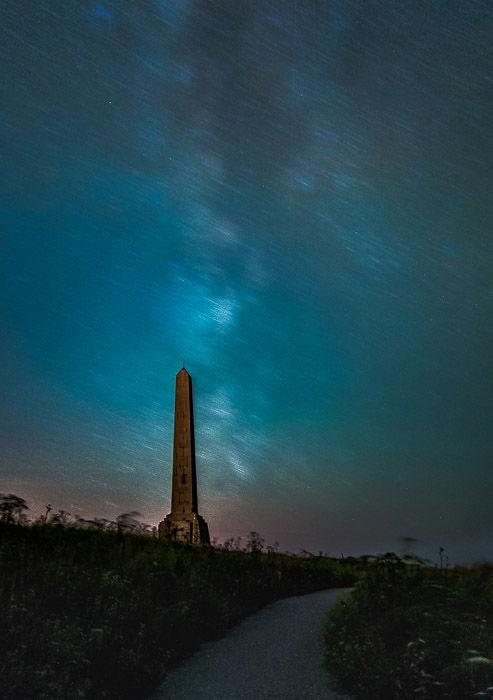
I was in Cap-Blanc-Nez, France, at a time when the Milky Way was behind the obelisk. I shot ten photos of the same scene in order to do some multi-frame noise reduction (MFNR) for my final image. As I said, since I had a fixed landscape, MFNR required me to create two stacks and process them individually. This was to account for both the landscape at night and the sky.
I always start by applying MFNR to the landscape. The Milky Way and the stars showed some degree of motion blur. In the end, I decided that the image with the blurred yet recognizable Milky Way was a lot more powerful than the image without a blurred sky.
How to Shoot Different Types of Nighttime Landscapes
Before you begin, lower the LCD brightness to the minimum. This gives you a better idea of the brightness of your image and stops you from being blinded for five minutes every time you look at the screen!
Take a test shot to verify that you are using the correct camera settings for stars, that the focus is on the stars, and that the composition works. Next, decide whether you want to obtain star trails or star dots (and the Milky Way).
Star Trails
If you are shooting star trails, take a new test shot, this time several minutes long. Your image will be horribly noisy and probably overexposed. But this gives you an indication of what the trails will look like in your final image. It also shows you whether the Polaris (the South Star) is in the frame or not.
Next, make sure that you have turned off any long-exposure noise reduction. Your battery must be fully charged and your memory card empty with enough space to record plenty of images.
If only it were true that you could record star trails by shooting a single photo with a nighttime long-exposure. Only using film can do this in reality.
In practice, leaving your digital sensor on record for a very long period of time results in it heating up. This causes purple hot pixels and luminance noise, which cripple your image quality.
You are better off using an intervalometer, and taking a huge number of relatively short exposures, say 30 to 60 seconds. Then you can stack them together in post-production to give you your trails. You may want to allow a few seconds between each shot to give the sensor time to cool down.
At the end of the sequence, put your lens cap on and take a photo. This is called a “dark frame,” which you can subtract from your stacking to help suppress hot pixels in your final image.
For decent trails, you need to record the sky for at least 30 minutes. The longer you record, the longer and more defined your trails will be. So you may wish to increase this time.
To avoid draining your battery too quickly, if you do not have a DSLR with an optical viewfinder, turn off the LCD screen in favor of the smaller electronic viewfinder if possible.
The beauty of star trails is that you can almost always record them, even in less-than-ideal conditions. So long as you can see some stars up there, you’ll get star trails, even above a luminous cityscape.
A word of caution. The bright cityscape, if not darkened by the use of neutral density filters, will force you to use an exposure time of just a few seconds at best. You will have to record (and then process) hundreds of images before you get some good trails.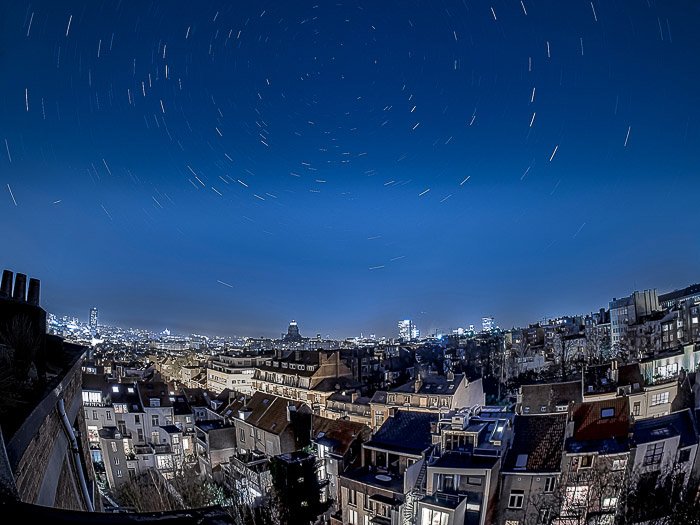
Point Stars and the Milky Way
If your aim is to avoid star trails, you need to determine your maximum exposure time. Use the 600, 500, or 400 rule I introduced above. Adjust your ISO to expose to the right of your image.
Be careful to avoid blowing out the highlights and the horizon (usually the brighter part of the sky on a moonless night).
This may result in needing to increase your ISO above a value you are comfortable with. If you’re concerned that, in doing this, you are going to ruin the image, think again.
You will more likely ruin it by keeping your ISO too low. This will underexpose your image.
Here are a few techniques you can use to deal with digital noise. You can turn on the in-camera long exposure noise reduction. Or you can use denoise algorithms available in all the major editing software and third-party plugins for Photoshop and Lightroom.
The last option is to shoot more photos and apply a Multi-Frame Noise Reduction (MFNR) technique. This is my personal favorite of the three. In a minute, I will explain how MFNR works and why you should give it a try.
Shooting Night Landscape Panoramas
There are many reasons why you may want to shoot a panorama. The most obvious is to capture a scene that you cannot fit into a single shot. You may want to take the kind of “panorama” that you could get with a wider lens because your wider lens doesn’t allow you to mount an LPR filter.
Finally, you may intend to print the image in a very large format. Panoramas can have a resolution of up to a few hundred megapixels.
I mainly use panorama because, until now, I could only use my small 48mm LPR filter on the Sony RX100 Mk2.
For shooting panoramas, it is best to allow a superposition of 30-40% between shots. You’ll do best to know the angular field of view of your lens and rotate the camera by half of this value.
Since one tends to shoot panoramas with the camera mounted in portrait orientation, you will have to consider the vertical angle of view. For example, for my Samyang 12mm on the Olympus EM-10, the vertical angle of view is 58.72 degrees. This means I can rotate the camera by 30 degrees at a time. I can do this quickly and easily using the graduated scales on the tripod head (if you have them).
One of the best tips for shooting night landscape photography is the following. Whether you are shooting star trails, the Milky Way, or a night landscape panorama, you want to shoot multiple sets of images. One with the correct exposure for the sky and one to properly expose the foreground, for example. This allows you to get the best exposure across your final image through bracketing.

A Few Tips for Editing Your Night Landscape
After photographing your night landscape in RAW format, you need to edit it.
I usually choose the white balance that best suits the image first. Then I fix the image exposure by adjusting the black and white points. Then I alter the highlights and shadows. Following this, I will make other minor adjustments, such as amending the contrast and so on. Nothing fancy.
Don’t be afraid to sharpen and micro-contrast (clarity) your sky. This makes the Milky Way and stars pop out, but be careful not to overdo it.
Sometimes you just have to accept that your location on the good Earth has not allowed you to get those incredible images of the colorful core of the Milky Way. And, no, the Universe is not conspiring against you… it is simply indifferent to your needs and wishes.
A big “don’t” is to assess the quality of your photos solely on the basis of pixel peeping. You already know that the sky will be super noisy when you blow your image up to full size. Do it to look at the improvements gained by applying the multi-frame noise reduction technique to reduce digital noise in your shots.
Multi-Frame Noise Reduction
MFNR is a great technique to both clean photos of random digital noise and increase the details. The technique consists of shooting multiple shots of the same scene. Then you average them to smooth out the random digital noise while enhancing details.
In practice, MFNR will improve the signal-to-noise ratio. If nothing moves, MFNR is straightforward. Simply stack the images as individual layers in Photoshop and blend them using either the “mean” or “median” mode.
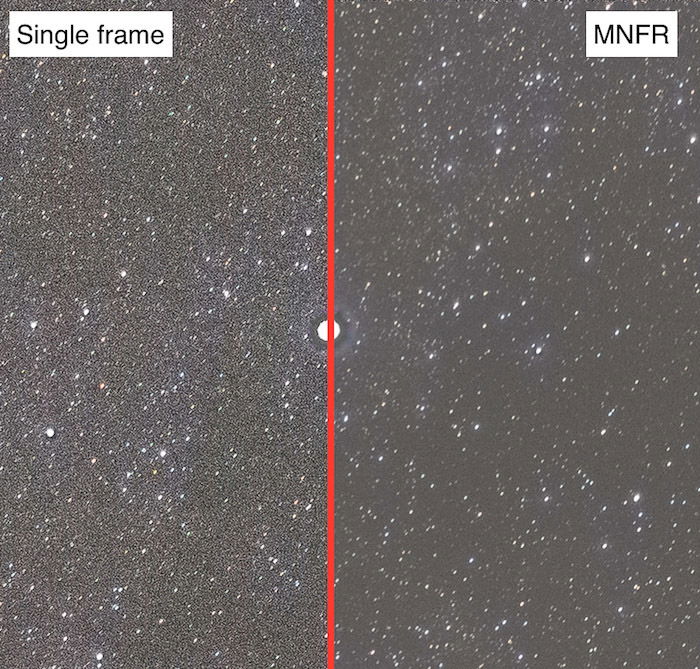
The median mode is a bit better at reducing ghosting. The improvement in photo quality is dramatic, as you can see in the comparison below.
Here, I took eight indoor shots on my Sony RX100 Mk2 at f/2.0 | 1/30 s | ISO 12,800. The photo is a 100% crop. The top half shows the image without any noise reduction, while the bottom half shows the final result after using all 8 shots to perform MFNR. I guess the results speak for themselves.
Things get a bit more complicated when dealing with objects that move in or out of the frame between the shots, such as stars. Recently, I shot a star field with my Olympus using the old legacy lens Zuiko 50mm f/1.4 (100mm full-frame equivalent).
I took 32 photos (exposure time 5 s, f/2, ISO 12,800) with the camera mounted on a fixed tripod, aimed roughly in the direction of the Milky Way.
Obviously, in the almost three minutes I needed to record the 32 images, the stars had moved quite a lot. Simply stacking and averaging these shots will result in a blurred image, as demonstrated below.
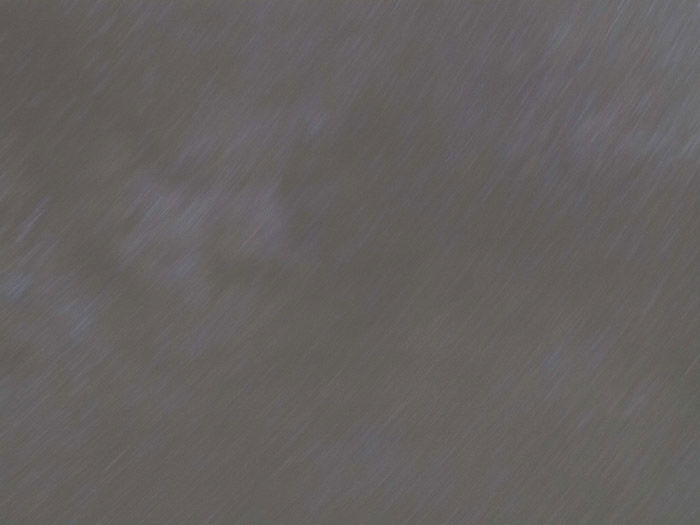
The trick is to align the stars between shots before stacking and averaging them. This can be a tedious task to perform by hand, in particular with many frames.
Fortunately, if you have Photoshop CC, you can use the auto-align function to align all frames by their content.
If your image contains enough contrast and useful details, the auto-align works beautifully. You can get a very clean image out of many high-ISO shots.
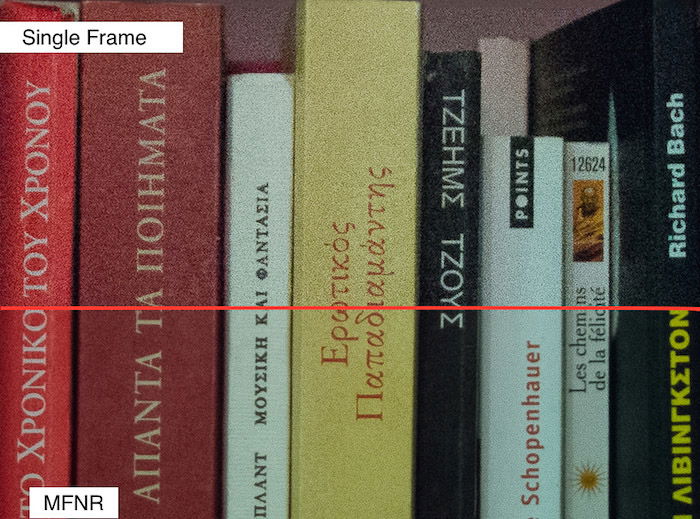
See the image below for a comparison between 100% crops of a single shot on the left versus the final image after MNFR on the right.
When the landscape, which does not move across the frame, is visible, you have an extra step in the process.
Under these circumstances, you will have to do two stacks: one for the sky and one for the foreground. Blend the two stacked and averaged images together.
Edit your night sky photos with an open mind. Sometimes you’ll find that during editing, you come across something fantastic that you can do with your image that you never considered whilst on location. Don’t dismiss this just because it’s not what you originally intended for.
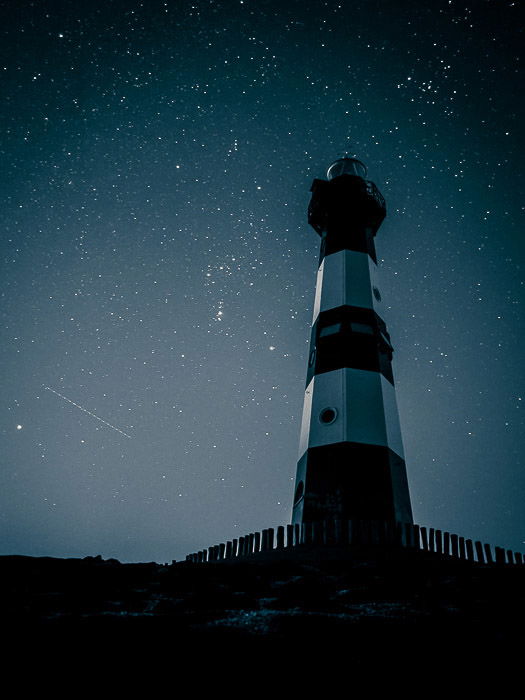
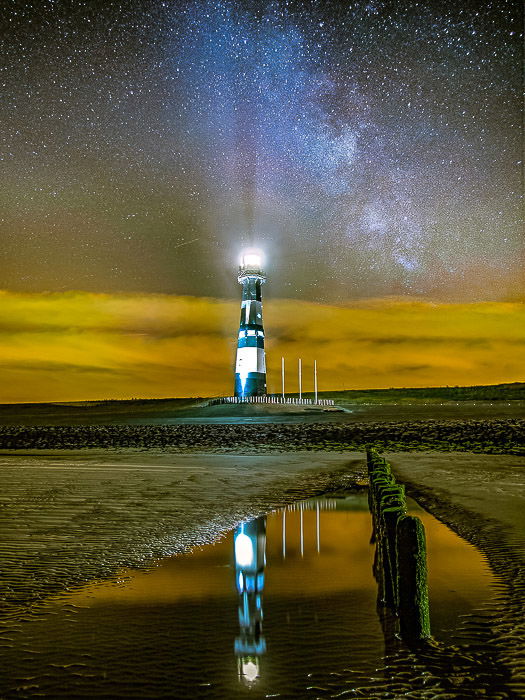
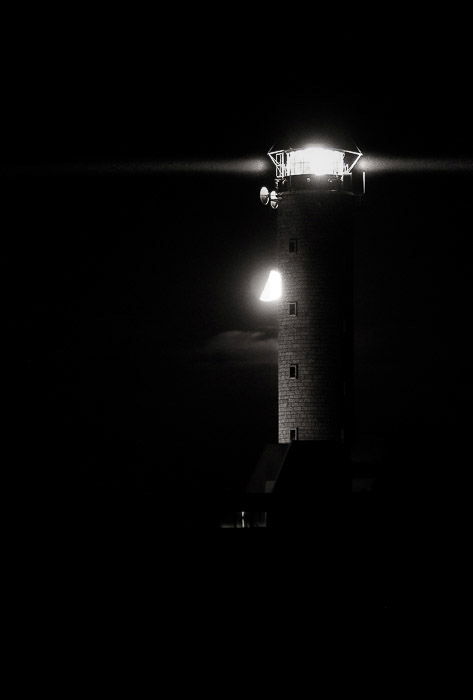
I recently went to Cap-Gris-Nez in France. I planned on capturing the lighthouse with the Milky Way next to it. Because the lighthouse was on with the lamp revolving, I wanted to capture the light beams passing out of the lighthouse.
I snapped some images of the sky, some of the foreground (for HDR), and of the lighthouse. Then I followed with a series of photos with very short exposure times to freeze the light in distinct beams coming out of the lighthouse.
Once at home, I started processing this huge volume of photos. And then, an extremely underexposed image I took for the HDR of the landscape at night came to my attention.
I could have easily turned it into a very moody, low-key portrait of the lighthouse. As I edited it with this new idea in mind, it became clear that this was how I wanted to portray the location.
Conclusion—Shooting Perfect Nighttime Landscape Photography
There’s a lot to consider when shooting nighttime landscape photography. If you’re not sure what you’re doing, it can seem impossible. But armed with the right tips, you can take mesmerizing night landscape photos!
Go out and capture the beauty of that starry night above your head!


