If you want to learn how to blur the background in Lightroom, you have come to the right place. This article will guide you through Lightroom’s easiest background blur methods.
Lightroom continues to add cutting-edge tools, allowing easier and more customizable background blur tools. This means you do not have to take your photos to Photoshop for expert levels of control. Lightroom is the best digital editing software for creating a quick background blur.
Creating a blurred background is a stylistic choice that puts all the attention on the subject in the foreground. It is useful for many reasons, from blocking our boring or distracting backgrounds to making the subject look sharper.
Background blur is created naturally in photography through a shallow depth of field. If you cannot produce this effect in the camera, you will have to do it in post-production. You may not be able to achieve it in the camera due to light restrictions or forgetting the right settings.
Background blur can completely change a photograph. It adds more depth to the image and places our subject at the front. Depth in a photograph can be a powerful tool for creating stunning images.

Adobe Lightroom now comes in two different versions: Lightroom and Lightroom Classic. Both versions have many of the same functions; what differs are the approaches to editing processes.
Lightroom favors a post-processing workflow that utilizes the cloud. This allows you to work from the same set of images on any device you want. This version also prioritizes simplicity and ease of use through a stripped-back interface. This may be easier for beginners to work through.
Lightroom Classic has an interface with which any photographer who has used the past versions of Lightroom would be familiar. It provides a wide range of features, some of which you may never need to use. You will find more in-depth controls and attention to detail in Lightroom Classic.
Both Lightroom versions produce the same results, as the algorithms for adjustments are the same. They each have the Lens Blur tools and a Brush Refinement section for greater control over your edits.
There are two different methods to blur the background in Lightroom. We will cover three different approaches. We recommend using the Lens Blur feature as it is a new and powerful tool.
Click these links below to go to the relevant section:
The Lens Blur tool is one of the newer additions to Lightroom’s arsenal. It is a powerful tool that is a great example of showing us how far digital editing software has come.
The Lens Blur tool uses AI to read our image to identify key features and depth in our photograph. This produces the fastest background blur technology Adobe has created, making the process much faster than Photoshop.
First, you want to open your image and go to the Edit panel in Lightroom or the Develop panel in Lightroom Classic.
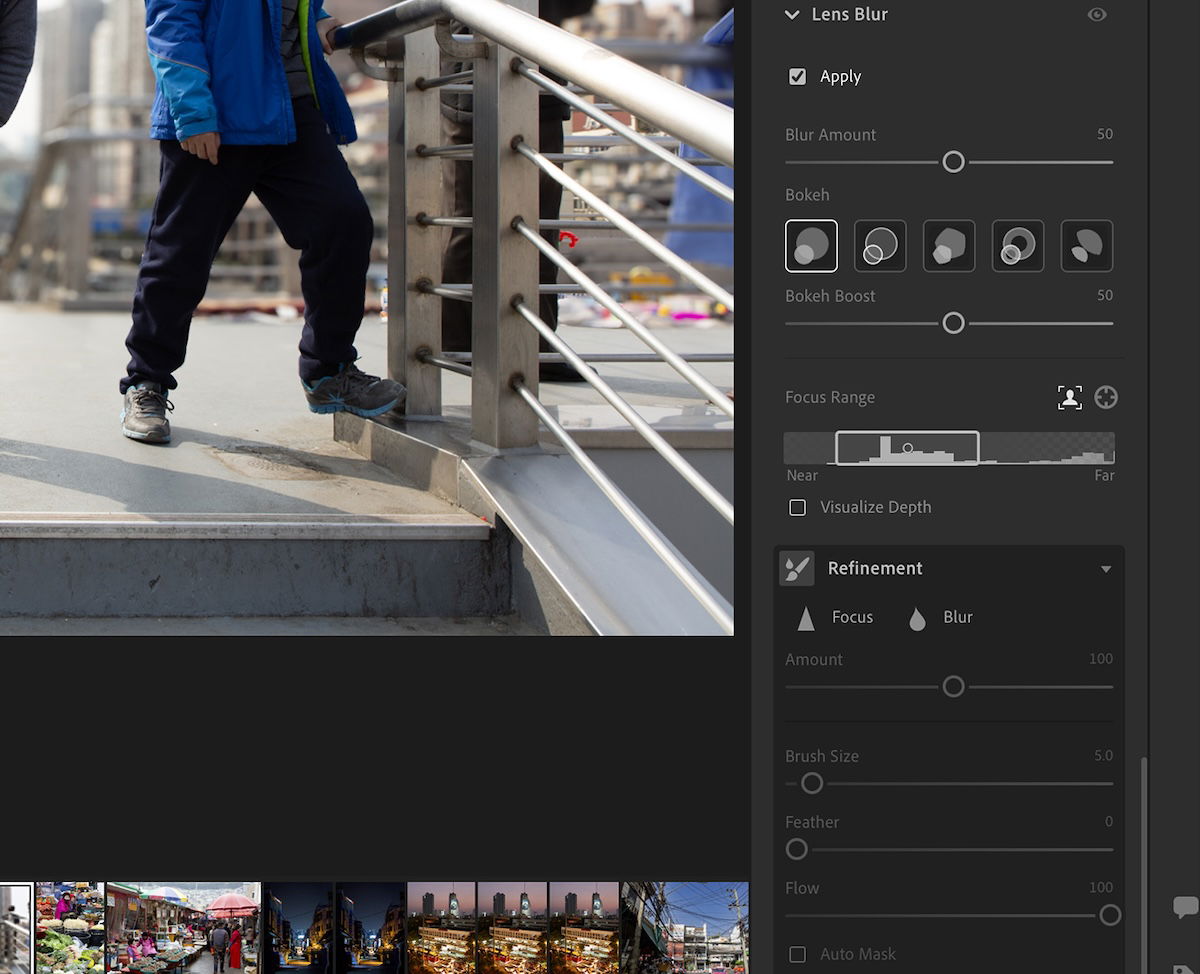
Scroll down to find the Lens Blur section. Now, click Apply. This will start the AI analyzing your photograph, which will take a few seconds.
Now, your image should have a provisional background blur applied. You can use the Blur Amount slider to adjust the intensity of the blur.


Now that you have your basic background blur in Lightroom, you can start to customise the edit.
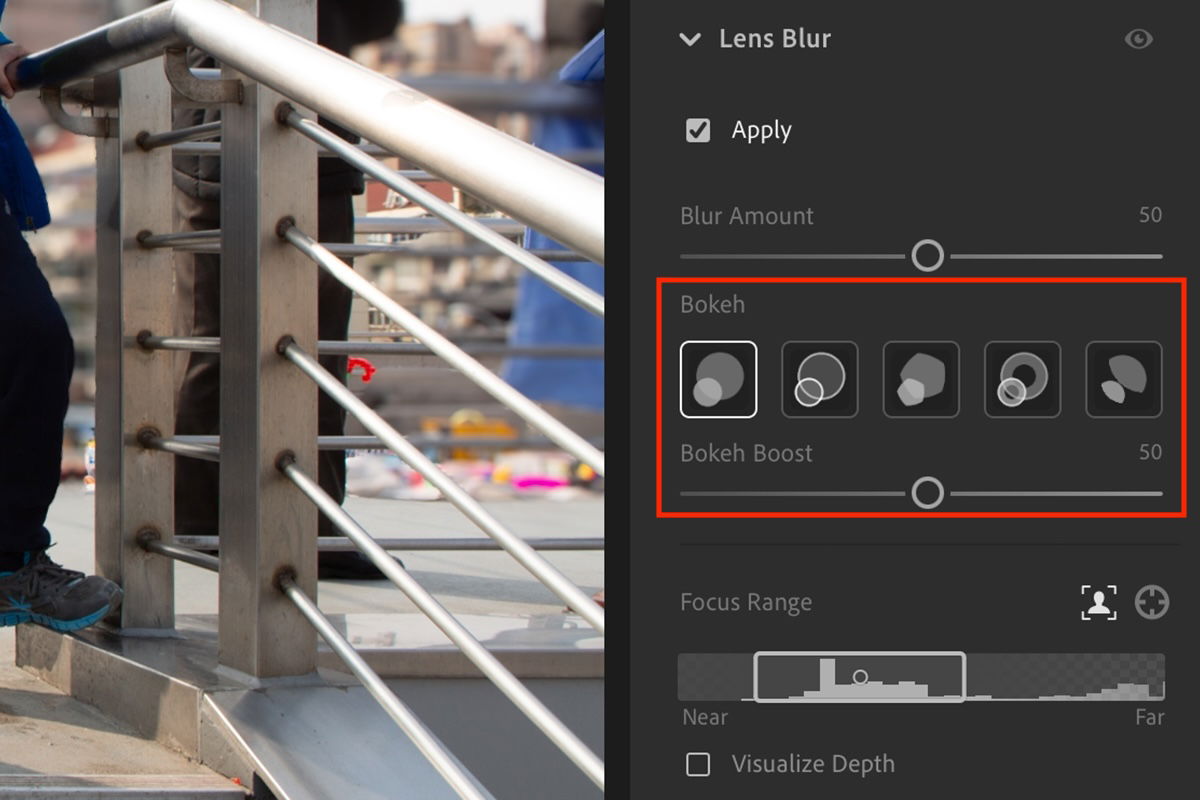
Lightroom offers five different types of bokeh to choose from: Circle, Bubble, 5-blade, Ring, and Cat Eye. These different types of bokeh simulate the effect you get from different types of lenses. Bokeh is produced by a lens’s construction and internal features.
By changing the different type of bokeh you will see how you get different types of blur in your photograph.
Underneath the Bokeh options, you have a Boost slider. The Boost slider adjusts the intensity of the Bokeh effect.


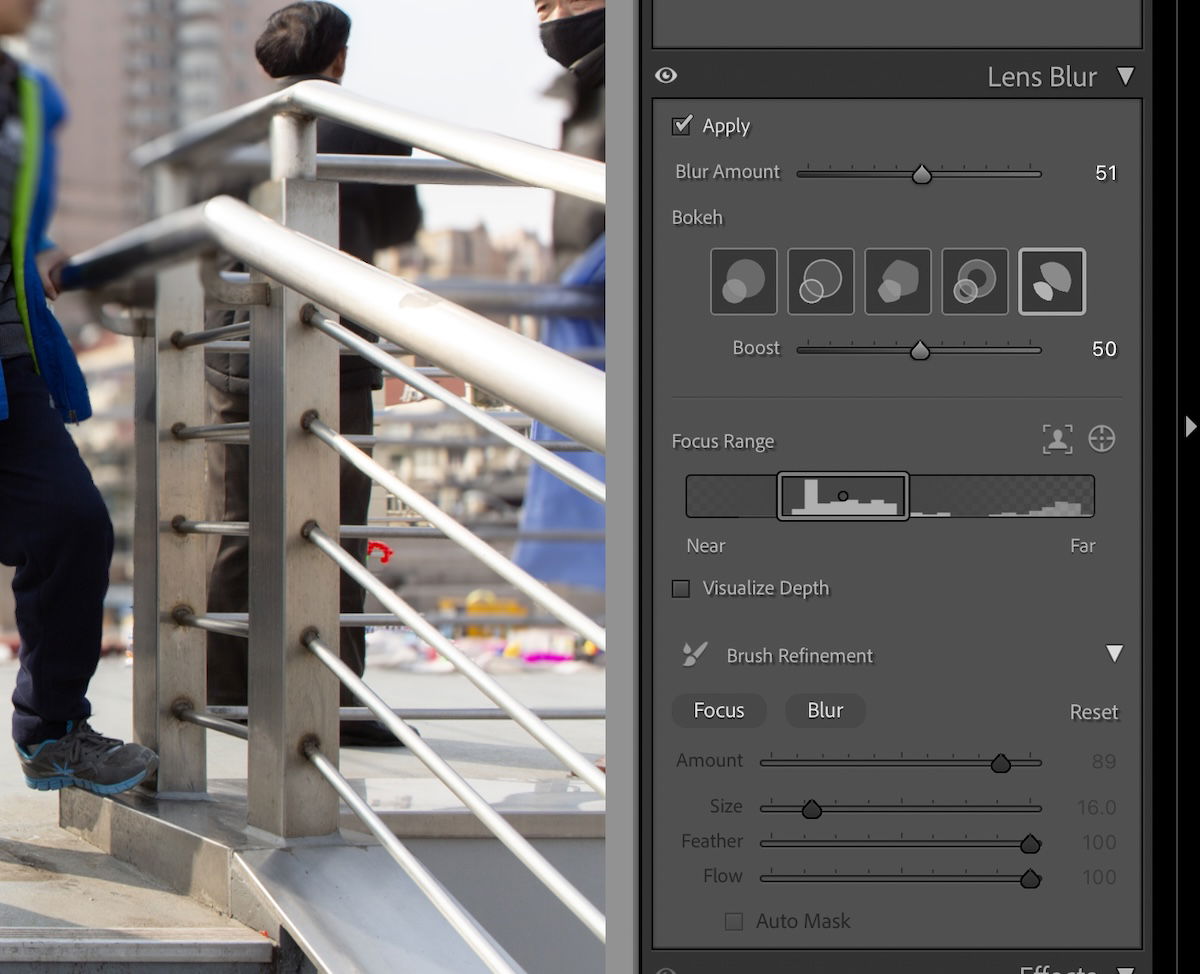
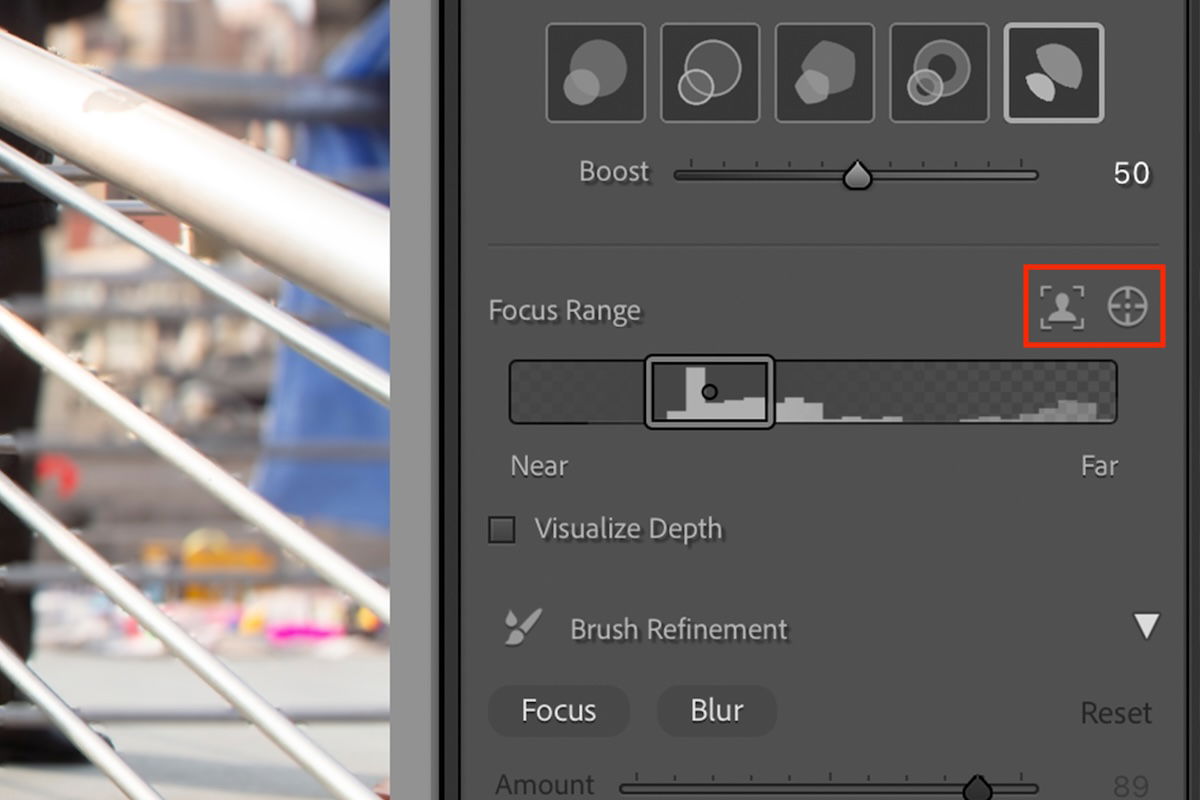
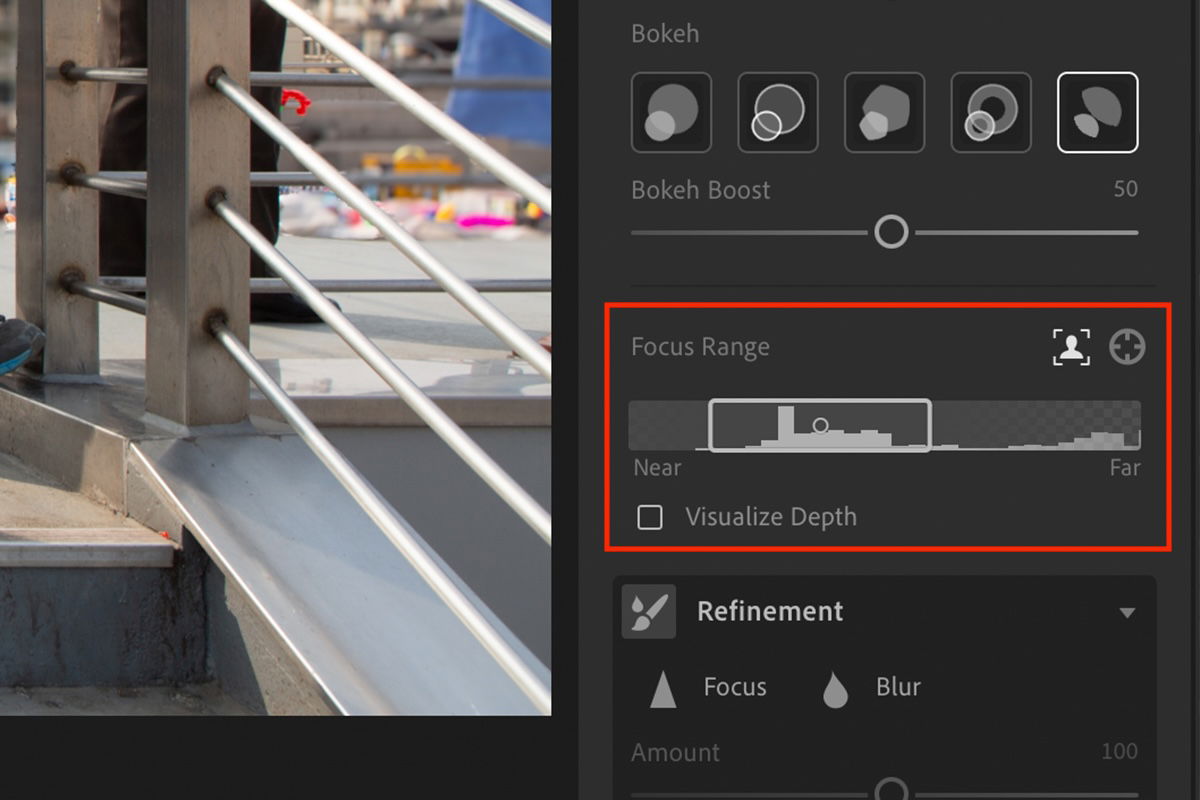
The best customizable feature comes from selecting the Focus Range. During the analysis process, Adobe’s AI calculates the depth in the photograph. The Focus Range adjustment allows you to pick the depth range that is in focus.
You can move the entire block or each end to select your Focus Range. Therefore, you can create a fairly wide or narrow focus range, deciding what works best for your image. The Focus range is Near on the left side and Far on the right side.
Lightroom features two icons to help you select different areas if you don’t want to manually do it. You will see these to the right of the Focus Range. One features an outline of a person, and one is of a crosshair.
The outline of a person is Subject Focus. This will identify the key subject in the photograph and ensure this subject is fully in focus, with the blur just behind it. The crosshair is Point/Area Focus. This allows you to click anywhere on the photograph, and it will set this area to not be blurred out.


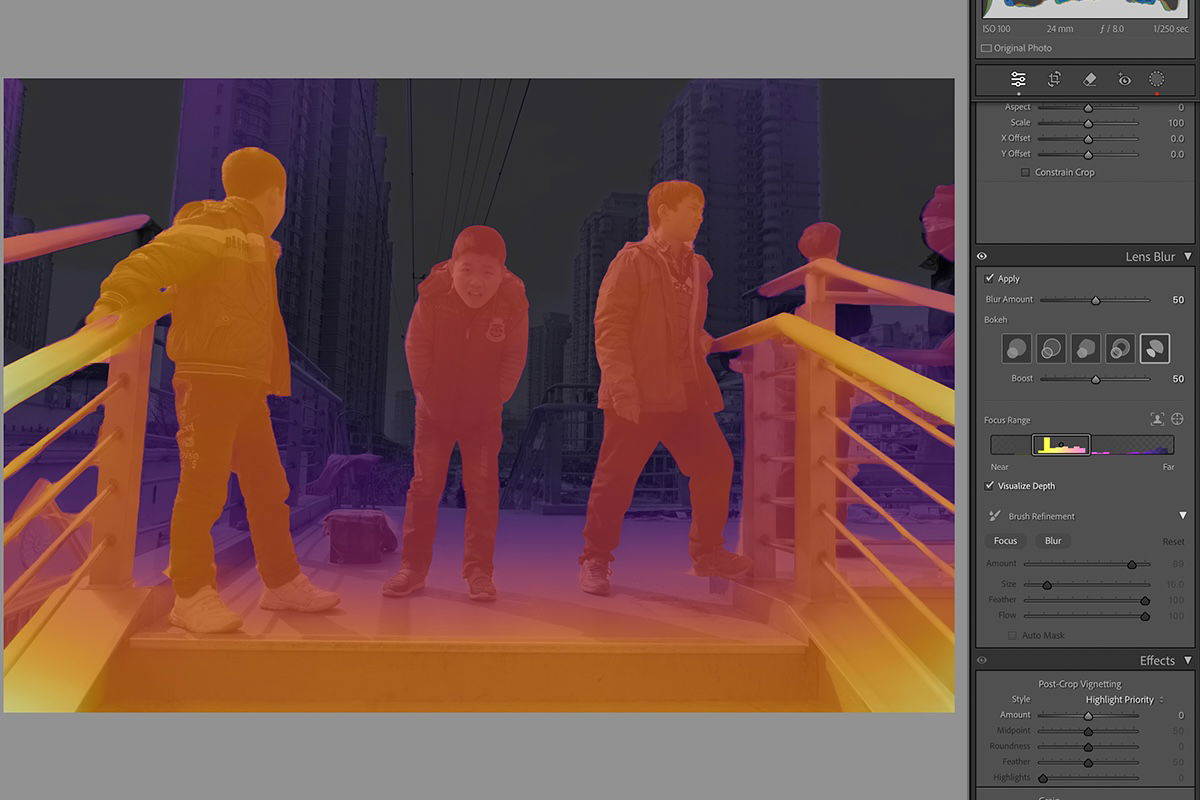
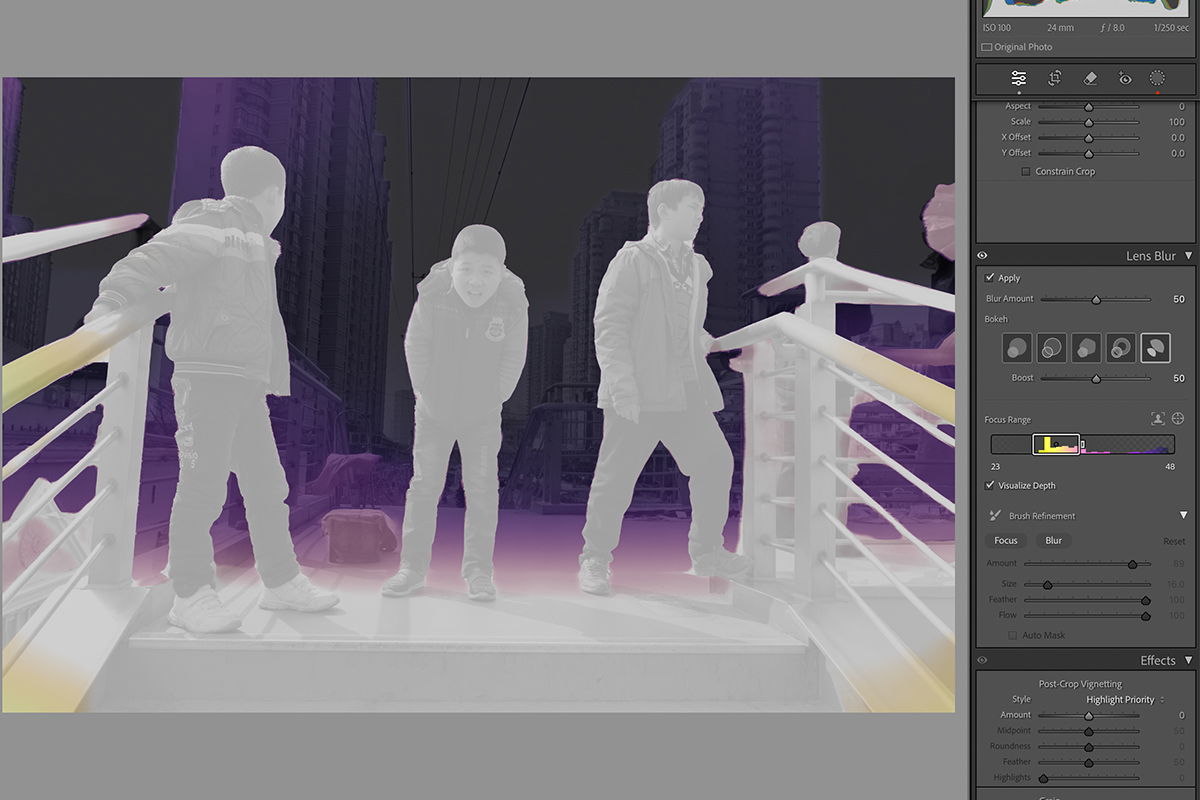
Another brilliant feature is the Visualize Depth tool. Clicking these options will provide a heat map overlay, visualizing the photograph’s depth. This is great for adjusting the Focus Range.
When you start to adjust the Focus Range areas you will notice the colours change. The areas in colour will be blurred while the white areas will be in focus. This allows you to adjust with great levels of accuracy.

Adobe understands its AI for reading depth may not be 100% accurate. To combat this, Adobe provides a Brush Refinement section in each Lightroom version for maximum control over your blur.
This Brush tool gives you two options: Focus or Blur. These options decide whether what you draw in is in focus or blurred out.
The Amount slider allows you to select the intensity of the blur. Having this on 100 will match the intensity of your options above. Using the main Blur Amount slider will also adjust this blur.
Below this, you have regular Brush controls. The Size, Feather, and Flow sliders control your brush and how it acts. With the Visualize Depth map on, you can see how your brush strokes change the depth.
This section also comes with a Reset button. This is helpful as you can always go back to the first AI edit and make a better adjustment.


Another quick and easy way to create a background blur in Lightroom is to use the Masking tools.
This does not give you as many customization options as the Lens Blur option. But if you often use masks, you may find it more convenient.
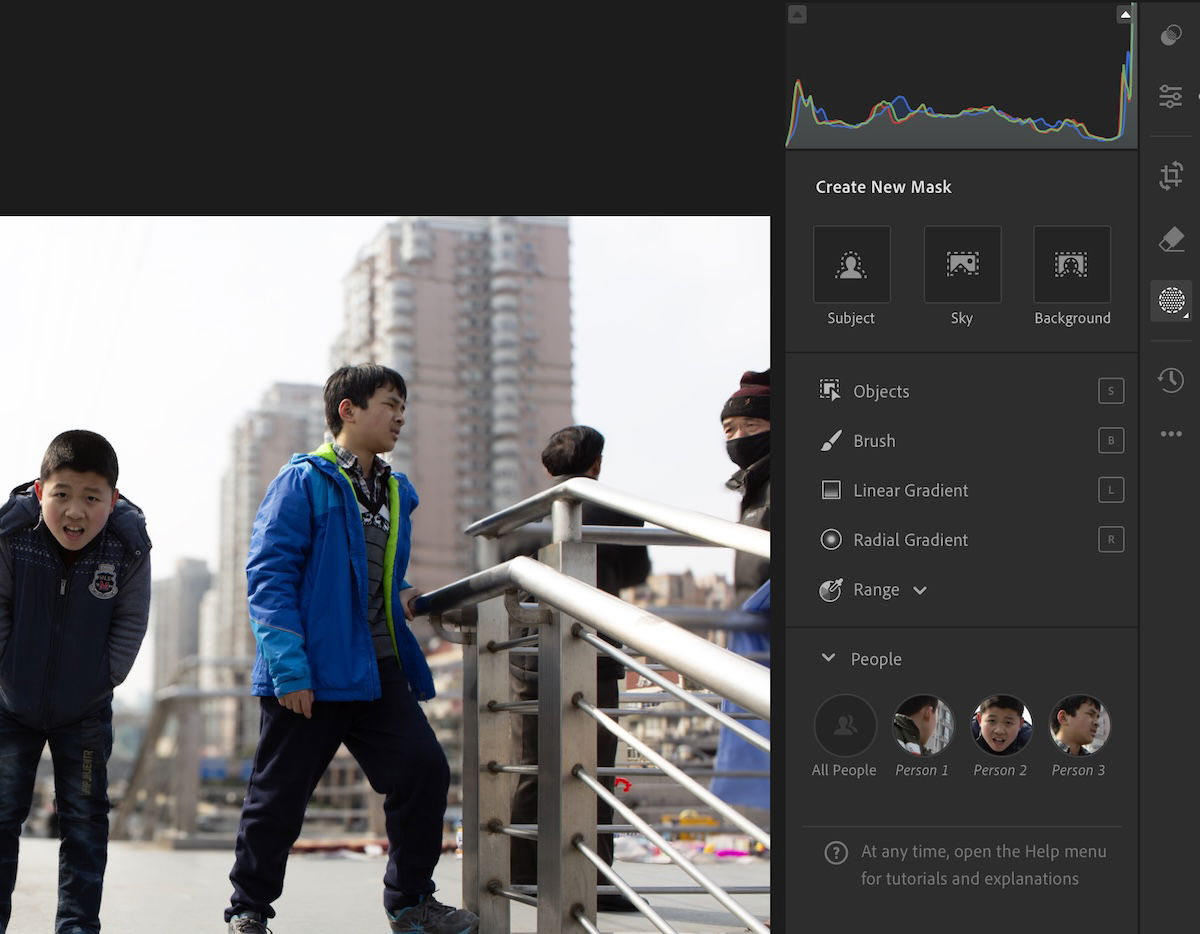
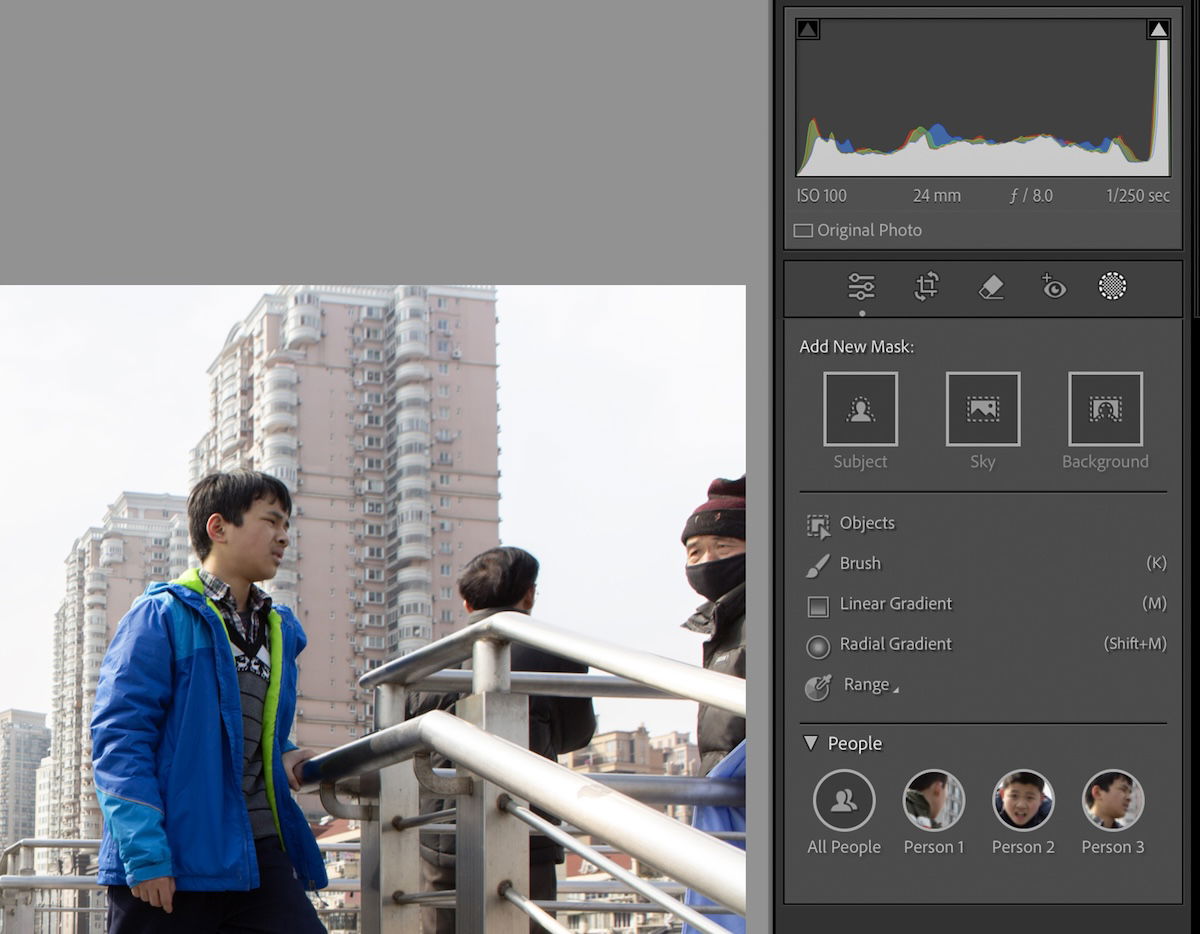
The icon for masking in Lightroom is a dotted circle with a shaded inside. You can find this in the Develop section in Lightroom Classic and below the Edit section in Lightroom.
Lightroom will present you with different AI masking options upon clicking the Mask section. These are Subject, Sky, Background, and People.
You can blur the background in Lightroom using the Subject, Background, and People options.
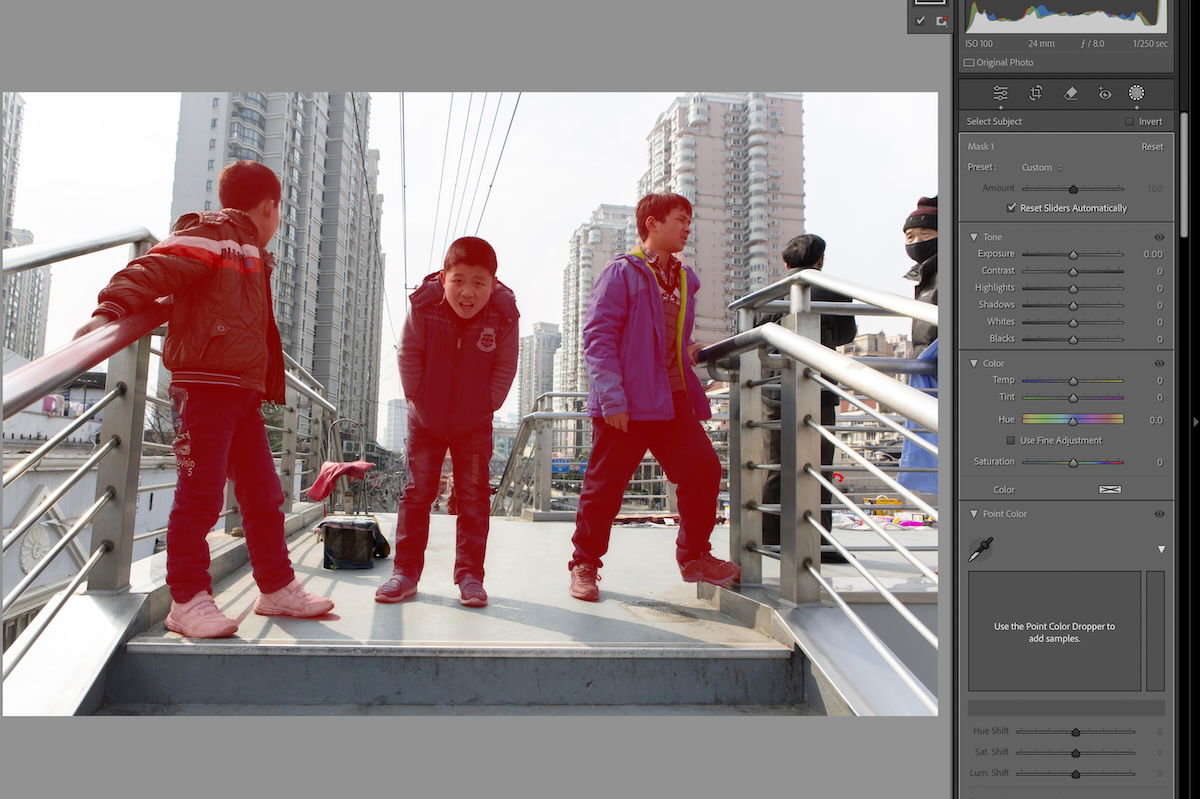
Upon selecting your desired mask, you will see a red overlay over the selected parts of your image.
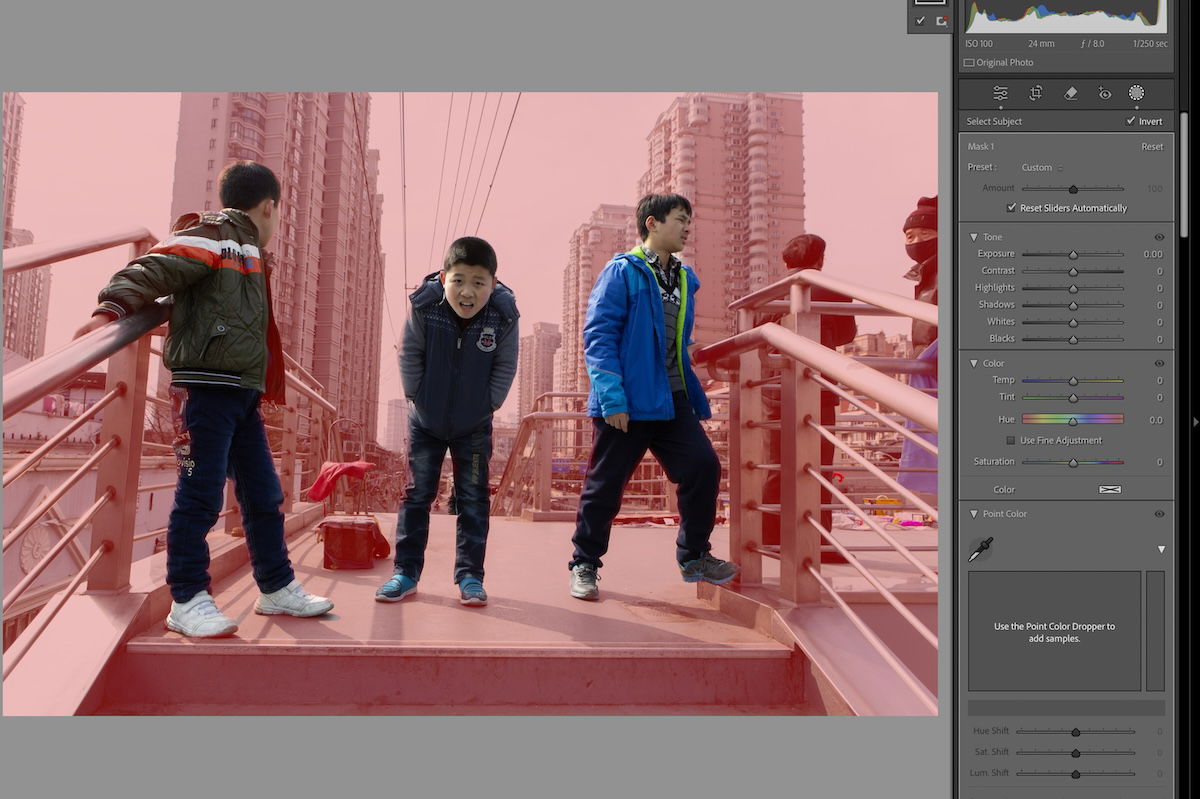
The red signifies the areas that will be edited. So, if you chose Subject or People, you must invert your selection. The Invert button is located just above the new adjustments for your mask.
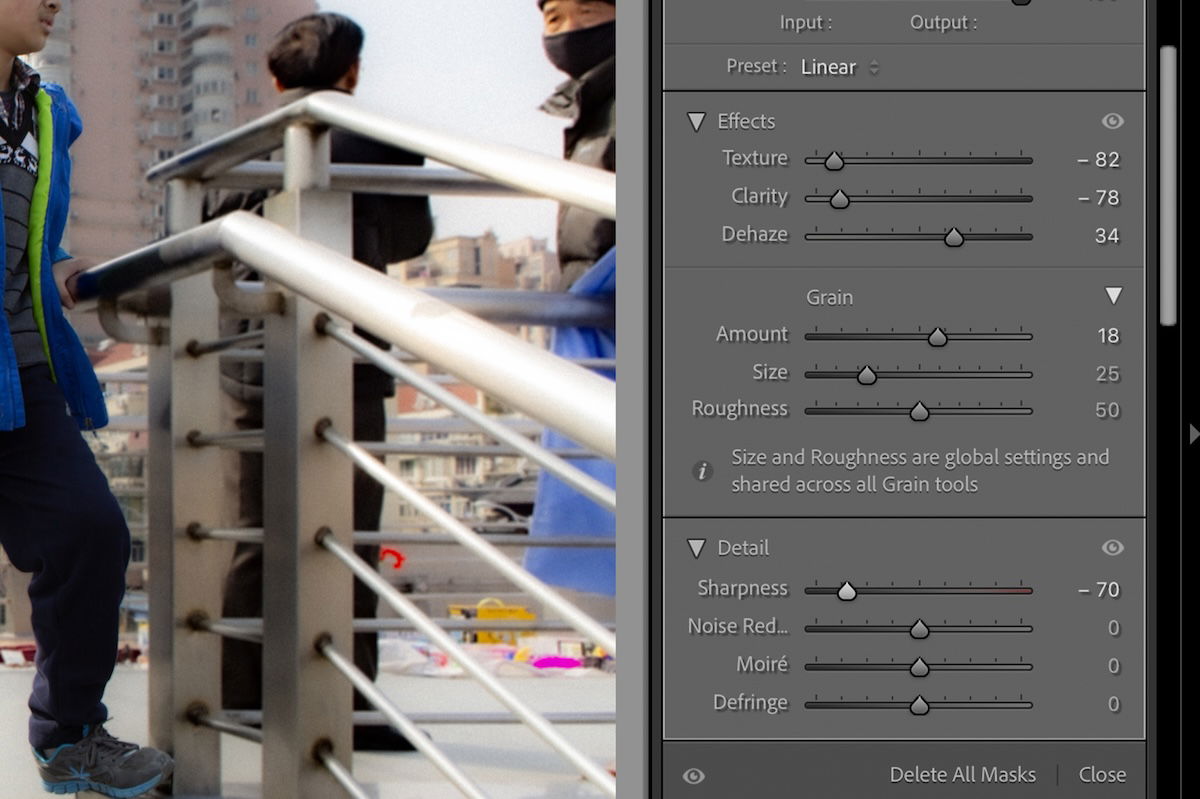
You can then make edits to blur the background. The best adjustments for this are the Texture, Clairty, and Dehaze adjustments in Effects and Sharpness in the Detail section. If you want more texture for your Blur, you could also add Grain.
This method doesn’t make as dramatic of a blur as the Lens Blur tool. But its subtlety and control may suit some photographers more than others.
Adobe makes blurring the background in Lightroom an incredibly easy task. Thanks to the Lens Blur tool, we can simulate different types of lenses and their effects. This is completely new in digital photo editing, and you will not be able to find it in any other digital editing software.
The previous process involved masking your subject in Photoshop and applying the blur to the background. Now, the entire process can take a single minute, which allows us much more time to fine-tune our creativity.


![P08 [Lead Gen] Product Sidebar_v2_date_20230223](https://expertphotography.b-cdn.net/wp-content/uploads/2023/02/P08-Lead-Gen-Product-Sidebar_v2_date_20230223-300x295.jpg)
![P08 [Lead Gen] Sidebar Banner 2_date_20230223](https://expertphotography.b-cdn.net/wp-content/uploads/2023/02/P08-Lead-Gen-Sidebar-Banner-2_date_20230223-300x245.png)
![P08 [Lead Gen] Sidebar Banner 3_date_20230223](https://expertphotography.b-cdn.net/wp-content/uploads/2023/02/P08-Lead-Gen-Sidebar-Banner-3_date_20230223-300x245.png)