One problem you will ask yourself at one point in your photographic journey is: how do I fix blurry photos? Today, we will guide you through different methods to fix blurry photos in Lightroom.
We will touch on techniques you can use in both versions of Lightroom. So, whatever version you prefer to work on, your photos will look as sharp as possible at the end. We will also mention a few points to help you get sharp results inside your camera.
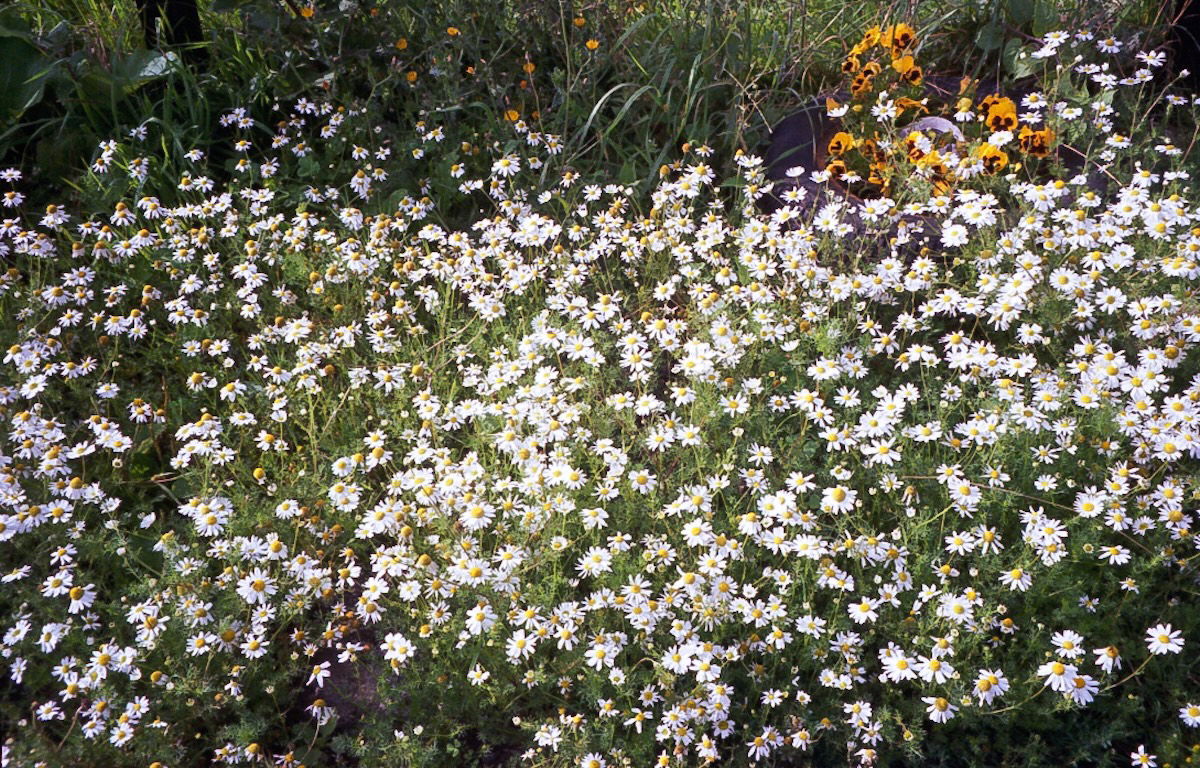
There are many reasons why our images could turn out blurry. There are obvious mistakes like the focus not being correct or having a low-quality or dirty lens,. Also, there are finer details like low-light situations and the different ISO settings.
The resolution of a camera is measured in megapixels. The higher the resolution, the sharper your images will be. Older DSLRs or smartphones will have fewer megapixels than the quality we are used to nowadays. Even though they may have previously been good cameras, we are now used to very high-quality images.
It is not always possible to shoot in the best conditions with the best equipment. So, this article will guide you through fixing blurry photos in Lightroom. Once you have taken the image, post-processing is the only option you have to refine your photograph.
Adobe Lightroom now comes in two different versions: Lightroom and Lightroom Classic. Both versions possess many of the same functions; what differs are the approaches to editing processes.
Lightroom favors a post-processing workflow that utilizes the cloud, allowing you to work from the same set of images on any device you want. This version also prioritizes simplicity and ease of use through a stripped-back interface. This may be easier for beginners to work through.
Lightroom Classic has an interface with which any photographer who has used the past versions of Lightroom would be familiar. It provides a wide range of features, some of which you may never need to use. You will find more in-depth controls and attention to detail in Lightroom Classic.
Both Lightroom versions produce the same results as the algorithms for adjustments are the same. So, it will come down to personal preference or whether you need to use a very specific process. This article will outline differences in the processes we touch on in either Lightroom version.
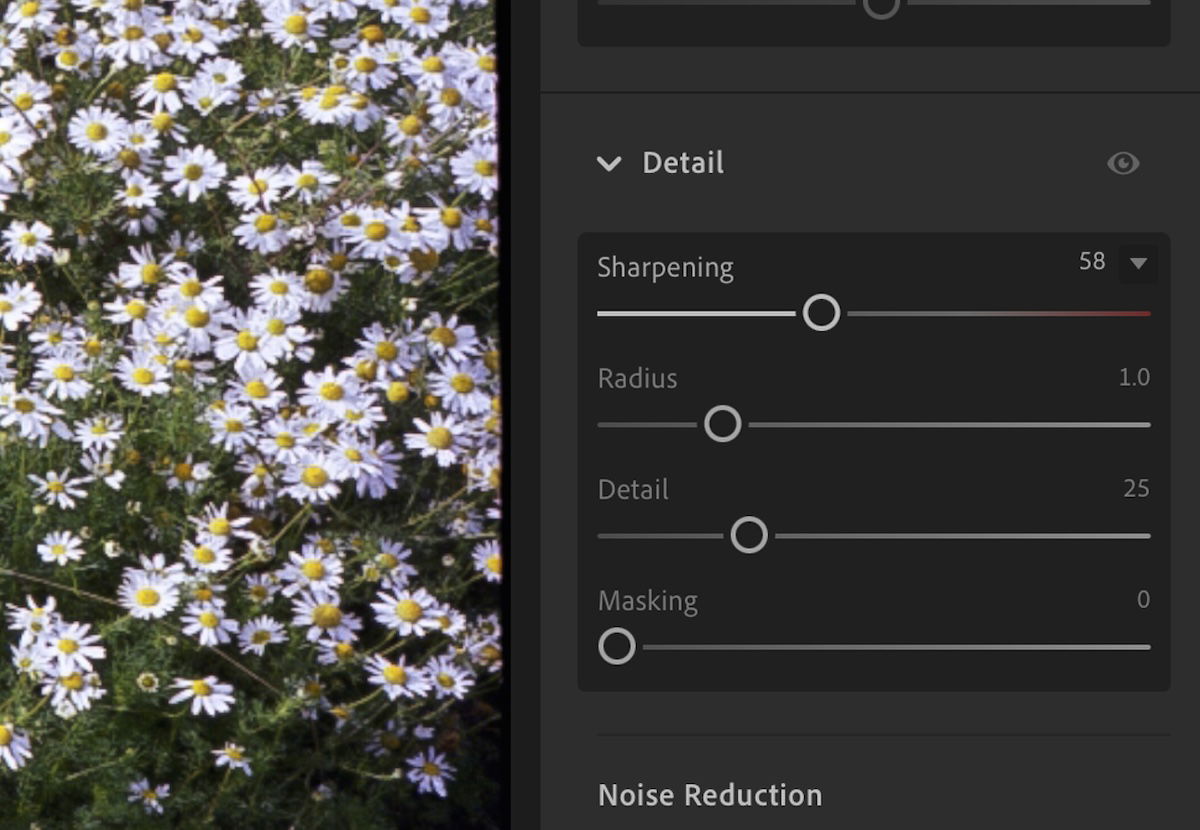
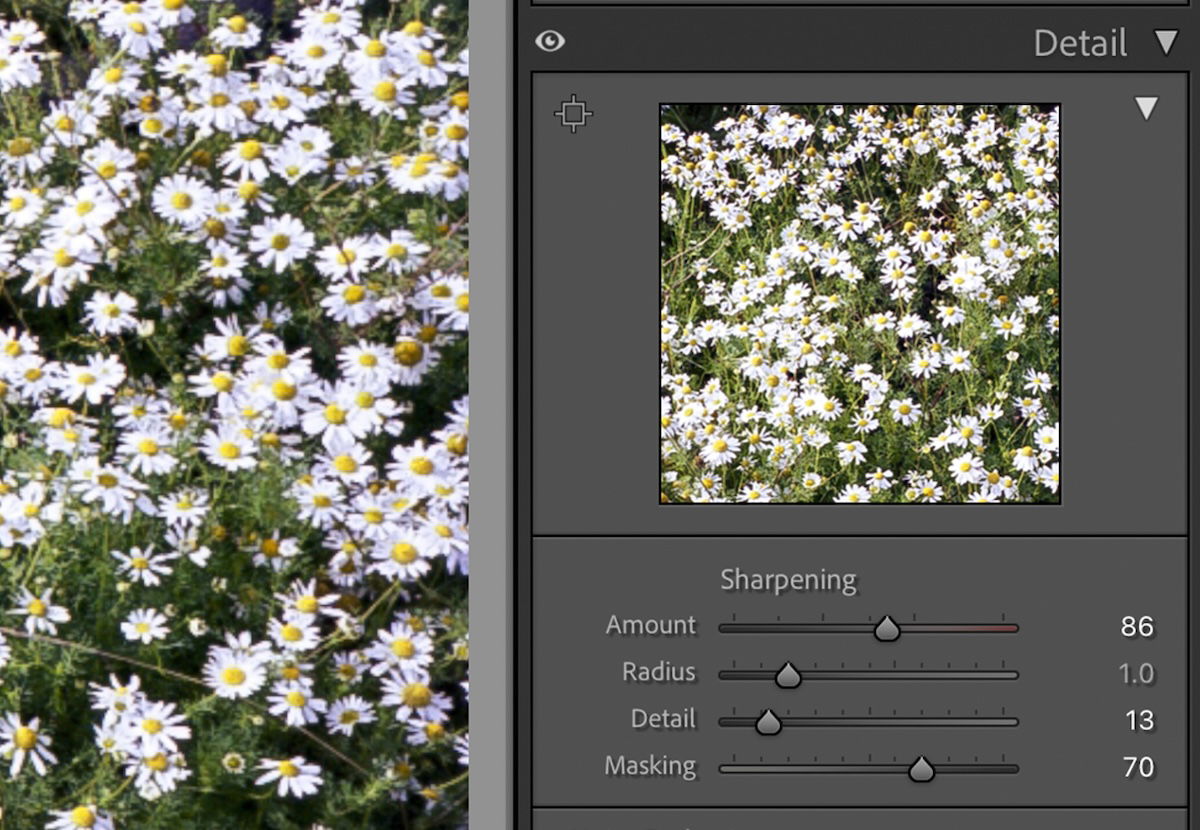
The quickest and easiest way to fix blurry photos is with the Sharpening slider. You can find this in the Detail section when editing in Lightroom.
The Sharpening slider is fairly straightforward. As you increase its strength, it will try to refine the softer edges in your photograph. This can easily make your image look overly pixelated, so you will want to make sure this is balanced convincingly. This is particularly important if you will print out your photographs.
The Sharpening slider also includes three other sliders that allow you to fine-tune this adjustment. In Lightroom, you can access them with a click on the dropdown menu next to the slider adjustment. In Lightroom Classic, you will see them below the Sharpening slider.
The first adjustment you will encounter is Radius. This adjustment controls the thickness of the edge where contrast is applied to make the edges look sharper. This is the best slider to use when fine-tuning your adjustment. It is best not to push this slider, though. You will want to see what the adjustment does at a smaller level, so it is best to zoom in while adjusting.
The Detail slider will increase the sharpness of objects’ edges and other details in your photograph. However, this can easily increase noise and grain in your photograph, so use it sparingly, like the Radius adjustment.
The Masking slider affects where the sharpening effect is applied. If the Masking slider is low, the sharpening will be applied to the entire image. If you increase the slider, the sharpening will only be applied to the strongest edges of the photograph.


Three other sliders may help you fix blurry photos in Lightroom. These three adjustments are Texture, Clarity, and Dehaze. You can find these in the Effects section in Lightroom and the Presence section in Lightroom Classic.
The Texture adjustment will enhance ‘medium-sized details.’ It detects textures and gives you the opportunity to increase or decrease them. This slider will be helpful if a texture is lost in a blurry photo. You can also use it to soften a texture that may be pixelated from sharpening.
The Clarity adjustment is very dramatic, so you will only want to use it in small increments. This adjustment increases or decreases mid-tone contrast, which can help sharpen blurry photos.
Finally, we have the Dehaze slider. This adjustment will increase or decrease atmospheric conditions like haze, fog, mist, or smoke. It can do this by adjusting the contrast in a particular way. This slider is ideal for adjusting a blurry photo due to weather conditions.
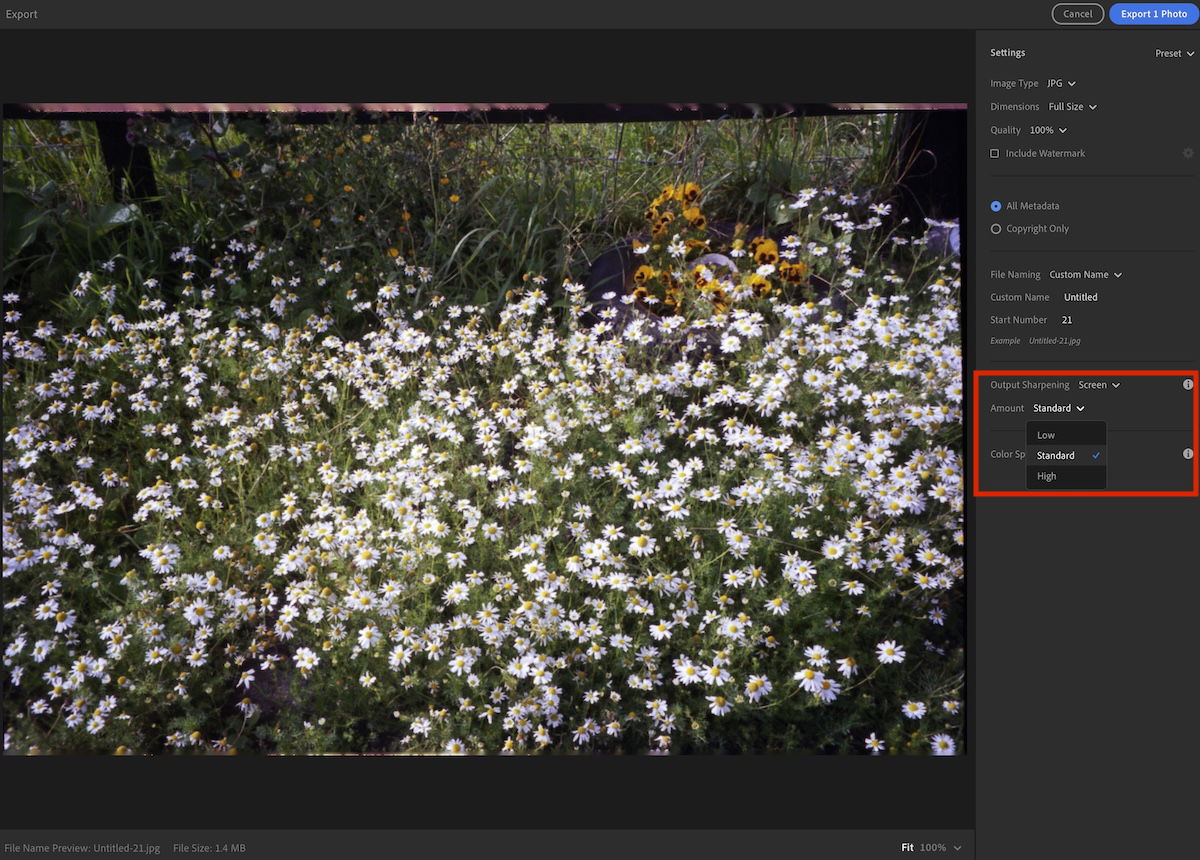
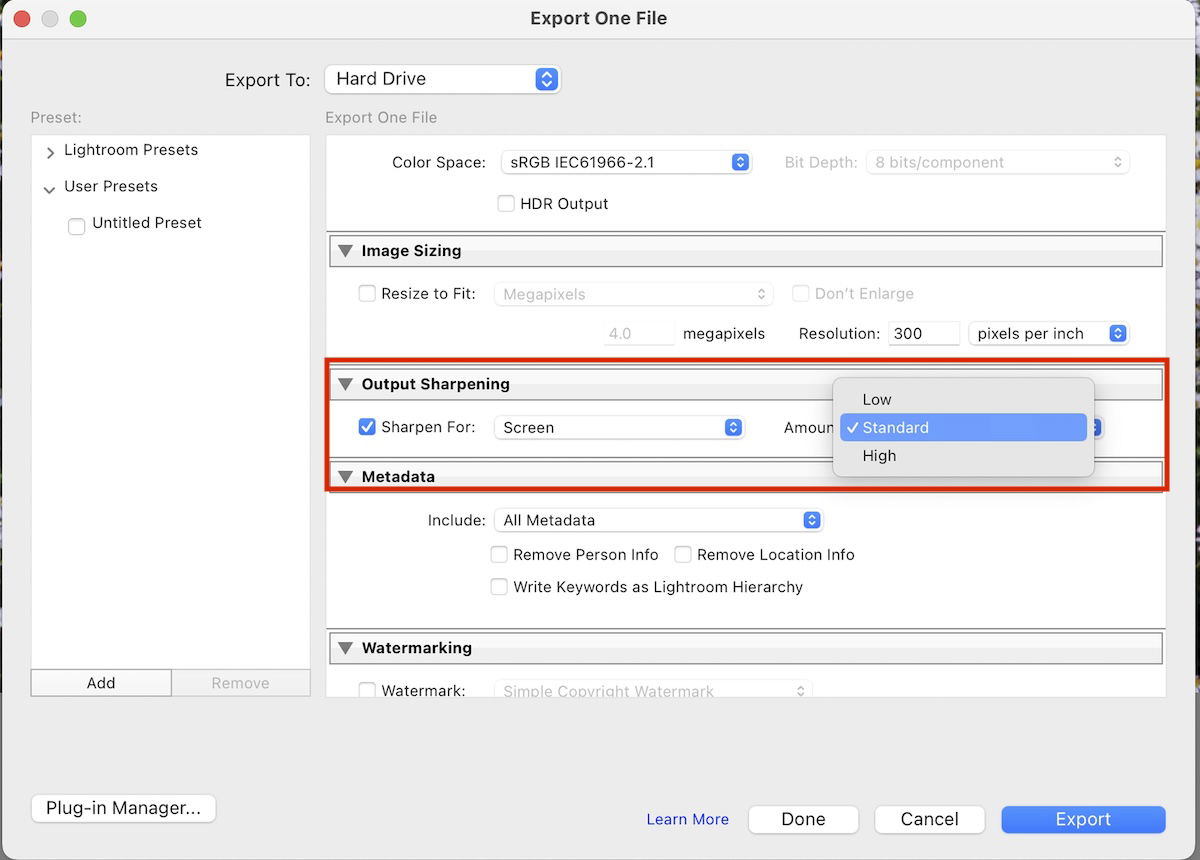
Both Lightroom versions allow you to automatically apply sharpening in the exporting process. This means you do not have to apply the sharpening yourself. It also allows you to apply sharpening to many images with the same consistency.
The downside is that you do not have the same amount of control as fixing blurry photos manually. This could mean that some photos come out looking pixelated.
Thankfully, Lightroom provides different levels of automatic sharpening. You can choose whether to sharpen for a screen, matte, or glossy paper. Then, you also get three levels of intensity: low, standard, or high. If you don’t want to overdo it, you can choose a low amount of added sharpening.
Let’s quickly brush over some points to remember when photographing to avoid blurry photographs.
The best way to avoid blurry photos is to make sure your lens is clean. Always use a lens cap when you are not shooting with any of your lenses, and avoid touching the lens glass with your bare hands.
Shooting in RAW will provide more information to your photographic files. This may not save a blurry image, but it will ensure you can get the most out of your file in post-processing.
Blurry images created by a slow shutter speed are notoriously difficult to edit in post-production. To combat this, try to shoot with a high shutter speed. This may be difficult in low-light situations, so you may want to consider increasing your ISO. This is a balance, though, as a higher ISO will produce less sharp results with added noise.
Lightroom is the ideal software for fixing blurry photos. It gives you multiple ways to do this, from a hands-off approach with the automatic application in the export processing. To a detailed, extensive process that allows you to fine-tune the detailing amount.
It is easier and more accurate than the options in Adobe Photoshop. Just keep in mind that pushing the sharpening sliders emphasizes pixelation, so it is about finding a balance.


![P08 [Lead Gen] Product Sidebar_v2_date_20230223](https://expertphotography.b-cdn.net/wp-content/uploads/2023/02/P08-Lead-Gen-Product-Sidebar_v2_date_20230223-300x295.jpg)
![P08 [Lead Gen] Sidebar Banner 2_date_20230223](https://expertphotography.b-cdn.net/wp-content/uploads/2023/02/P08-Lead-Gen-Sidebar-Banner-2_date_20230223-300x245.png)
![P08 [Lead Gen] Sidebar Banner 3_date_20230223](https://expertphotography.b-cdn.net/wp-content/uploads/2023/02/P08-Lead-Gen-Sidebar-Banner-3_date_20230223-300x245.png)