How to Use a Time-Lapse Interval Calculator for Photography
A time-lapse video can look fantastic, but they can be difficult to make. But a time-lapse interval calculator can simplify the process.
Whether you’re charting the movement of the milky way or documenting the growth of a flower, they’re magical and captivating. Making a seamless time-lapse video can involve some complicated calculations.
Unless you’re a master of math, a time-lapse calculator can save you a lot of head-scratching.
What is a Time-Lapse Interval Calculator?
A time-lapse calculator tells you how many frames you need for a time-lapse video. You input how long you want your final video to be, and it tells you how many frames you’ll need to achieve a smooth video.
As well as telling you the number of frames you need, it will tell you the time you need between each shot. For a smooth time-lapse, you need the intervals correctly separated with the right amount of time in between.
A video, unless slow-motion, requires at least 24 frames per second. If you’re making a 10-second video, you’ll need 240 frames. And that’s without any intervals in between shots.
When you add intervals, the mathematical formula becomes more complicated. You can work it out in your head. But that’ll take some brainpower, and you might get the calculation wrong.
A time-lapse calculator will save you time and trouble. And it’s far more risk-free than doing the math in your head. It gives you the exact information you need so you can create fantastic time-lapse videos.

© Canopus (Depositphotos.com)
Why You Need a Time-lapse Calculator
Time-lapse photography isn’t always easy. And creating time-lapse footage can be a drain on your battery life and memory usage. But the hardest part is calculating the shooting interval length between shots.
If you want a time-lapse video that runs at 30 fps with a duration of 30 seconds, setting a shooting interval of eight seconds will give you an event duration of 2 hours.
We want a video that lasts 30 seconds. And each of those seconds needs 30 frames.
30 x 30 = 900 images. 900 images x 8 seconds = 7200 seconds or 2 hours.
You might be asking, why isn’t it the time it takes one image PLUS the 8 seconds? The maths behind photographing 900 images at 1/250th of a second means 900 images would take 3.6 seconds in total.
But, it isn’t 7203.6 seconds. This is because the shooting interval starts at the beginning of the capture, not at the end. The interval is actually 8 seconds minus 1/250th of a second.
If you’re finding this complicated and confusing, that’s because it is.
We can also look at how long an interval takes to create. Let’s say you’re capturing an event that lasts four hours, and you want to create a 45-second video. You’ll need to work out how big your shot intervals must be.
If you’re working with a 24 fps frame rate, you can calculate that your intervals need to be 13.3 seconds. The mathematical breakdown is 4 hours = 14,400 seconds. We divide 14,400 seconds by 24 as that is our frame rate per second. 14,400 divided by 24 is 600 seconds.
Then, we divide 600 seconds by 45 seconds, which gives us the final answer of 13.3 seconds.
That’s a lot to work out for each time-lapse video you want to create. Using a calculator removes the trouble and speeds up the process. It allows you to focus on photography, not math.
Another benefit is that a time-lapse calculator can also give you memory usage information. If you know the file size for each shot, the calculator can tell you how much memory the shots will take up.
It’s useful information, so you know how much memory you need before you start shooting. You’ll avoid the nightmare scenario of running out of memory halfway through a shoot. With a time-lapse video, that means starting all over again.

© Tabkatrina (Depositphotos.com)
How to Use a Time-Lapse Calculator
Time-lapse calculators are straightforward tools to use. You insert the necessary variables, and the calculator gives you the exact information you need for your time-lapse video.
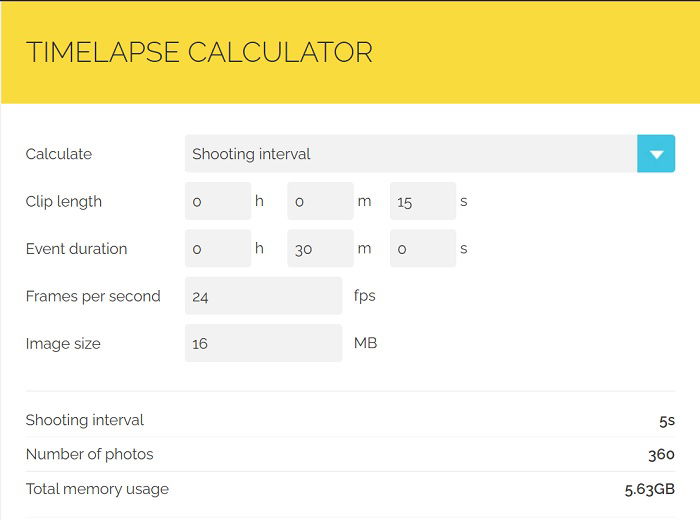
If you’re working out the shooting intervals, you input the desired clip length and the event duration time. Then you add the frame rate you want to use. And for memory information, you need to insert the file size in MB for each shot.
The calculator will then tell you the size of the intervals, the number of photos, and the total memory usage. You can see the results in the image below, where we used the time-lapse calculator from PhotoPills.com.
You can also work out the event duration or the video length, depending on the information you have.

https://www.photopills.com/calculators/timelapse
Time-Lapse Calculator Recommendations
PhotoPills is an excellent app for all photographers to have on their phones. They have a time-lapse calculator that’ll work out intervals, the event duration, and clip length.
They also have depth of field calculators. And a 500 rule calculator for astrophotography. Along with their calculators, PhotoPills can help you with location shoots by giving you sun and moon information.
PhotoPills is available for both Android and iOS smartphones. Or you can use their calculators for free on their website.
There are also specialized time-lapse photography apps that work really well. There’s Framelapse for Android and Lapse It for iPhone users.

© Fundiworks (Depositphotos.com)
Conclusion
For time-lapse photographers, time-lapse interval calculators are a godsend. You no longer need to spend hours crunching the numbers to get a smooth and spectacular time-lapse video.
Calculators take the pain out of time-lapse video creation. And they allow you to focus on getting the right shots for a perfect video.
There are some great free time-lapse calculators you can use. And they’re all simple and straightforward. They will definitely help you with your next time-lapse project.
Check out our Total Time-Lapse video course to create stunning time-lapse videos every time!
The images in this article are partly provided by depositphotos.com


