If you’re in a creative rut, these creative editing ideas will help you escape it. I’m sure most of us have used photo editing software before, whether for touch-ups or enhancements. But you can use modern software for much more than tweaks and adjustments.
These creative editing ideas show you how to make the most of photo editing software. We show you how to edit photos in new ways, giving your work a new lease of life. Our article has tutorials on editing techniques that produce truly unique images.
Whether you’re a beginner or a pro, you can find something to spark your imagination in our list of creative editing ideas!
This compilation of creative editing ideas will kickstart your passion for digital art. We have a wide range of techniques and concepts, from digital collages to 3D modeling. So, there’s something to excite any photographer or digital artist.
All the tutorials are beginner-friendly. So, they’re accessible even if you’re new to photo editing software and editing.
More experienced readers will have no problem following the instructions. You’ll find something completely new to get their creative juices flowing.
Each section has a link to a full article on that topic, so if anything interests you, follow the links to learn more.
Digital art is a vast and exciting field encompassing various creative processes, from digital painting to 3D artwork. You need a computer or tablet, an input device like a digital art tablet and stylus, and digital artwork software.
As a beginner, you can create many fun projects. You can make comic strips, children’s book illustrations, or alternative movie posters. You can also make local postcards, birthday cards, and photo paintings.
You can also build your digital art portfolio on Instagram to track your progress, connect with others, and get feedback. With the right tools and resources, creating digital art can be a rewarding and enjoyable experience for anyone.
Our full-length article is the best place to start if you’d like to learn more about digital art for beginners.

Photoshop has opened up a world of creative possibilities for photo manipulation. With the right techniques, you can transform your images into surreal works of art.
There are some easy photo manipulation ideas. They include digital double exposure, multiplying your subject, or using the “Droste effect.” You can also restructure landscapes, create faceless portraits, or overlay images for dual worlds.
Other ideas involve creating hybrids using photography and illustration. Or, there’s adding magic and movement with cinemagraphs. You can also make your own perspective illusions. With a bit of creativity and Photoshop skills, the possibilities are endless.
Click the link if you’d like to learn more about photo manipulation.
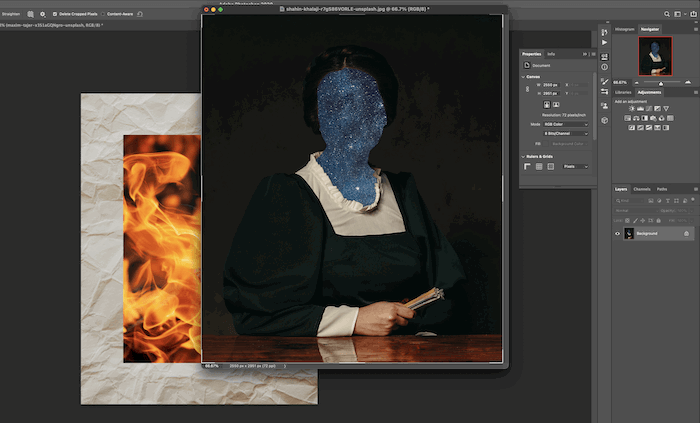
Digital collage is a technique that combines multiple images using editing software to create a new context. It takes the same cut-and-stick approach as a traditional collage but applies it in a digital environment like Adobe Photoshop.
To make a digital collage in Photoshop, start by selecting photos for your collage. Cut out a section of the main subject to reveal an image beneath it. Add a detailed layer underneath your subject and use collage elements to create different layers.
You can also cut and stick more collage elements, erase and reveal layers, and incorporate the cut-and-stick approach in many ways. Balancing all the elements together can make for an exciting image.
Find out more about digital collage by clicking the link.
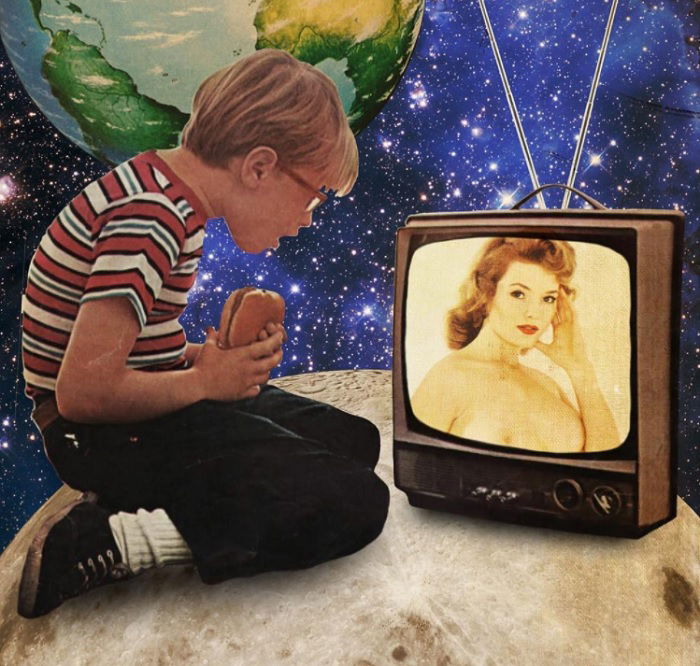
Digital collage is a powerful artistic genre. It combines photography, graphic design, and traditional skills like painting and drawing.
Modern technology has brought new life to the art of collage. Photoshop and other editing software have redefined the limits of what’s possible!
Collage artists are embracing their surrealist spirit. They use retro aesthetics and teleport viewers to other dimensions.
They combine various media and techniques. They also replace heads to challenge viewers and electrify compositions with vibrant colors. Some artists go minimalist for a strong composition, while others tear it down and put it back together.
Pop culture, past and present, is a significant source of inspiration for digital collage artists. They can also use humor to express themselves and add meaning to their work.
If you want to learn more about digital collages, our ideas will help you create unique and inspiring pieces.
Photogrammetry is a process for creating a 3D model from photos. You need a camera, 3D modeling software, and a 3D printer (optional).
Use a DSLR or mirrorless camera with a wide-angle lens and a sturdy tripod. Agisoft Metashape, Regard3D, and VisualSfM are popular 3D modeling software options.
Choose a subject that’s not too large and take photos from different angles, ensuring an 80% overlap between each shot.
Import the images into the software and align them. The software will create a 3D model, which you can 3D print or use for various applications.
Learn more about creating a 3D model from photos with our complete article.

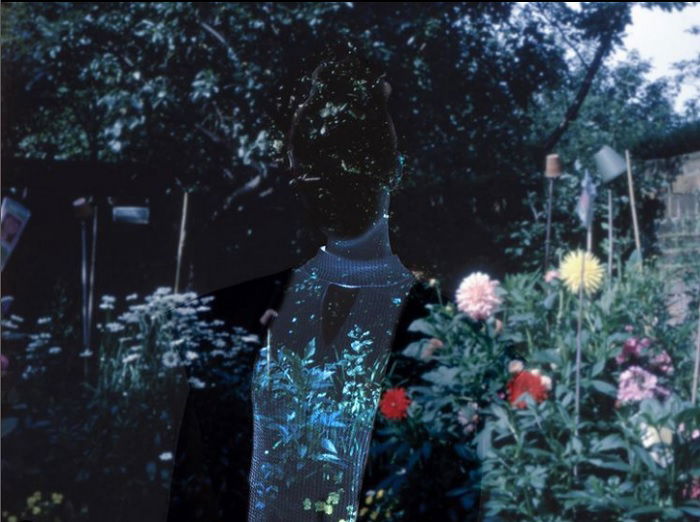
Double-exposure photography is a creative way to make your photos more interesting. It involves merging multiple images to create surreal, emotional, or humorous results. You can create double exposures in-camera or using editing software like Adobe Photoshop.
There are many ways to experiment with double exposures. Try combining a simple portrait with a detailed texture, or convert your results to black and white for added depth. You can also express emotion through self-portraiture or merge two photos of the same person.
Double-exposure photography is a fun way to unleash your creativity. There are endless possibilities for combining images. And you can transform ordinary photographs into powerful masterpieces!
Our article is a must-see if you want to learn more about creating double-exposure photography images with software.
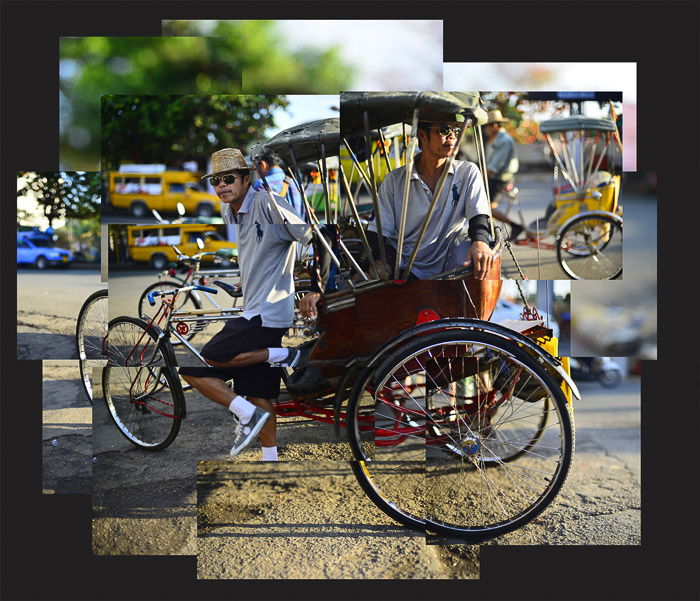
A photomontage is a series of individual photographs arranged to create a single image. The number of photos, time taken, or locations used to make a photomontage is unlimited.
To create a photomontage, plan out your subject and take more photos than you need, covering every part of the scene. Use imaging software to arrange the photos, following lines in the composition to create an attractive flow.
Experiment with the layout until you’re satisfied with the result.
Printing the photos adds another dimension to the artwork. Stick the prints to a board, using the digital version as a guide. A photomontage lets you explore time and space in ways not possible with a single image.
Get started with a photomontage by reading our full tutorial.
Day-to-night photography captures a scene from day to night in a single image. To create one, find a location that works well in daylight and nighttime. Set up your camera on a tripod and use manual focus to keep the focus consistent.
For the daytime shot, shoot during golden hour to avoid harsh shadows. Use a polarizing filter to improve the sky. Increase ISO, widen the aperture, or use a slower shutter speed for the nighttime shot to account for low light.
In post-processing, layer the nighttime image over the daytime one in Photoshop. Add a layer mask to the top layer and blend the two images with the Gradient tool. Paint with a brush to clean up the transition if needed.
Day-to-night photography is a simple yet effective way to create a unique image.
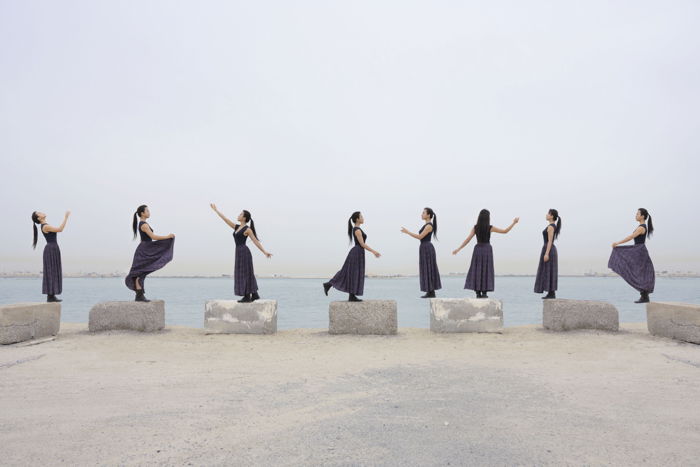
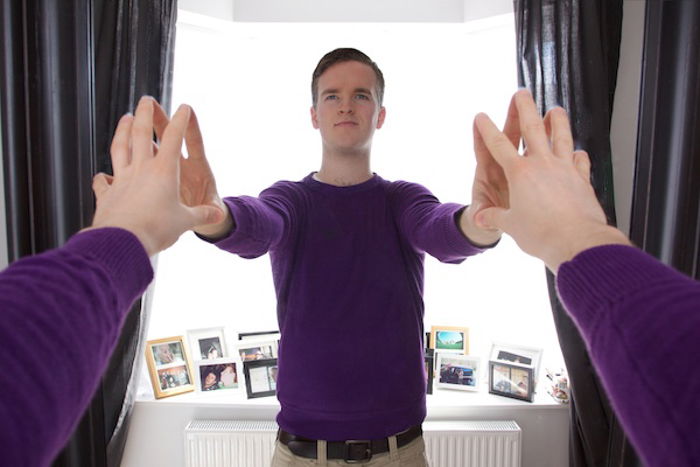
Multiplicity photography is fun and creative. It’s a way to combine multiple photos of the same person or object into one image using Photoshop.
The key to success is using a tripod to keep your camera in the same position for each shot. This setup ensures consistent lighting and depth of field throughout the photoshoot.
In Photoshop, you’ll layer the images and use the Polygonal Lasso tool to create a selection around the subject in each photo. Then, create a layer mask to reveal or hide parts of the image. Use the Brush tool to refine the edges of the mask for a seamless blend.
Duplicating and rearranging the layers can also create a Warhol-inspired effect. With practice, you’ll master the art of multiplicity photography in no time.
If you’d like to dive deeper into multiplicity photography, read our full tutorial.
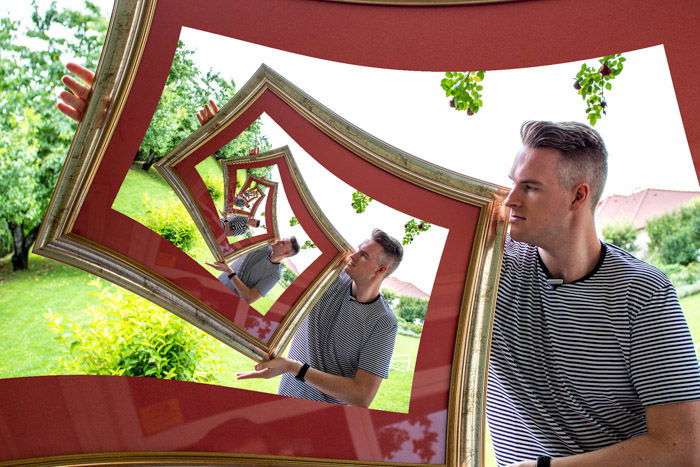
The Droste effect is a creative photography technique. It involves placing a copy of an image inside itself, creating the illusion that the photo repeats infinitely.
To achieve this effect in Photoshop, duplicate the image and scale it down using Free Transform. Place the copy over the area you want to edit and erase the parts you don’t want to show.
Another method is to use an app like PhotoSpiralysis. Import your image and adjust the settings, such as magnification, spirals, and stretch. Then, move the center point to find the perfect combination.
Play around with the settings until you achieve the desired result, then render and save your final image. The Droste effect can produce exciting and unique results, but it may take patience and experimentation to get it right.
Read our full tutorial on the Droste effect if you’d like to learn more.
The Harris Shutter effect is a fun way to add movement to your photos. Robert Harris of Kodak created it by re-exposing the same piece of film three times through red, green, and blue filters.
You can recreate this effect digitally using Photoshop or a free program like GIMP. Take three photos of a scene with some movement, then adjust each photo’s red, green, and blue levels.
Merge the three images into one using the “Addition” blending mode in the layers dialogue.
This technique works well with images of smoke, bikers, pedestrians, waves, waterfalls, or rivers. The Harris Shutter effect is a great way to impress your friends and improve your photography and editing skills.
Taking a mirror selfie without your phone showing may seem impossible, but it’s quite simple with a little Photoshop magic. All you need is a camera and a large mirror.
First, take three separate photos: one of your left arm, one of your right arm, and one of your face without the camera blocking it. Use manual mode or lock the exposure so all the images appear the same.
In Photoshop, layer the three images on top of each other. Use layer masks to remove half of the top photo, revealing the arm underneath. Add the face photo on top and mask it to fit perfectly.
Touch up any imperfections with the Clone tool, Healing Brush, Patch tool, or Content-Aware Fill.
With some practice, you can take a mirror selfie without the phone showing and create a unique, eye-catching self-portrait.
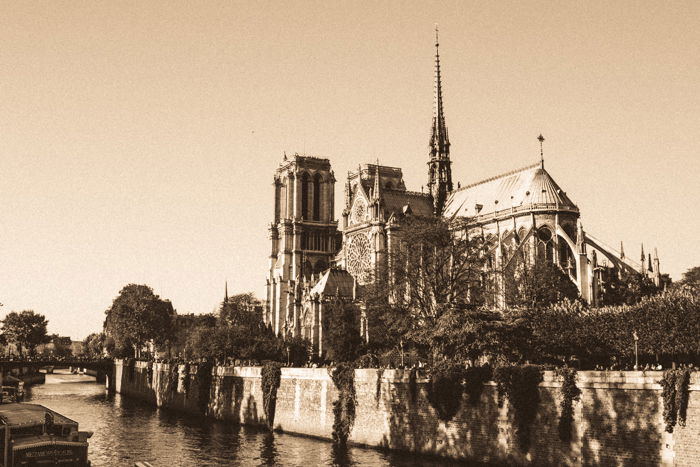
Sepia is a warm brown color that can give photos an antique look. Most digital cameras have the option to shoot in sepia tone. You can also create a sepia effect post-processing using Lightroom.
First, convert your image to black and white in Lightroom to create a sepia effect. Then, go to the Split Tones panel and select a golden color for the highlights and a brown color for the shadows.
Use the Balance slider to find the right ratio between shadows and highlights. In the Effect panel, add some grain for an extra vintage touch. You can save your sepia edit as a preset and apply it to other images.
To learn more about creating sepia-colored photos, both in-camera and when editing, check out our detailed guide.
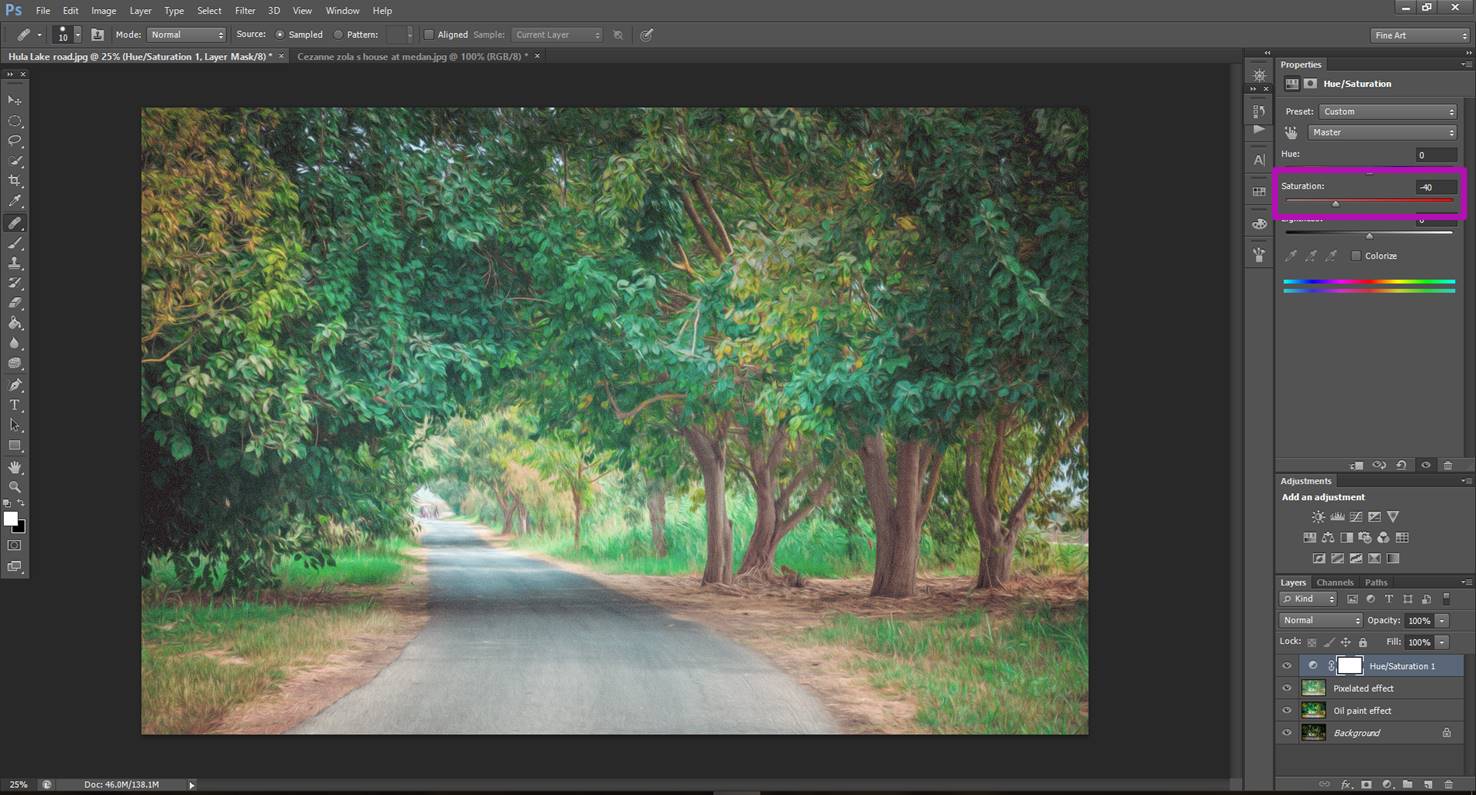
Turning photos into paintings with Photoshop is easy. First, open your photo and a painting you like in Photoshop. Create two new layers and rename them “Pixelate” and “Oil Paint Effect.”
To match the colors from the painting to your photo, select the Pixelate layer and go to Image > Adjustments > Match Colors. Choose the painting as the source and adjust the settings.
Then, add a pixelation effect by going to Filter > Pixelate > Pointillize. Lower the opacity of the Pixelate layer to make the effect more subtle.
Next, select the Oil Paint Effect layer and match the colors again. Go to Filter > Oil Paint and adjust the settings to your liking. Finally, make some final adjustments by going to Image and clicking Auto Tone, Auto Contrast, and Auto Color.
If you want to turn photos into paintings, click the link for the full how-to guide.
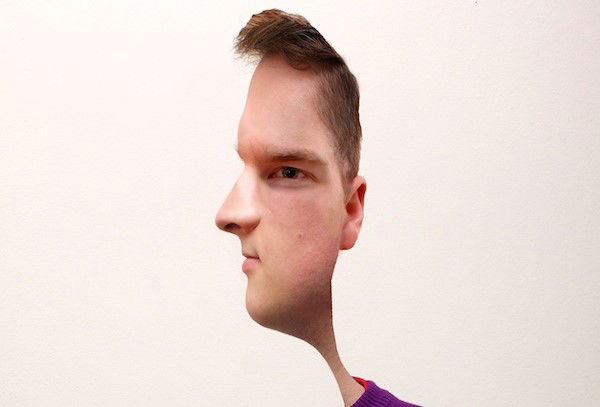
Creating a Picasso-style portrait in Photoshop is a fun way to add an artistic touch to your images.
The idea is to create a cross-section of yourself by combining two photos, one facing straight ahead and the other turning to the side. When merged, they create an illusion that confuses the eye, like Picasso’s iconic style.
To get started, take two photos of yourself—one facing the camera and the other turned 90 degrees to the side. For the best results, use a plain background and natural light.
Open both images in Photoshop, placing the side-facing photo on top with a 50% opacity to line up the key features.
Add layer masks to each image and paint black on the areas that don’t overlap. Use a soft brush to blend the two images seamlessly for the finer details.
Pay close attention to the nose, making it appear to face both forward and to the side. With some practice and adjustments, you’ll have a unique Picasso-style portrait that’s sure to impress.
Create a Picasso-style portrait using our step-by-step guide!
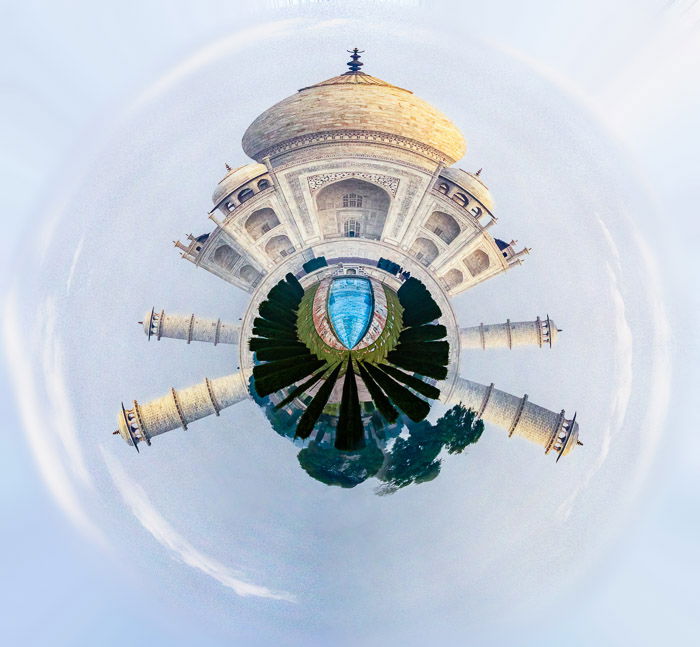
Tiny planet photography is a fun way to capture your surroundings from a new perspective. By stitching together multiple photos, you can create a “tiny planet” effect that’s sure to impress.
To create a tiny planet, look for images with strong vertical elements like trees or buildings. Photos with a clear blue sky and simple ground texture work best. Open your image in Photoshop, straighten the horizon, and prepare the edges by matching the left and right sides.
Next, create a square aspect ratio, flip the image vertically, and apply the polar coordinates filter. With a few finishing touches to clean up the seam and adjust the background, you’ll have an out-of-this-world tiny planet photo.
If you’d like to learn more about tiny planet photography, we have a detailed guide covering everything you need.