The Content Aware Fill tool in Adobe Photoshop is an action all creative photographers must become familiar with. It allows you to seamlessly eliminate certain objects that could ruin your photo.
You can apply these transformations in many situations. You can use it in photos with loved ones where people are standing in the sunset or fix wildlife photos. In this article, we will guide you through a number of ways to make these photo-ruining subjects disappear, just like magic!
What Is Content Aware Fill?
Photoshop has many tools to move or remove unwanted objects from a photo.
With Content Aware Fill, I tell Photoshop what I want to be moved or removed, and the software does the rest. Photoshop selects pixels around the object that might work in the space.
An advanced algorithm powers Content Aware Fill in Photoshop. And with every version of Photoshop, these tools become more powerful.
Some of the tools I will show you are only available in the newest versions of Photoshop. If you haven’t upgraded to the latest Photoshop, now’s the time to do it!
First, I’ll show you the Content Aware Fill option within the Patch tool. Then we’ll move to the Content Aware Move tool.
After that, I will show you the Content Aware Fill workspace. It allows the highest degrees of control.
And finally, I will show you how to use it with the Object Selection tool. This is the quickest method by far that can get rid of objects in seconds!
When to Use Content Aware Fill
There are a lot of Photoshop tools and techniques to move or remove objects. The difficulty is learning which tool will work on the photo you have.
The Spot Healing Brush works well to remove spots or small objects. In my article on smoothing skin in Photoshop, I focused on this tool for removing blemishes in a portrait.
Content Aware Fill in Photoshop is useful when removing objects from a scene. Photoshop does a good job replacing pixels when colors and textures are consistent.
In more complex images, Photoshop might struggle and create odd effects in your image. But the Patch tool allows you to select replacement pixels.
The new Content Aware Fill workspace was designed for a higher level of control. The workspace allows a lot of flexibility in choosing replacement pixels. Compare the before and after images.


Moving objects to a different part of an image, or a different image, becomes easy with the Content Aware Move tool.
The selected object is moved and integrated into the image. Photoshop then uses Content Aware Fill to patch over the hole left behind.
The latest Object Selection tool is the quickest way to remove objects. But it may not work well in some situations.
As with any tutorial, it’s best to follow along with an image of your own. Find an image to work with, open the latest version of Photoshop, and let’s have fun moving and removing details!
How to Use Content Aware Fill
First, we’ll look at where to find the fill tools. Then we’ll go through each option step by step.
Locating Content Aware Fill Tools
Let’s start by locating the Content Aware Fill tools we’ll use. The Patch and Content Aware Move tools are in the lefthand toolbar.
The Patch tool icon is a rectangle with lines bisecting each edge. The Content Aware Move tool is a pair of crossed arrows in the shape of an “X.”
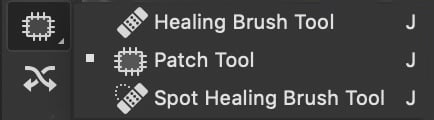
Patch and Content Aware Fill tool icons on the toolbar.
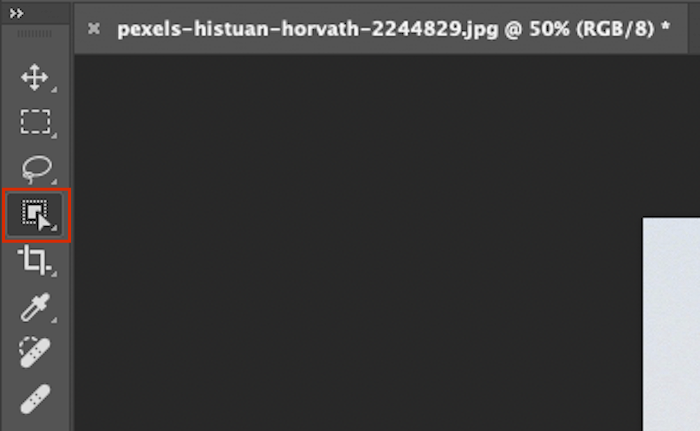
The Object Selection tool looks like a mouse pointer over a square. It’s with the Quick Selection and Magic Wand tools.
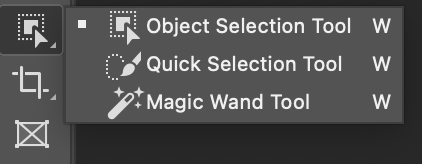
Object Selection tool on the toolbar.
If your toolbar isn’t visible, go to the Windows dropdown menu and place a tick mark next to Tools. If I mention a Photoshop tool you can’t see on your toolbar, go to Edit > Toolbar.
Drag hidden tools from the right column to the left column. You can group tools in a way that makes sense to you. When you select the Patch tool, choose Content Aware Fill in the Options bar.
The Patch and Content Aware Move tools also have “structure” and “color” settings. I’ll talk about these more later in the article.

Patch tool Options bar.
To open the Content Aware Fill workspace, first make a selection around an object. Then go to Edit > Content Aware Fill...
If the Content Aware Fill option is greyed out, use a selection tool like the Lasso tool (keyboard shortcut “L”) to highlight your content. This should activate the command.
Let’s start with learning how to use the Content Aware Fill option in the Patch tool.
Content Aware Patch Tool
The Patch tool is one of the first tools I reach for when removing something from an image.
Step 1: Selection
First, I create a copy of my image in a new layer. Creating a new layer with each change is a good habit to get into. This ensures you can always go back to your original image.
If you haven’t created a duplicate layer before, go to Layers > Duplicate Layer (Ctrl or Command+J).
On this new layer, I choose the Patch tool (hotkey “J”). And I draw a loose lasso around the object I want to remove.
Ensure the Content Aware option is selected in the Options bar.
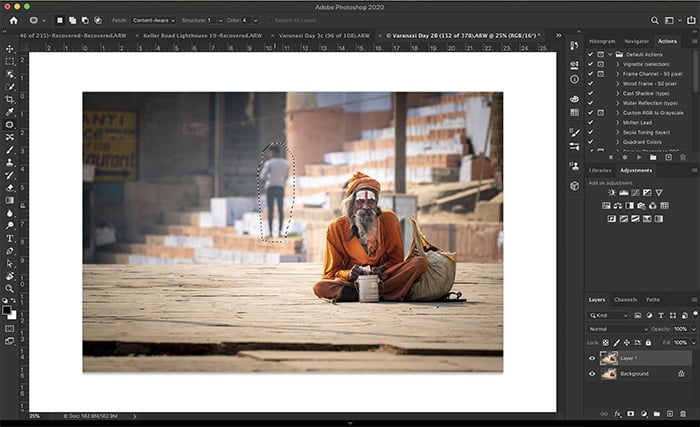
Screenshot of Photoshop workspace showing lasso around the person to be removed.
Step 2: Drag to Search Pixels
Next, grab the selected area and drag it to a sampling area. I try to match any obvious lines if I can.
When I release, Photoshop takes this suggestion and uses Content Aware Fill to fit the new pixels into the space.
If I don’t like the result, I undo the change. Select Edit > Undo Patch Selection (Ctrl or Command+Z). Then I drag the patch to a different place.
I have two more fill settings in the Patch option bar—structure and color.
With structure, I’m telling Photoshop how closely to adhere to the shapes in the new content. Seven means being faithful to the shapes. Zero means loosely interpreting the shapes.
For color, I select how much color blending I want Photoshop to do. Ten is the maximum. Zero means that I don’t want any color blending.
Let me show you the results when I use different combinations of structure and color.
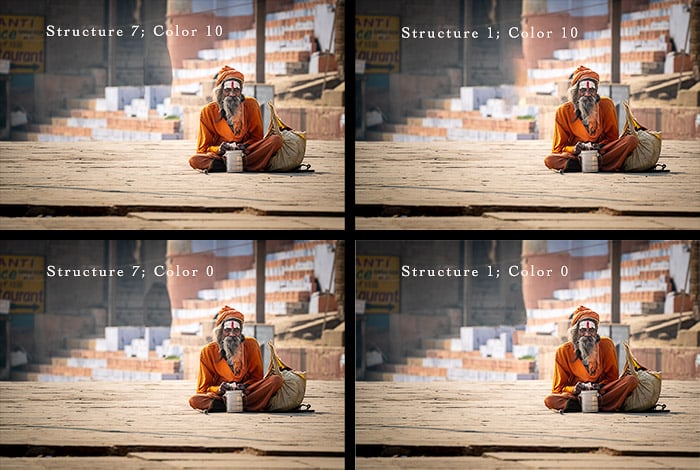
A comparison of Patch tool results with varying levels of structure and color.
The patch isn’t that much different in this image. Some are more blurred. Others have a harder edge around the patch.
The Patch tool works best on less detailed images like this. And I’ve found that patching the object in smaller sections works better for more complicated images.
Content Aware Move Tool
Content Aware Fill is useful for removing objects. But it is also helpful for moving them.
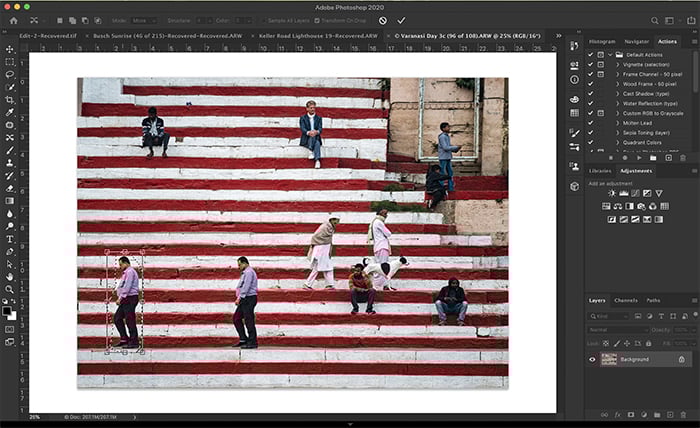
I moved a few people around in this photo taken in Varanasi, India, to add more space. Compare the before and after images.


Step 1: Selection
Create a copy of the image in a new layer by choosing the Layers dropdown menu and Duplicate Layer (Ctrl or Command+J).
Select the layer and click the Content Aware Move tool. Then draw a loose lasso around the object you want to move.
Step 2: Drag to Move Pixels
Grab the selected area and drag it to where you wish to move it.
When you release, a transform box will appear around your selection. This allows you to rotate the content to better fit into the new space if needed.
The transform box created by the Content Aware Move tool.
Click Return or the checkmark in the top menu bar to accept any changes. Photoshop moves selected pixels into the space and patches the original space.
As with the Patch tool, I have two fill settings—structure and color. They work similarly in this tool to patch the hole left by moving the object.
Content Aware Fill Workspace
The Patch tool works fine for simple edits, but the Content Aware Fill workspace gives me more control.
The previous Content Aware Fill tool is still available with Edit > Fill > Content Aware Fill. This will open the fill panel.
And you can select Content Aware. But this tool has, by and large, been replaced by the workspace.
Let me show you the Content Aware Fill workspace. I will use this tool to remove a highway sign from the image below.

Highlighted highway sign I plan to remove using the Content Aware Fill workspace.
Step 1: Selection
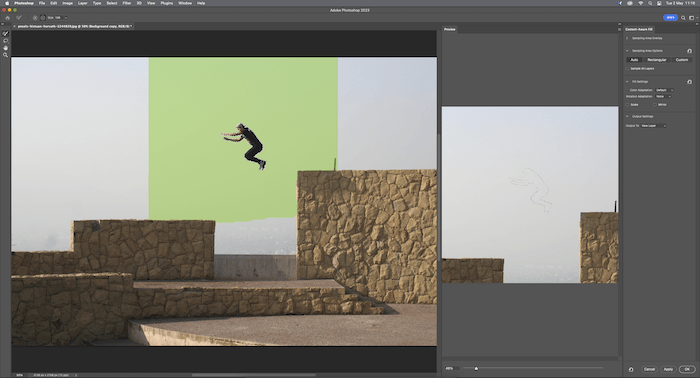
I start by selecting the object I want to remove with the Lasso tool. Then I select Edit > Content Aware Fill. This opens the workspace.
There are three sections to this workspace.
The middle panel (below) is my image. Photoshop has already applied a preview of the Content Aware Fill. But it’s not replacing the sign with the right info. I’ll show you how to change next.
The far left panel, covered by a green overlay, highlights Photoshop’s sampling area. Refining the sampling area will give me better results.

Content Aware Fill workspace consists of three panels.
I also have a toolbar on the far left that includes a Sampling Brush tool, a Lasso tool, a Hand tool, and a Zoom tool. The far-right panel gives me additional options.
Notice that, in the Preview panel, Photoshop is replacing the sign with part of the lighthouse’s roof. I only want trees and the sky in the background. So here’s how to change this.
Step 2: Refine the Sampling Area
I erase the green overlay in the sampling area using the Sampling Brush tool set to minus in the top menu bar. I don’t want Photoshop to use these parts of the image as replacement pixels.
Notice in the video of my screen that Photoshop updates the replacement pixels as I paint. If I remove too much, I switch the Sampling Brush tool to the plus sign in the top menu bar.
By default, Photoshop automatically selects the sampling area. But I can control the choice in the righthand panel.
I select Rectangle if I only want Photoshop to choose from the pixels around my selection. I select Custom to completely control the sampling area.
Then I use the Sampling Brush tool set to plus and paint the sampling area.
In a more complex image, I may want to increase the color adaptation. I have a choice of none, default, high, and very high.
If my selection is on an angle, I may want to apply a rotation adaptation. I have a choice of none, low, medium, high, and full. I also have the option to scale the image or mirror.
When I change these settings, Photoshop warns me that the results may be unexpected. If I don’t like the result, I simply undo it with Edit > Undo (Ctrl or Command+Z).
When I’m happy with the changes in the Preview panel, I click OK. By default, the selected area with the Content Aware Fill changes is saved on a new layer.
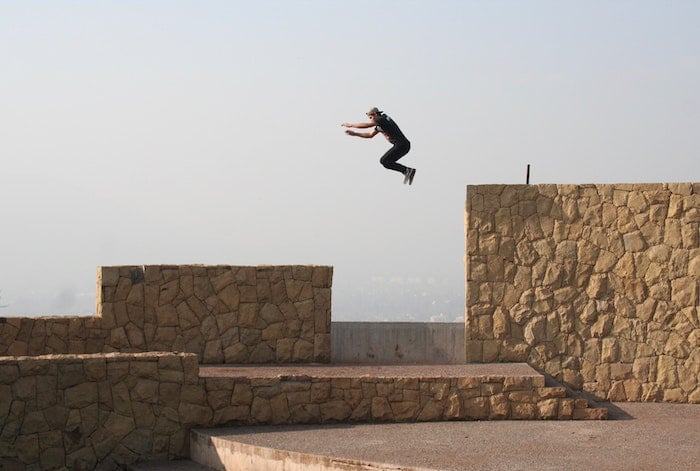
After a little more cleanup work, here is my final image. I sometimes find that Content Aware Fill in Photoshop removes textures I want to keep. So use the Clone Stamp tool to replace the texture.
Object Selection Tool
Photoshop also offers a super-quick one-click solution to people who have the 21.0 version of Photoshop and onward.
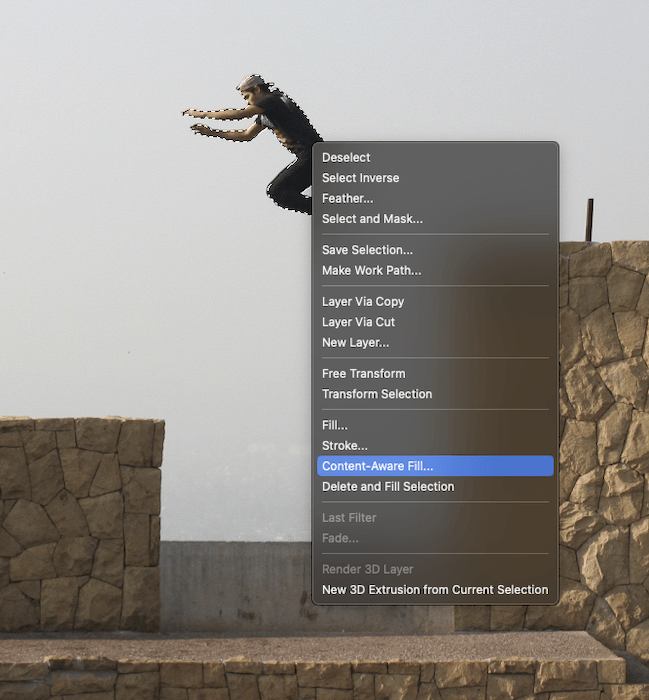
Now we can use the Object Selection tool to select and remove stand-out objects in seconds!
Step 1: Selection
First, you want to make a duplicate layer of your image. Next, you want to find the Object Selection tool.
This will be in the same section as the Quick Selection and Magic Wand tools. So if you can’t find it, hold down your click on these tools to bring up this option.
Highlighted Object Selection tool
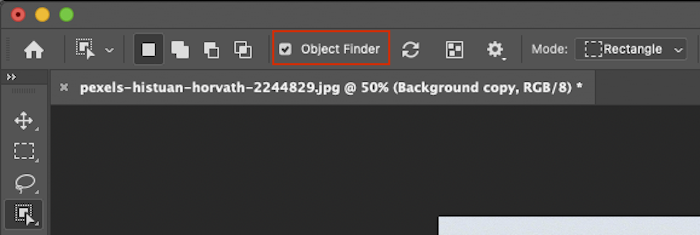
You should then ensure you have Object Finder selected along the top toolbar.
Now you can hover over different objects to see if you can select them. The object will be highlighted in pink.
The Object Finder tool may not work well with objects that blend into the background. In this case, use one of the processes above!

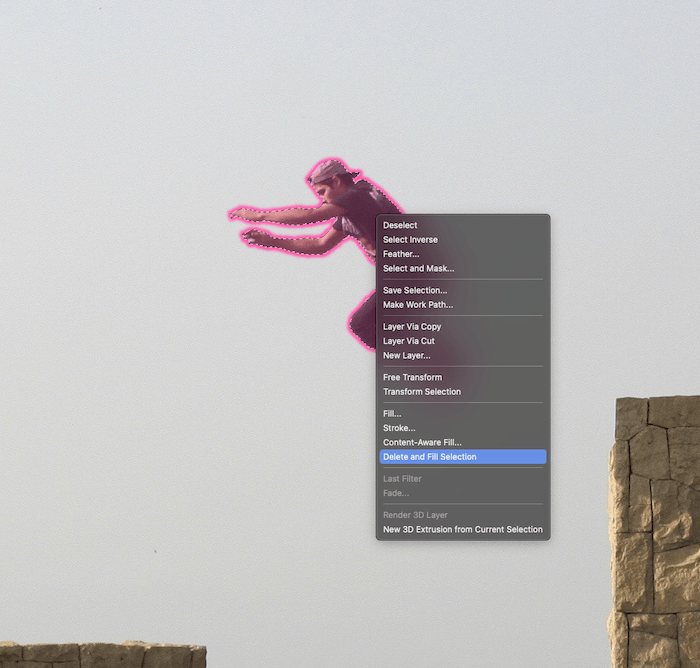
Next, click on the object to turn the highlighted pink area into a selection.

Highlighted subject
Step 2: Using the Content Aware Fill
Right-click your subject and select Delete and Fill Selection for quick results. This works best with a neutral background without many different textures.
Here is the result of this quick-and-easy process that only took a few seconds!
You can select Content-Aware Fill if you need more control over the selection.
This will take you to the Content Aware Fill workspace we covered above. This lets you select the areas that the Content Aware Fill samples.
Conclusion: How to Use Content Aware Fill in Photoshop
Photoshop fill tools help you move or remove objects in your images. Content Aware Fill uses AI technology to select and blend the best replacement pixels.
The Patch tool allows us to select an object and choose pixels to put in its place. The Content Aware Move tool lets us move a selected object, integrate the object into its new home, and patch the space left behind.
The Content Aware Fill workspace lets us control the sampling area. It is much more subtle and sensitive than the Patch tool. And the Object Selection tool is the fastest approach we can take.
The Content Aware technology in Photoshop has greatly improved over the years, but it’s not foolproof! You may have some cleanup work after moving or removing an object.


