Importing photos into Lightroom can be somewhat mysterious for those new to the software.
It’s not uncommon for people to unwittingly make multiple catalogs. Or they duplicate their photos or lose track of where they’re sending their images. Or, in extreme cases, delete them.
So it’s important to understand exactly what the import process does from the beginning. (Note that we are using Lightroom Classic in this tutorial.)
Importing Photos Into Lightroom: What is Importing?
You may have heard people talking about “importing photos into Lightroom.” It sounds like they’re somehow adding the images themselves to Lightroom. But this is not the case.
In essence, importing your photos boils down to telling Lightroom where they are in your storage. The location of your photos is all entered into Lightroom’s catalog.
And it includes camera-generated EXIF data (shutter speed, aperture, time and date, etc.) It’s like filling in an old-style index card for a new book in a library.
You cannot edit any photos in Lightroom until you first import them. And this is done from the Library module.
Check that the Library module has been selected in the top module selection strip. Click the little arrow at the top center if you can’t see it. It should look like this.

The module selector. Hit the “G” key to quickly access this.
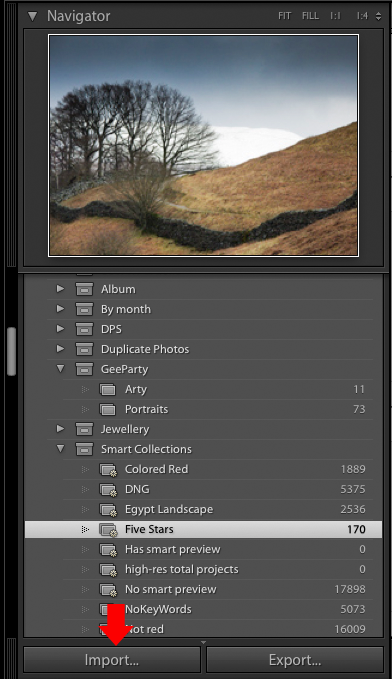
On the left-hand side of the screen, you should see a pane containing several other panels. And at the bottom of this, you should see the Import button.
If this pane is not visible, tap the Tab key. And it should appear as follows.
Importing From a Camera
To import pictures from your camera, connect it to your computer using a USB cable. (There’s no need to use a card reader or other special software.)
Then switch the camera on. And click the Import button to bring up the import dialogue box.
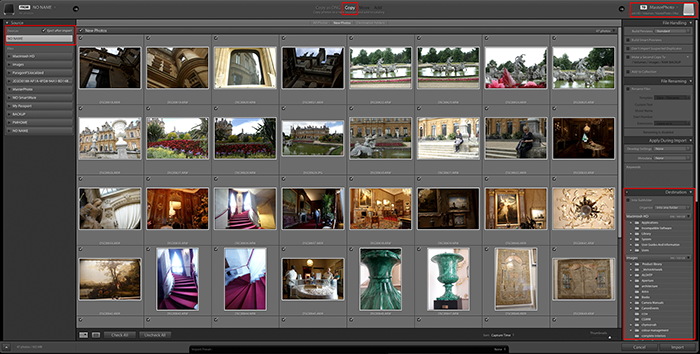
The Import dialogue box. The areas in the red boxes are referred to in the descriptions below.
The layout of this dialogue box is very logical. You adjust the settings in the windows from left to right and then hit the Import button.
The Left Window
This shows you the various places from which you can import photos. It will show all connected hard drives, memory cards, and cameras.
Your camera should appear on the list. It may show up as your camera’s model name. Or it may just be called “No Name.”
Click the item corresponding to your camera. And you should see the thumbnails begin to appear in the center window, which is the main part of the screen.
The Center Window
The images stored on your camera will appear as thumbnails in the main area of the screen.
Untick any that you don’t want to import. If any photos appear greyed out, Lightroom thinks you’ve already imported them.
The selection at the top center of this screen is very important. Lightroom will normally select the correct option. But this doesn’t always happen. So it pays to check this.
There are four options:
- Copy as DNG
- Copy
- Move
- Add
When importing from a camera, select either Copy or Copy as DNG.

When importing images into Lightroom from a camera’s media card, you should first copy the photos to your computer’s hard drive. (Or an external drive.) That way, you can reuse your memory card.
- Copy as DNG: This converts any RAW files it finds on the card into the Adobe Digital Negative format and then saves them. This takes a little longer. But it’s a good format to use for archival purposes. And it takes slightly less hard drive space.
- Copy: This copies each of the selected images as they are,
The Move and Add options should not be available. But they can sometimes be. Just check that Add has not been selected. Otherwise, you can’t edit the photos later.
The Right Window
The destination where your photos will be copied is displayed above this panel. This can be any drive, either a computer’s internal hard drive or an external drive.
Many people choose to have a general-purpose folder on their chosen drive where they import all their images.
Select the destination folder by clicking the top right area to see a list of recent destinations. Or click on a folder from the Destination panel at the bottom of the right-hand window.
If you want to create a new folder to which the photos will be copied, click the plus (+) button at the top of the Destination panel.
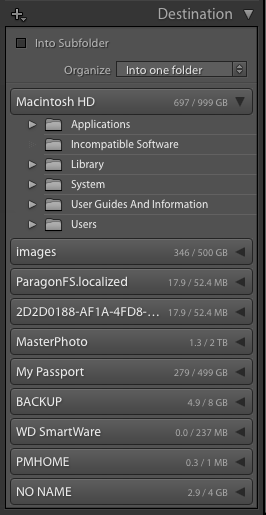
Destination folders for photos.
Some people find that they have loads of unwanted sub-folders after importing photos into Lightroom. These may be named by date, with only a few photos in each one.
This is because the Organize drop-down box in the Destination panel was set to “by date” instead of “into one folder,” as shown above.
If you want to place your photos into a new subfolder, you can tick the Into Subfolder box and supply a suitable name.
Import Options
Lightroom allows you to perform a number of useful tasks. You can apply these as photos are copied to your computer and added to the catalog.
File Handling
Options for how each imported file is handled are listed in the File Handling window.
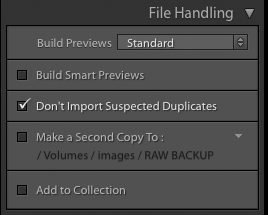
The File Handling panel with its options.
Here’s a rundown of what each of these options does.
Build Previews
To display thumbnail photos in the various Lightroom modules, it’s necessary to build previews of each photo.
This happens during the import process. You can use the drop-down box in this panel to choose from three types of previews (other than the Standard preview).
These previews differ by quality and are as follows:
- Standard: This is the default preview. Standard uses the Camera Raw engine for processing. So it sometimes appears different from Minimal or Embedded previews.
- Minimal: This preview produces low-resolution camera-generated JPEG images that are very fast to create but not color-managed.
- Embedded & Sidecar: These larger camera-generated previews take a little longer to create than minimal previews.
- 1:1: Lightroom uses these full-sized images when you zoom into an image. When you tell Lightroom to generate 1:1 previews, it generates Minimal and Standard previews. So all three are available as the software requires. Full-sized previews can take a long time to generate and slow the import process.
Build Smart Previews
If you have your master photos always available in the catalog, you can leave the Build Smart Previews box unticked.
Maybe you want to edit your photos when the master images are not online. When the external USB drive on which they reside has been unplugged, for example.
Smart Previews allow you to make edits with missing master photos.
But if you don’t intend to do this, leave the box unticked. Smart Previews will take up extra space on your hard drive. You can make a Smart Preview easily later on if you need to.
Don’t Import Suspected Duplicates
Sometimes photos are left on a media card between import sessions, from one shoot to the next.
This can make it difficult since some photos on the card will be new. And some will have already been imported to Lightroom.
The same photo may be copied to multiple places on your hard drive in cases like this. And it ends up getting messy when importing.
To help avoid this happening, tick the Don’t Import Suspected Duplicate box.
Lightroom will then check the EXIF data for each photo against those it already knows about. And it greys out any it thinks you already have in the catalog.
Ideally, you should import all the images on a card. And once safely copied to your hard drive, the media card should be re-formatted, ready for the next shoot.
But not everyone does this, based on personal preference and habit. So even if you always reformat your cards, it’s generally a good idea to tick this box to help keep things tidy.
Make a Second Copy To
You don’t want random duplicates of some of your photos. But you should have comprehensive back-ups.
All hard drives will fail eventually. So having access to a copy of each photo is good insurance against accidental deletion or hardware failure.
The best system is a proper incremental backup procedure using proprietary backup software. But if you don’t enjoy this level of protection, Lightroom does offer a type of solution.
If you tick the Make a Second Copy To box, you can specify another hard drive folder where Lightroom will copy your photos during import.
This saves you from remembering to back up your photos. But it doesn’t allow you to rename any photos during the process.
It’s just a direct copy of what happened to be on the camera’s media card. It’s crude but better than nothing.
Add to Collection
If you tick this box, Lightroom can automatically add all the photos you’re importing then to an existing collection.
File Renaming
Maybe you’re trying to import photos from several different cameras. You’ll quickly discover the chances of having two or more photos with the same file name are quite high.
Because of this, it’s useful to rename rather cryptic file names your camera generates. More recognizable and unique names are better.
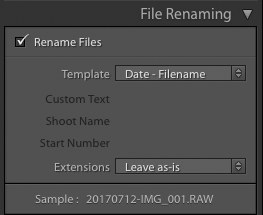
Give photos more meaningful names.
To do this, tick the Rename Files box. And select a template from the drop-down box.
In the example above, the template chosen adds the date to the front of the filename provided by the camera.
Perhaps you’re using several cameras on the same shoot. If so, you might instead want to select a template that includes a custom name for a particular camera.
There are lots to choose from. But if nothing suits how you work, you can make your own template by selecting Edit.
Apply During Import
This import option allows you to add additional information (metadata) to your photo files.
A handy tip is to use the Apply During Import panel to add copyright in the metadata for each image imported.
Maybe you’ve already found some Develop Settings adjustments you like. And you’ve saved them as a preset.
Select them or any other preset from the Develop Settings drop-down box. Lightroom will then apply those settings to each imported photo.
This panel also lets you add keywords to help you with the task of organizing photos in Lightroom.
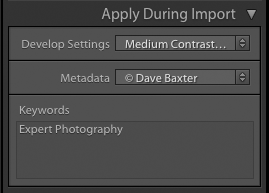
Apply Develop Settings presets, copyright info, and keywords here if desired.
Save Your Import Settings
Finally, at the bottom of the import screen, there’s an option to save your import settings as a named preset. Just click on the arrows and select Save Current Settings as New Preset…
How to Import From A Hard Drive
Importing from a hard drive is simple. Lightroom only needs to know where the photos are already located.
There is no need to copy or rename them. But it’s easy to make accidental copies if you don’t carefully watch the settings.
Follow these steps when importing from a hard drive:
- Select the folder whose photos you want to import in the Source panel. If it contains subfolders, tick the Include Subfolders box to see thumbnails of the photos in this folder and all its subfolders.
- Make sure you select Add and not Copy. This will leave the photos in their current folders and will avoid making duplicates.
- Set the options under File Handling for doing a camera import. Note that making a second copy is greyed out with the Add option.
- Under Apply During Import set as per the camera import.

When adding photos from a hard drive, select Add.

