Capturing the Northern Lights is a must for outdoor photographers.
Dramatic, bizarre, ethereal, colorful, weird, and at times, downright jaw-dropping, northern lights photography is unquestionably a perfect subject.
They are also challenging. As lights dance over the frozen winter landscape, it can be hard to put everything together to create successful northern lights photography.
Northern Lights Photography Gear

One of my clients on an aurora workshop is well equipped for the cold in his down suit
- Tripod. You need it. There is no faking this one. Get one, and use it. If it's brutally cold (which, let's face it, it probably will be) you'll appreciate carbon over cold-channelling aluminum, but either will work. Bring it, use it, no excuses.
- Camera. I've seen beautiful pictures of the northern lights made with everything from good point and shoots to high end mirrorless and DSLRs. So don't feel too restricted by your choice of camera. That said, a camera with low noise at high ISOs, is definitely preferable for capturing the aurora borealis. And though not absolutely necessary, the ability to change lenses, too, is a major asset.
- Lenses. As a general rule, you want wide and fast. The faster the better. My primary aurora lens is a 14mm f2.8, but I'm eyeing a 20mm f1.8 for the extra speed. All will need to be manually focused, so make sure that is straight-forward. A variety of focal lengths, either in the form of a zoom, or a choice of lenses is also helpful. I've used everything from a 70-200 to my fixed 14mm to photograph the lights.
- Remote Release. Though not absolutely necessary, a cable or wireless release for your camera will help reduce camera shake when you click the shutter. A jiggly blur in the stars can ruin an otherwise good shot. If you don't have a release, use the camera's timer, (many have a 2-second delay setting). Keep in mind that using a timer rather than a release will slow you down.
- Clothing. Maybe I should have put this one at the top of the gear list, because it is probably the most important thing for a successful winter shoot of any kind. On some of the northern lights photography workshops I've led to the Brooks Range of northern Alaska, we spent hours outdoors, at night, capturing the polar lights in extreme cold. While there is always a warm refuge somewhere nearby, being prepared and comfortable in those conditions will extend your shooting hours, and result in better images.
Good clothing is not just important, but vital. I don't want to go into too much detail here, but a thick down coat with a hood, down or synthetic fill pants, mittens, liner gloves, face masks, and warm hats should all be on your list.
I do, however, want to take just a second to talk about footwear. Northern lights photography trips like those I lead to the Arctic are not the time to toy around with light winter boots. This is not the time for fashion. Pack boots, god-ugly bunny boots, mukluks, and other extreme-cold footwear, a couple sizes too big (to account for thick socks and toe warmers) are what you are looking for.
Nothing will wreck a night of photography more quickly than painfully cold, or (please no) frost-bitten toes. Enough said.
The Day Before
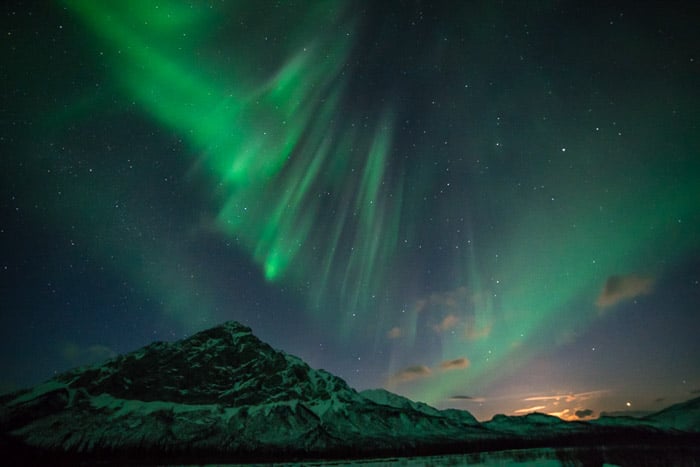
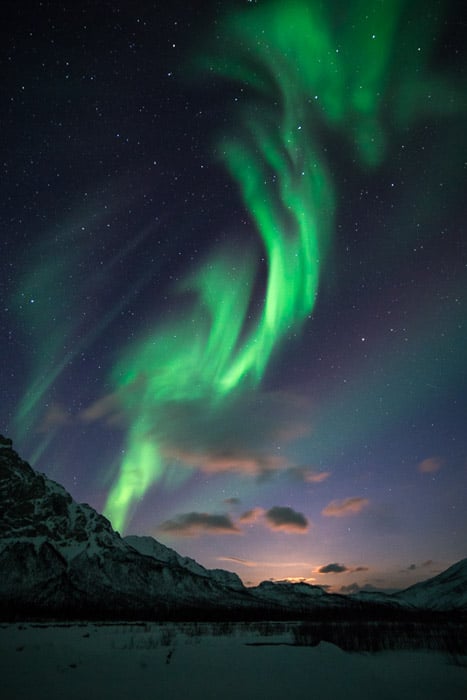
The rising moon offers some warm light to this image of the aurora over Mt. Dillon in the Brooks Range of northern Alaska.
Prefocus. Autofocus is wildly unreliable in the dark. Manual focus is the way to go. The first thing I do when I'm leading a photo workshop or tour is take my clients out in the daylight, and have them set their focus to some distant mountain top.
After making sure their focus is tack sharp, I hand out small pieces of electrical tape and have everyone tape the focus ring in place so it won't shift around accidentally. Come the excitement of the first aurora show, no one has to worry about messing with their focus points, or worse, find their shots heart-breakingly soft.
A caveat: You still need to check your focus periodically. I've found that some lenses will shift their focus point slightly when there are extreme temperature changes. Pixel peep occasionally and adjust as necessary.
In the Field
Have patience. The aurora is a fickle lover, and she only appears when she wants. Even when the forecasts are coming together and everything seems set for success, the lights may take a while to appear, they may erupt when you don't expect them to, or clouds may obscure the sky.
It's very important to plan for several nights to account for bad weather or uncooperative conditions. It's not uncommon on a northern lights chase to spend a few hours, doing nothing at all, waiting.
So when packing your , add a book to your gear list, you might want it to fend off a bit of boredom.
Patience however, usually pays off. On a recent aurora photo workshop, my students and I spent three hours sitting, waiting, chatting, drinking coffee, and looking helplessly at the sky.
Then, with a suddenness that caught us off guard, the sky filled with curtains of green and purple aurora. We dashed for our cameras and tripods, and spent the next two hours making incredible images, hooting and hollering like we were at a fireworks display, as we admired the aurora light show above.
It was worth the wait.
Camera Settings for Aurora Borealis Imaging
This image is one of my earliest digital shots of the aurora. The 20 second exposure blurred the curtains into hazy bands of light. We can do much better now.
In the days of film, and early days of digital, long exposures of 15 or 30 seconds for the aurora were the name of the game.
This allowed the lights to appear bright and colorful, but details within the aurora, the pillars and beams, blurred away leaving behind an indistinct curtain. Technology has moved beyond this.

One second shutter speed. Any more and those lovely details would have blurred out.
You want the shortest shutter speed possible that allows sufficient brightness and low noise. ISOs in the 1600, 3200, or 6400 range are typical.
For a moderately bright aurora display, I'll usually start with a setting of f2.8, ISO 1600 or 3200, for 5 seconds.
From there, depending on what the lights are doing, the moonlight, or other factors, I'll adjust up and down.
2 seconds, ISO 6400, f2.8. WIth high ISO capabilities in modern digital cameras, we can capture the northern lights in a way we could never do before.
On the night I describe above, for about 10 minutes the lights brightened and started moving VERY fast. Sacrificing some noise, I went to ISO 12800, f2.8, and 1 second exposures.
The shots needed a bit of noise reduction in post-processing, but I was able to capture every detail of the curtains. That sharpness and detail in the northern lights is what makes the pictures successful.
Aurora Borealis Imaging Composition
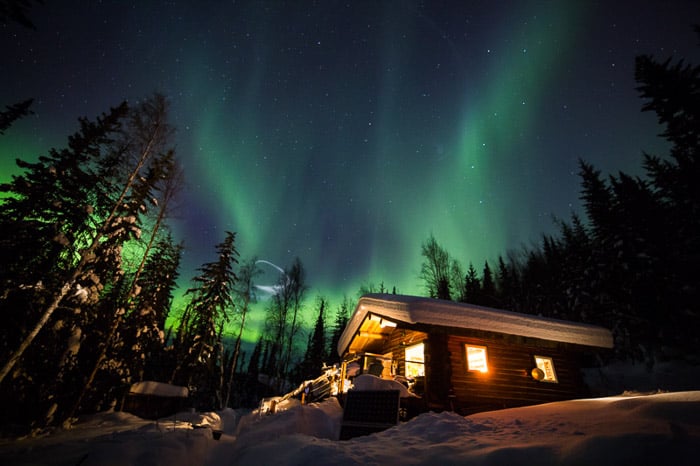
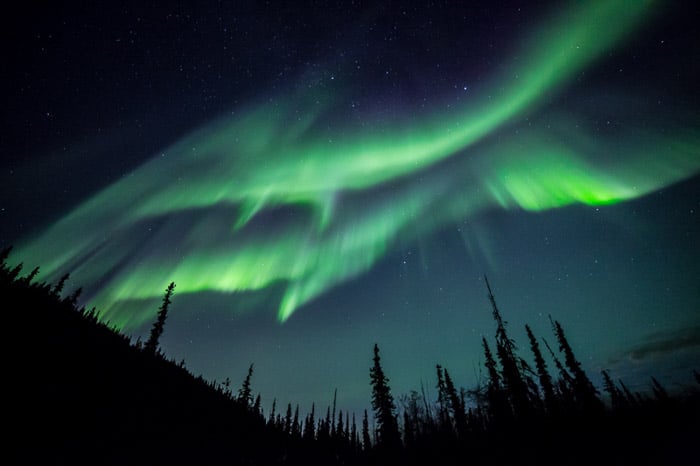
A strong foreground, like my cabin north of Fairbanks, Alaska makes for a much more compelling image than the lights alone.
When the aurora is hopping, your attention will shift to the sky and away from the foreground. You'll have to concentrate, focus, and remember that composing northern lights photography is little different than any other sky-dominated landscape image.
In the dark, a poorly framed image may not stand out the way it does in daylight, but I'll guarantee that you'll notice when the photos appear on your computer the next morning.
Consider where you are, provide some context, avoid distractions, and compose carefully.
Where and When to Capture the Northern Lights

Selecting the ideal spot for a Northern Lights capturing excursion is a significant choice. The northern lights can be seen around the planet's northern regions. Scandinavian countries, Iceland, northern Canada, and of course Alaska, are popular destinations.
While your budget and available time may limit you, it is important to consider the likely , local tours, lodging and transportation options, and seasons. The aurora is primarily a winter phenomenon. In the far north, nights don't get dark enough in the summer for the lights to appear.
Here in Alaska, you can see the lights from late August or early September through mid-April, but prime time is late September through early April.
Research weather patterns. Some months are more likely than others to have clear skies. In Alaska, March and April are the driest months with the best chance for clear skies, but other locations will differ.
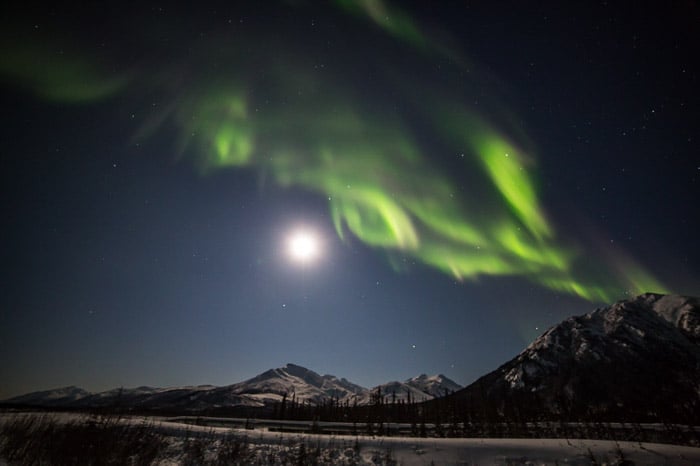
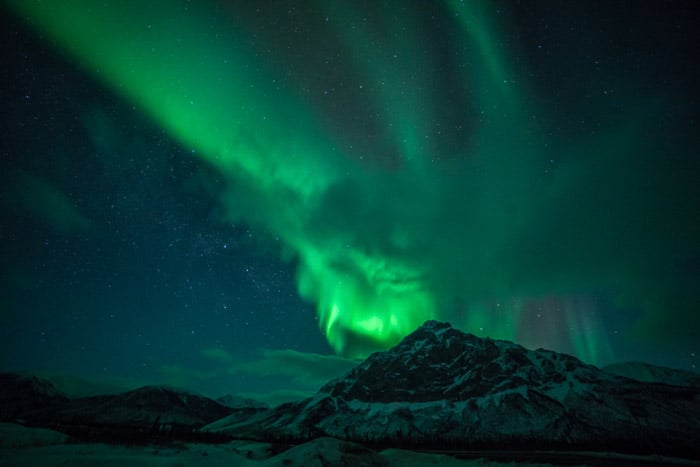
A full moon is not necessarily bad for capturing the northern lights. Here a the moon lights up the Brooks Range of northern Alaska in warm light while the aurora dances above.
Moonlight is another thing to consider. While great lights can occur regardless of how bright the moon is, during the dark nights of a new moon, even low-grade aurora displays will appear more distinct.
However, I love a little moonlight. It sheds light on the mountains and snow-covered trees, provides texture, and adds a remarkable warm light to many otherwise cool-toned images of the aurora.
Getting Help
Like any photography discipline, northern lights photography takes practice. This can make northern lights photography a frustrating pursuit for people new to it or with limited time.
Organised Northern Lights workshops or tours, or private photo-guide services are a great way to assure some success. Even if you prefer to take photos of the Northern Lights independently, hiring a local expert for a night to get you started may help you dodge the usual pitfalls and find the best locations to shoot.
Conclusion
On a recent workshop in the Brooks Range, my clients and I drove a few miles north of the cabins where we were staying and pulled off the remote road. There were no visible lights in the sky, but we waited, patiently.
I raised my camera to the windshield every now and again and made a test shot. My camera, I knew was far better at "seeing" the northern lights than my naked eye would be.
Nothing. Nothing. Still nothing.
And then…something. A pale green curtain.
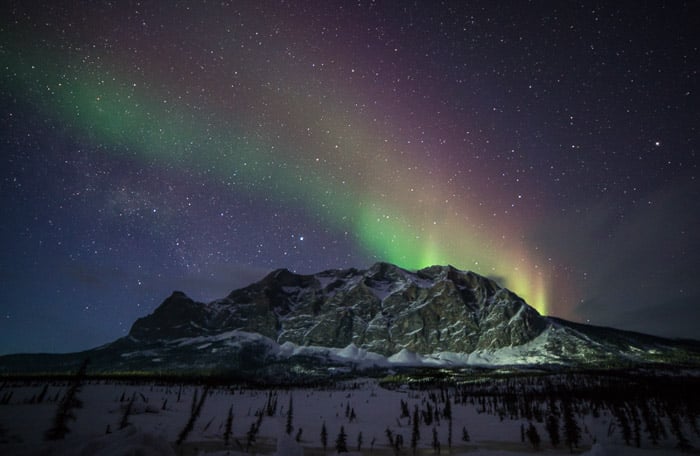
Aurora vary from green to purple to red, depending on how the solar particles are interacting with our atmosphere. Only once, however, have I encountered a display where they all appeared at once. This was a virtual aurora rainbow over Sukakpak Mountain in northern Alaska. My workshop students were thrilled, and so was I.
We grabbed cameras, extended tripod legs and climbed from the warmth of the car into the chill Arctic air. As we set up the aurora brightened, just a bit, finally visible to the naked eye.
Our images started showing reds, and purples, and greens. Though extremely pale to the eye, our cameras were pulling a rainbow of colors from the quiet aurora display.
Over the next few hours the lights grew brighter and brighter, eventually erupting into a display like few I've seen before. But the first images, the bright colors over the rugged peaks of the Brooks Range remain some of my favourites.
The aurora will surprise you. And that is one of the best reasons I know to go and photograph the northern lights.
Interested in some more interesting photography tips? Check out our adventure photography guide or article on photographing the moon!