How do you reduce noise in Photoshop? This step-by-step tutorial explores two Adobe Photoshop denoise tools. We go over the Noise Reduction filter and the Adobe Camera Raw filter. I will also show you how to use the Photoshop Neural filter for JPEGs. And there are plugins designed to reduce grain and make a picture clearer.
Perhaps you’ve had an epic day shooting. But when you later look at the photos, they are grainy and soft. There is too much noise! Good news! The images are probably not ruined. So let’s go over the Photoshop techniques to remove grain from the picture, so there’s not as much noise. But first, some background information…

How to Reduce Noise In Photoshop
Noise makes your picture look grainy. It consists of tiny dots of light, sometimes colored, across your image. One of the main reasons for noise in photographs is a high ISO.
With advances in camera technology, digital noise is less of a problem than had been with film. ISO performance improves with each generation of camera bodies.
This depends on your camera. But you may be able to shoot at ISO 800, 1600, 2500, or even 5000 before you notice grain in your images. Even then, you may only see it after zooming into the photo.
And noise is not necessarily bad. If you want your photo to look vintage, grain is fine. Most black-and-white images also look good with a bit of grain. But too much digital noise distracts the viewer from the subject. It makes the photo look soft and out of focus.
There are a couple of different types of noise.
Luminance Noise
Luminance noise is the most common type of digital noise. This type of noise looks like grains of sand in your image. When you zoom in, some pixels seem brighter than others.
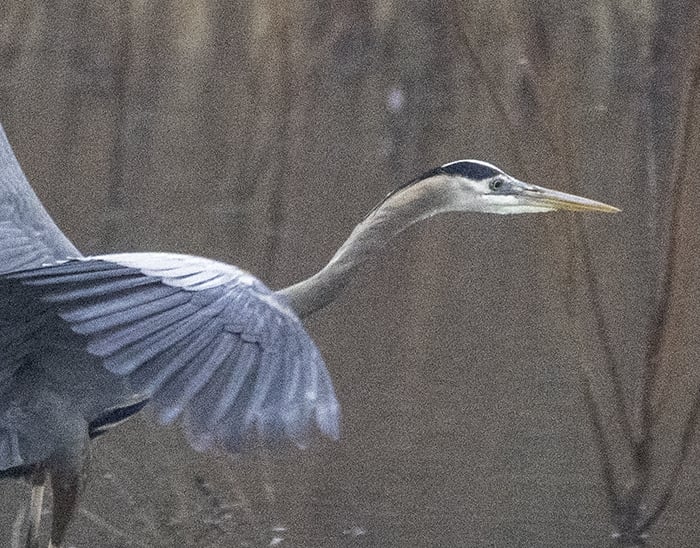
The heron in this photo was moving fast at dusk. There was no option but to increase the ISO to 6400 and fix the grain later in post-processing.
Color Noise
Color noise is also called chromatic aberration or chrominance noise. When isolated pixels pop out with a color like green or red, you are looking at color noise. The colored dots do not go with the other colors in the image.
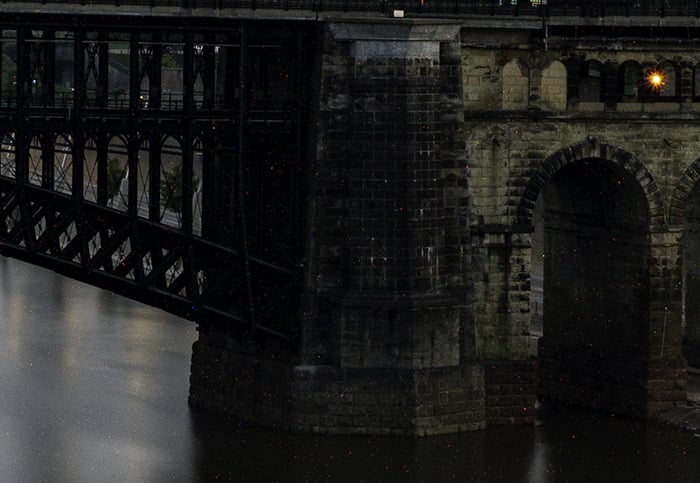
Color noise is created when your sensor gets hot. Even though I was on a tripod and shooting at ISO 100, this image has red and green dots of color noise. That’s because it was a 183-second exposure.
How to Reduce Noise in Your Camera
Denoise tools are for the worst-case scenario. Ideally, you want to make the cleanest photo possible with your camera. Start by lowering your ISO. A high ISO introduces grain into your image.
You may also see grain if you lighten shadows too much. It helps if you use a bright exposure to keep the shadows from getting too dark. This is the reason to “expose to the right.” The peaks on your histogram should favor the right-hand side of the graph.
How to Reduce Noise in Photoshop (Filters and Plugins)
Sometimes though, it is impossible to avoid noise. For instance, you have to raise your ISO when photographing action in a dim space. But now, there are tools to help you remove or reduce the grain during post-processing.
First, let’s look at how to remove noise from a photo in Photoshop using two different filters. Then let’s look at Photoshop’s Neural Filter and plugins.
Noise Reduction Filter in Photoshop
Let’s start with the Reduce Noise filter. The filter is easy to use, but you have to be careful with this tool. You do not want to introduce more noise into your image.
Step 1: Open Photo in Photoshop
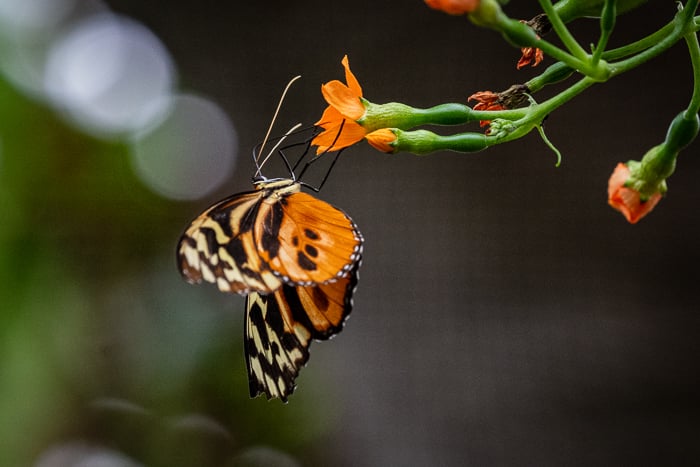
Open a photo in Photoshop by going to the File dropdown menu and selecting File > Open. Then navigate to your image. I am going to use this photo taken at ISO 8000. You can see the digital noise by zooming in on the butterfly and the textured background.
Butterfly image with noise
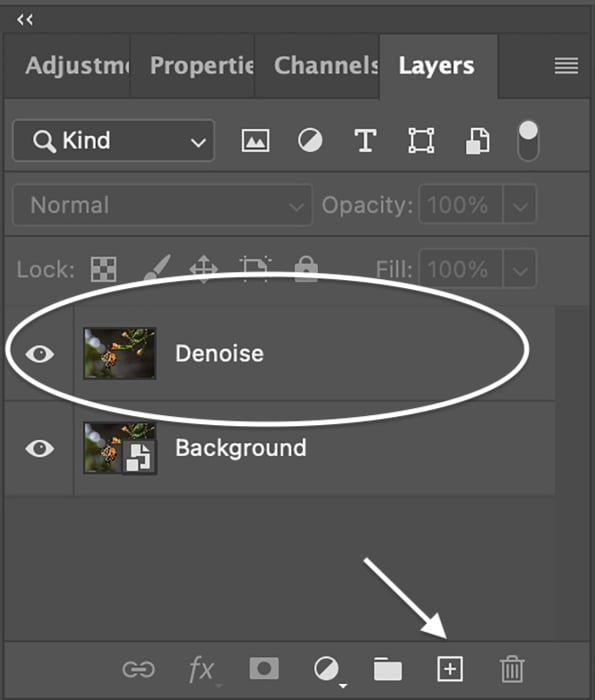
Step 2: Duplicate the Background Layer
Duplicate the original image by going to the Layer dropdown menu. And select Layer > New > Layer via Copy (Ctrl+J or Command+J). You can also drag the Background layer down to the new layer icon (plus sign) at the bottom of the Layers panel.
Then rename this layer “Denoise.” You should have two layers in the Layers panel.
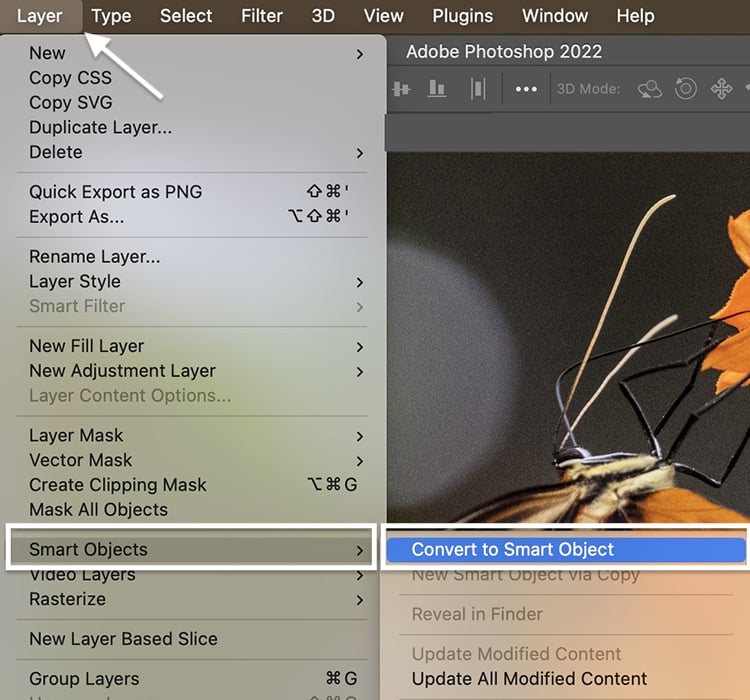
Step 3: Create a Smart Object
Convert the Denoise layer to a “smart object.” You can filter noise and then re-adjust your settings later with a smart object. Go to the Layer dropdown menu. And choose Layer > Smart Objects > Convert to Smart Object. An icon appears in the lower right-hand corner of the thumbnail.
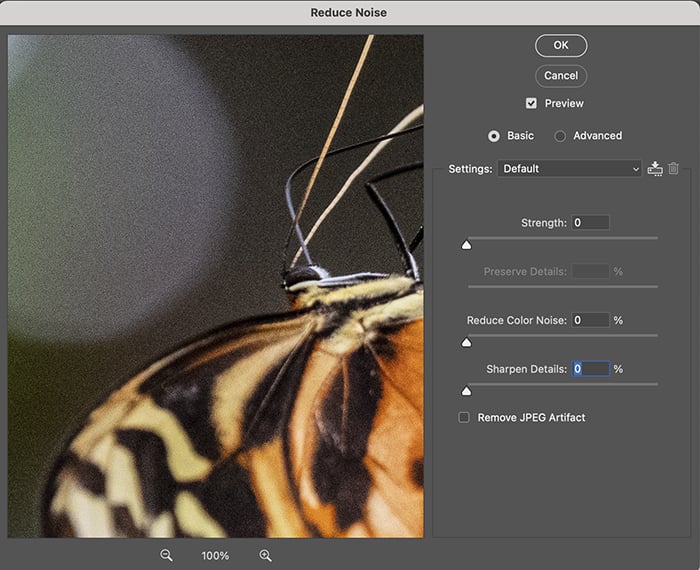
Step 4: Open the Reduce Noise Filter Window
With the Denoise layer selected, go to the Filter dropdown menu. Choose Filter > Noise > Reduce Noise. (Notice there is another filter you can use to add noise in Photoshop. You may want to do this to create a vintage look.)
Position the preview screen to show your subject. By default, the preview will be at 100% zoom. But you can change this.
There are four sliders:
- Strength
- Preserve Details
- Reduce Color Noise
- Sharpen Details
You also have a checkbox at the bottom that removes JPEG artifacts. The default Reduce Noise filter is the basic version. I will talk about the advanced version as a second option.
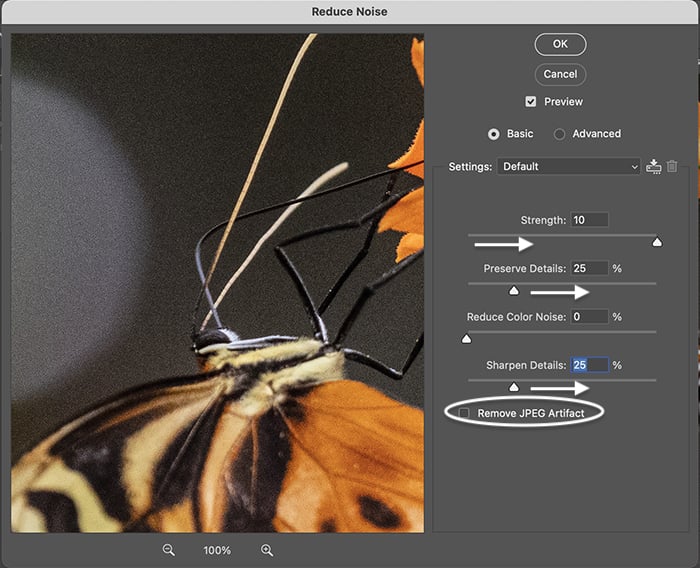
Step 5 (Basic Version): Move Sliders to Reduce Noise
Even though it is not labeled as such, the Strength slider adjusts the amount of luminance noise. The scale is 0 to 10. Move the Reduce Color Noise slider if your image has color noise. The scale is 0 to 100%. I often set the strength to a high number. But I only reduce color noise if this is obvious in my image.
Watch the preview window for the changes. You may see your photo become blurred and lose detail. It is a balancing act between reducing noise and retaining sharpness.
Use the Preserve Details and Sharpen Details sliders to bring back some lost detail. The scale for both sliders is 0 to 100%. Move the sliders in increments. Moving them too much could create more grain in your photo.
If you are working with a JPEG, check the box at the bottom. But there is another way of removing JPEG artifacts in Photoshop that we will explore a little later. Next, click OK at the top.
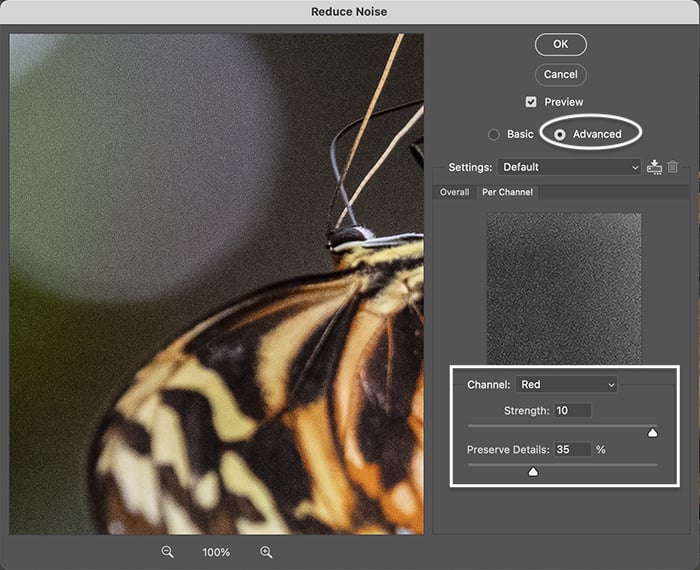
Step 5 (Advanced Version): Luminance Noise Reduction
The Reduce Noise filter in Photoshop has an advanced option. This lets you remove luminance noise in the red, green, and blue color channels one by one.
If you have noise throughout your image, use the first option. But if one channel has most of the noise, the advanced option may be helpful. Then click OK at the top.
Adobe Camera Raw Filter
You can also use the Adobe Camera Raw (ACR) filter to reduce noise in Photoshop. Steps 1, 2, and 3 are the same as the ones for Reduce Noise filter. Open a photo in Photoshop, create a duplicate copy, and convert the new layer to a smart object.
Step 1: Open the Adobe Camera Raw Filter
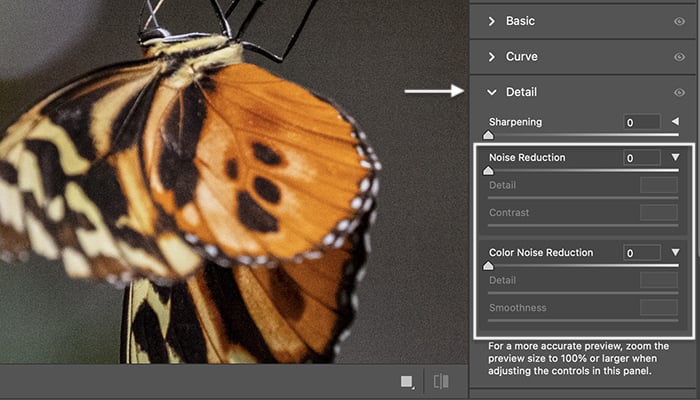
Select the Filter dropdown menu. Choose Filter > Camera Raw Filter (Shift+Ctrl+A or Shift+Command+A). This opens the ACR workspace. Reduce noise tools are under the Detail dropdown.
You have separate sliders for noise reduction (luminance) and color noise. Also, there is an instruction to zoom in to 100% for more accurate control.
Step 2: Move Sliders to Reduce Noise
Even though it is not labeled as such, Noise Reduction adjusts the amount of luminance noise. The scale is 0 to 100. Move the Color Noise Reduction slider if your image has color noise. The scale is 0 to 100.
Hold the Alt or Option key as you slowly drag the sliders. This turns your preview black and white. It is sometimes easier to see the grain. As with the Reduce Noise filter, adding too much will soften the edges, and you will lose detail. Most images have a little noise. After you move the main sliders, the Detail and Contrast sliders become active.
The Detail slider works like the Reduce Noise filter’s Sharpen and Preserve Details sliders. The higher the detail value, the more details remain in your image—and more grain. You have to find a balance between reducing grain and keeping details. Adding too much detail also adds more noise.
Contrast is the difference between the light and dark tones in your image. A higher contrast value emphasizes these differences and sharpens the photo. But more contrast also means more grain. Since you are working with a “smart” layer, you can always re-adjust the settings later.
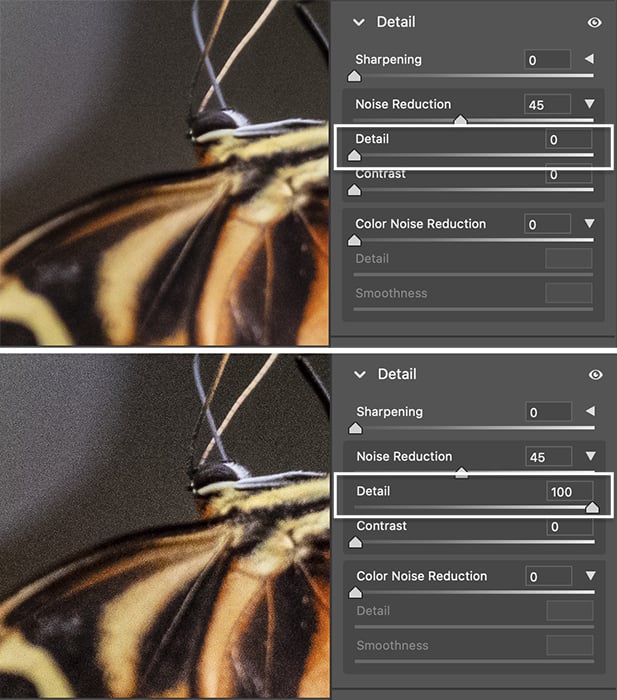
The detail slider brings back edge detail. Set to 0 (top) and 100 (bottom)
Step 3: Reduce Noise and Mask
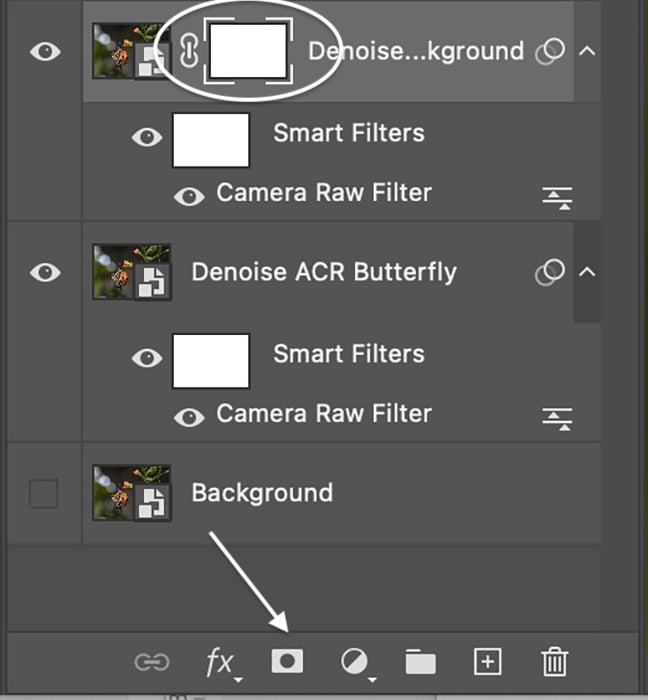
Tools that reduce noise in Adobe Camera Raw work like Lightroom. But using ACR means that you can mask the results in Photoshop. In my image, I reduced noise in two different ways. I created two layers—one for the background and the other for the butterfly.
I heavily reduced the noise. And I added zero detail and contrast for the blurred background. I reduced the noise slightly for the butterfly layer and added some detail and contrast. I also added a little sharpening.
I had two layers. I reduced luminance noise more in one. On the other, I balanced some noise with some sharpening detail. Select the layer with more digital noise and add a mask. You can do this by clicking the “add vector mask” icon at the bottom of the Layers panel. A white mask appears next to the layer thumbnail.
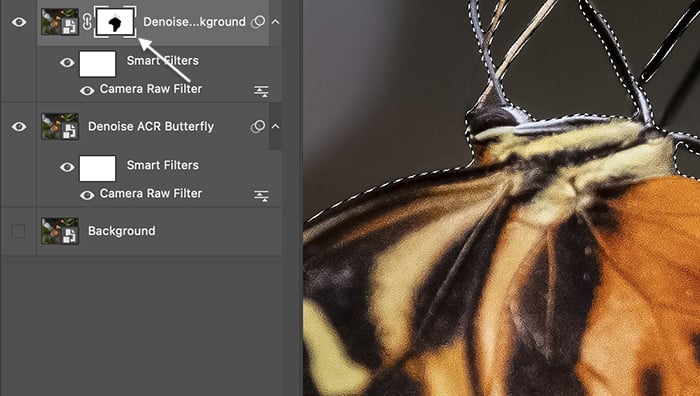
 Select the subject using one of Photoshop’s selection tools. I used the Subject selection tool. Marching ants appeared around the butterfly.
Using a soft, black brush, paint on the layer mask. Black hides this layer and reveals the layer underneath. By masking the subject, we can reduce luminance noise at two different levels in the same image.
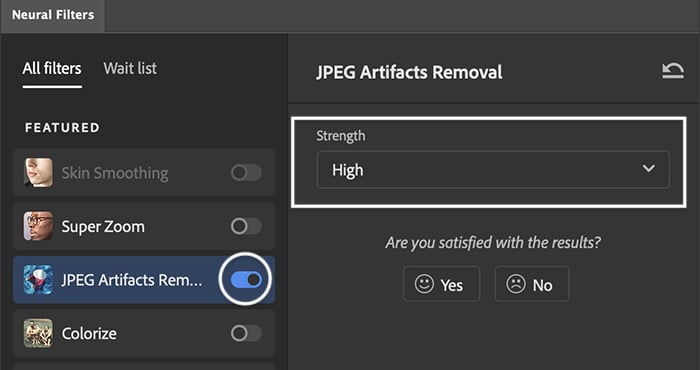
JPEG Artifacts Removal Neural Filter
If you are working with a JPEG instead of a RAW file, you may want to apply JPEG Artifacts Removal. This is a type of remove noise filter. It is one of Photoshop’s new AI Neural filters.
Go to the Filter dropdown menu. Select Filter > Neural Filters. Toggle on the button next to the tool. You have a choice of low, medium, and high. Wait for the processing to finish. Then accept the changes.
Photoshop Noise Reduction Plug-In
Recently, there has been an explosion of software tools that remove noise. Some are part of complete programs. Others are stand-alone programs or plugins that work with Photoshop. To know my top pick, go to our article on noise reduction software for photographers.
One of the best-selling noise plugins is DeNoise AI by Topaz Labs. After you install the program, it appears under the Filter dropdown menu. You can make changes in DeNoise AI. When you click Apply, the results appear as a layer in Photoshop.
<img class=”aligncenter wp-image-756017 size-full” src=”https://expertphotography.com/img/2022/04/How-to-reduce-noise-in-photoshop-mishra-topaz-plugin.jpeg” alt=”Photoshop screenshot of Topaz Labs DeNoise AI plugin in the filter menu” width=”586″ height=”700″ />
Conclusion: Reduce Noise In Photoshop
Using the Reduce Noise filter, removing noise from your image is easy in Adobe Photoshop. Or you can use the noise tools in the Adobe Camera Raw filter. With these tools, you can reduce luminance noise and color noise. If the Photoshop noise reduction tools are not enough? There are other denoise programs. And many work as plugins within Photoshop.
Details smooth out after reducing noise. And you can balance the noise reduction by retaining detail and structure. There are all sorts of denoise Photoshop tools at your fingertips. And by knowing how to reduce noise in Photoshop, you can fix those photos ruined by excessive grain!


