Flat lay photography is perhaps one of the most appealing subgenres of product photography. But doing it isn’t as simple as you think. If you’re struggling to create flat lay product photography photos, we’ll give you a few tips to help you achieve the perfect shot!
1. Flat Lay Product Photography: Point Your Camera Straight Down
Strictly speaking, flat lay photography requires that you position your camera at a 90-degree angle downwards. So if you take pictures at a 45-degree or even at a 75-degree angle, it isn’t considered flat lay.
So how do you know if you’re shooting straight down? If you’re doing flat lay product photography without a tripod, you’ll need to watch your objects’ edges. If you can see the sides of any particular item, that means your camera isn’t in a 90-degree position yet.
Now, how do you make sure your camera is in a 90-degree position if you’re shooting flat lays handheld? The secret is to eyeball your angle. You’ll need to make sure the barrel of your camera lens is pointing straight down. Then look at the objects’ corners. If you can see their sides, then you’ll need to move higher up and adjust your angle until the sides disappear.

Use a Tripod with a Horizontal Mount
When doing flat lay photography, it’s best to use a tripod with a horizontal mount. That way, you can take overhead images without having to hold the camera at all.
To check whether your camera is pointing 90 degrees downwards, you’ll need to look at the spirit level. It’s a tiny guide attached to the tripod with an air bubble inside a clear plastic tube.
Tripods usually have several spirit levels corresponding to horizontal and vertical axes. The one you should look for is the tube that’s oriented vertically.
When the camera is mounted in an upright position, the bubble should be either at the left or right side of the tube. But once you move your tripod to the horizontal position, you should find it in the middle of the tube. If it’s not, then it means your camera angle is still off.
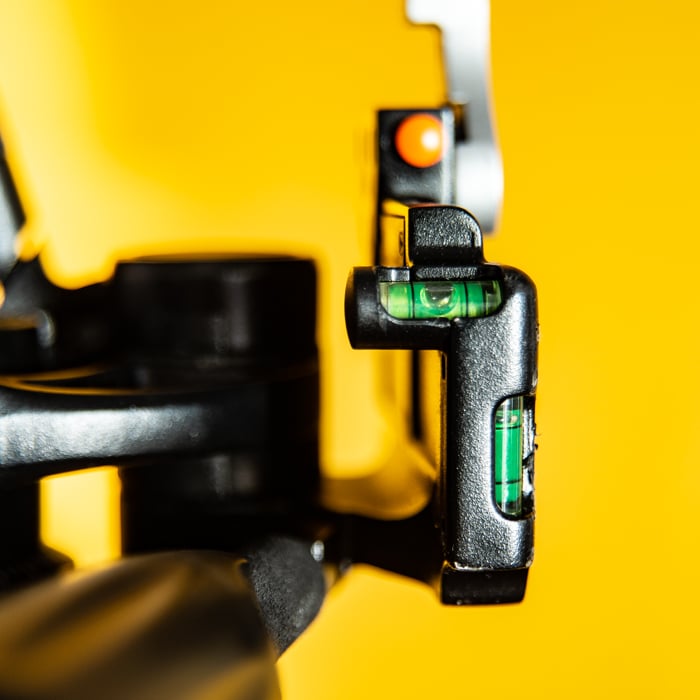
Tripod spirit level tubes indicating different camera orientations.
2. Choose the Correct Flat Lay Background
Great flat lay photography relies on the correct background. You can view it as a canvas that allows you to create your artwork.
Of course, the ideal background for flat lay photography is a flat surface. But feel free to experiment with textured and layered options if you want to add dimension to your work. Layered backgrounds are common in flay lay photography.
It would also be best if you chose a plain background for your flat lay. Why? Mainly because using patterns can be too distracting. And if you have a ‘clean’ canvas, your viewers can better see the products featured in your image.

Example of a layered background.
3. Use Proper Lighting to Set Your Mood
It doesn’t matter if you’re using natural light or artificial light. Knowing the type of light to use when it comes to flat lay product photography is always crucial. It sets the ambience of your image and can help create a visceral look to the products.
If you want to make your flat lay appear edgy, you’ll need to shoot in direct sunlight. Doing so allows you to bring out punchier colors in your product. The hard light also creates dark shadows that add dimension to your image.
Of course, the mood of your image would change depending on when you shoot your flat lays. For instance, if you take pictures at noon, you’ll have short shadows and end up with bright and vibrant images.

Example of hard light.
On the other hand, if you take pictures during sunset, you’ll have long shadows that add to the mood of your shot. Your flat lay product image will also have a softer glow due to the sun setting.
Now, what if you want a more painterly look to your flat lay ideas? Consider shooting beside a window. Since it’s away from direct sunlight, your images will have diffused shadows and softer, more even lighting.
Example of soft light.
4. Style Your Flat Lay Set
There are many ways to style flat lay photographs. You can either keep it messy or create neat patterns. But no matter what you end up doing, you must have complete control over how you want to present your images.
One of the best methods of creating flat lays is called knolling. It’s a style that involves organizing objects into patterns. It requires meticulously arranging objects to create clean patterns.
When knolling, the main rule is to arrange objects in the same angle or orientation. It’s also crucial that you keep them at the same distance from each other. Of course, you’re free to break these rules as long as you can still create discernable patterns in your flat lays.

Knolling may be pleasing to the eyes due to the beautiful patterns, but messy flat lay photography can be just as appealing. Surprisingly, there’s something about its chaotic nature that makes it interesting to look at.
Creating messy flat lay photography can be more challenging than knolling. Why? Because it takes guts to find order in all that chaos.
Now you must be wondering, how exactly can you find order in chaos? The secret is finding an object or two to anchor your image to a particular narrative.
You can make any of your flat lay product photos as messy as you want. Then, place the main object prominently in your frame. Why? Because it will dominate your viewer’s attention, and it will be easier for them to relate all the other random things in the photo to that single object.
The secret to messy flat lay styling is making sure you have a prominent object in your shot.

5. Tell a Story
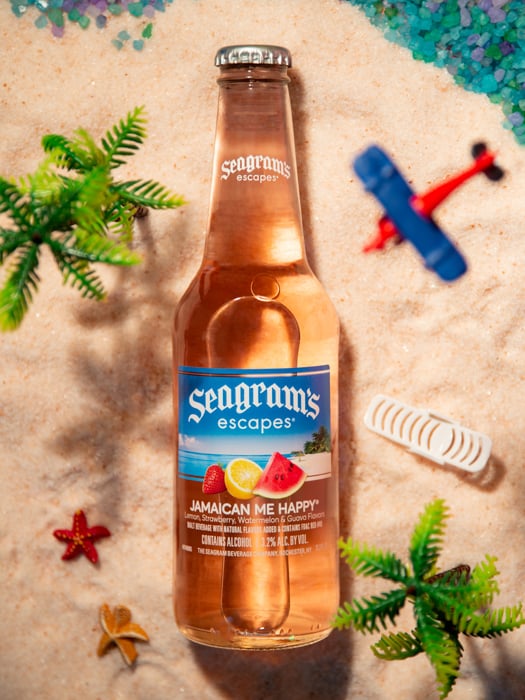
Perfect flat lay product photography is all about telling a good story. But how do you create a narrative in a single picture? Let’s use the photo below as an example.
Despite this flat lay photo’s whimsical vibe, it shares little stories through tiny clues. The secret is to surround the frame with items that help explain a narrative.
The bottle in the photo is the type of drink people will enjoy by the beach. We conveyed that by creating a beach set around it. Even though we used miniature props, the image still perfectly captures the mood that we wanted the viewers to feel.
6. Compose Your Shot with the ‘Hero’ in Mind
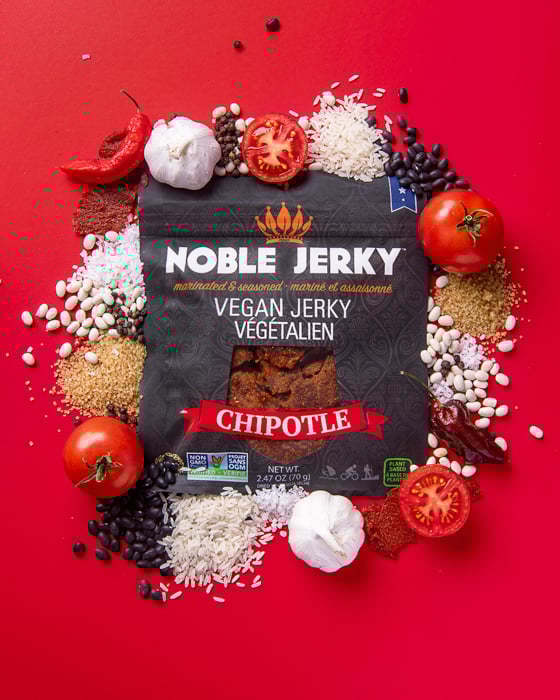
In product photography, the term ‘hero’ typically means the main product you want to feature in your images. Some people fill their flat lay set with so many objects that the hero gets buried in the clutter when doing flat lays.
So how do you make sure your hero remains the main point of interest in your shot? The secret is proper composition.
The most obvious solution is to place your hero in the middle of the frame. That way, people will know right away that it’s the object they need to pay attention to.

Example of centering your product.
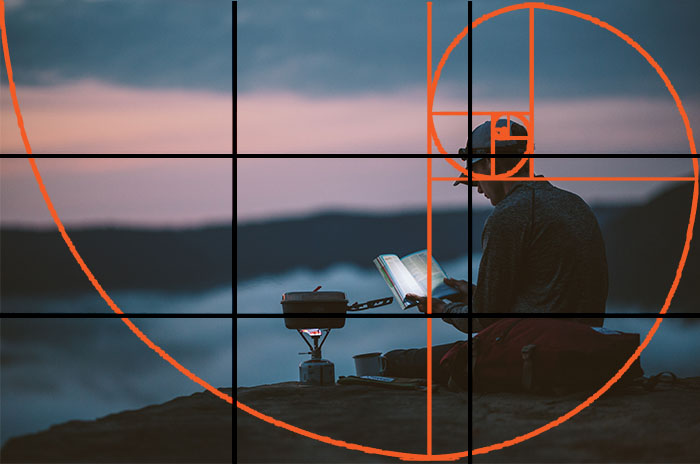
But simply placing a product in the middle may not always be possible. If that’s the case, consider using the grid on your camera and use the rule of thirds to compose your shot.
The rule of thirds divides the image as its name suggests and dictates that you place your main subject in the areas where the lines intersect. Doing so ensures you have a balanced composition.
But even when using rule of thirds, make sure that your hero appears prominently in the shot. That way, people don’t have to look around for the product and play a version of ‘Where’s Waldo’.

Example of using the rule of thirds grid.
Conclusion
Some people think flat lay product photography is easy because it only requires you to take pictures from above. It’s a lot more complicated than that. It can be a difficult genre to master if you don’t know what you’re doing. So keep these tips in mind and you’ll be able to take stunning flat lays right off the bat!
Are you interested in learning more about product photography? Check out our e-book, Products in Focus, to learn how to capture compelling photos that sell.