Adobe Lightroom is the most renowned RAW processing and organizing software. Lightroom consistently sets the bar for similar software and provides the widest range of features. It covers the whole range of digital editing, minus serious manipulations intended for Photoshop.
Adobe has championed the digital editing software market. Since the 1990s and the boom of digital imaging, Adobe has been synonymous with the development of imaging technology. And today, it’s no different. Finding a photographer, videographer, or designer inexperienced with Adobe products is almost impossible.
Lightroom is well known for its high performance levels, from its organization to the exporting process. Amateurs and professionals are drawn to the software because of its ease of use and convenience.
But these excellent features do come at a price. The biggest turn-off for most amateurs is that the latest versions of Lightroom are only available with a subscription.
Adobe Lightroom is still pushing the bar by incorporating AI features. Users have been introduced to ones that were once only possible in Photoshop. This tells us that complex edits are being simplified, and Photoshop’s steep learning curve is slowly fading. This gives photographers a more accessible way to edit their images.
Let’s now look at how Lightroom performs when put to the test. Our Adobe Lightroom review looks at Lightroom (Creative Cloud or CC) and Lightroom Classic. We compare relevant features so you can decide which version suits your work style best!

I have used Adobe Lightroom since its first iteration and have experience with various editing software. I have tested the top options available on the market. This testing has included everything from high-end software to entry-level programs.
Go through our review of Lightroom alternatives if you want to look at other editing software.


Adobe Lightroom Review: Key Features and Benefits
Adobe Lightroom is a RAW processing program that treats photos non-destructively. After your images have been uploaded to the software, the RAW files are saved directly to your predetermined destination. You can then edit and export the images without interfering with the RAW files.
Lightroom is ideal for photographers who want a RAW processing program to upload and sort images into convenient folders. You can also sort your images internally in the software. The software provides a huge range of manual filters and a few AI filters that can sort images automatically.
From this, we can see that Lightroom excels in its file management. This extends to its connectivity and accessibility. Lightroom (Creative Cloud) makes it extremely easy to share images or your whole library while on the go.
Lightroom Classic works in “catalogs.” You can split up different facets of your work or keep it all together in one big catalog. You can save this catalog and pick up where you left off on a different computer.
The modern Lightroom CC steps up its sharing capabilities. This Lightroom version wants you to use the cloud for storage. Everyone has different views on cloud storage. But there, you can swap between devices seamlessly, even for phones or tablets! Lightroom CC also now has a local storage option.
Adobe Lightroom provides an extensive range of adjustments you can apply to your photos. It even allows for some basic video adjustments!
You can do everything from basic tonal adjustments to color grading and calibration with photos. This extends to great object removal tools and other AI functions such as denoise or lens blur.


What Is the Difference Between Lightroom CC and Lightroom Classic?
First, I want to point out that Lightroom CC is referred to by Adobe simply as Lightroom. For the sake of this article, I will label it Lightroom CC to distinguish between Lightroom in general and this specific version.
The main difference between the two versions is that CC is a cloud-orientated service, and Classic is desktop-based. Lightroom Classic allows cloud usage, but it is not designed for this to be the main storage mode. After understanding these approaches, we can see why all their other differences make sense.
Lightroom CC provides an extremely easy and approachable workspace. On the other hand, Lightroom Classic is an extension of the same workspace that has been developing since its first iteration in 2007.
Previously, Lightroom CC had fewer adjustments than Lightroom Classic. This is still the case, but Classic provides more in-depth adjustments in the tonal range and other features.
This is not to say that you are missing out on adjustments in Lightroom CC. You just don’t have the same degrees of control. There are certain features, such as tethered capture, that you won’t find on CC.
One other difference between each program lies in the importing and exporting processes. Lightroom CC provides a simplified exporting service that doesn’t give you amazing control over your images. But this process is much simpler and more approachable than in Lightroom Classic.
Overall, we can see that Lightroom CC is the better option for beginners and amateurs in digital photo editing. Not only this, but it could also be perfect for photographers looking to simplify their process or spend less time on a desktop computer. It is also helpful for those who work on the go.
In contrast, Lightroom Classic provides an excellent space for professionals. It’s for those who want the most control over their photos. The good news is that you get both Lightroom versions when you buy your Adobe Lightroom subscription!
Overview of Specifications
| Minimum Computer Requirements |
Minimum Computer Requirements
4 GB RAM, 32 GB disk space
|
| Minimum Software Requirements |
Minimum Software Requirements
mac OS 12.0 (Monterey), Microsoft Windows 10 22H2
|
| Tethered Shooting |
Tethered Shooting
Yes (only Lightroom Classic)
|
| Mobile / Tablet Option |
Mobile / Tablet Option
Yes
|
| Keyword Tagging |
Keyword Tagging
Yes
|
| Camera and Lens Corrections |
Camera and Lens Corrections
Yes
|
| Brush Tools |
Brush Tools
Content Remove, Heal, Clone
|
| Layered Editing |
Layered Editing
Yes
|
| AI Editing |
AI Editing
Yes
|
| Noise Reduction |
Noise Reduction
Yes
|
| Export Options |
Export Options
JPEG, TIFF, PNG, DNG, PSD, Original (Classic) JPEG, Original (CC), JPEG XL, AVIF
|
| Best For |
Best For
Photographers who want an all-in-one software that features brilliant advanced functions
|
Adobe Lightroom can handle the whole post-production process from upload to export. But it cannot provide complex photo manipulations. Luckily, Adobe also has the best photo manipulation software on the market, Photoshop.
At the same time, it is hard to find a particular function or feature that isn’t covered in Lightroom, particularly Lightroom Classic. Adobe has pushed Lightroom’s developments with the trends to meet the needs of the digital photographic industry.
Because new features were considered crucial, Adobe provided a space for them in Lightroom. We have seen this with tethered capture, color grading, lens corrections, and, most recently, AI functionality.
With all this development, Lightroom is still software that uses basic sliders to make grand changes to a photo. Simplifying intricate adjustments is a godsend for those who want to spend as little time as possible with editing software.
Adobe is constantly bringing out new features in updates. One big advantage of the subscription model is that you always get the most up-to-date software without extra costs. So, sticking with Adobe guarantees expert adjustments and the most up-to-date features.


Main Strengths
Adobe Lightroom excels in many ways, so it is hard to identify its key strengths. File management and organizational tools are stand-out features. You can see that software developers considered many factors to provide convenience.
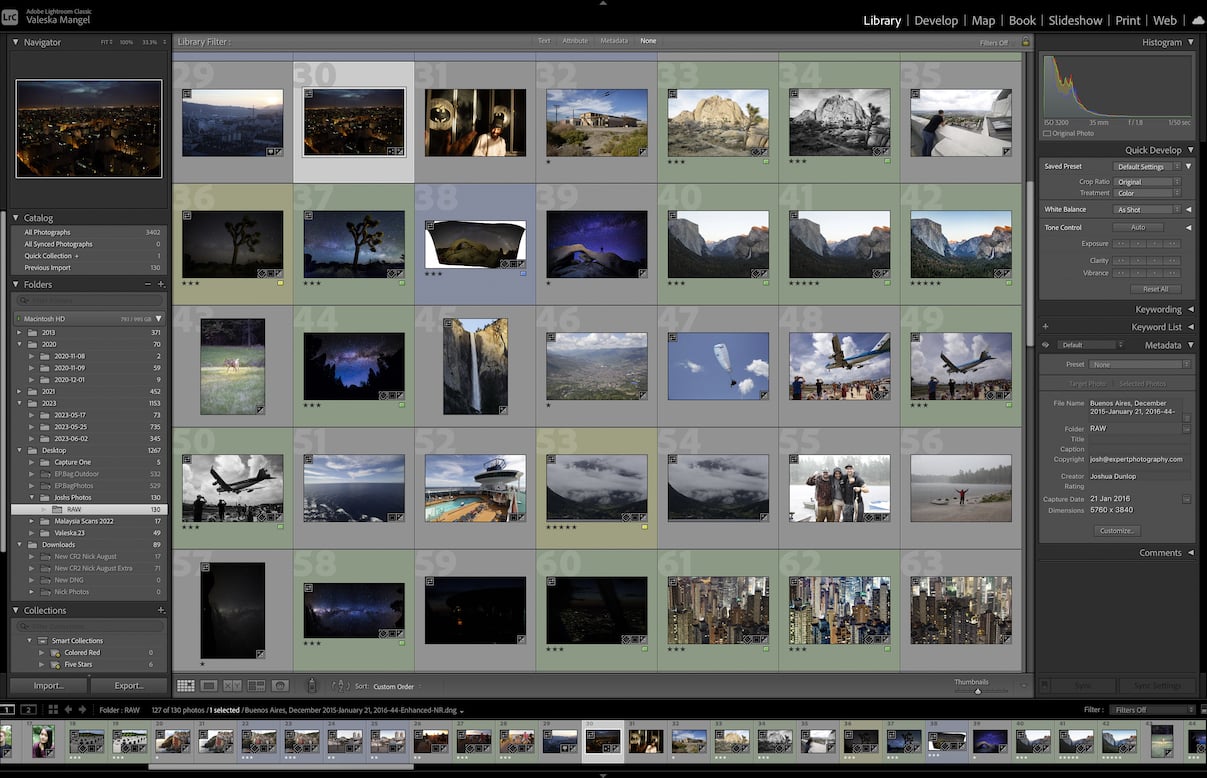
You find the organization is more detailed in Lightroom Classic. There, you are provided clear color boxes for your flagged photos. The only downside to having a comprehensive file management or organizational system is that it can take a while to become familiar with it.
Another main strength is how Lightroom’s adjustments perform. Each adjustment performs to a high standard, creating convincing edits and extracting the best out of your images.
After testing various photo editing software, I have seen how many adjustments can be too harsh or inaccurate. Lightroom‘s tools provide exceptional adjustments. They allow for professional color grading and fine tweaking for print.


Workspace and File Management
The two Adobe Lightroom versions deal with the workspace and file management differently. In fact, this is one of the main differences that may determine which version you use.
Lightroom Classic has a much more intimidating workspace. After opening the program for the first time, it will take some time to familiarize yourself with everything.
Lightroom CC only has the essential features, leaving you with a stripped-down workspace. This is much easier to navigate for beginners, as you aren’t overloaded with options.
As mentioned, file management is another key factor separating the two versions of Lightroom. Classic is designed for desktop users. It’s for those who want their files to be organized neatly on a piece of hardware (laptop computer or hard drive). In contrast, Lightroom CC prioritizes cloud storage.
Each method has its advantages. You just have to pick which method and Lightroom version works best for you.
Importing and Organizing Photos
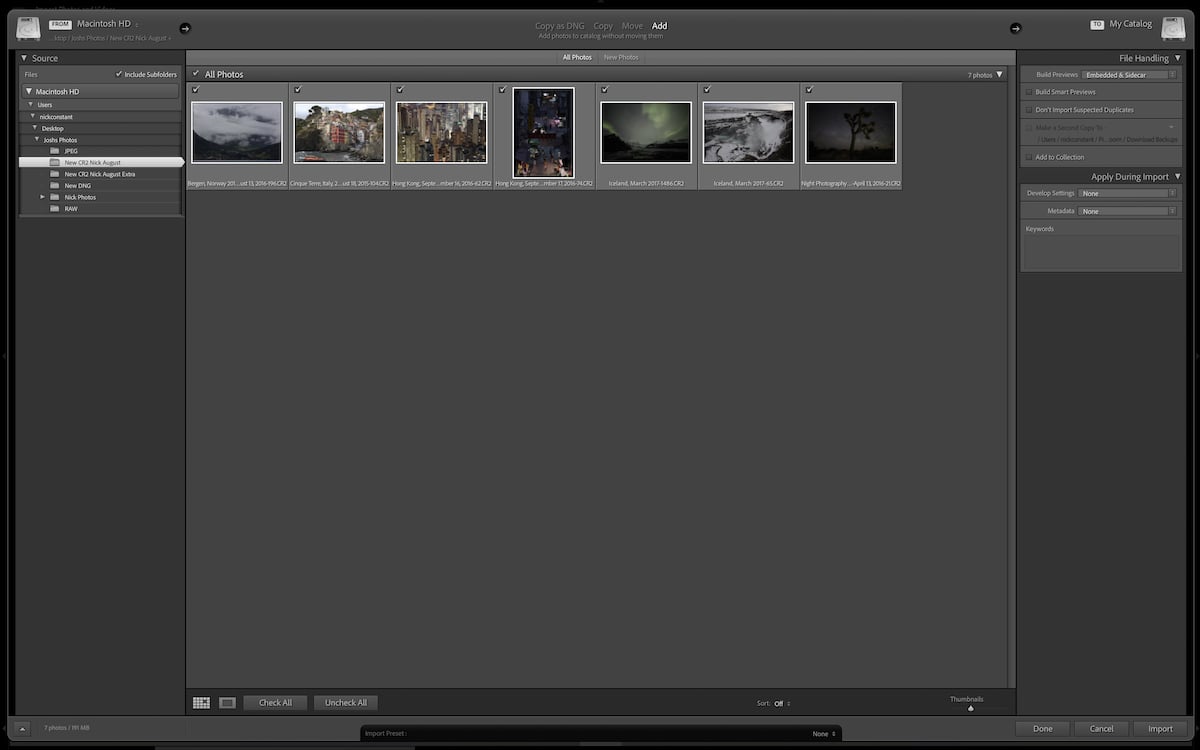
Adobe Lightroom‘s import process follows the same trend. Lightroom Classic is more detailed. This version has a pop-up window that clearly labels the file handling.
Along the top, you find ways to select the source of the files and how you want these files to be managed. (Add to the catalog with moving, move files, copy files, etc.). You can also choose where you want the files to be saved.
A feature that needs to be added to Lightroom Classic’s uploading process is the ability to apply filters and ratings. You can cull the images (choose which ones you want to upload). But there is no prior organization you can perform at this point.
Lightroom Classic does let you apply some development and metadata settings to your images upon import. The Develop settings let you apply any preset, even user-made presets.
It also has some basic tonal adjustments like tone curve shapes, vignettes, and sharpening. This is helpful if you are importing a big job and know which presets you will apply to these images.
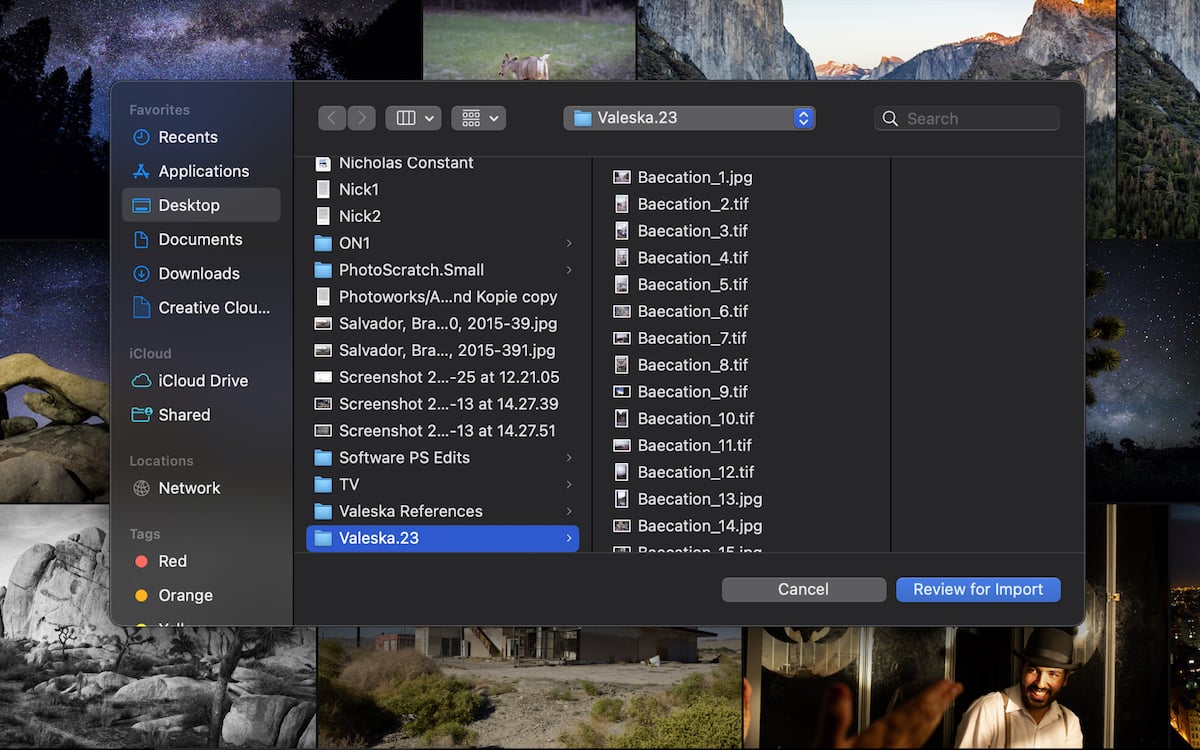
The Lightroom CC uploading process is more basic. When uploading to the cloud, you get a pop-up window that reflects regular file browsing windows you find on any computer.
If you don’t want to upload images to the cloud, you can go through the Local section. This new feature completely changes how we can use CC. It now operates as a file browsing system that lets you dig into each folder and edit images without uploading.
Local usability changes Lightroom CC from an internet-only application to one you can use anywhere. You can use Lightroom as normal (except for accessing or uploading files to the cloud).
You can then upload images to the cloud after you have an internet connection again. I was also very surprised at the speed at which Lightroom CC can read these yet-uploaded files.
Viewing Photos
Lightroom developers understand that a big priority in editing software is to compare and contrast images and edits. Therefore, you get Grid, Full Screen, Compare, Survey, and People view in the Develop section of Lightroom Classic.
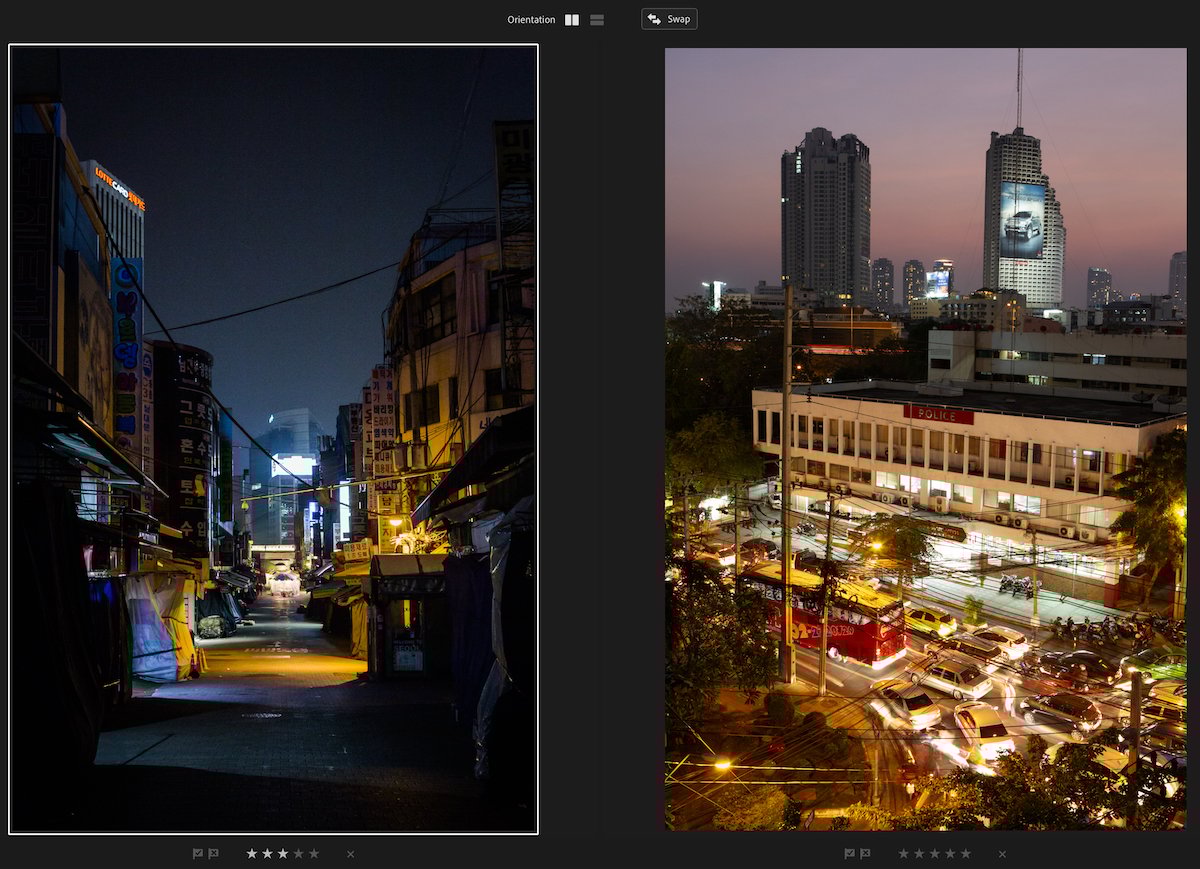
Classic also provides customizations to fine-tune these views to get what you want from each mode. This includes thumbnail size adjustments on Grid view, zoom and image swap on Compare view, and drag and drop image sequence on Survey view.
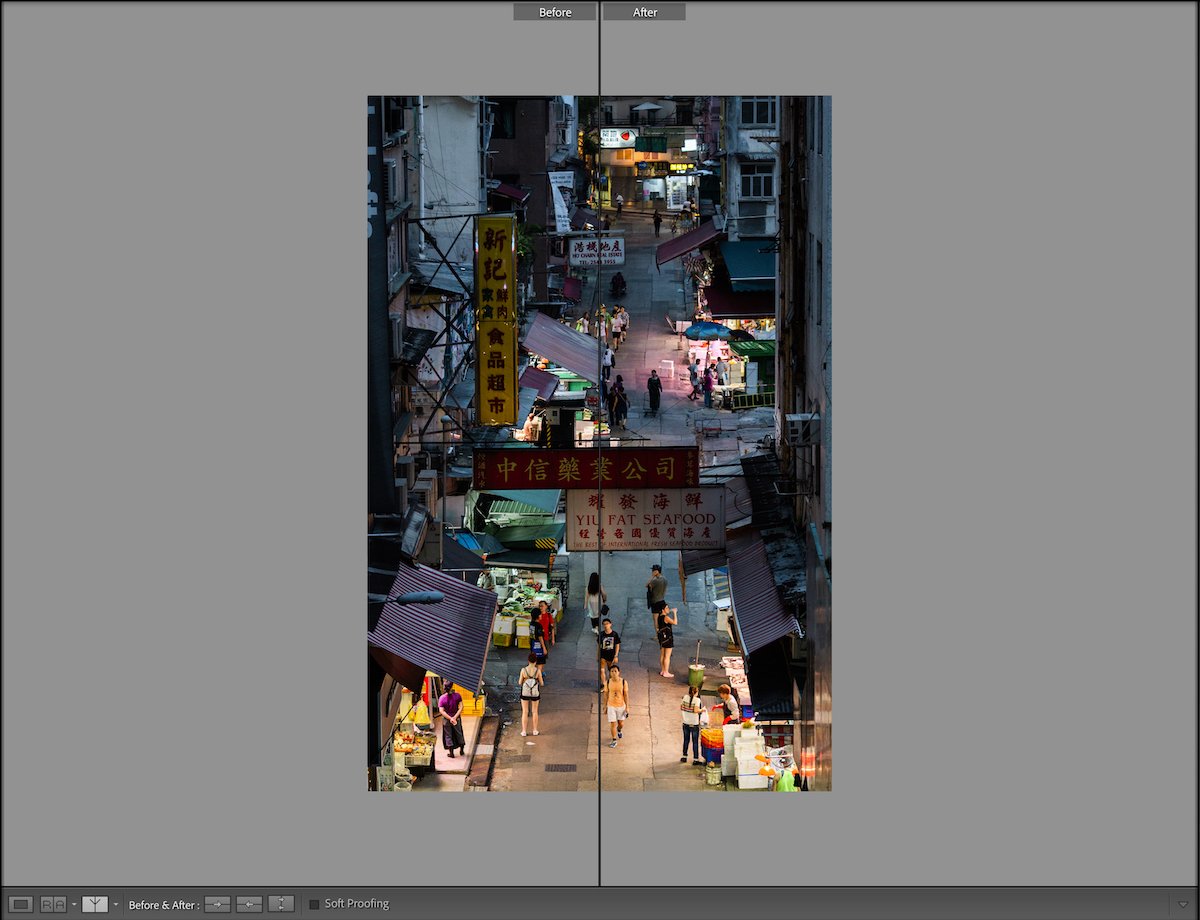
When stepping into the Develop workspace, you can use a Reference view and a before-and-after viewing option. You can cycle through different ways to compare and contrast your images by clicking on the icons multiple times. These viewing modes are fantastic and give you a detailed overall view of your photo.
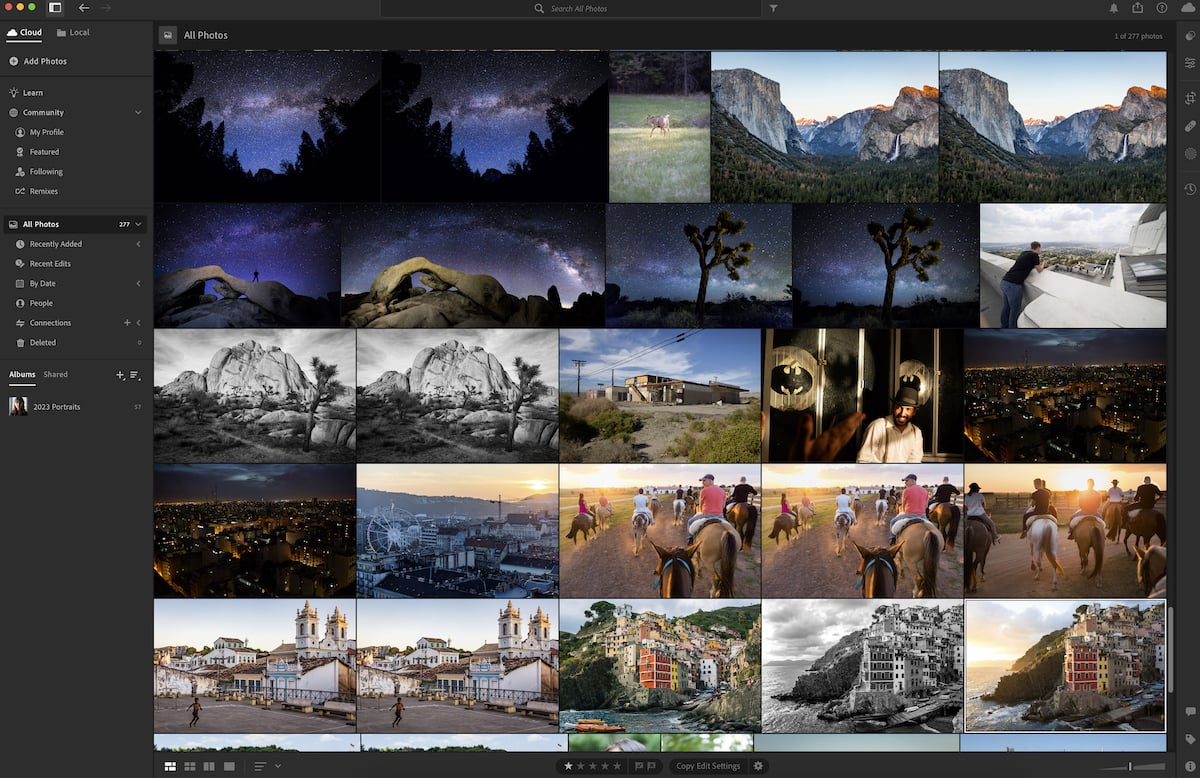
Lightroom CC approaches its viewing options differently. The images default in a Photo Grid viewing mode. This leaves no spaces between portrait and landscape images, letting you see as many images as possible.
You also have Square Grid, Compare, and Detail viewing modes. There is no Survey view in Lightroom CC, which could be an issue for those working in sequences.
Both versions of Adobe Lightroom give you multiple ways to view your images. And both versions also do a great job of taking as little attention away from the images as possible. This is particularly relevant in the simplified Lightroom CC.
Search and Sorting Tools
Lightroom utilizes the full range of rating tools we are used to. In both versions, you get star ratings and flags. But the color ratings are only available in Lightroom Classic.
Lightroom CC sorts your images by date, people, and “recent edits.” They also put in a Recently Added section, which tells you the exact date and times you uploaded your image sets to the cloud. This system may be simple, but works well for such basic functions.
Lightroom Classic lets you create a “collection” inside your catalog. This is basically a folder that you can fill with photos from multiple upload folders.
Inside collections, you also find “smart collections.” This lets you set parameters for the software to search through all your images and collate the relevant ones. For instance, you can group all red-colored or five-star images.
Both Adobe Lightroom versions also have a facial recognition option. This searches through all your portraits and groups the images based on its findings. You can then add names to the grouped photos for future reference.
It would be nice to see Lightroom take this AI search one step further and apply object recognition. With this added feature, finding a photo in Lightroom would be even more thorough.
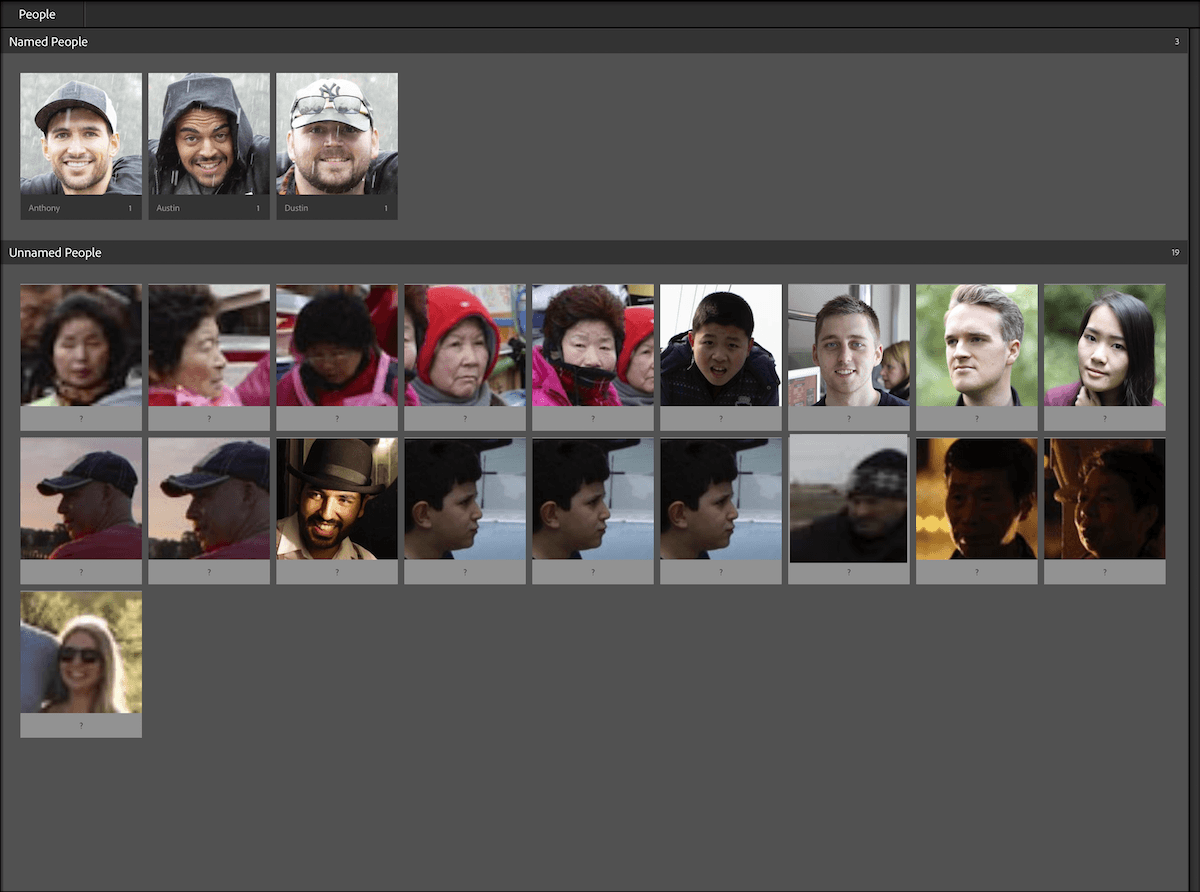
Sorting by the People tool (shortcut key “O”) in Lightroom Classic
Image Development
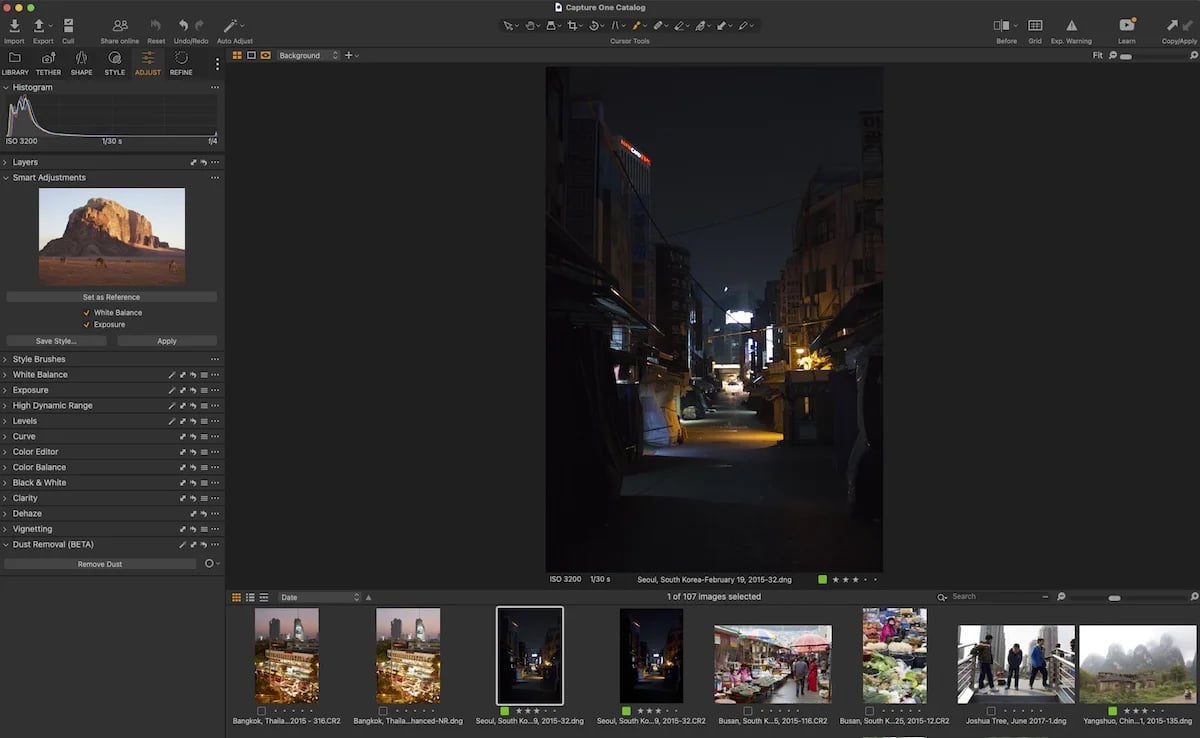
Let’s see how well Adobe Lightroom can process and edit our images. We compare our results to Lightroom’s top competitor, Capture One. Note that both Lightroom versions operate their adjustments exactly the same.
RAW File Processing
Let’s first examine how Lightroom reads our images through RAW Processing. This is where the software reads the image files and turns the data into a visual image. The better the software is, the more color, tonal range, and detail it can extract from an image file.
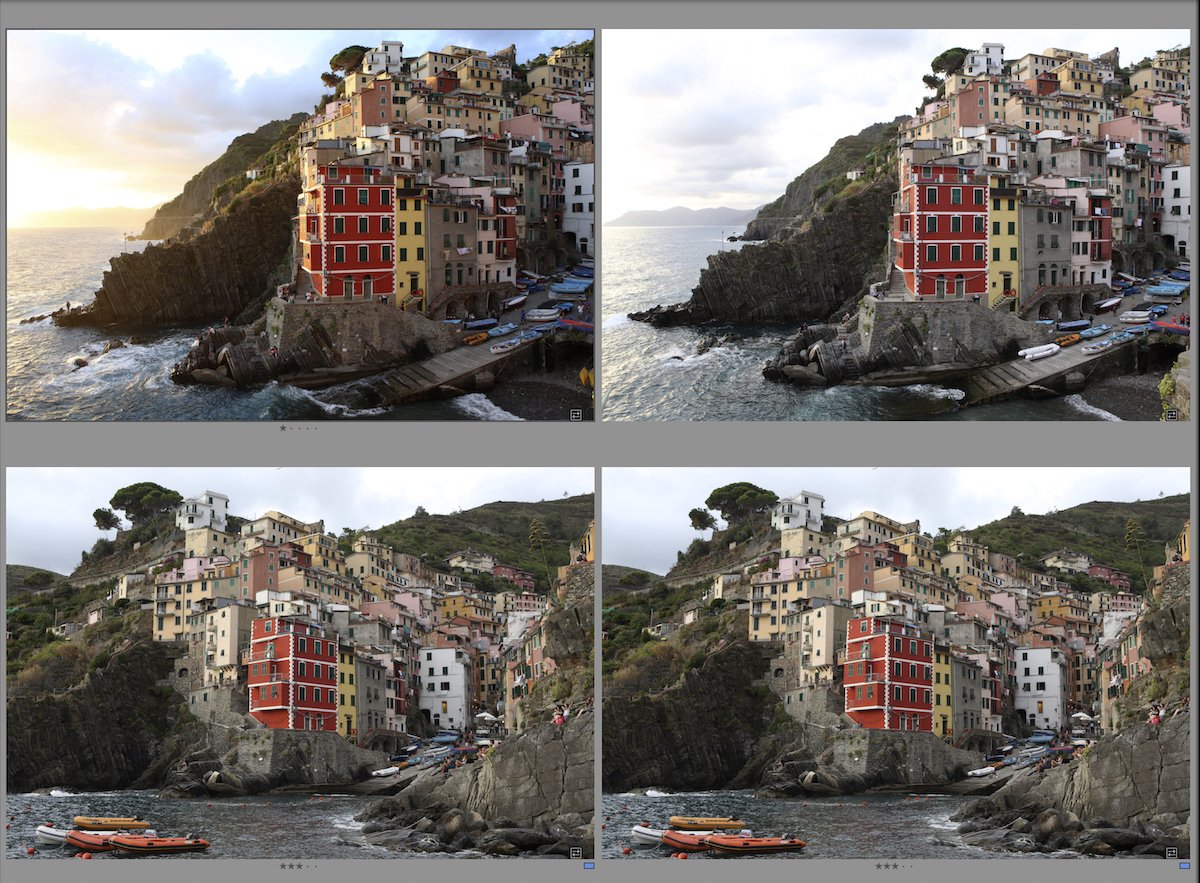
Adobe Lightroom provides one of the best RAW processors today. It gives us brilliant colors and exceptional detail. If we compare these results to Capture One, we can see the difference is only slight. Compared to Lightroom, Capture One’s results are slightly more saturated, warm, and smooth.
Lightroom’s results have a clearer tonal range and are sharper. This sharpness and extra detail may be the reason for Lightroom’s slightly more pixelated results. You will also notice that Capture One’s results are slightly flatter in the highlights and shadows. This adds to the stronger tonal range in Lightroom.
The slight pixelation difference in Lightroom results isn’t as much of an issue as you would think. Applying Denoise to the image slightly reduces it. Also, this pixelation is only notable if you print large images.


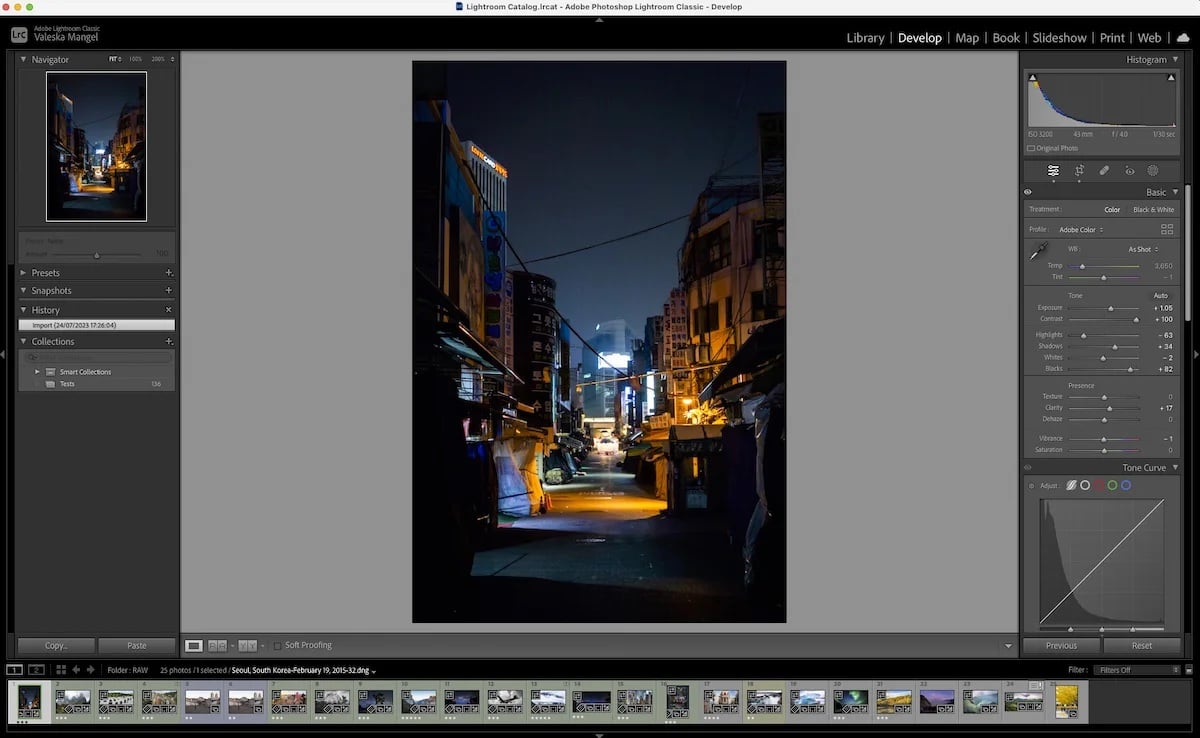
Basic Editing Tools
Adobe Lightroom‘s basic editing tools are in the Develop (Classic) and Edit (CC) sections. Both versions provide an excellent range of sliders to work through. But you will find a more detailed array of functions in Lightroom Classic. All adjustments use sliders and also let you add custom numbers if you want to be specific.
The Exposure tool in both versions lets you compensate for five stops of light in either direction. This is the widest range available in photo software. The tools work extremely well and provide an accurate rendition of what this difference in light could do to your photo.
If we compare these results to Capture One, we can see that both software act differently. Lightroom produces a slightly flatter image, whereas Capture One shows more contrast. But Capture One does tend to produce more noise and pixelation in the same areas.
Capture One does a better job of retaining color saturation in the exposure compensation. This comes from the wider dynamic range the adjustment gives you. Even though this is preferable, Lightroom is more true to exposure simulation.


Let’s look at how Lightroom does when considering its singular tonal adjustments. I pushed the Shadow adjustment to the lowest degree to get a clear idea of what the adjustment does to our photo. This adjustment mimics similar results to how each software handled the exposure compensation.
Lightroom tends to bring down a wider tonal range than Capture One. This is not a bad trait, as it makes the whole adjustment seem more natural. Adjusting just one side of the tonal spectrum also means you get less contrast.
Capture One does better at identifying the shadows and only bringing down these areas. We can also see that Capture One tends to produce a softer result.


I am a big fan of how Lightroom Classic facilitates the adjustment of the tone curve. It has an interactive graph that visualizes what tonal ranges are affected when you hover over it. The tonal sliders below also aid your understanding of a tone curve. This tool is brilliant for beginners.
Preset Support
Adobe Lightroom provides a wide and strong selection of presets for its users. Both versions include similar presets, with Lightroom Classic including some extra tonal options.
Both versions offer a preview of the preset overlayed over your image when hovering over the preset’s title. This lets you quickly breeze through multiple options. Both versions also come with an intensity slider to fine-tune your selection.
Lightroom CC splits its presets into three sections—Recommended, Premium, and Yours. In the Recommended section, medium-sized thumbnails show your image with different presets applied. These options are split between criteria, from Subtle adjustments to B&W recommendations.
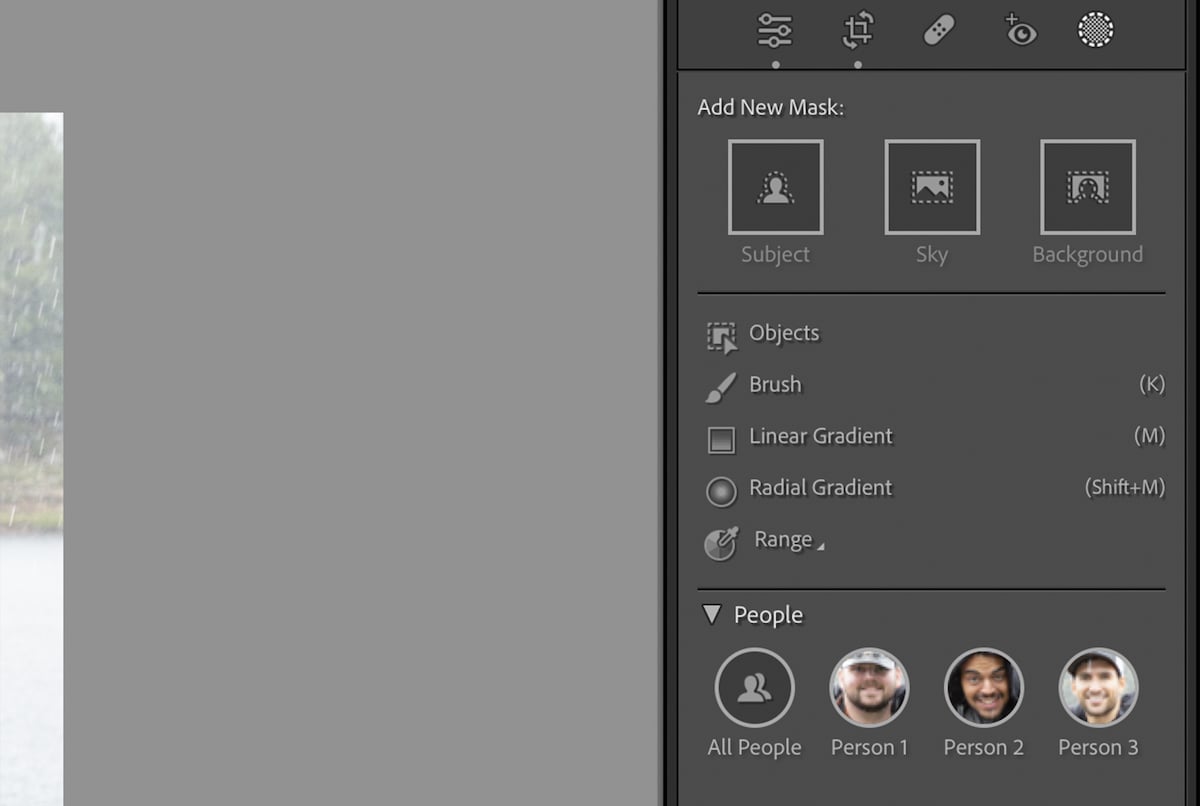
A strong feature that Lightroom executes well is its adaptive presets. These read your image and only adjust certain areas like a person, sky, or subject! This saves you from having to make your own mask.
It is especially useful to make certain areas stand out quickly. I enjoy the adaptive presets for skies, which can save a dull sky in seconds.
Lightroom also lets you create your own presets. This easy process allows you to select which adjustments are copied over.
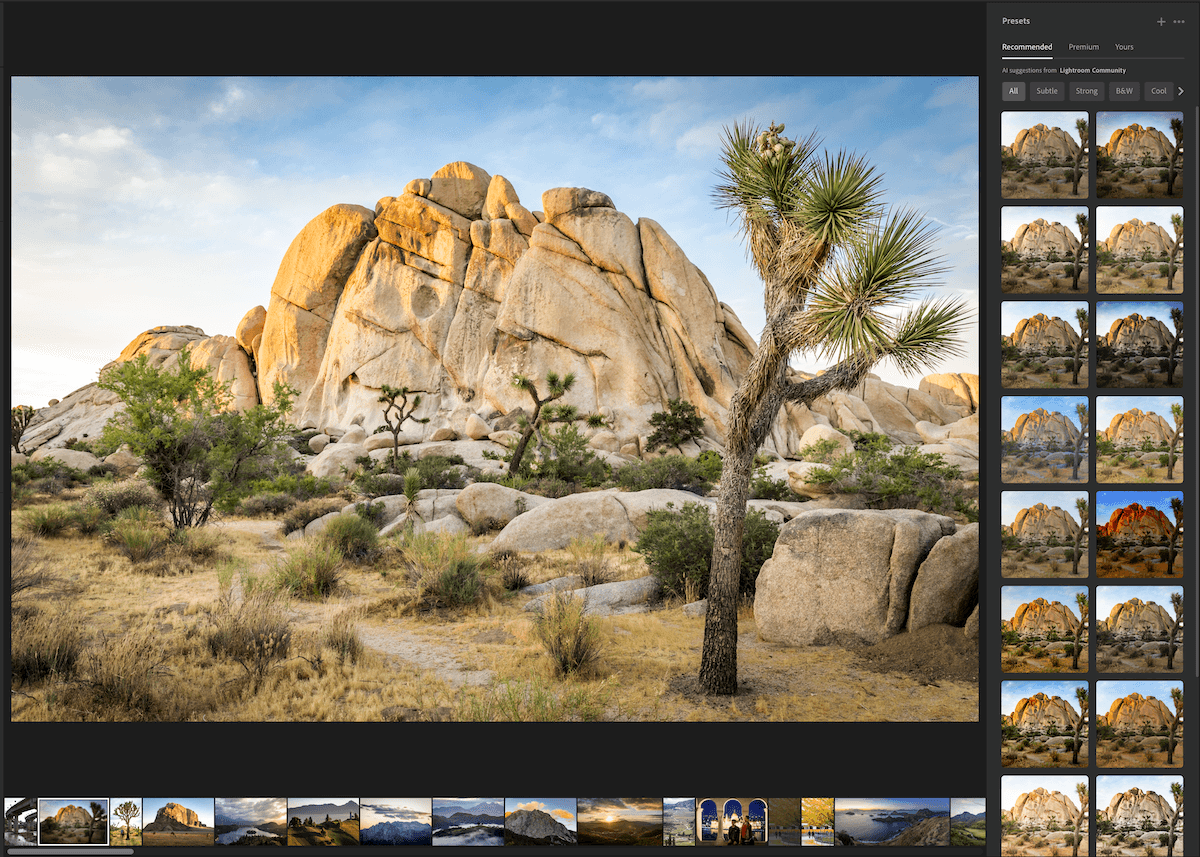
Recommended presets in Lightroom CC
Photo Manipulation Tools
Adobe Lightroom provides its users with a brilliant selection of healing tools. The Healing section is divided into three actions— Remove, Heal, and Clone. These functions are simplified versions of Photoshop tools. As an Adobe extension, the performance of these Lightroom tools is high-class.
Each of these tools has its strengths and weaknesses. The Remove tool fills the area with content-aware features. This is useful for eliminating anomalies quickly. But it could function better with busy and complex backgrounds.
To combat this, you can use the Clone tool to directly reference an area of an image that matches your background better. Its weakness is that it may take some time to make it believable, especially with complex backgrounds.
Overall, these tools work great and are easy to use. This ease lets beginners create images that would normally need more expertise in Photoshop. This is particularly helpful for images where a person standing in the background can ruin a perfect photo.
Lightroom also provides excellent masking tools to make editing particular areas much simpler. In both versions, AI features can automatically mask your subject, sky, or background. I was thoroughly impressed by these AI actions. They may not always work perfectly, but they save you a lot of time.

Variety of Image Editing Views
Lightroom‘s Compare views are great for realizing how much you have changed your image. Lightroom Classic provides a much more extensive selection of Compare views.
In Lightroom Classic, you can choose from before-and-after views that lay out these versions side by side and on top of each other. Classic also offers options to split the image in half horizontally or vertically. You can easily cycle through these options by pressing the Compare view icon multiple times.
Lightroom CC offers you an icon that you click to bring up the original image. This is less extensive than what Classic offers, but it works just as well. This view also works when zoomed in to get as much information as needed.
Both versions of Adobe Lightroom also offer you a Reference image view while editing. This is important for photographers who want continuity in their editing styles across a series of photos.
Advanced Editing Features
All tools mentioned in this section are available in both Lightroom versions. So, you still get the most advanced editing features regardless of the avenue you decide to take. Let’s look deeper into Lightroom’s most recent and advanced features.
Noise Reduction
Adobe Lightroom includes one of the best denoise performances in the market today. Its constant refinement and integration of AI have brought the technology to a level. Noisy pictures can be rescued and used, even for photography work!
The noise reduction works by simply clicking the Denoise button. This pops out a dialog box with a preview and some sliders to make adjustments. The process can take up to a minute to execute.
Any photographer will be pleasantly surprised with the results Lightroom gives. The noise reduction not only helps with noise. It also helps with the pixelation and sharpness of finer details. I have not encountered any examples of this software producing digital artifacts in my testing.
Thanks to Adobe’s constant development of imaging technologies, we now have a way to save our noisy photos. This addition gives you more peace of mind if you shoot in a low-light environment to push the ISO higher.
Of course, this isn’t ideal, but perfect shooting environments are rare. I have even shot some jobs where I have applied Lightroom‘s denoise to all my images.
This feature is perfect for street photographers or photographers who shoot events without a flash. Events can sometimes be challenging. You may not want to ruin a wedding with a flash every few seconds.
Let’s examine how the Lightroom Denoise tool compares to Luminar Neo‘s Noiseless AI tool. Neo’s Noiseless AI is brilliant, but you can see a superior performance in Lightroom’s Denoise.
One detail to note is that Lightroom’s Denoise function only works for Bayer and X-Trans mosaic RAW files.


Lens Blur
The Lens Blur tool is another brilliant, cutting-edge feature in Adobe Lightroom. Like noise reduction, lens blur can adjust your photo, altering your manual settings in post-production. You can simulate a wider aperture with lens blur, leaving your foreground and background blurry.
The Lens Blur tool can also add a bokeh to your photo, which is simply unbelievable. Many other programs have a bokeh simulation option, but none perform it like Adobe.
First, the identification of subjects and depth is as advanced as I have seen from any imaging software. Secondly, the tool lets you fine-tune this blur to such a fine degree. In the Lens Blur panel, you click to activate the blur. From there, you can adjust the intensity.
A huge development here is that you can choose what kind of aperture shape you want! Different aperture types produce different blur effects. This is a brilliant addition that gives you visual and creative control!
The Focal Range slider is mind-blowing. It produces a heat map for the subjects it detects and at what distance. You can even click the Visualize Depth button, and a heat map will be applied to your photo.
Focus Blur also lets you brush in focus or blur. This is another great example of how Adobe has fine-tuned technology for the most professional levels of quality.
This excellent Lightroom feature will have many photographers—from beginners to professionals—rejoicing. Like the noise reduction technology, these features let us shoot more forgivingly. We know we can easily make these adjustments in post-production.


Content-Aware Remove
Lightroom‘s content-aware removal was briefly covered in the Manipulation Tools section. The Content-Aware Remove tool is a feature that lets you remove unwanted objects from your image by brushing over the object.
After the outstanding performance of the last two features, I was let down by the performance of this tool. Content-aware filling is always tricky. It relies on what is around the object to fill the space accurately or convincingly. I tried removing large objects central to the photo, but the image mostly ended worse.
The tool works well if the background is a simple and consistent pattern. But this limits the tool’s possibilities. There aren’t too many occasions where a shot has a simple background.
With Adobe’s advancement in AI generation, we expect a bit more from the Content-Aware Remove tool. But this Lightroom tool is there for simplicity. If you want an accurate removal, using the Clone tool is best. Content-aware removal is best for quick and simple removal.


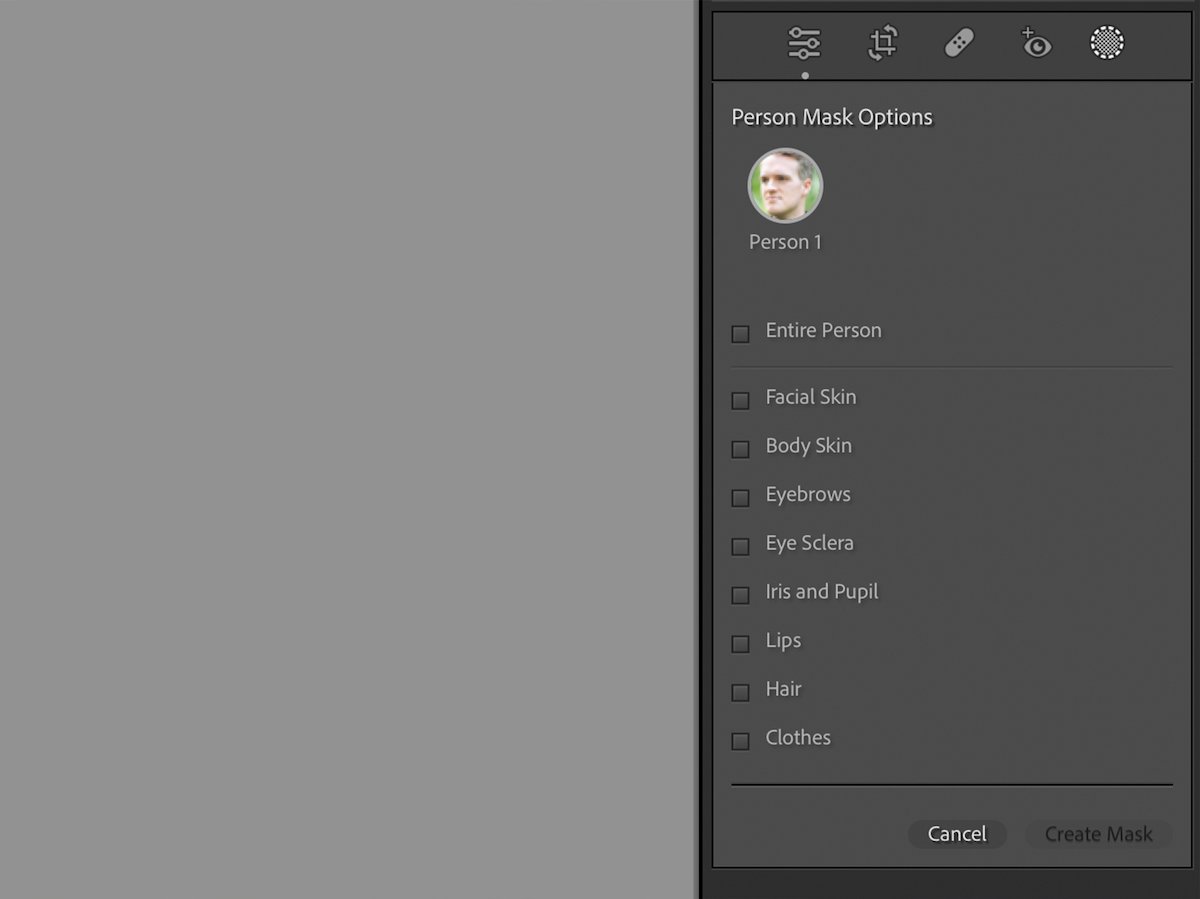
Person Mask Options
Lightroom‘s masking is also a topic we touched on earlier, including the AI masks. A new brilliant feature is applying masks to people’s features with Person Mask options.
In the Mask section, you can select your subject after the program has scanned your image for people. You get eight masking options for specific areas when you untick the Entire Person box.
You can choose features from facial skin to clothes and hair. You can even specifically choose the lips or different sections of the eyes. This AI masking also lets you select multiple areas to put in the same mask. So you can choose the eyebrows and hair under the same or separate masks.
This feature is another game changer that Lightroom has recently introduced. Lightroom gives its users high levels of control with the smallest amount of intervention. You don’t need to be proficient in Photoshop or take hours zoomed in at 200% to draw the perfect mask.
The Person Mask options are available in both Lightroom versions. From my experience, the AI’s abilities are excellent. They can identify each area accurately. Sometimes, the mask does extend the borders of the areas. But this is minimal and is only noticeable if you make drastic tonal changes.
Many photographers will enjoy this feature as it saves a lot of time editing portraits. This is another tool that can dispel the need for Photoshop for some users. You can use it for a range of edits. And you can make clothes or facial features pop or change hair and eye color!


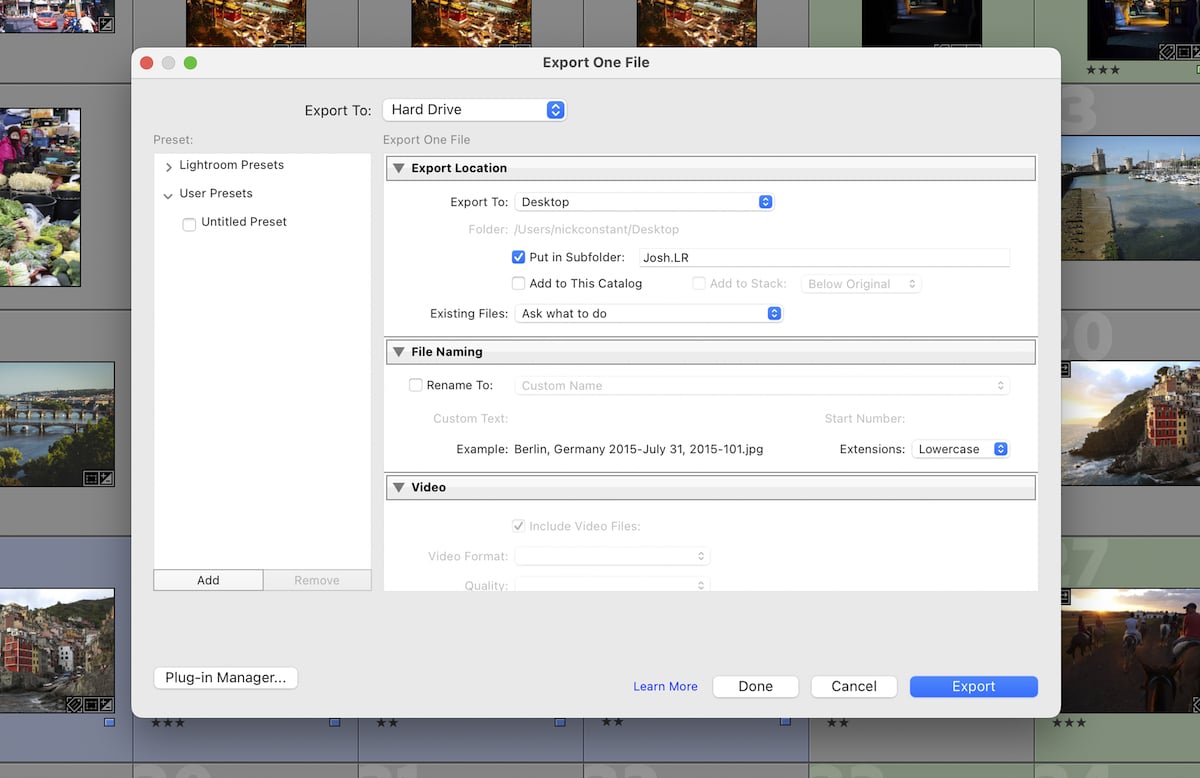
Exporting and Sharing Images
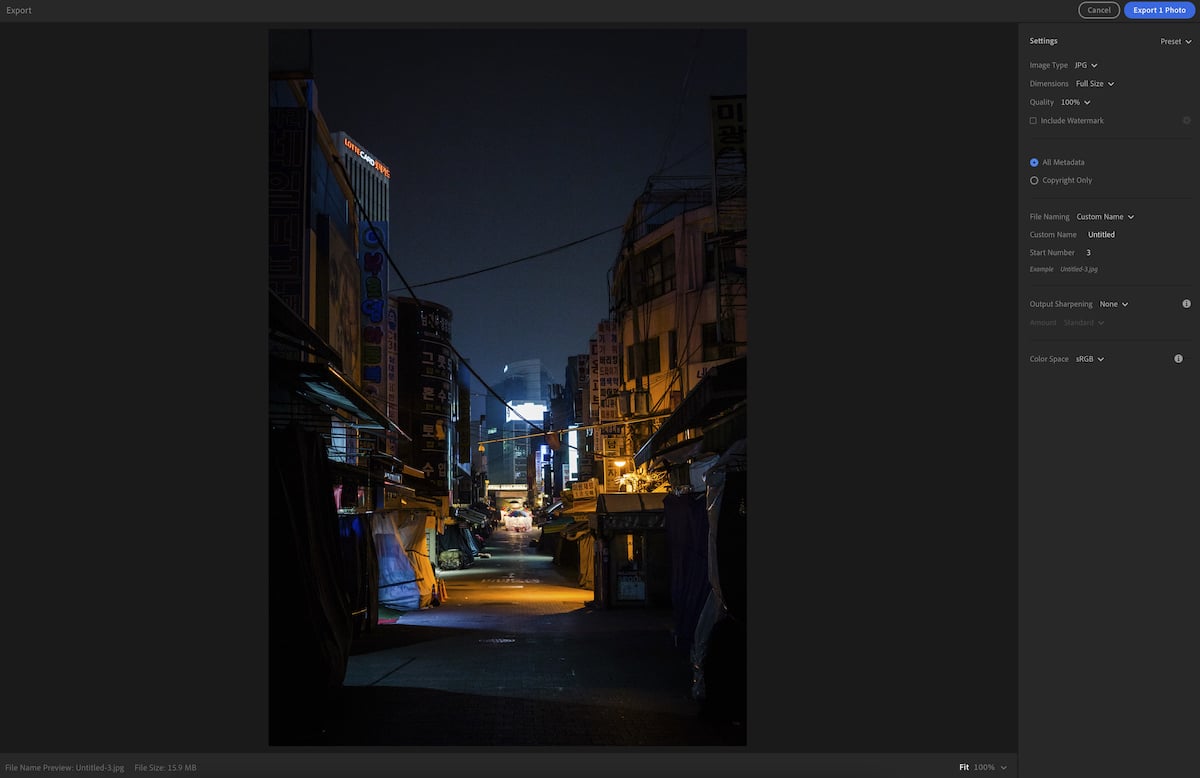
Adobe Lightroom provides a clear and simple process for exporting your images. As mentioned, Lightroom CC and Lightroom Classic differ in the exporting process.
Lightroom CC gives you a simple and quick exporting process that misses some features. Meanwhile, Lightroom Classic can go much more in-depth, giving you the highest levels of control.
CC does provide enough features to give you good control. But you miss out on helpful aspects such as limiting the file size, setting the color space, and applying post-processing features.
Classic also provides a wide range of sharing options. This version lets you get your images into a book, sideshow, print, or web format. This can be incredibly helpful for those who deal regularly with the output of their images or projects.
Each sharing option gives you high levels of control and lets you choose images from your whole catalog. These options are perfect for photographers who want to avoid finding other software to prep their sharing methods.
Other dedicated software may be a lot smoother and more considerate. But to have this integrated into Lightroom Classic is nice to have as an option.
Smartphone and Tablet Compatibility
Adobe Lightroom provides the best phone and tablet service for photo editing. So, if phone and tablet editing is crucial to your workflow, Lightroom is the program for you.
Adobe has done an excellent job condensing almost all the features found in Lightroom CC into an application you control by touch. This includes new features such as AI masking, lens blur, and content-aware removal. People masking isn’t available, but I wouldn’t be surprised if this is added soon.
The app’s biggest advantage is that Lightroom CC runs mainly on its cloud service. This means you can access all your cloud images from your portable device!
And, of course, this works the other way around. So, if you have a busy day, you can work on your images on the go. You can then return to your desktop to continue with your edits.
There are specific features that smartly transfer to the touchscreen. One example is the Tone Curve tool. Instead of making a small tone curve that is hard to control, Adobe puts the graph over the photo. This is useful because you can easily see the changes you are making.
Other features are found in different places. For instance, the Lens Blur tool is in its own panel instead of under Edit. And if you want to get a Comparison view, you must click on the Versions panel and then select the original.
Overall, the app is incredible and feels like an extension of the program rather than an afterthought. Again, Lightroom is perfect for photographers who want to edit while on the go.


Adobe Lightroom Pricing Plans
When looking at all the features that Adobe Lightroom offers, it is no surprise that it is up there with the priciest options. You must pay a monthly subscription for the most up-to-date versions and features.
Adobe has specific photography bundles that help cater to your needs. At the entry-level price, there is a choice between a Lightroom (both versions) and Photoshop bundle or Lightroom CC with 1TB of cloud storage. You must decide if you need the extra features of Classic or if added cloud storage is best for you.
Adobe also includes an option to buy both options combined, which comes in at double the price. All options come with Lightroom mobile. Only the options with Photoshop include Photoshop mobile. The cheaper Lightroom and Photoshop option comes with 20GB of cloud storage.
The product is expensive, especially if you plan on using this software for an extended period. But it may be worth your money as Lightroom is one of the best photo organization and editing software. This is particularly relevant if you are making, or want to start making, money from your work.
We break down all the different ways to buy Lightroom and Adobe products.
Alternatives to Adobe Lightroom
Capture One
Lightroom and Capture One are similar programs. They both aim themselves at the higher end of organization and editing software. They also both produce amazing features.
Both provide results as good as you can get in digital photo editing. To begin working in the photo industry, you should be familiar with both programs.
The strengths of Capture One lie in its attention to finer details, such as color editing and a fully customizable workspace. Capture One also allows for better collaboration connectivity. These points make Capture One best if you work on big projects with multiple people.
Lightroom’s strengths are in its everyday uses. This comes from its organizational skills and ease of use. So, from these comparisons, we can see Lightroom caters to the individual, whereas Capture One caters to teams.
Both programs have great RAW processing and tonal adjustments. Lightroom provides more flexibility in advanced edits, but it all depends on the sort of material you are working with. I don’t work in large teams often, so I much prefer the ease and simplicity of Lightroom.
Read our full review of Capture One to see if it’s worth buying.
Final Verdict for Adobe Lightroom
[scores price="no" product="30864″ tag="expertphotog-20″ toc="no" left_title="Measurement" right_title="Score"]
Adobe Lightroom is the bar that other digital editing applications strive to achieve. Lightroom can handle the whole digital photography post-processing experience from start to finish.
And now, it is increasingly dispelling the need for Photoshop. Lighttroom’s AI simplifies complex commands for editing novices.
It is hard to think of features not featured in Lightroom that are crucial to modern digital photography needs. Lightroom does it all. Its excellent organizational skills are the best around. And its editing tools deal with tonal and color ranges accurately. It mimics true photographic settings.
Lightroom manages to do all this at the highest level while providing a simple workflow that beginners can quickly pick up. This fine balance is the result of years of testing and development. And by looking at the new features constantly being released, we can expect more great things from Lightroom.
Lightroom deserves the attention it gets from the photographic community. It is a shame that the monthly price is so high. But it’s what you must pay for top-tier digital editing software. If you plan to take photography seriously, consider getting Adobe Lightroom.