The Magic Wand tool in Photoshop is a usually overlooked tool. But it can help you do plenty of edits. As an example, the Magic Wand tool can be handy for changing the color and appearance of your background.
Let’s take a closer look at how you can use the magic wand selection tool to your benefit.
What Is the Magic Wand Tool in Photoshop?
The Magic Wand tool is a selection tool. It allows you to quickly select areas of your images and make independent edits to it. It’s most used often to select solid backgrounds and color areas. It doesn’t work as well, for example, on an image with a distinct gradient or blurry features.
You can also swap out the background in a photo without moving or altering the subject of the image. This is very useful for product photography or e-commerce shots.
Unlike the Quick Selection tool, it selects pixels based on similarities in the color and tone in an image. Instead of looking for distinct borders, the Magic Wand tool searches the canvas for similar hues to make up its selection.
Click on a part of your image with the Magic Wand tool. Photoshop will match those pixels with pixels from another part of the image determined to be a match. You can use the Options bar to refine further how Photoshop looks for those pixels.
Magic Wand Tool Options
Tolerance Level
The Tolerance increases or decreases the sensitivity in the luminance values of a given color. The higher the number, the higher the range of luminance values that will be included in the selection.
The default is set at 32, but you can go as high as 255.
For example, if you choose a value of 50, it means that Photoshop will select luminance values 50 shades brighter and darker than the area you clicked on.
Change this selection to 100, and it will double that amount.
If you only want to choose the exact value of tones that you have clicked on, you can select 0 for the Tolerance value.

Contiguous
Contiguous chooses whether the selected pixels are next to one another. This will allow you to limit your selection to a particular area. Or it can choose many areas across the image with a single click.
![]()
Anti-Alias
When you select Anti-Alias, Photoshop will smooth the edges of your selection. It softens the transition of color between the selection and the rest of the photo. This is an option that works with other selection tools available in Photoshop as well. It makes for realistic-looking selections that blend seamlessly.
![]()
How to Use the Magic Wand Tool to Make a Selection Based on Color
This tool is especially useful for images that have a consistently colored background. You can also use it for images that have a lot of a particular tone represented.
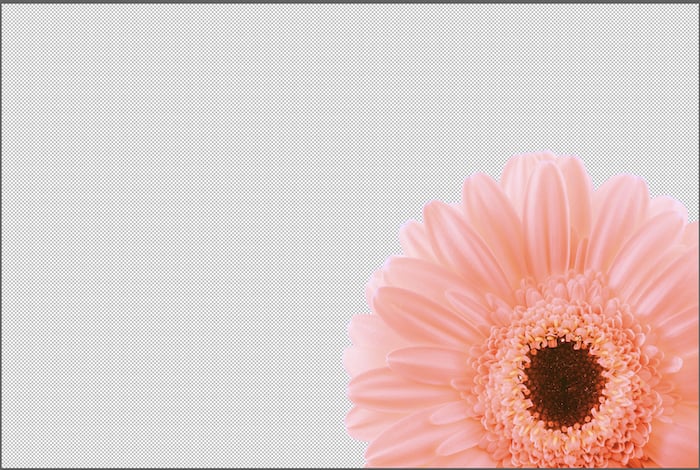
In the image below, I wanted to change the background to something more vibrant and dramatic. I want a color that would contrast well with the flower.

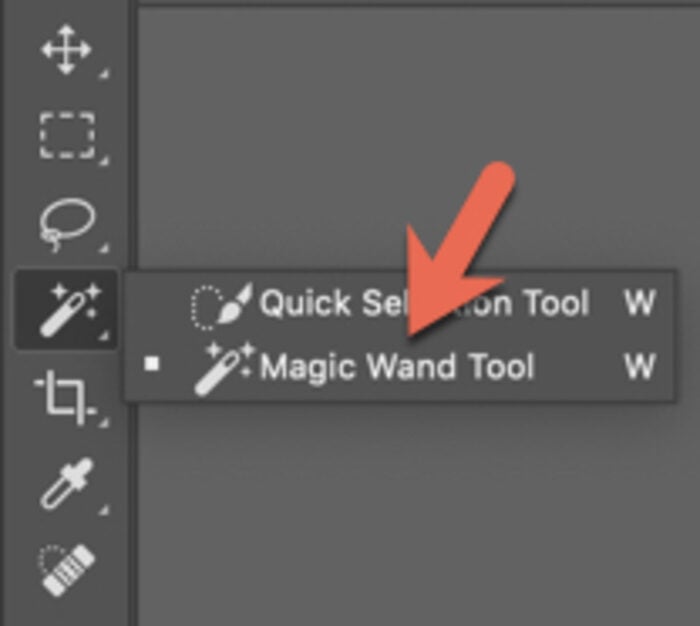
To use the Magic Wand tool, select it from the Photoshop tools toolbar. You can find it below the Quick Selection Tool. You can also hit W for the shortcut.
Click on the area to pick a sample color.
On the Options bar, choose your settings for Tolerance, Contiguous, and Anti-Alias.
Click on a color in the image to make your selection.
Choose Sample All Layers if you want to select similar colors on all visible layers. Uncheck if you want to sample from the current layer only.
In the image of the daisy, the Magic Wand tool did a pretty good job of selecting the area to alter, signified by the “marching ants.” Anything within this area will be included in the selection.

This selection can be further refined by holding down the Alt/Option key and (+) or the Shift key and (-) and dragging the selection.
Once you have made your selection, hit Ctrl/Cmd + D to deselect and adjust the Tolerance level.
Again, if you increase the Tolerance, Photoshop will select a much broader range of colors. Any areas that may have been missed in your initial selection will now be included. Also, if you turn Contiguous on, Photoshop will only select from connected areas.
For the daisy image, the appropriate Tolerance level was 100.
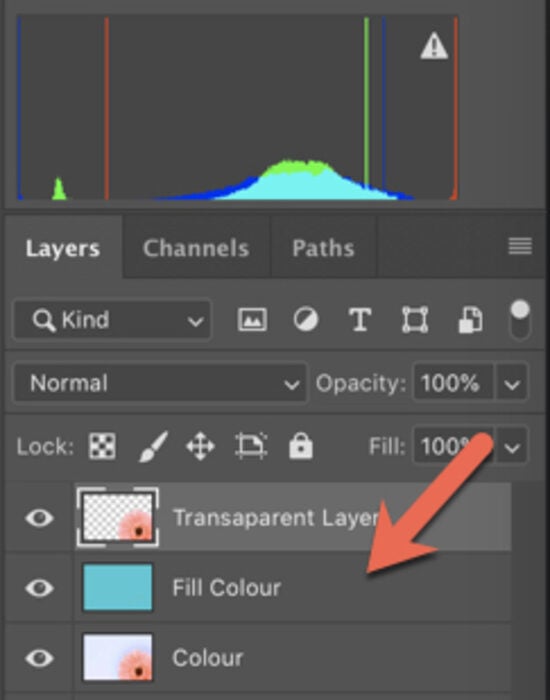
Once you have made your selection, hit Ctrl/Cmd + J to create a copy of the layer. This will give me a layer with a transparent background, showing me what will be replaced.
Once you do that, you’ll need another layer for the background color. Go to the bottom right-hand side of your workspace and choose the icon for Create New Layer.
![]()
Drag this layer below the transparent layer.
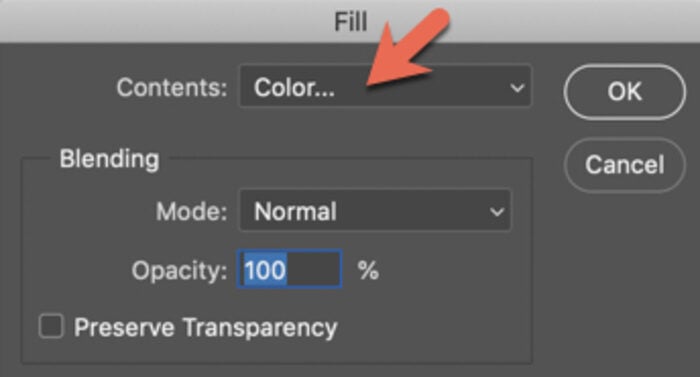
To choose your color for the background, go to Edit and then choose Fill. Make sure you choose Color from the menu. This will bring up the color picker that will allow you to choose the exact color you wish to use as a background.
Hit OK to add this fill color to your background.

So again, the exact steps are as follows:
- Make a selection with the Magic Wand Tool. Refine the selection as needed using Alt/Opt or Shift.
- Create a new layer by hitting Ctrl/Cmd + J.
- Create a new layer to create a separate “fill” layer.
- Drag that layer below the transparent layer.
- Go to Edit, then choose Fill.
- Click on Color.
- Choose the color you want in your background with the Color Picker.
- Hit OK.

Most Common Magic Wand Questions
How Do I Adjust the Magic Wand Tool in Photoshop?
You can make adjustments to the Magic Wand tool in the Option bar. Selecting Tolerance will change how much of the color areas are sampled. Checking Contiguous will ensure that only colors that are next to one another are selected.
How Do You Turn Off the Magic Wand Tool?
To turn off the Magic Wand tool, hit Control (Windows) or Command (mac) + D. D stands for Deselect and is one of the most common shortcuts used in Photoshop.
Conclusion
The Magic Wand tool in Photoshop can be a bit tricky to use on some images. On others, it can be a handy tool that gives you great results with a couple of quick and easy steps.
Try it the next time you want to change the color of a solid background quickly. Or use it to make the sky in your image look more dynamic.
Check out our Effortless Editing with Lightroom course to master editing!


