It is easy to feel overwhelmed by the amount of commands that Adobe Photoshop has. That’s why we’ve put together this list of 20 Photoshop shortcuts for photographers.
Using Photoshop keyboard shortcuts make your editing workflow faster, so keep reading. And bookmark this article for future reference.
1. Photoshop Shortcuts: New Layer
If there is something that characterizes Photoshop is its workflow based in layers.
You can create a new layer with the shortcut Shift+Ctrl+N (Window) or Shift+Cmd+N (Mac).
A dialog panel will appear where you can rename the new layer. You also have options such as opacity, color or blending mode.
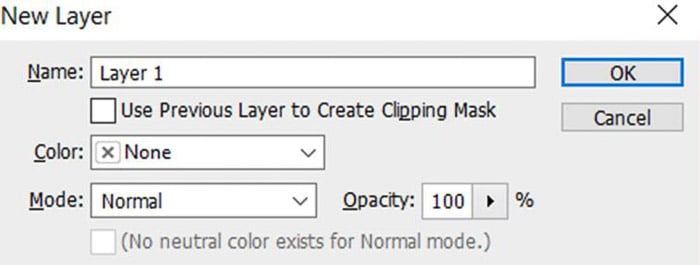
If you use default settings, your new layer will be a blank transparent one.
2. Duplicate Layer Shortcut
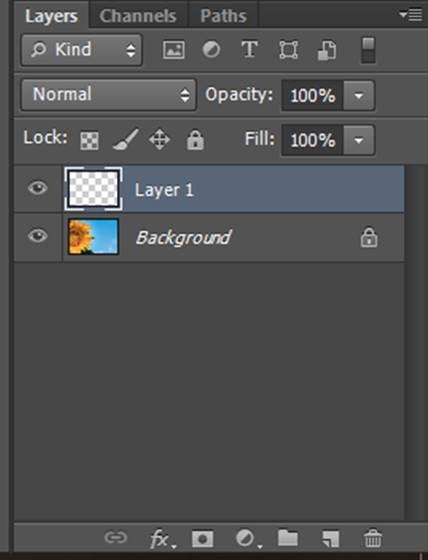
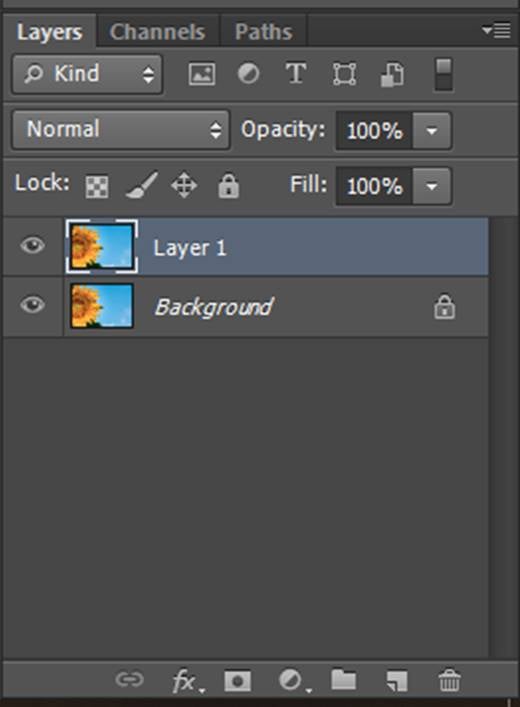
When you open your image to edit it in Photoshop it is highly recommended that you create a copy of your background layer (aka your image).
This will allow you to work on this copy and not directly in the image. It makes your flow less destructive. You can always delete this layer and your image remains intact.
You can create copies of any layer you need, not just the background one.
To do so, press Ctrl+J (Windows) or Cmd+J (Mac). Just make sure that you have previously selected the layer you want to create the copy from.
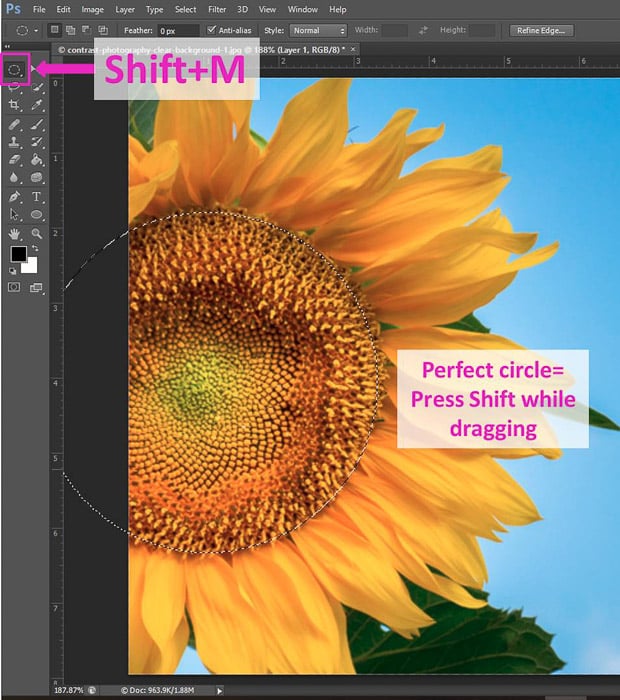
3. Marquee Tool Shortcut
The Marquee tool is used to select areas of an image with a certain shape. Use the shortcut M to access the Rectangular Marquee Tool.
Press Shift+M to change between this one and the Elliptical shape. You can then select your desired area in the image.
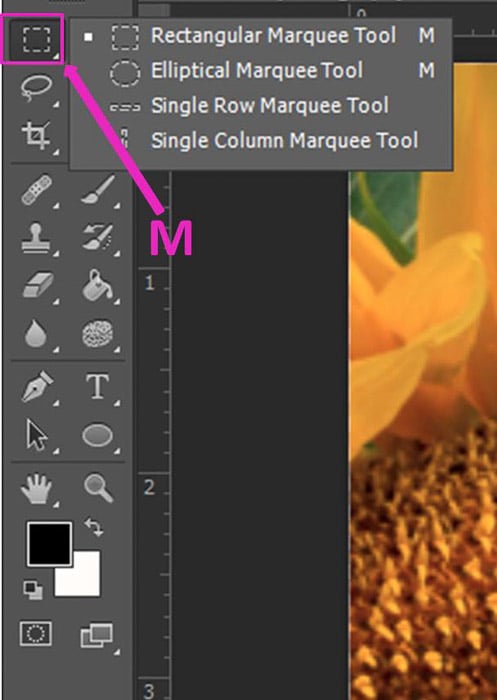
If what you need is a perfect circle, select the Elliptical Marquee Tool and hold down the shift key while dragging your selection.
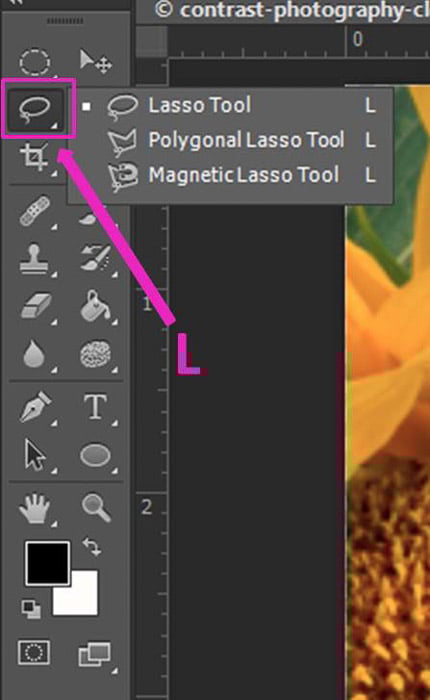
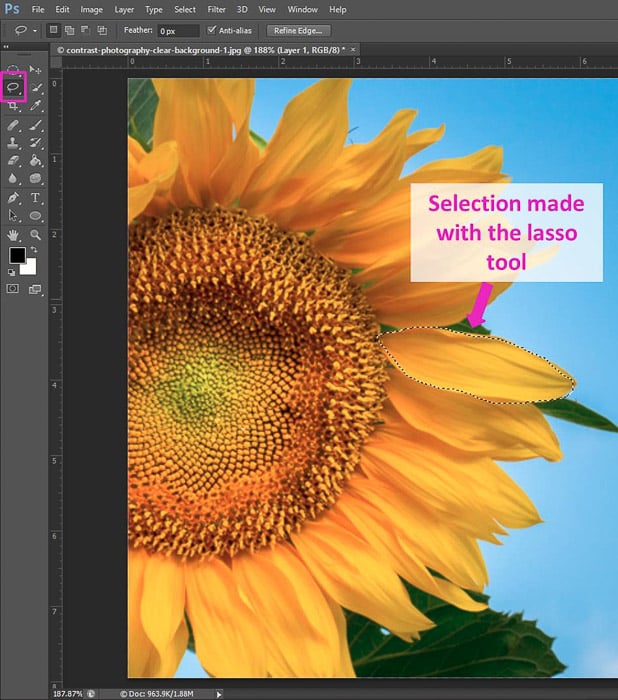
4. Lasso Tool Shortcut
The Lasso Tool is used for selecting a free area of your image (not a geometrical shape).
When you use the shortcut L the first time, you select the Basic Lasso Tool.
With this tool you can freely select areas. To create straight lines, press the Alt/Opt key while you draw.
By pressing Shift+L repeatedly, you can change between the Basic Lasso Tool and two other options: the Polygonal Lasso Tool and the Magnetic Lasso Tool.
The Polygonal Lasso allows you to create angles by adding points in each click you make in the image.
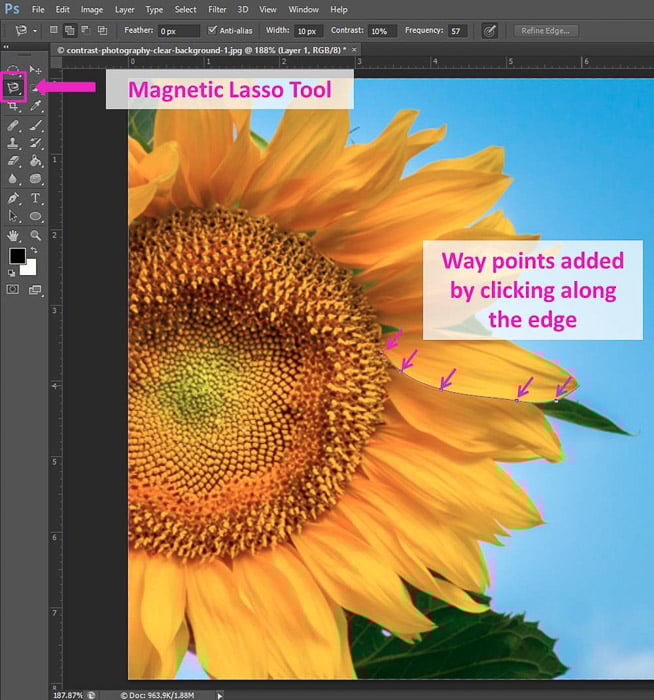
The Magnetic tool is great to select edges (areas with big contrast).
Click at the starting point of the selection and move your mouse. You will see that the selection line wraps the edge and Photoshop adds points.
You can also add points by clicking with the mouse. If you make a mistake, you can delete the points with the delete button.
To complete the selection you need to get to the first point and close the selection area.
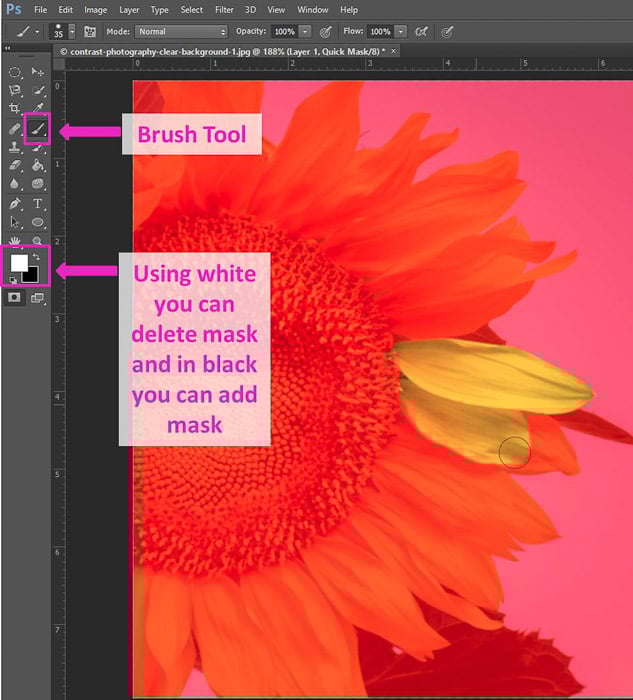
6. Brush Tool Shortcut
The shortcut for the brush tool is B. Pressing Shift+B you can change from the brush tool to Pencil Tool, Color searchment Tool and Mixer Brush Tool.
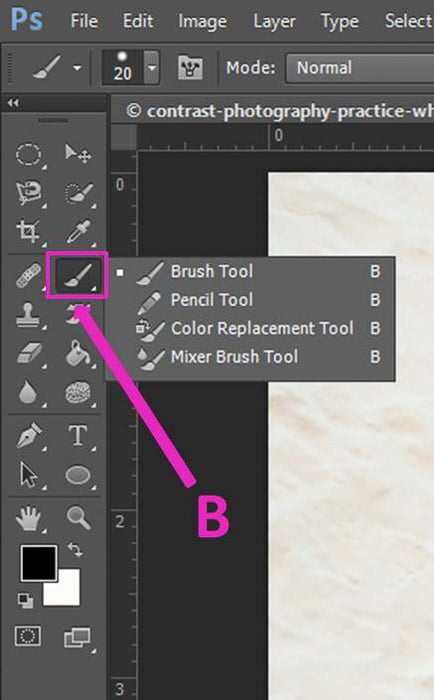
There is also a Photoshop brush size shortcut.
By pressing ] you make it bigger and by pressing [ you make it smaller.
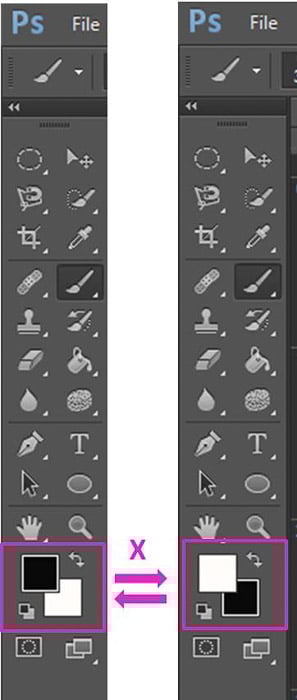
7. Change Background/Foreground Color With a Shortcut
This is especially useful while working with masks. That's when you need to paint in either black or white to modify the mask area.
It is easy to switch between these two colors by pressing X. The only caveat is that you need to have the background and foreground colors set to black and white.
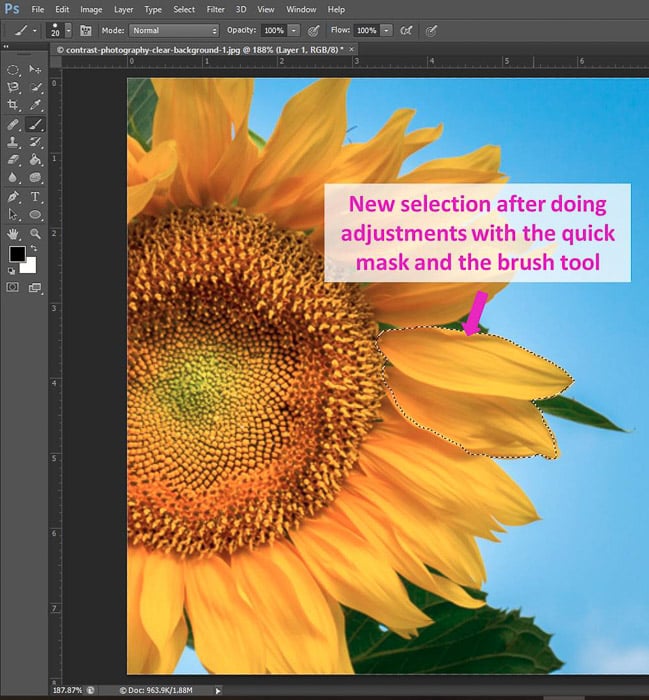
5. Quick Mask Shortcut
When selecting an area you can make local adjustments easily by using a quick mask. While having an area selected, press Q to activate the quick mask.
A red mask will appear outside the selected area.
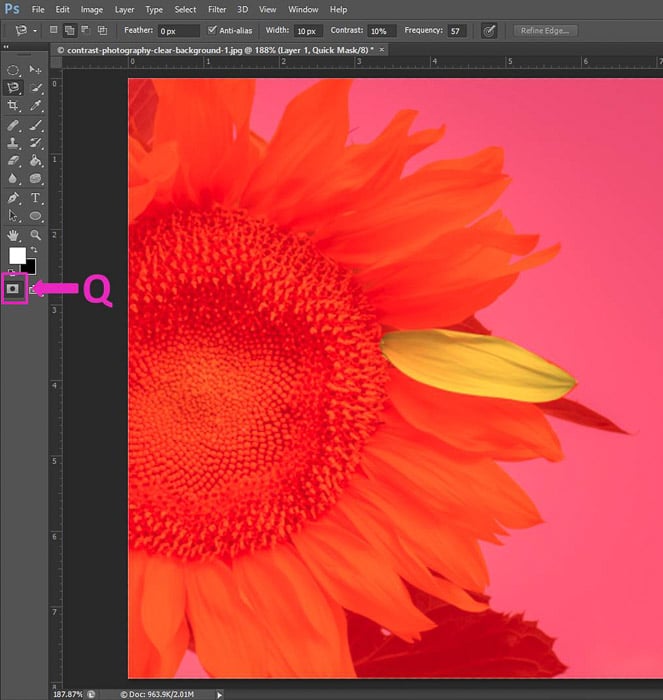
Using the brush tool (B) you can make changes in the selection.
If you paint in black you will add a mask and if you paint in white you will delete it (here is where the previous shortcut is useful).
Press Q again to go back to the selection view.
8. How to Deselect in Photoshop
If you have an area selected and you want to unselect it, press Ctrl+D for Windows or Cmd+D for Mac.
This shortcut works only when the selected area is active (when you still see the lines of your selection).
9. Invert Selection Shortcut
You can invert your selection using Shift+Ctrl+I (Windows) or Shift+Cmd+I (Mac).
10. Move tool shortcut
The Move tool is one of the basics. It allows you to move elements in your workspace.
It is useful, for example, when you are composing using several images or when making a collage.
Once you select the tool, you can move elements in 2 different ways. Drag them with the mouse or use keyboard arrows.
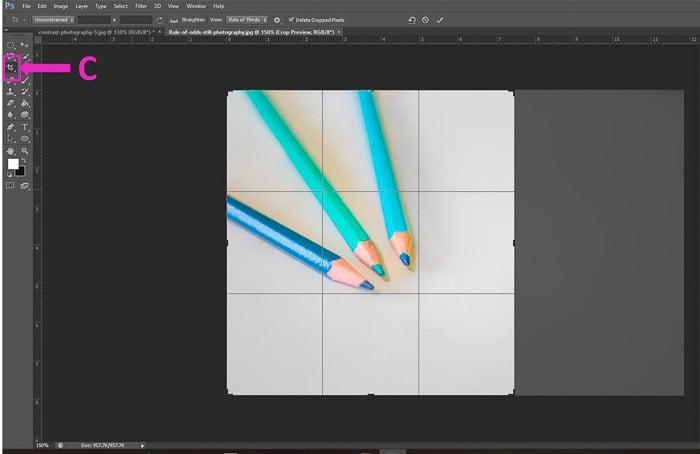
11. Crop Tool Shortcut
You might need the Crop Tool often, so learning its shortcut (C) will be really useful for your Photoshop workflow.
Once in the Crop Tool, you can select other handy features such as the straighten tool.
12. Clone Stamp Tool Shortcut
The Stamp Tool allows you to copy an area of an image and paste it into another part. Press S to access to the tool and your cursor will become a circle. As in the case of the brush tool, press ] and [ to make it bigger or smaller.
Copy an area by pressing Alt/Opt while you click on it (it is your target point) and then paint it in the place where you want to copy it.
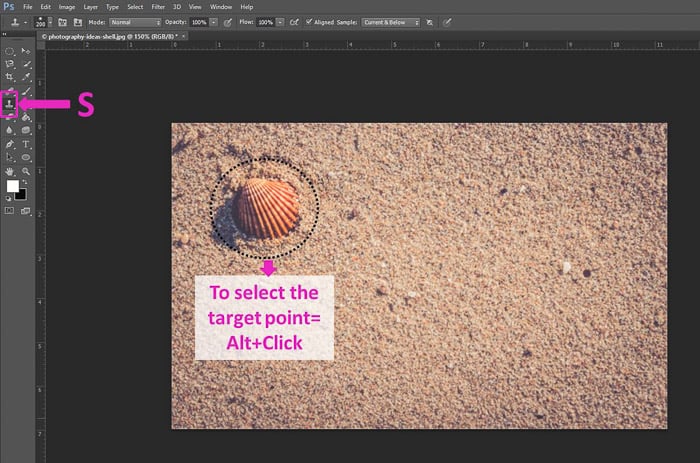
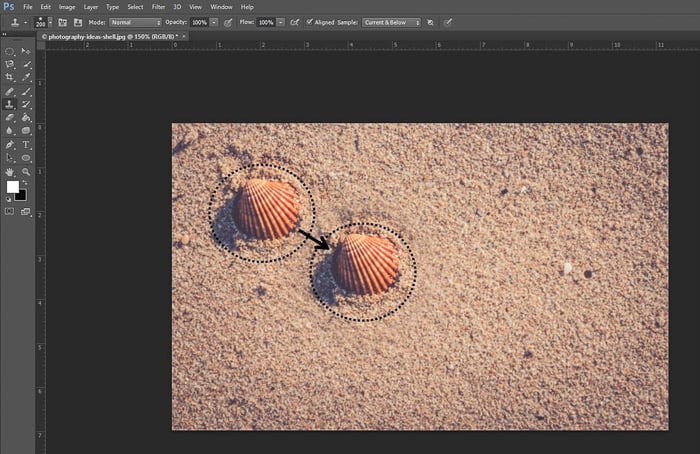
Check the Aligned sample box in the toolbar. This will make the target element follow your movement while painting.
13. Photoshop Zoom Shortcuts
There are several ways to Zoom in Photoshop. The fastest shortcut to Zoom in and Zoom out is pressing Ctrl+ to Zoom in and Ctrl- to Zoom out (Cmd+ and Cmd- respectively on a Mac).
If you just want to select the Zoom tool, then press Z and you access its tool bar options.
14. Fit Screen Shortcut
You can always Zoom out using the Ctrl –/Cmd- shortcut.
But you can do it even faster by pressing Ctrl+0 (Windows) or Cmd+0 (Mac).
The image will resize itself to fit your screen.
15. Hand Tool Shortcut
When you zoom in, you might need to move the image to see the surrounding areas. You can do it with the arrow keys, but a faster way is by using the Hand tool.
Press H to select it. Your cursor will become a little hand. Click and drag your image around however you need.

16. How to Undo
You can use the shortcut Ctrl+Z to undo your last step (Cmd+Z on a Mac). To undo multiple times in Photoshop, you might think you just need to press this repeatedly. That won’t work.
If you want to undo multiple times press Ctrl+Alt+Z (or Cmd+Opt+Z on a Mac) and you will step back through your History one step at a time.
In Edit>Preferences> Performance you can enter the number of History steps you want Photoshop to save. With a higher number you will be able to undo more steps, but it will also use up more of your computer memory.
17. How to Merge and Unmerge Layers Using Photoshop Shortcuts
If you are working with a lot of layers, you might want to merge them to reduce the size of your image files.
Select the layers you want to marge and press Crtl+E (Windows) or Cmd+E (Mac).
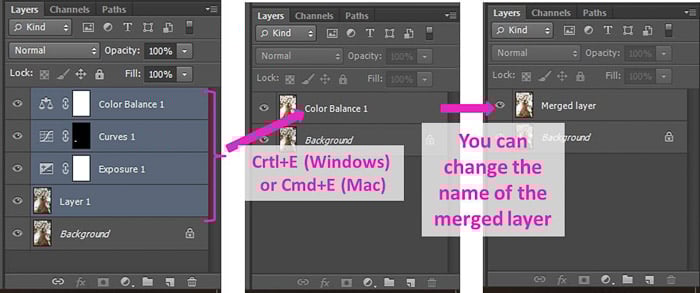
It is possible to unmerge layers before you save your file. If merging was your previous step, press Ctrl+Z/Cmd+Z to undo it.
If not, you can use the shortcut Crt+Alt+Z/Cmd+Opt+Z to go back through your History.
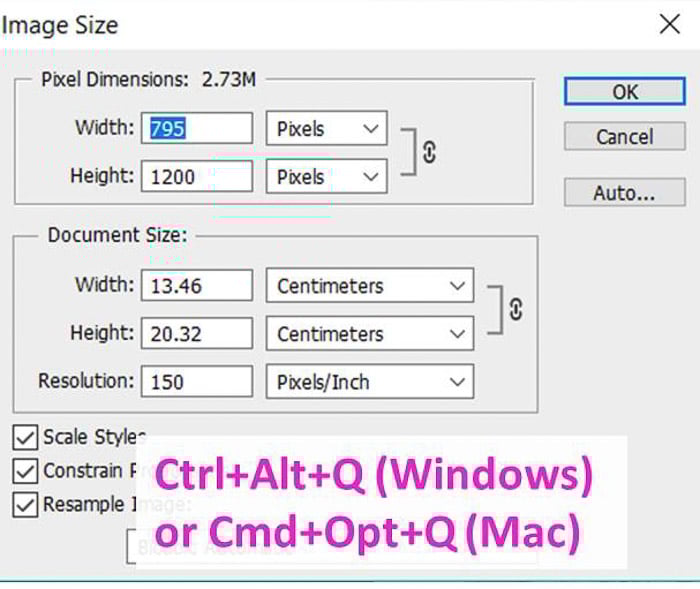
18. Image Size Shortcut
If you want to resize the image just press the shortcut Crtl+Alt+Q to access to the Image size dialog panel (Cmd+Opt+Q on a Mac).
You can change both the size and the resolution of your image. Remember though that if you make the image bigger, you will lose in the resolution!
19. Save and Save As Shortcuts
To save your image quickly you can use two Photoshop shortcuts. For just saving it, press Crtl+S (or Cmd+S on a Mac).
If you want to access the Save As panel, press Shift+Ctrl+S (or Shift+Cmd+S) instead.
20. Shortcut for Photoshop Shortcuts
If you think that some (or all) Photoshop shortcuts are hard to remember and you would like to change them, you can do it!
There is a shortcut to access to the Shortcut dialog panel: Shift+Alt+Ctrl+K (Opt+Shift+Cmd+K on a Mac).
You can change the shortcuts under "Application menus", "Panel menus" and "Tools".

If your new shortcut is already in use, Photoshop will give you a conflict message in a dialog box.

Using this, you can change default Photoshop shortcuts, like O for the burn and dodge tools.
Conclusion
Photoshop has a lot to offer, but with so many available tools and panels it’s easy to get lost.
Using Photoshop shortcuts can make your work more efficient (and your life easier).
It might take some time to get used to them but it’s definitely worth it.
Now check out our article on Photoshop actions, plugins and effects for more great tips!
And check out our articles on the Photoshop selection tool and clone stamp tool for more Photoshop tutorials.


