Editing black and white photos can be a great way to improve the quality of your images, and Photoshop is one of the best tools for the job. In this tutorial, we’ll show you how to use Photoshop to edit black and white photos.
How to Edit Black and White Photos in Photoshop
Photoshop provides many different ways to convert a color image into a black-and-white one. Whatever method you use, the process is essentially the same.
You enter the values from the red, green and blue components of each pixel into a formula.
This calculates just one number that’s then applied to all color components. Thus, the pixel is forced to a shade of grey.
The Grayscale Mode
Photoshop supports a special mode called ‘Grayscale’. It’s designed to handle images with no color information. Images in this mode have no red, green or blue channels but instead store only the brightness (luminance) information in a single channel.
Switching to this mode necessarily removes the color from a photo. It’s not the best way to make a black-and-white image but it’s not the worst either. And although it’s quick and simple, it can give surprisingly good results.
Let’s examine this technique first.
This conversion models the way the human eye perceives the brightness in a scene. Our eyes are most sensitive to green, less sensitive to red and least sensitive to blue. The grayscale conversion models this by multiplying the red value by 0.28, the green value by 0.7 and the blue value by 0.06. It then sums these modified values to obtain the final grey value.
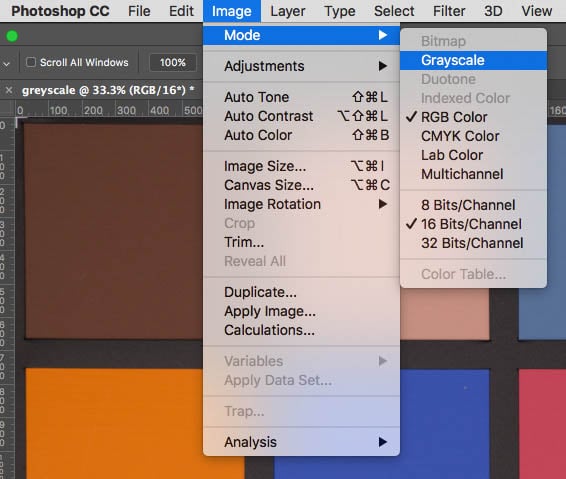
This is a destructive conversion, so work on a copy of your color image by selecting Image > Duplicate… from the main menu. Then, with the duplicate image open, select Image > Mode > Grayscale.
The Grayscale conversion is approximately 0.28r + 0,7g + 0.06b.
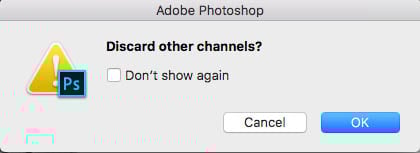
Photoshop will warn you that you’re about to discard color channels and suggest a better method that gives you more control.
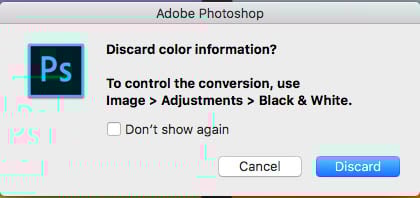
If you click the ‘Discard’ button, Photoshop will apply the fixed conversion. It will discard the color information and switch to Grayscale mode.
If you want to save your Grayscale image as a JPEG, Photoshop will automatically reinstate three identical red, green and blue channels.
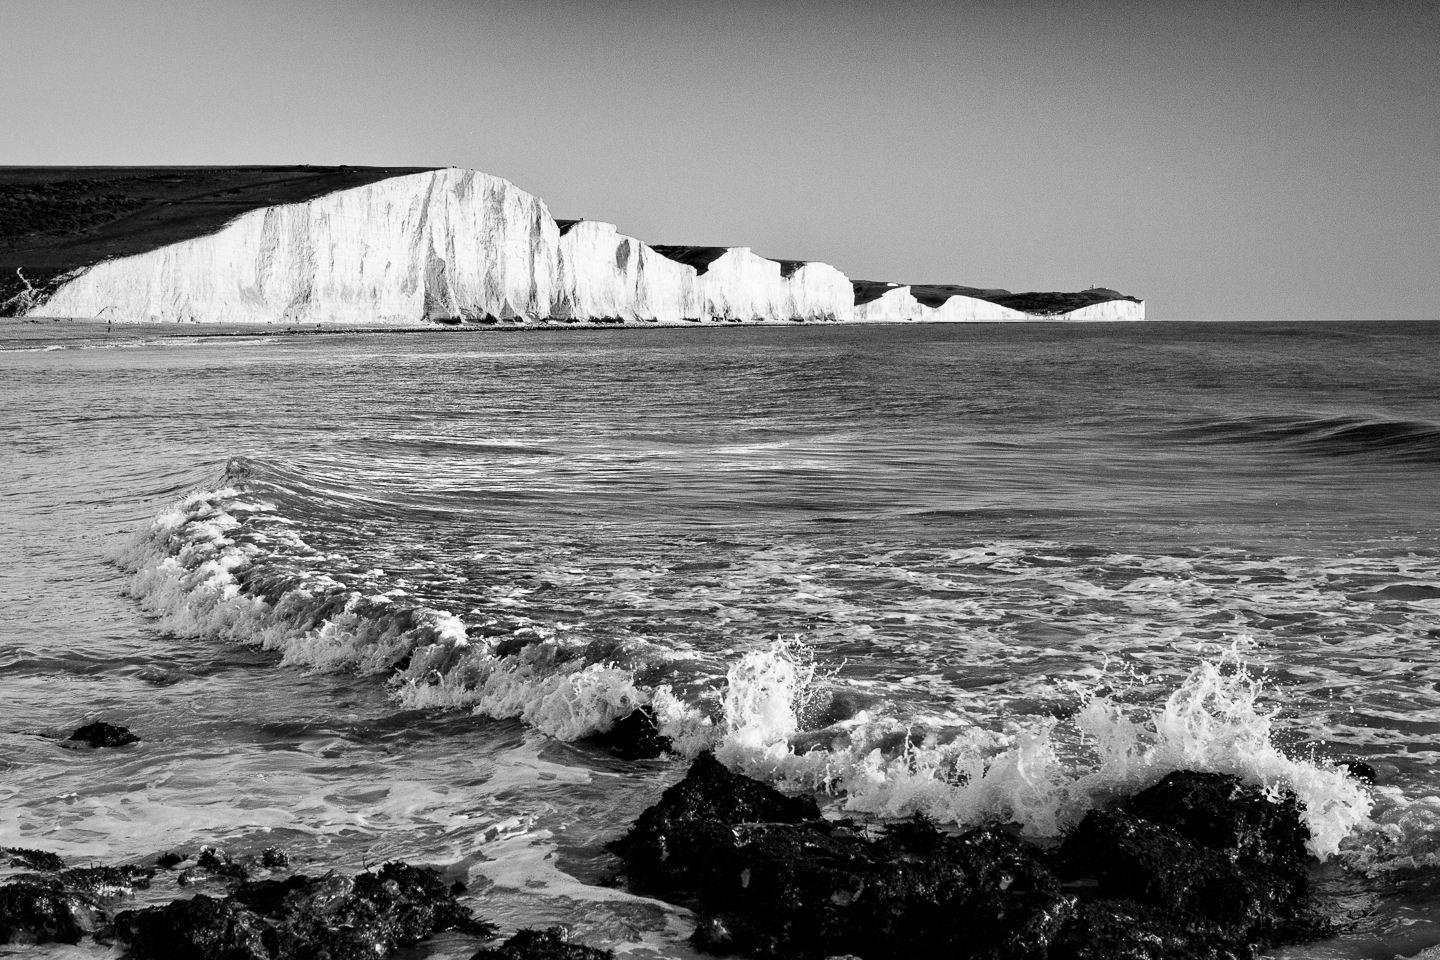
A simple Grayscale conversion can give good results if the subject matter has a strong composition. In this example, the colors are well differentiated.
It also has strong leading lines and textures that work well in black-and-white.

This Grayscale conversion has a dark sky, well lit pavement, good mid-tones and strong shadows.
Selecting a Single Channel to Convert
Each pixel on your sensor can see the world through either a red, green or blue filter. This depends on its position. Software in your camera generates a full resolution image for each of these primary colors.
Normally, these three images are combined to display the composite color image. Photoshop can also display them separately, and they’re called Channels. To see them, open a normal color image and click on the Channels tab.
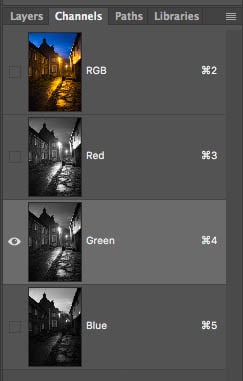
The Red, Green and Blue channels in Photoshop.
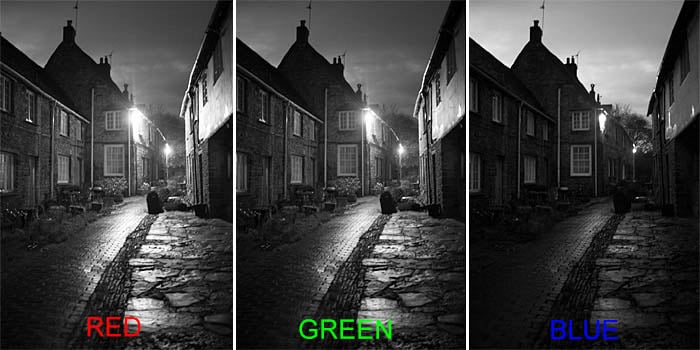
The Channels tab will show you the composite color RGB thumbnail. If you click the Red, Green or Blue channels in turn, you’ll see a black-and-white representation of the contribution from just that channel. They can be quite different.
Select a single channel that produces the best result and then switch to the Grayscale mode as shown before. This time, Photoshop will ask if you want to discard the information in the other channels.
Click the OK button and Photoshop will make a Grayscale image of just the chosen channel. Generally, the Blue channel won’t give very good results. There’s usually little information in this channel which means it has the worst signal-to-noise ratio. Selecting either the Red or Green channels can give reasonably good results.
So now we’ve seen that the Grayscale’s fixed formula yield good results. Let’s look at an image where this method fails.
When a Fixed Conversion Fails
Red and green can easily have similar brightness levels, despite being different colors. This means they’ll yield almost identical grey values when converted to black-and-white.
A good example is the well known Ishihara color blindness test. If you have normal color vision, the figure ‘8’ will be clearly visible in the color image. But convert it to Grayscale using the fixed formula, and the reds and greens become indistinguishable.
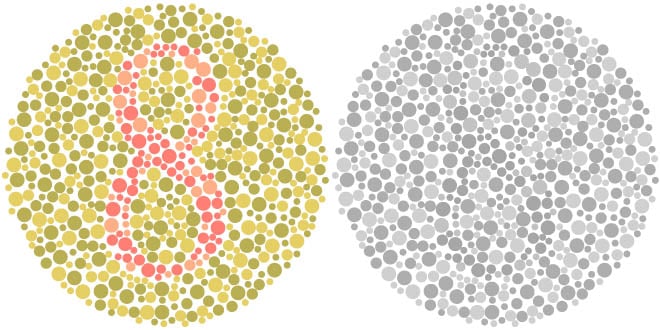
Grayscale can fail to sufficiently distinguish between quite different colors.
You can of course use the Channel selection trick for you Grayscale conversion and see the figure appear as shown below.
But for real-life black-and-white photography, you need much greater control over how color ranges affect the final shades of grey.

Left: Red Channel Greyscale conversion. Right: Green Channel Greyscale conversion.
Desaturation – Why You Shouldn’t Use It
Taking the color saturation down to zero might seem like an obvious way to turn an image into black-and-white. But this is probably the worst way to make a black-and-white image.
In Adobe Photoshop, the desaturation operation works by taking the average value of the largest and smallest values of the rgb triplet. It doesn’t apply weighting coefficients like the Grayscale conversion does. This leads to very poor differentiation of colors. The resulting image often shows a significant lack of contrast.
Here’s a comparison of two conversions of an X-Rite color test card. The center image is the result of a simple desaturation. Notice how the colors on the third row down have been converted to very similar shades of grey. Compare this to the right-hand image which is a Grayscale conversion.
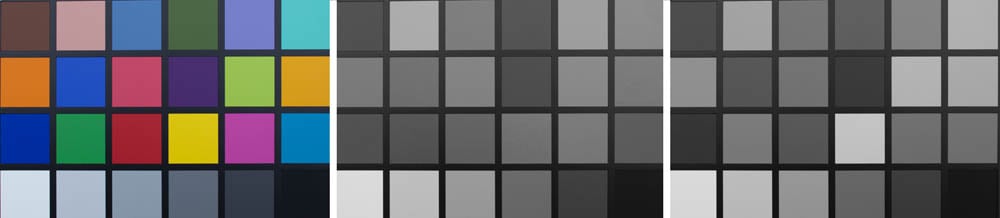
Left: Color test card Center: Desaturation Right: Grayscale
Keeping Your Options Open With Adjustment Layers
Whenever you’re editing an image, it’s always a good idea to do it non-destructively. As long as your image is open in Photoshop, you can use the History Panel for this purpose. Once you save your image, its history is discarded.
This is the case when making a black-and-white conversion using the ‘Image > Adjustments’ menu options. It will make changes to the image directly.
A better way to work is to use Photoshop’s Adjustment Layers.
You can turn these on and off and tweak the corresponding adjustments as often as you wish without modifying the pixels in the underlying layers. They can also be combined with layer masks to apply their effects to specific parts of your image.
To keep the ability to return to any edits later on, save your work as a layered Photoshop document.
Custom Channel Mix Technique
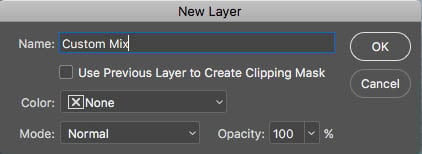
The first adjustment layer we’ll examine is the Channel Mixer. Open a color image and then add an adjustment layer by selecting Layer > New Adjustment Layer > Channel Mixer… from the main menu. This will bring up the New Adjustment Layer dialogue box. Here you can name the new layer.
Click OK to add the Channel Mixer adjustment layer and double-click its icon to display its properties panel:
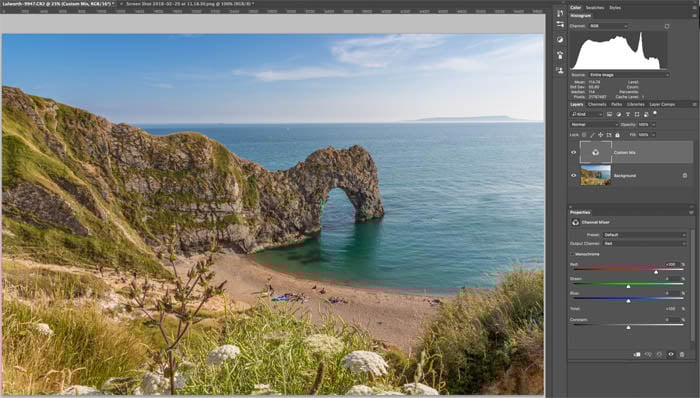
Color image with Channel Mixer adjustment layer and properties panel.
The properties panel has red, green and blue sliders that allow you to mix the images from these channels back to either the red, green or blue channels.
If you alter these sliders while examining the Channels tab, you can see how the various channels are affected as you modify the sliders.
The Channels mixer can make some significant color changes to a photo. But it really comes into its own when we mix the color channels into a monochrome composite.
To do this, tick the ‘Monochrome’ box in the properties panel. You can now adjust the sliders to create your own custom blend of the underlying color channels.
And you can do this without having to convert into Grayscale mode.
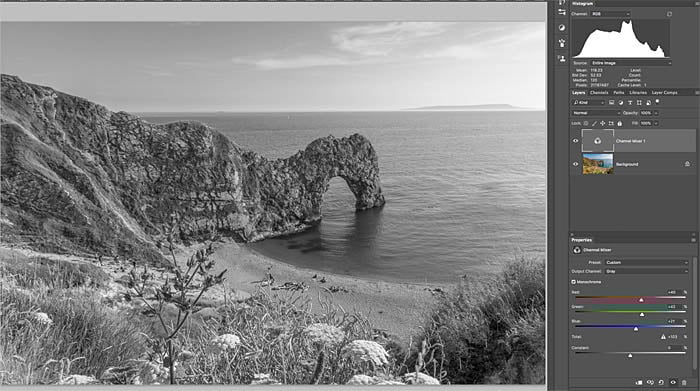
Alter the red, green and blue sliders to balance their contribution to the final image. It’s possible to make them add up to more than 100% and blow-out some highlights so keep an eye on the histogram.
Aim to keep the Total: value (shown underneath the blue slider) to around 100% for best results. If you boost the contribution from one slider, you may need to back-off the other sliders to achieve a good balance.
The Black & White Adjustment Layer
he Channel mixer combines the primary colors directly with a wide range of plus and minus 200%. This makes it a rather blunt tool for black-and-white conversions.
You may find that you need to keep switching the adjustment layer on and off to remind you what colors various parts of the image are. This might makes the whole process feel somewhat hit-and-miss.
To refine the process, Adobe have provided a dedicated Black & White adjustment layer. This gives you the ability to more accurately adjust specific color ranges.
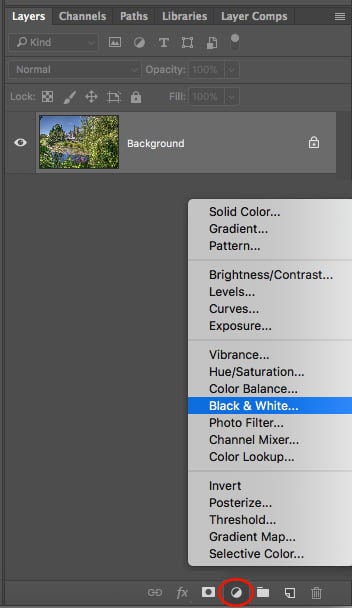
Click the ‘create new fill or adjustment layer’ button at the bottom of the Layers palette (shown circled red). Then select Black & White from the menu.
Alternatively, click the Adjustments icon in the toolbar and then select the Black & White icon (shown circled) or add a layer from the menu by selecting Layer > New Adjustment Layer > Black & White…
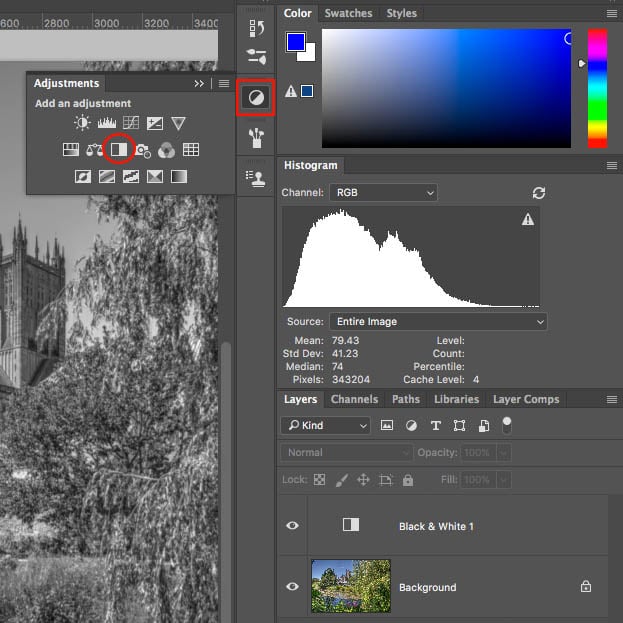
You can see the adjustment layer here above the background layer it affects. Click the eye icon of the adjustment layer to switch its effect on or off.
This will add the adjustment layer above the currently selected layer (which in this example, happens to be the background layer).
A panel of six sliders now gives you control on how the red, green and blue hues will affect the final grey tones. It also gives you control over the contribution of cyan, magenta and yellow hues.
Use the drop-down menu to quickly select a starting point for your conversion. If you find a combination you want to use on another photo, save it as a preset.
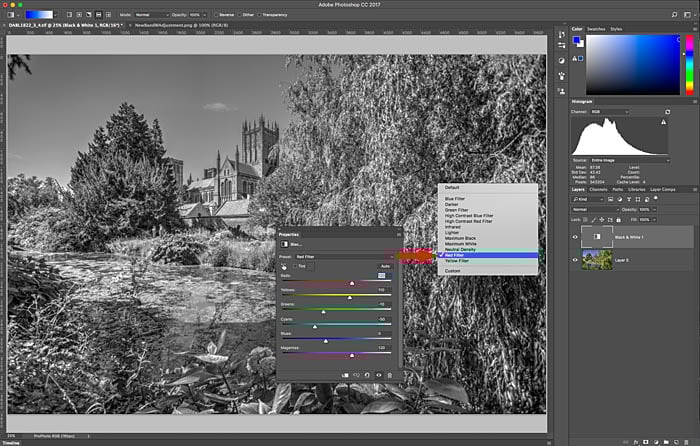
The properties panel for this adjustment layer has a handy preset drop-down menu. You can use this to quickly simulate the effect of colored filters used with black-and-white film. You can also adjust any of the sliders to alter how much the corresponding color affects the final shade of grey. This is less prone to clipping than the channel mixer.
If you prefer to sample points on the image, click the ‘targeted adjustment tool’ icon beneath the word ‘Preset’. Then click and drag left/right on an area of the image you want to darken or lighten.
This will target the color range and move the respective slider.
Note that unlike Lightroom‘s black-and-white controls, this targeted adjustment tool only moves one slider. There’s no operational difference between dragging a slider and using the targeted adjustment tool.
TIPS
- If your adjustment layer isn’t converting your image to black-and-white as expected, check that the blend mode of the adjustment layer is set to ‘Normal’ and the opacity to 100%.
- Experiment with the various blend modes of the adjustment layer. They can produce some interesting effects by combining black-and-white adjustments with color information. Luminosity and difference modes are particularly interesting.
- When adjusting the color sliders, keep an eye on the histogram to help you avoid clipping.
- Zoom into the image at 100% view and check for halos and strange lighting effects around edges where different colors meet. Adjust those sliders as needed.
- If you hit upon a slider combination you want to use again for another conversion, save it as a preset.
Adding a Tint
Viewing a pure black-and-white image on-screen is one thing. Actually printing it is quite another.
It was once common for home printers to have just four inks – Cyan, Magenta, Yellow and Black (CMYK).
Such printers were limited in the gamut of colors they could reproduce. And they were particularly bad at making black-and-white prints as they only had one black ink.
More recent printers often sport several blacks. Matte Black, Photo Black, Dark Grey, Grey and Light Grey for example. This enables them to reproduce a rich range of tones for a black-and-white image.
Printers with only one black ink benefit from having a hint of color added to the final image. This way, they bolster the black with a some color. Even if your printer can handle true black-and-white, adding a hint of color can warm up the final print.
To add a color tint, simply click the ‘Tint’ box on the properties panel of the adjustment layer. Double click the adjustment layer icon in the layers palette to display it if it’s not visibl. Then you can select a color via the color picker.
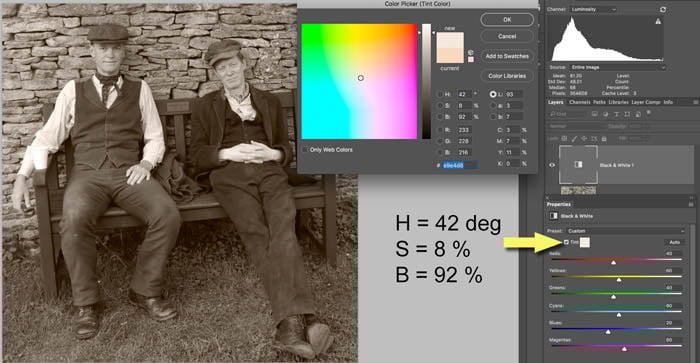
Tick the Tint box and click on the colored square to bring up the Color Picker. Here a sepia tint of HSB(42,8,92) has been chosen.
Using Adobe Camera RAW
When you open a raw file in Photoshop, you’ll activate the Adobe Camera Raw converter.
his dialogue box offers a wide range of image adjustments. They’re accessible from the toolbar beneath the histogram.
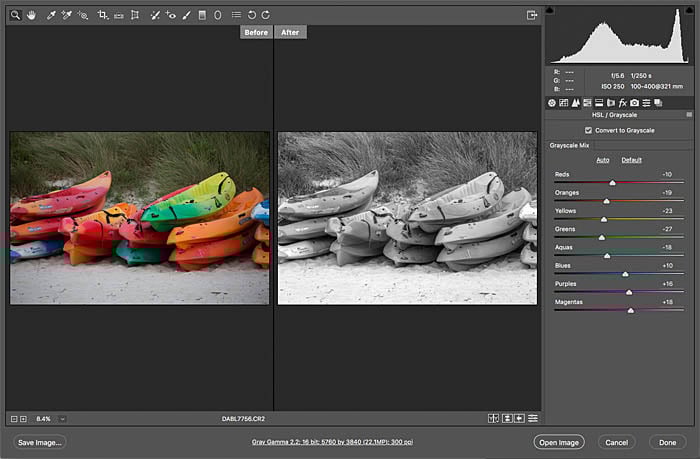
You can apply all the usual tonal tweaks by selecting the first icon (basic adjustments) and then click the forth icon (HSL / Grayscale).
Tick the ‘Convert to Grayscale’ box. You’ll have eight color ranges to target for your Grayscale mix.
Buttons at the lower-right of the screen enable you to see the before/after images. This is particularly useful when working from color to monochrome.
If you click the ‘Done’ button after making your edits, Photoshop will save them a sidecar xmp file with the original raw file. This means your edits are non-destructive.
If you instead click the ‘Open Image’ button, Photoshop will consolidate them into a Grayscale image. The actual black-and-white conversion will have been made using your custom settings rather than the ‘Convert to Grayscale’ settings.
Check out our article on why you should NEVER use spot color!