In post processing, especially exposure blending, luminosity masks play an important role to blend an image smoothly. In the old days, you may have tried to use HDR software to blend different exposures into a single image. Most of them are good software and you can create beautifully blended images.
However, the problem when you use HDR software is that you can only create the blend to the whole image. You cannot make precise local adjustments.
Instead, we recommend using Adobe Photoshop, as this gives you the ability to use a luminosity mask.
1. Create Basic Luminosity Masks With Just One Click
First, I would like to introduce the simplest way to create luminosity masks.
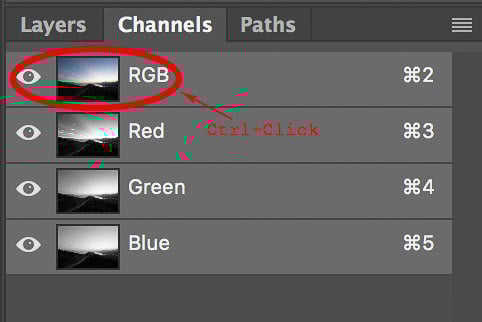
First step, you hop over to the layer window and select the channel tab. You can simply Ctrl+Click the thumbnail of the RGB channel in channel window. You have selected the luminosity of this image and the basic mask is ready to apply.
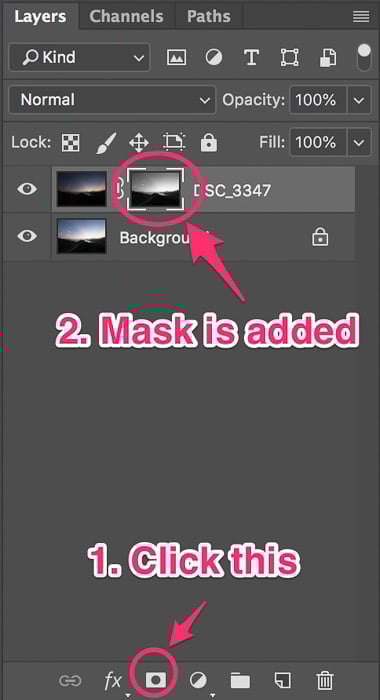
While you have selected the luminosity of the image, you can hop over back to the layer tab. And then select the layer you want to apply the mask to and click the create mask button. You have now created basic luminosity masks.
You can also create a dark mask instead of a bright one. Make sure you have selected the mask, then you can use the shortcut Ctrl+I to invert the mask. You can see that the dark area has become white and the bright area black.
2. Adjust the Luminosity Masks by Level and Curve
While you are blending your image, most of the time you may find that a basic mask is not working well for several reasons. Mostly it is because of super high dynamic range in only small area of your image, such as the area around the sun.
In these cases, you will need to adjust your luminosity masks to highly focus on the super bright area or super dark area.
You can imagine that a mask is just like a black and white image, you can adjust it with different destructive adjustment layers. The two adjustments I use for luminosity masks are level and curve.
The shortcut keys for level and curve adjustment are Ctrl+L and Ctrl+M respectively. When you want to adjust the luminosity masks with level, you can select the mask and press Ctrl+L. Similarly, you can press Ctrl+M if you want to adjust it with the curve adjustment.
3. Intersect Luminosity Masks With a Mask
Sometimes, adjusting luminosity masks with level or curve is not a good choice. You can try intersecting the mask with itself instead.
When you use the luminosity of an image as a mask, your mask contains different levels of grey. Bright areas show more "white" and dark areas show more "black". When you have luminosity selected and hold down Ctrl+Alt+Shift while hopping over to the RGB channel, you can see the mouse icon turns into a cross.
Click again on the channel while holding Ctrl+Alt+Shift, and you will intersect the selected area with the channel you have clicked on.
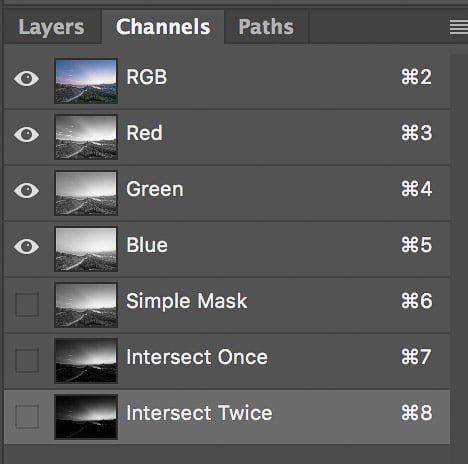
Then you can try to apply the intersected selection into the adjustment layer like normal. You can find that the new mask is more targeted to bright area. You can also intersect the mask a few time to get an even more targeted luminosity masks.
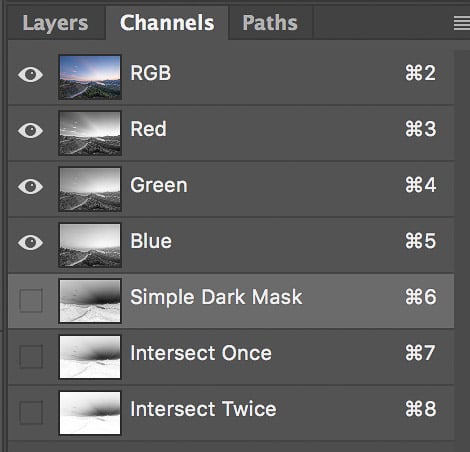
Similarly, if you want to target a darker area, press Ctrl+I while the mask is selected.
4. Create a Mask on a Mask
In some cases, you may want to have local adjustment with a luma mask. However, you cannot create a mask on an adjustment layer which contain a mask already. Photoshop allows you to add two luminosity masks onto one layer, but the latter one is having no effect to the whole layer.
In this case, what you can do is to group the layer with the luminosity masks. Then you add a new mask onto the group instead of the adjustment layer. In the new mask, you use the brush tool to paint in black color to hide the effect.
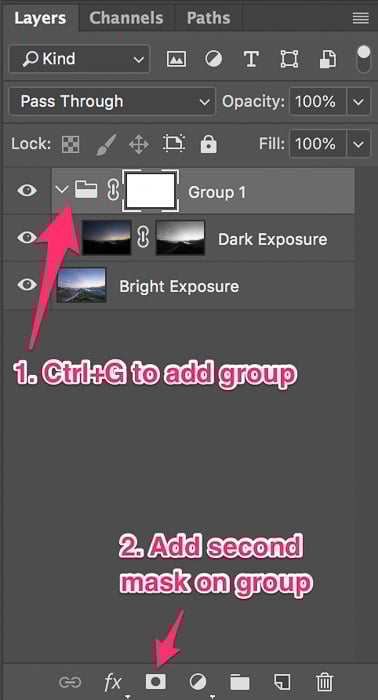
For example, you want to apply the curve adjustment to the bright area of the image and you only want the effect to appear on the upper part. First you should create a bright mask. Ctrl+Click on the RGB channel, then add a curve layer.
After adjusting the curve, you can press Ctrl+G to put the curve layer into a group. Then press add mask icon to create a new mask on the group. Then you can add a simple gradient where the upper part is white and lower part is black to show the curve effect on the upper part only.
5. Prevent Halos
When you shoot in widely different exposure settings, such as +3 and -3, and try to blend them together, ugly halos will appear. You cannot do anything to kill these halos because you do not have enough exposure data to get rid of them.
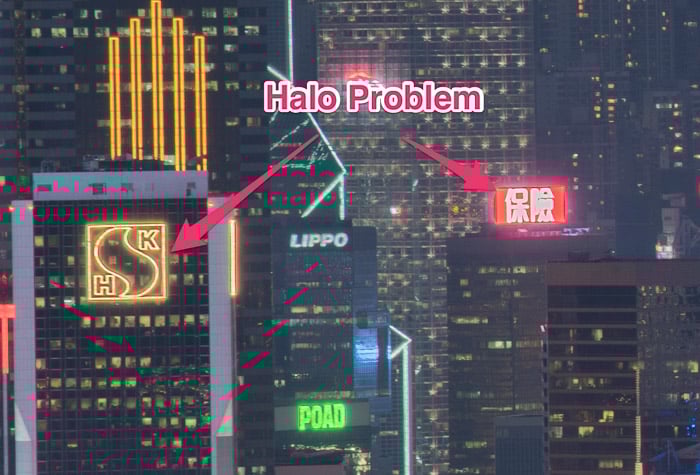
Therefore, to prevent any halos, try not to shoot in very extreme exposure settings. Normally I find +2EV, 0EV and -2EV is more than enough in most cases. The exception is if you are shooting cityscapes at night. Then you may need a lower EV to cover those advertising signs.
Another cause of halos is using a bad mask. Before I learnt luminosity masking, I’d use simple brush tools to create masks. And I’d end up with lots and lots of halos. When you are using the brush tool to create a mask, you draw the mask by hand. This is extremely difficult. When you draw out of the boundary, a halo will appear.
If you really need to draw a mask with the brush tool, I have two suggestions for you. You can use a digital drawing pad instead of using a mouse to draw. Secondly you should use a much lower opacity and draw a few more times instead of using high opacity and drawing one line. Even if you draw out of boundary, it is a small and unnoticeable effect.
6. Avoid Ghosting
The ghosting effect appears when there is a moving object between two images. To get rid of it, shoot the moving object in the base exposure. When you shoot it in the base exposure, you can brighten it up or darken it to match the blending exposure to create a ghost free image.
There are two possible scenarios here. First, you can completely hide the moving object in the base exposure. In this case, you can simply mask the ghost away in the blending exposure with a simple mask.
The second case is when the moving object cannot be hidden completely. In this case, a base exposure also helps a lot because you can use the double processing technique to process the image so that the moving object is still in the same location as the base exposure.
If you want to learn more about handling ghosting effect, you can refer to this blog post.
7. Prevent Flattened Shadows
When you are blending exposures, especially if you are blending a brighter exposure into a darker exposure, you will see that shadow areas become flattened. Flat shadows will make your photo less attractive. There are two commonly used methods to prevent getting flat shadows.
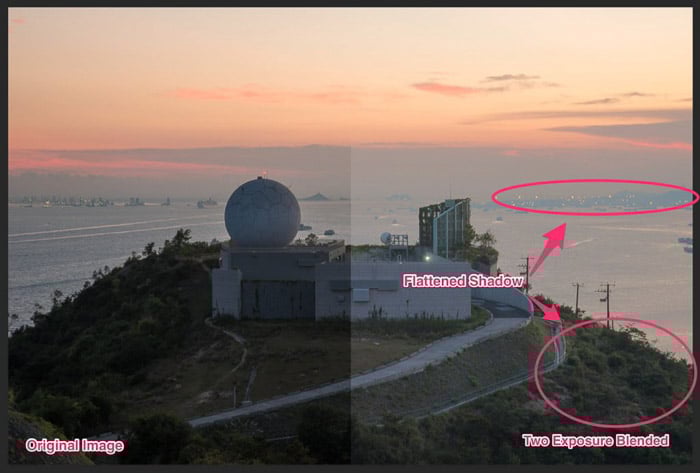
First one is more simple. You can reduce the opacity of the brighter image to reduce the effect. It is a very efficient way to bring the contrast back to your image. However, the problem is that you also take away the detail of the shadows as well.
Another way is to mask away the real dark area in the luminosity mask. This may sound weird. The concept is like this: when you use a shadow mask to let the bright image pass to the dark image, you also use a darker mask to prevent the bright image to pass the real dark area to the dark image. You can do this by subtracting the mask with a much darker mask.
8. Edging Effect
The edging problem will occur when you are blending a super high contrast image. When you shoot a high contrast image, the edge will be clipped for 1 or 2 pixels. Normally you hardly notice the clipping. But when you blend two different exposures together, you will see discover 1 or 2 pixels clipped will ruin your entire work.
Removing edging takes some work. If you don’t need a high resolution image, you can actually skip this. The edging will disappear when you reduce the image size.
However, if you really want to remove the edging, here is one technique. Use the quick selection tool to select the larger area outside the edging object. Then bring out the refine edge dialogue by pressing Ctrl+Alt+R. Adjust contrast and smooth to create a nice selection of the sky without the branch.
Then reverse the selection by pressing Ctrl+Shift+I. Select the mask of the upper layer, use a pretty low opacity to paint in some black in the branch if you are using brighter exposure on top. If you are using darker exposure on the top, paint in more white.
9. Double Processing a Single Image
Double processing mean that you can create two different looks of the same image and blend them together. This is only possible with raw images.
I like to use Adobe Lightroom in raw processing. In Lightroom, you can create a virtual copy of an image. Then you can have two different looks of the same image.
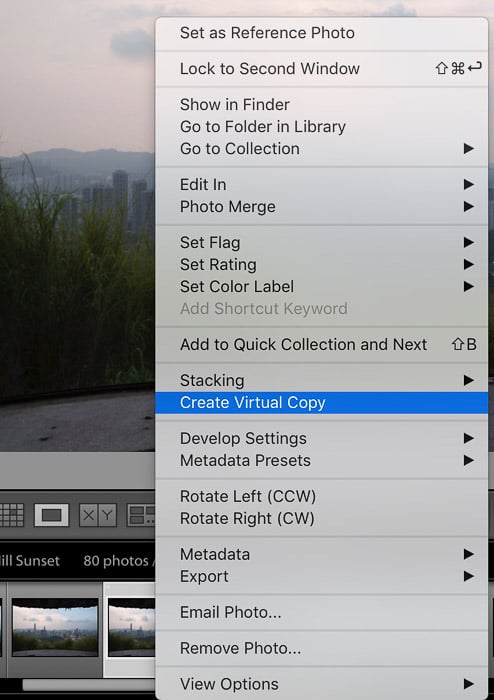
For example you would like to have +1 exposure to get the detail out of the rock and -1 exposure to preserve the detail of the sky. In the virtual copy, you need to adjust the exposure to -1 and +1 in the original copy. Hold down Ctrl and select both images. Right click and select edit in Photoshop, and open as a layer in Photoshop.
Lightroom will then bring up Photoshop and put these two images into the same file but different layers which are ready for your blending.
10. Creating Luminosity Masks With Different Channels
Luminosity masks don’t work on luminosity only. They also work well in specific color channels of the image. You can use the same technique to create masks in the red channel, blue channel or green channel. Some people call this channel masking, but I think this is the same as the luminosity masks.
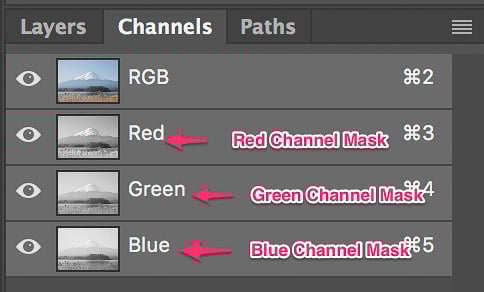
Say you want to use curve adjustment to reduce the brightness of the sky. The main color in the sky is blue. When you hop to the channel panel and left click the blue channel, you can see that the sky is "whiter" than all other areas. After previewing the blue channel, you can decide to use this as a mask for the curve adjustment.
Select RGB color again. Then you can create a blue channel mask by holding down Ctrl and click on the blue channel thumbnail just like creating a luminosity mask. Then hop over back to layer panel and add a curve layer as usual. You will see the blue mask is already applied to the curve layer.
You can also do this with red and green channel. Also, intersecting masks, adjusting masks with level or curve and other masking techniques are also workable.
To Sum Up…
I think using luminosity masks is not an easy skill to master. It takes time and practise to create a good mask. And it takes lots of practise to create useful luminosity masks very fast. But it’s worth the time and effort it takes to learn.
After you have mastered how to create luminosity masks check out some other great Photoshop techniques such as creating paintings from photos, digital painting or creating double exposures!


