ExpertPhotography
  • Articles
  • My Learning
  • Store
  • About
  • Contact
  • Photo Quiz
ExpertPhotography

Learn Photography
  • Quick Capture Cheat Sheets
  • Photography for Beginners
  • Intuitive Composition
  • Show more...
  • Effortless Editing With Lightroom
  • Epic Landscape Editing
  • The Preset Collection
  • Show more...
  • The Magical Photography Spellbook
  • Dreamy Childhood Portraits
  • The Creative Photography Cookbook
  • Show more...
  • Simply Stunning Landscapes
  • Infinite Exposures
  • Milky Way Mastery
  • Show more...
  • Products In Focus
  • Fairytale Portraits
  • Organic Marketing for Photographers
  • Show more...
Need Help?
Contact UsCookie PolicyPrivacy PolicyTerms of Use
Connect

ExpertPhotography is part of several affiliate sales networks. This means we may receive a commission if you purchase something by clicking on one of our links.

ExpertPhotography is a participant in the Amazon Services LLC Associates Program, an affiliate advertising program designed to provide a means for sites to earn advertising fees by advertising and linking to amazon.com.

As an Amazon Associate, I earn from qualifying purchases.

Expert Photography © 2011-2024. All Rights Reserved.

Privacy Policy Terms of Use

Photography QuestionsPhotoshop Processing

How to Resize an Image in Photoshop (3 Easy Steps)

Joshua Dunlop
by Joshua Dunlop
Last updated: 04/04/2025-2 min read
ExpertPhotography is supported by readers. Product links on ExpertPhotography are referral links. If you use one of these and buy something, we make a little money. Need more info? See how it all works here.

Resizing images in photoshop is simple and easy. You can do this with Lightroom, but when you only have a single image to resize, it’s often faster to do it in Photoshop.

Step 1 – Resize An Image in Photoshop Using the Image Size Editor

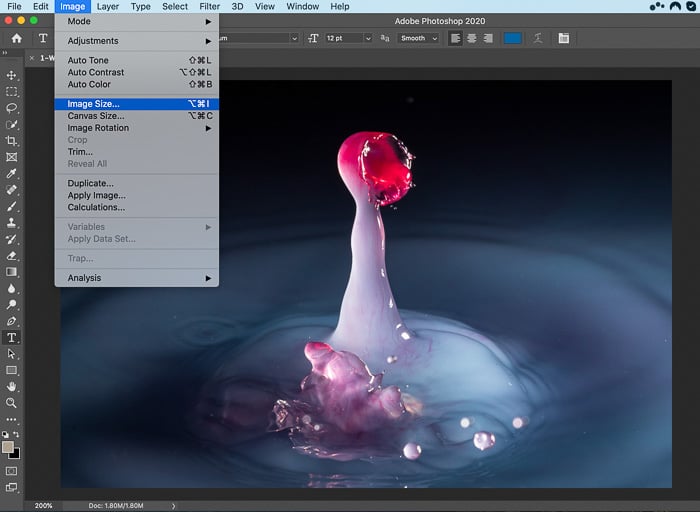
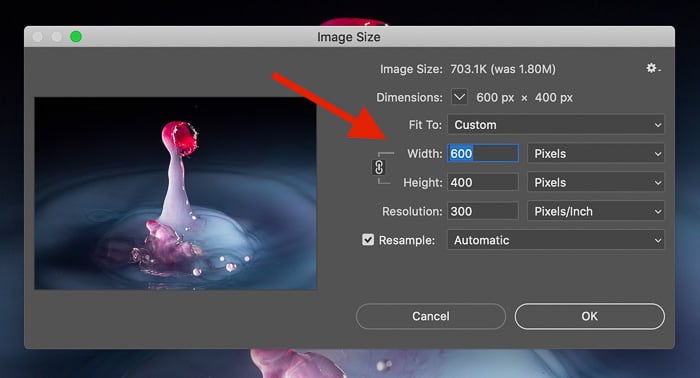
Open the image in Adobe Photoshop, then click on Image in the top bar menu, and then click on Image Size.
Screenshot of changing an image size in photoshop

Step 2 – Set the Resolution (Optional)

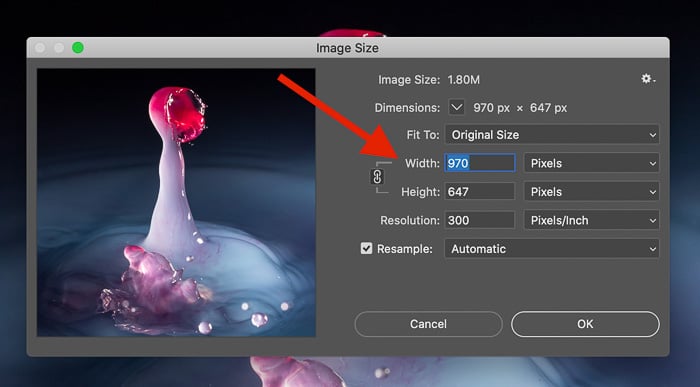
Depending on the purpose of your size change, you may wish to change the resolution. For example, if you’re printing the image, you may set it to 300 dots per inch (dpi). If you change it to a lower dpi, the image size will get smaller.
Changing the resolution of an image in photoshop

Step 3 – Change the Dimensions

If you are changing the size of a photo, you will probably want to keep the same aspect ratio (proportions), otherwise, the image will look distorted.
To do this, ensure that the Width and Height are connected together using the chain icon in the screenshot below
How to keep the aspect ratio of an image when resizing in photoshop
Screenshot of adjusting the resolution of an image in Photoshop
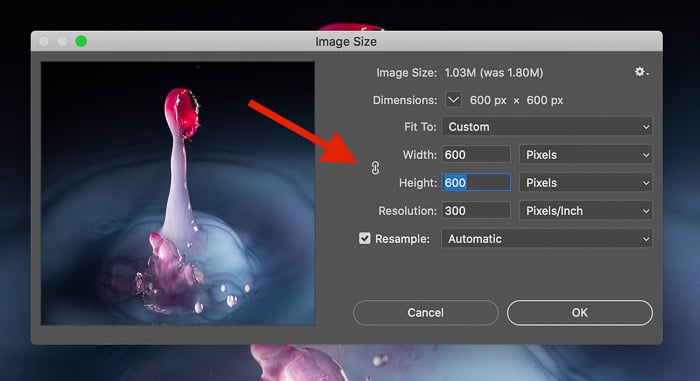
If you disconnect this when you adjust the width, the height won’t change in proportion to the width, and vice versa.
To change the size of an image, you simply adjust the Width and Height using the dialog below.
Keeping as aspect ratio as you change the image size in photoshop
Click OK, and you will be taken back to the main interface.

Finishing Touches

If you resized the image to make it smaller than the original image, it will appear smaller on the screen. You can zoom by pressing Z on your keyboard, then clicking on the image to zoom.
Smaller images also have the benefit of a smaller document size (file size), which is great for using on the internet.
This process is great if you’re only working on one image, but sometimes Lightroom is a better option for resizing images. If you have lots of images to resize at once, check out this tutorial to do it with Lightroom.
And click here if you’d like to learn how to crop and straighten your image using Photoshop next.

P32 [Lead gen] sidebar banner Related ebook
P32 [Lead gen] Sidebar Banner
P32 [Lead gen] Sidebar Banner 2

Popular Content

How to Adjust White Balance in Photoshop (Step by Step)

Read Article