Two point perspective in photography is a classic technique to create an illusion of depth in their images. When done correctly, it can make a photograph look like it was taken from inside a scene rather than in front of it. Here are four tips for using two point perspective to its best effect.
Two Point Perspective In Photography: What Is It?
When talking about perspective, the term “vanishing point” often comes up. A vanishing point is a spot on a photo where all lines converge or disappear.
For example, in the photo below, the vanishing point is where the visibility of the road ends.

Kaique Rocha- Pexels
While using one point-perspective, the vanishing point draws attention to itself. In contrast, two vanishing points embrace the subject.
Two-point perspective means that there are two vanishing points on the horizon line.
The lines that come from the points show us what we should be paying attention to.
Two-point perspective, if used well, gives your photos a unique and monumental look. It puts the emphasis on the middle of the image while giving a feeling of depth with the use of leading lines.
Where Should You Use Two-Point Perspective?
You can create a two-point perspective in any style of photography. Two-point perspective is especially useful in architecture photography.
Hala Al Asadi- Pexels
You might want to emphasise a specific building with the use of perspective.
Architecture photography the best niche for experimenting with distinct lines, shapes and forms. The lines also make it possible to play around with the placement of vanishing points.
How to Create a Two-Point Perspective
Step 1. Find a Suitable Location
A proper location for this type of perspective is crucial. You need to find a place where straight lines are leading toward your subject.
Unlike the one-point perspective, they should lead outwards, not inwards. These lines usually originate from the horizon line.
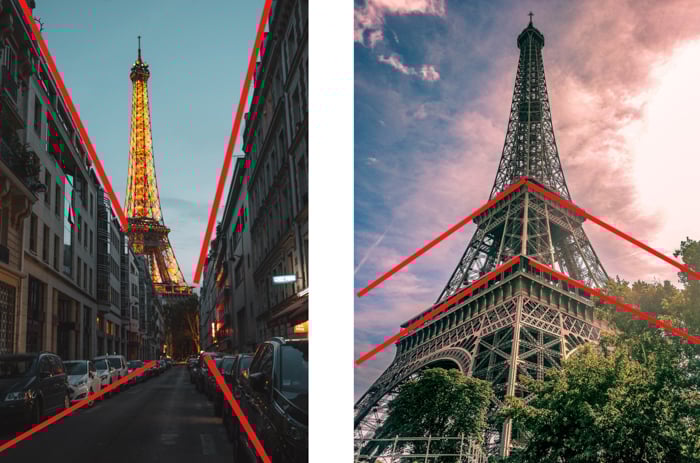
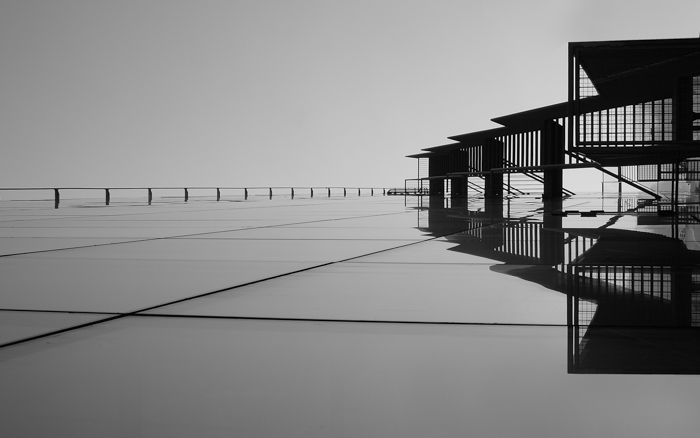
One-point (left) vs two-point perspective (right).
I recommend choosing a rectangular building as your subject as your first try. Due to their shape, they are perfect for two-point perspective photos.
Step 2. Find Where You Will Take the Photo From
Where you stand with your camera is always an important decision you have to make as a photographer. But it is an even more essential element of composing a two-point perspective photo.
You need to stand at a spot where your subject is in the middle, and lines lead toward it.
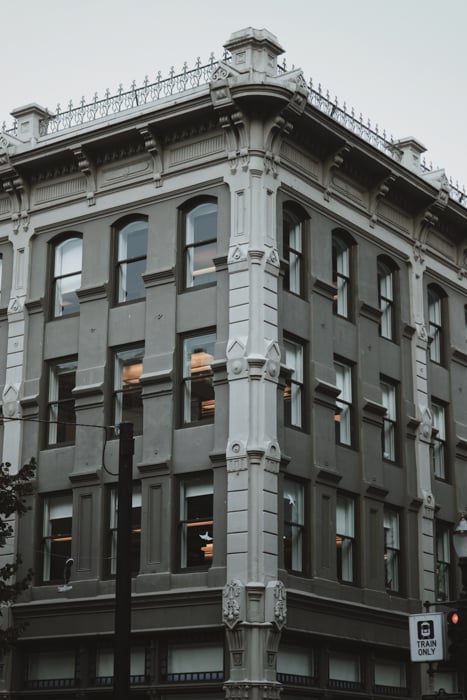
Buildings are the easiest subjects for making two-point perspective photographs. If you are photographing architecture, stand at one corner of the building. It is simple to compose the picture from there, which I will present in the next step.

Pexels
Step 3. Compose and Take the Photo
Once you are standing in front of the subject, it is time to consider how you will compose the photo.
Center composition is a controversial topic amongst photographers. But it is different when it comes to a two-point perspective. Here it is usually beneficial for your picture to place your subject in the center. After all, we use this type of perspective to bring our attention to what is in the middle of the picture.
This is especially true with architecture photos. Here the corner of the building should be at your eye level and in the center of the frame.

Raghu Nayyar- Pexels
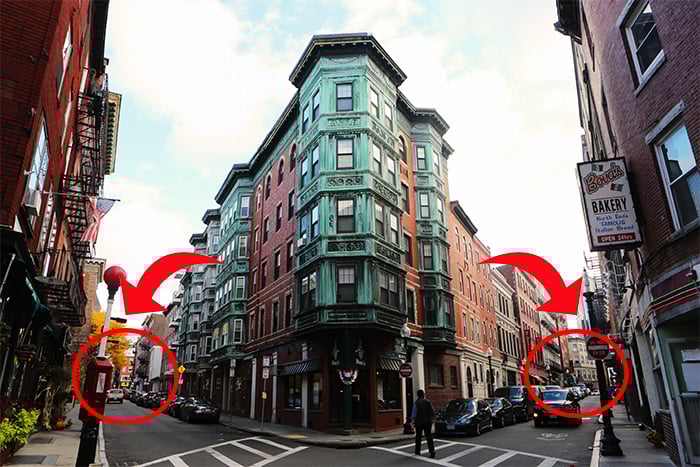
The two vanishing points should either be on the horizon line, or in the corner of your future picture.
You can change the placement of the vanishing points while editing. If you would rather prefer them in the corners, you can crop your photo during post-processing. However, I do not suggest cropping too much, as it will lower the resolution of your image.
There is one simple trick to know whether you have composed the photo well.
Look at your picture. Can you identify the two vanishing points? If yes, then you have successfully used two-point perspective in your photography.

Yuri Mane- Pexels
Conclusion
Anyone can create a two-point perspective in photography. The way to do this is by having two vanishing points on the horizon line. It is an excellent tool if you want to emphasise your subject in the center of the frame.
It is especially useful in architecture photography. The reason for this is the geometric shapes and lines present in that niche.
I hope this article has helped you understand the two-point perspective! With a good location and a bit of practice, you will be able to master this technique in no time.
If you liked this article and want to learn more about perspective, check out our Forced Perspective Ideas!
For photography tips on-the-go, check out our Quick Capture Cheat Sheets!