Metering modes are one of the most important settings on your camera. They determine how your camera meters light and, in turn, how your photos look.
Knowing when and how to use each metering mode is essential for getting the best results from your camera. So, we explain what metering modes are and walk you through each so you can use them like a pro!
What Is Metering Mode?
The metering mode in photography refers to the method a camera uses to measure the brightness of a scene before capturing an image. It helps determine the exposure settings by analyzing the light in the frame.
Metering considers factors like the overall brightness, contrast, and the subject’s distance. Different metering modes prioritize various areas or aspects of the scene. This influences how the camera calculates the best exposure settings for a well-balanced photo.
Metering mode is also called “metering” or “camera metering.” Most modern digital cameras are equipped with metering modes for photography.
Why Adjust the Metering Mode?
By adjusting the metering mode, you can capture the best-exposed images. You can prioritize different areas or aspects of the frame. This ensures the camera accurately assesses light levels based on your intent and the lighting conditions.
You want to ensure proper exposure, preserve details, and accurately represent the intended mood or focus in the final image. But even with recent technological advances, your camera may not know the best metering mode.
Also, cameras can’t change the exposure of separate parts of the photo. It needs to determine the exposure that works for the whole picture. That’s why many photographers encounter problems when taking images of high-contrast subjects.
Let’s take landscape photography as an example. During sunset, you usually focus on the beautiful sky with your camera. The problem is that this can result in the landscape and other parts of the photo being too dark, like in the picture below.

To avoid this, you must adjust the metering according to the subject.
The default metering mode of the camera is usually Evaluative, Matrix, or Multi Metering (Canon, Nikon, Sony/Fujifilm). It may have a different name, depending on your camera brand.
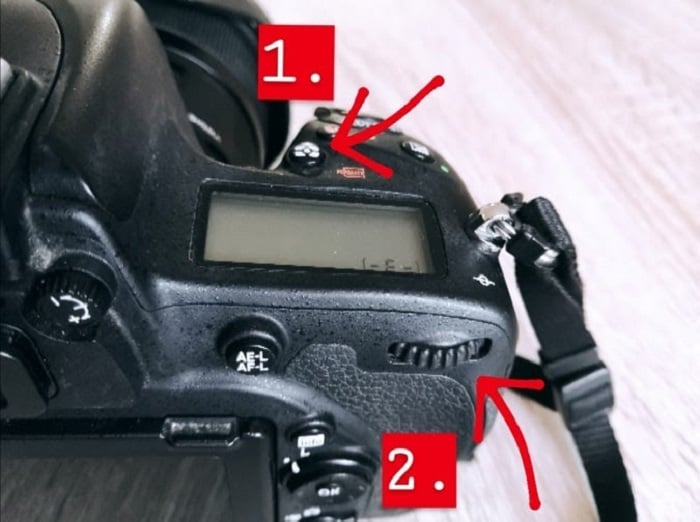
To switch between the modes, press the metering mode button and use the main command dial (on some DSLR cameras). You will see how the modes change on the camera LCD or the control panel.
Otherwise, go into your camera’s menu settings (most mirrorless cameras) and select the metering you want.
Reaching a balance between shadows, highlights, and midtones is crucial. This is what you should be aiming for when choosing a metering mode. Before taking a picture, you have to weigh the options that the different modes provide you with.
So, let’s look at what the different camera metering modes do and when you should be using them.
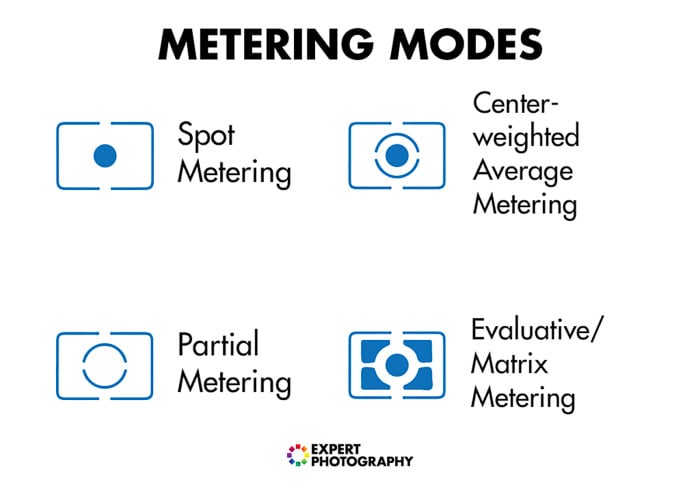
What Are the Different Metering Modes?
- Evaluative / Matrix / Multi Metering (Canon, Nikon, Sony/Fujifilm)
- Partial Metering (Canon)
- Spot Metering
- Highlight-Weighted Metering (Nikon)
- Center-Weighted Metering
- Average Metering (Fujifilm)
Evaluative / Matrix / Multi Metering Modes
This mode has different names depending on the manufacturer. Canon calls it “Evaluative,” Nikon calls it “Matrix,” and Sony and Fujifilm call it “Multi.” But there is no difference in the way they decide on exposure.
Evaluative Metering (Matrix or Multi Metering) is the most complex and modern way of metering a scene. It collects data across the entire frame and prioritizes the focus point.
I prefer using this mode as it is the most reliable way of metering in most situations. If the camera sees a bright area, like the sun, it considers that spot. According to this spot, it will try to work out the best exposure settings.
Partial Metering Mode
This metering mode collects data from a small circular area in the metering center of the camera. It covers about 6 to 15% of the scene and is only found in Canon cameras.
Partial light metering is useful when your subject is in the center of the frame. You likely want the camera to prioritize the subject during exposure calculation. There’s not a lot of difference between Partial and Evaluative Metering.
Spot Metering Mode
For Spot Metering, the dot in the camera center is smaller than Partial Metering, meaning roughly 5% of the frame. It sets the exposure according to where your focal point is. Your subject has to be still to get the focus point right and achieve your desired results.
This is a more advanced way of working out the best exposure for your camera. This is because it involves metering for the small area of your focal point. The rest of the scene may not be correct, leaving that up to you to work out.
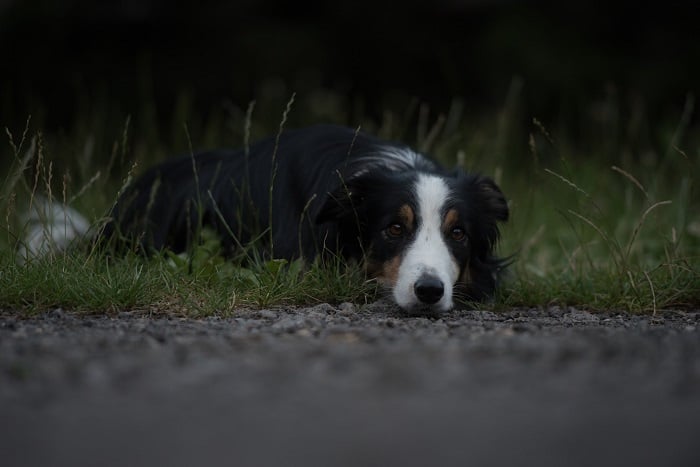
Notice that the white fur on the dog picture below looks much softer and less highlighted. Even though it is more pleasant to look at, it leaves the rest of the scene underexposed.
Be careful when using this metering mode. It can be useful, but you don’t want to end up with all your photos in this style.
Highlight-Weighted Metering Mode
Some Nikon cameras have highlight-weighted metering as an option. It is almost the same as Spot Metering.
But unlike Spot Metering, the camera recognizes the highlights even in motion. This prevents the whites in your photo from blowing out. It is the most useful when photographing moving, highlighted subjects, such as a white car.
Just remember to adjust your camera’s shutter speed according to the subject in motion.
Center-Weighted Metering Mode
The center-weighted mode is halfway between Evaluative (Multi or Matrix) and Partial Metering. It measures the exposure of a pretty big metering spot in the camera’s viewfinder.
Most people take photographs in which the subject is in the metering center of the image. Camera manufacturers realized this. So, they include an effective center-weighted metering system in cameras. This way, photographers can reach an accurate exposure value.
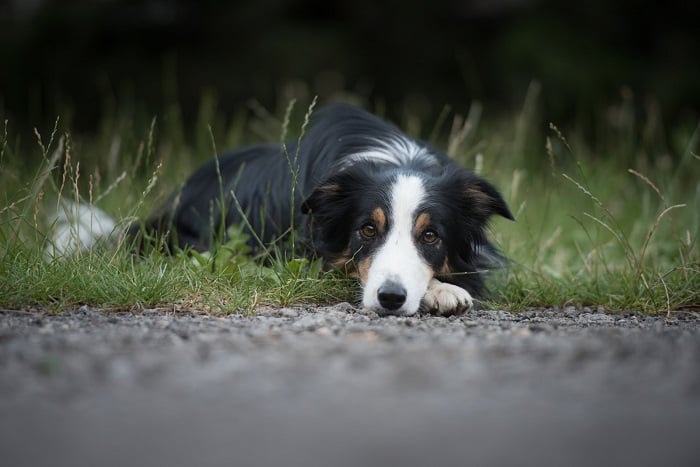
Notice in the photo below that the dog is quite well exposed. This results in a darker, less visible background and surroundings. For this reason, center-weighted metering can add a special atmosphere to your photos.
The outcome of center-weighted metering can be hard to predict in digital photography. I only suggest using it when the corners of the frame don’t have much importance. Look in the viewfinder and consider how much detail you need to keep in the corners.
Average Metering Mode
This works similarly to matrix metering in photography. The camera looks at the light from the whole scene. But it does so in a very unintelligent way.
Not only does it not recognize what’s in the scene, it also doesn’t make any suitable changes. If there’s a bright sun or a dark shade in a scene, the camera will treat this region like the rest of the photo.
This often results in over and underexposed areas in the same image. For this reason, average metering isn’t found in many modern digital cameras. But Fujifilm cameras have this as an option.
It can be useful if maintaining consistent exposure levels from one shot to another is important. It is also good in situations with dynamic or moving subjects in the composition.

The Best Metering Mode to Use and When
By now, you should have a pretty good understanding of what metering modes do and when to use them. But I’d like to go into more detail about the two I use the most—Evaluative (Matrix or Multi Metering) and Spot Metering.
I find Evaluative (Matrix or Multi Metering) to be pretty good at working out what I want in most situations. For me, it would be pointless to switch to center-weighted metering.
When matrix metering doesn’t deliver the subject well, I use Spot Metering. It gives me more control over the light and dark parts of the scene.
Evaluative / Matrix / Multi Metering in Use
There are cases where the dynamic range of the photo is very small. This means that there are no strong shadows or highlights.
Thus, it’s easier for the camera to balance the exposure with the help of light metering. For shots like this, I leave my camera in Evaluative mode (Matrix or Multi mode).
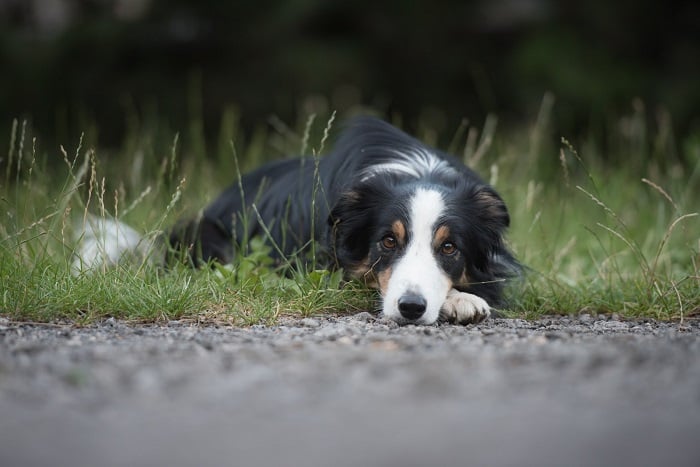
I took this photo well into the evening when no strong highlights were within the image. Hence, I didn’t need any special metering modes.
 This next photo differs from the one above since the shadows are stronger. Most of the image is dark, but the effect that the Evaluative mode (Multi or Matrix mode) gives us is almost the same.
It brings out a small amount of highlights on the side of the bridge. But it still keeps the silhouettes where I wanted them.
 Below is an example of where the Evaluative Metering mode (Matrix or Multi Metering mode) has prevailed.
The camera noticed the light creeping through the top of the photo and ignored it. Instead, it correctly exposed the rest of the picture. This is what we are looking for in difficult light conditions.

Sometimes, on Evaluative Metering (Multi or Matrix Metering), the camera sees a black subject and thinks it should be grey. It tries to boost the brightness too much because it aims for the average 18% grey.
This is when you need to use exposure compensation to reach the desired exposure. Or, you can switch the camera to Manual mode and adjust the aperture, ISO, and shutter speed according to the light conditions.
Now, we look at when you might want to use spot metering.
Spot Metering in Use
Taking photographs while facing the sun makes it much harder for Matrix Metering to get the lights right. You end up with silhouettes instead of correct exposure. This is when I like to switch the camera to Spot Metering.
Remember that the focal point in the metering center is very small. So, point it at something where the light balance is essential. Spot Metering is especially useful in the case of portraits, where you are trying to set the skin tone right.

Conclusion: Metering in Photography
Take some time and experiment with the different metering modes. It can help you figure out your photography style and give your photos an artistic look.
Don’t miss out on our Quick Capture Cheat Sheets for photography knowledge on the go!


