The sooner you learn how to use exposure in photography, the faster you grow as a photographer. Knowing how to control light lets you create different artistic results.
Before you continue reading this article, please grab your camera. We’ll use it to see how exposure works in real life.
- Learn to photograph waterfalls, waves, sunsets, and stars effortlessly.
- Discover how to balance movement and stillness in your shots.
- Master exposure settings easily, with or without a filter.
What Is Exposure in Photography
Exposure in photography refers to the amount of light that reaches your camera’s sensor. This determines your image’s brightness or darkness. You can control exposure by adjusting your camera settings for a well-balanced, properly lit photo.
Sounds easy enough to understand. But why is exposure significant in photography?
Manipulating the exposure with your camera is a skill set you need to master. It’s not enough that you know all the knobs and buttons you need to adjust. It’s also just as crucial to understand why and how you’re making those adjustments.
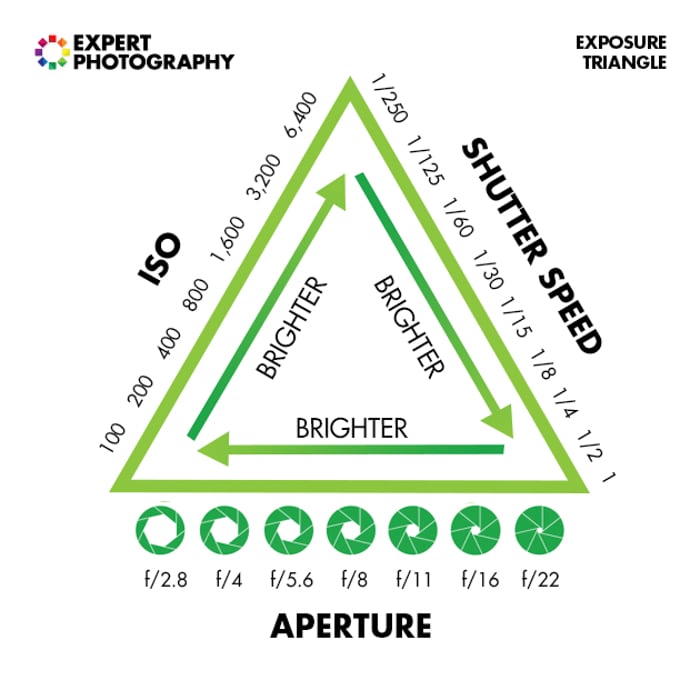
What Is the Exposure Triangle?
This is perhaps one of the most important terms you must learn with photography. It’s called the “exposure triangle” because it involves those three elements that work together to control light.
So, what are the three components of exposure in photography? They are ISO, shutter speed, and aperture. These components control the amount of light entering your camera.
Each works differently from the other. But they all work together to achieve correct exposure. Let’s discuss each component of the exposure triangle to give you a better understanding of how each one influences exposure.
ISO
You probably hear this term a lot in photography tutorials. But what is camera ISO, exactly? Think of it as your camera’s sensitivity range to light.
Most ISO in-camera ranges from 100 to about 12,000 these days. But high-end cameras can reach up to 30,000 or even more. Some also feature extended ISO, which uses a digital process to boost values up to 100,000 or more.
ISO 100 is often the lowest sensitivity value for exposure. That means you can only use it in daylight. You need a higher number in darker conditions to create a proper exposure. For instance, you have better chances of taking pictures at night with ISO 800 than with ISO 100.
The problem is that using such high exposure values creates a lot of image noise. So expect your image to look grainy as you increase ISO from 100 to 800 or more. Every camera sensor also has a threshold when it comes to image noise.
For older cameras, going beyond 800 or 1,000 (even if your native camera ISO is 12,000) most likely results in distracting grainy photos. But with modern digital cameras, you can use 3,200 or even more with minimal noise.
When it’s dark out, don’t crank up your ISO on camera too high. Do some test shots and determine how high you can go before you end up with distracting noise. Otherwise, stick to lower values to maintain the quality of your photos. When possible, stick to 100 or 200 for daylight exposure.
You can go as high as possible for dim conditions before image noise becomes overwhelming. In most modern digital cameras, that threshold is between 3,200 and 6,000. But we recommend only using these values for night photography.
Shot with a Canon R10. 24mm, f/5.6, 1/125 s, ISO 1000. Denise Jans (Unsplash)
Shutter Speed
Let’s move on to the next crucial element in exposure photography—shutter speed. Like ISO, shutter speed also controls the amount of light that gets into the camera.
So what makes shutter speed different? Unlike ISO, which deals with the camera’s light sensitivity, shutter speed is responsible for how long the light hits the sensor.
Your camera needs a certain amount of light to achieve correct exposure. When there’s plenty of daylight, your shutter only needs to stay open briefly. But it needs to remain open longer to gather enough light when it’s dark.
With shutter speed, you can time how long you want the shutter to open to achieve the correct exposure. The fastest shutter speed is about 1/8000 s for most cameras. (This is measured in hundredths of a second.)
The slowest is 30 seconds. The slower the value, the more light it lets in.
Fast shutter speeds like 1/8000 s are perfect for daytime use. Why? Because the shutter doesn’t have to stay open for a long time to gather the right amount of light.
But 1/8000 s isn’t suitable for low-light situations. This is mainly because it doesn’t let the shutter stay open long enough for correct exposure. So, when it’s dark, it’s always best to use slow shutter speeds instead.
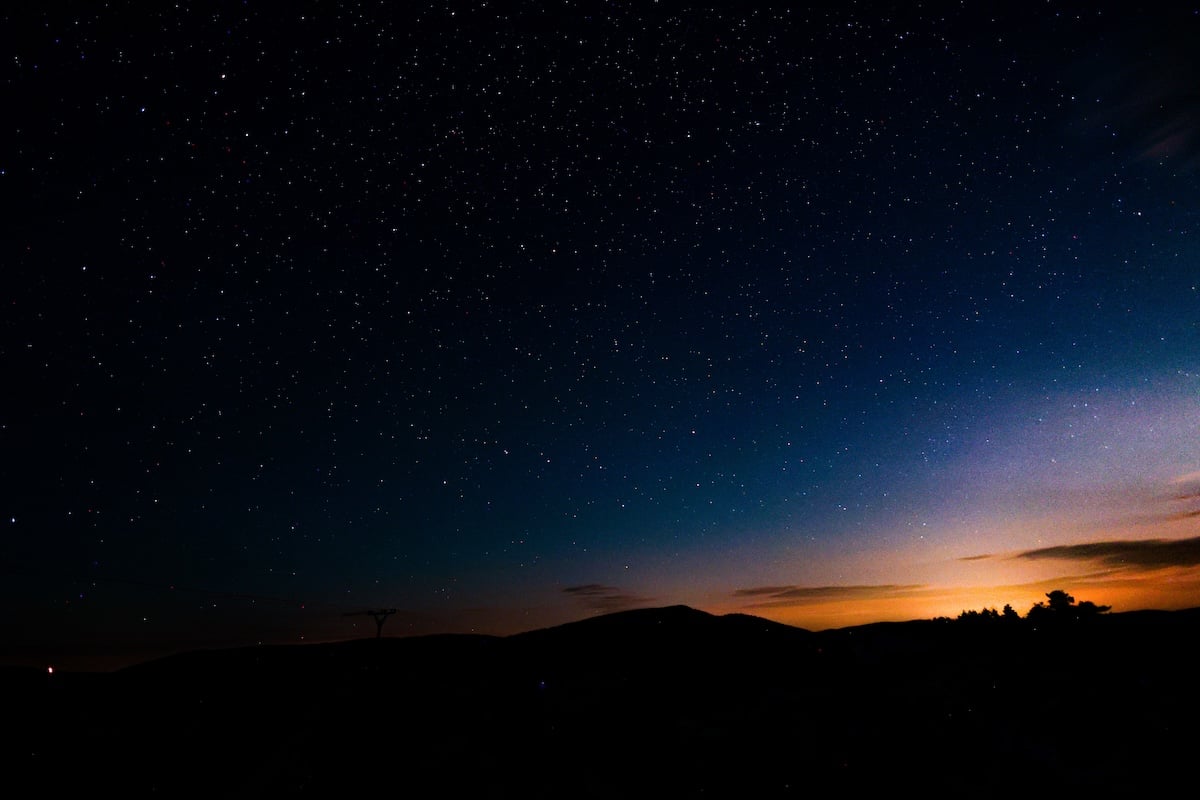
As mentioned before, the slower the shutter speed, the more light gets in. So if you’re shooting indoors with artificial lights at night, 1/15 s may be enough. But if you’re photographing stars at night, then 10 to 30 seconds may be necessary.
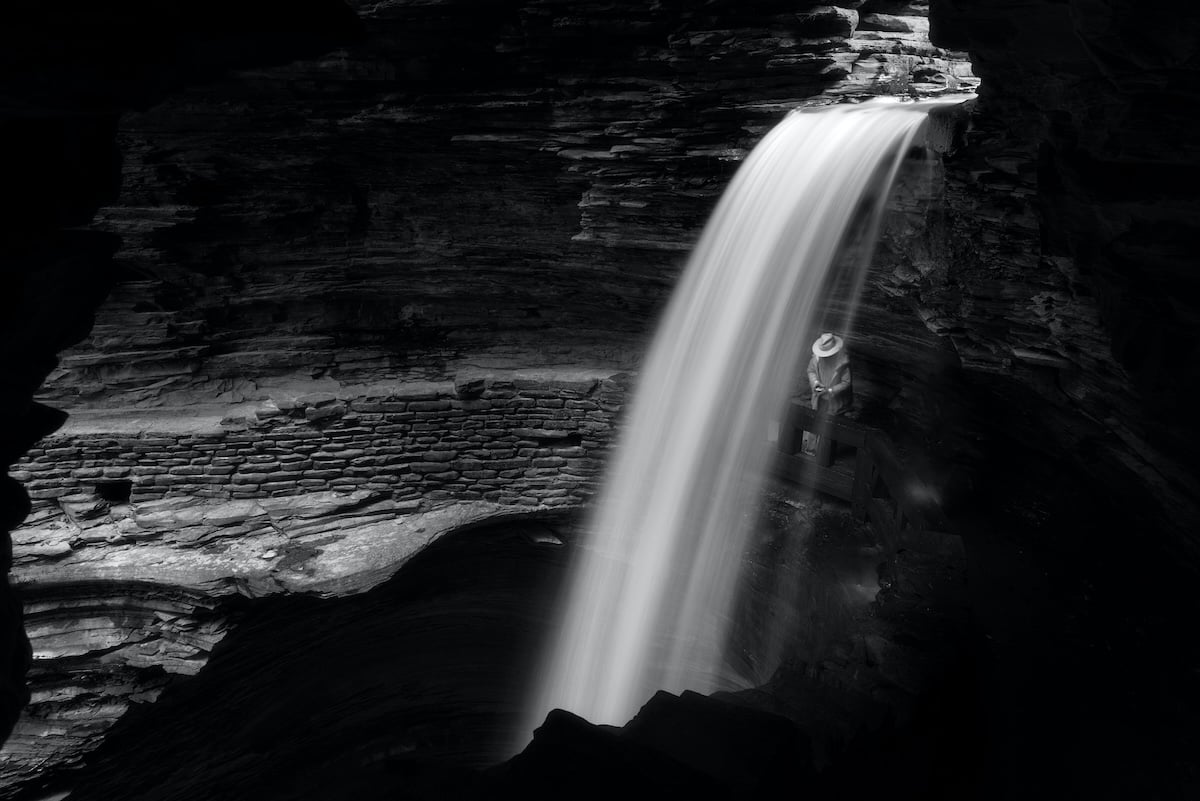
Shot with a Nikon D800E. 24mm, f/8, 1.6 seconds, ISO 100. Gerald Berliner (Unsplash)
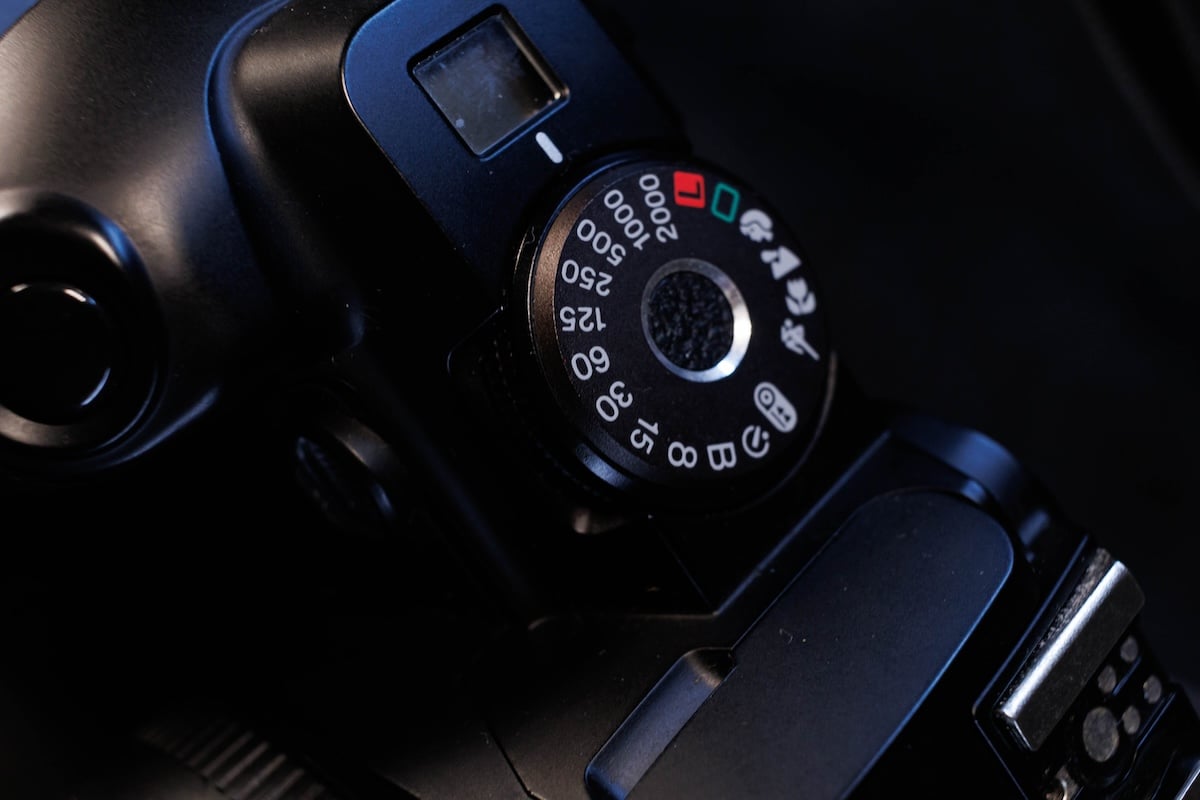
Bulb Mode
Explaining shutter speed in photography isn’t enough if we don’t mention bulb mode. This feature lets you keep your shutter open for however long you like, as long as your finger is on the button.
Why is bulb mode crucial? The slowest shutter speed for most cameras is 30 seconds. In most situations, it’s enough to create a proper exposure, especially in low-light conditions.
But sometimes, you need to keep the shutter open for longer. And that’s when this feature comes in handy. It lets your camera record enough light in conditions with extremely low light to produce a proper exposure.
You may need to guess how long it will take to keep the shutter open when using bulb mode. But to be more precise with your exposure, you can also try the 500 photography rule.
Bulb mode is perfect for all sorts of night photography, from astrophotography to nightscapes. The only issue with bulb mode is that it causes a lot of motion blur.
Since it keeps the shutter open for over 30 seconds, all the movement it records becomes hazy. Even touching the camera prevents you from recording sharp images.
We recommend setting your camera on a tripod when using bulb mode or other slow shutter speeds. This prevents camera shake and is best done with help from a camera remote. This results in great exposure.
Shot with a Canon EOS R5. 16mm, f/2.8, 13 seconds, ISO 1600. Gabriel Lenca (Unsplash)
Aperture
In photography, aperture refers to the opening in the lens that lets the light into the camera. When not in use, the aperture remains closed. But when you press your camera’s shutter button, it stays open for a few moments and closes once it completes an exposure.
In many point-and-shoot cameras, the aperture size is the same. In other words, the area of the opening doesn’t change at all.
In most modern digital cameras, the size of the aperture changes depending on the amount of light available. When it’s bright outside, it usually stays small. But you can make it wider to gather more light when it gets dark.
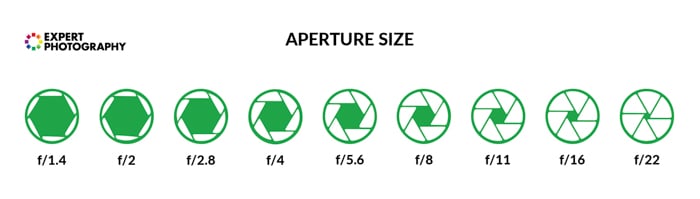
So, how does an aperture change its size? The answer lies in a mechanical contraption called the diaphragm. It has several blades that slide together to adjust the opening.
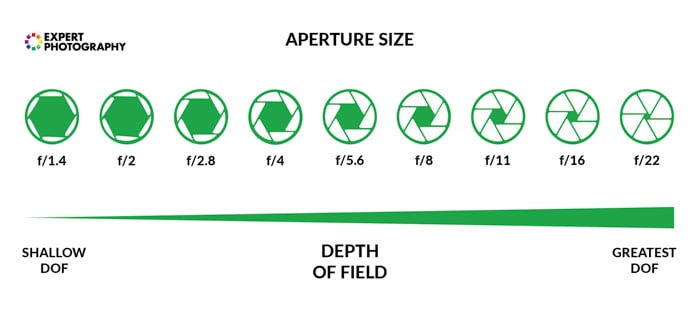
In photography, aperture size is measured in f-stops. The narrowest aperture size is either f/32 or f/22, and the widest is often between f/1.8 and f/1.2.
What Does F-Stop Mean in Photography?
Do you need to know more about the f-stop? In simple terms, it’s a value system that measures the amount of light coming into the camera.
The f-stop is often used when adjusting the aperture size. We already mentioned that the aperture could go as wide as f/1.2 and as narrow as f/32. But what do all these numbers mean in photography? Why is f/1.2 the widest setting and f/32 the narrowest?
It helps a lot if you think of f-stops in terms of fractions. If you switch f/1.8 to 1/1.8, then it starts making more sense. When it comes to fractions, you learn that 1/2 is more than 1/4. So, if you use f/2, you’re letting in more light than f/4.
The same principle applies to the other f-numbers. f/32 (1/32) lets the least amount of light in because it’s smaller in value compared to f/4 (1/4).
For bright situations or long exposures, f/32 can be better because it’s a small opening. Meanwhile, f/1.2 is perfect for dim conditions or fast shutter speeds since its wide opening lets in lots of light.
It’s important to note that, generally, lenses are less sharp at their extreme apertures.
How Does the Exposure Triangle Influence Exposure?
ISO, shutter speed, and aperture are collectively called the exposure triangle because they’re all interconnected. When you change the ISO, you also affect the shutter speed and aperture.
It’s best to turn on your camera to understand how the exposure triangle influences exposure.
First, set your camera to ISO 100. Then, switch your camera mode to aperture priority. Choose f/3.5 and point your lens to a constant light source like a light bulb. Now, take note of the shutter speed on your display.
Without moving your camera, change your ISO to 200. Since you’re on aperture priority, the aperture size stays the same at f/3.5. But now look at your shutter speed. Did you see it change?
Your shutter speed is probably faster now than when the ISO was 100. Why? You just brightened the scene by adjusting light sensitivity. So, the shutter doesn’t have to stay open for too long to create an exposure.
If you set your ISO to automatic, you see how the shutter and ISO values fluctuate as you change the aperture.
So, what’s the reason behind the interdependency between these components? Remember that all of them can control the amount of light coming into the camera.
If one element changes, all the others must adjust so the camera achieves a correct exposure. Otherwise, your images look too dark (underexposed) or bright (overexposed).
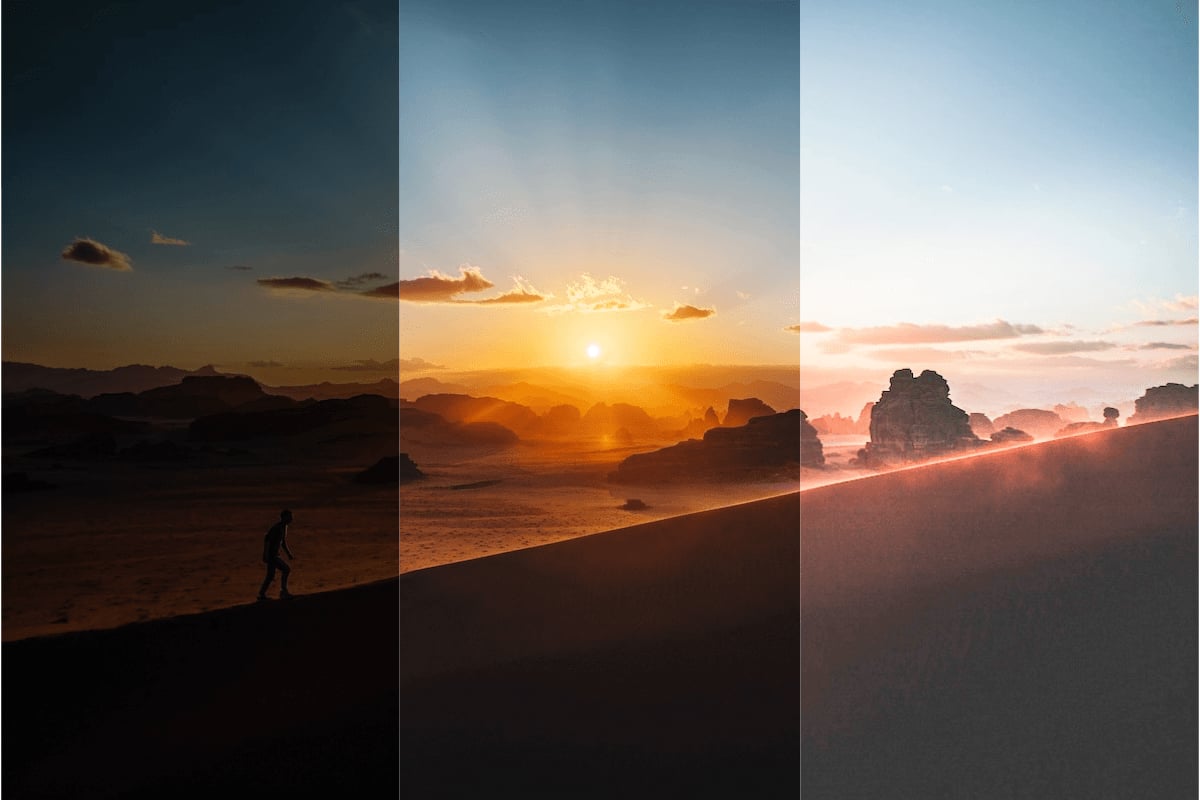
Underexposed (left), properly exposed (middle), and underexposed. Photo by NEOM (Unsplash)
How Do You Use the Exposure Triangle to Achieve Correct Exposure?
There are several ways to adjust the ISO, shutter speed, and aperture. Each method we discuss lets you achieve proper exposure. But each option also affects the way your photo looks. So, you must know which component you change to get the desired result.
Use Aperture Priority for the Correct Exposure
We mentioned aperture priority earlier. But how exactly does it work, and how do you use it?
Aperture priority lets you keep the aperture size constant while taking pictures. To compensate, the camera automatically changes the ISO and the shutter speed to achieve proper exposure.
So when is aperture priority useful? It’s best to use it for low-light situations and when you want it to control your depth of field.
When there is not enough light, use the widest aperture possible to create a proper exposure.
Switching to aperture priority is best to ensure the lens opening stays wide open as you take photos. But changing the aperture size affects the sharpness of your image.
The term for this phenomenon is depth of field. If you want a blurry background, use a wide aperture, like f/1.2 or f/1.8. If you want everything to look sharp, f/16 or f/22 is ideal.
With that in mind, what should you do if you take photos in daylight but still want a blurry background?
The beauty of aperture priority is that it lets you use f/1.8 to create a shallow depth of field. To compensate for all that light, your camera automatically increases the shutter speed and lowers the ISO to achieve correct exposure.
Use Shutter Speed Priority for Low-Light Situations
Shutter speed priority works much like aperture priority. The only difference is that the shutter speed value stays constant this time. The camera automatically changes the aperture and ISO to create a proper exposure.
When is shutter speed priority useful? If there’s barely any light available, a wide shutter is not enough to create a decent exposure. That’s when you can use a slow shutter speed to gather more light.
But you must know that long exposure can cause moving objects to look blurry in photos. If a shutter stays open for two seconds or longer, any moving element may not stay in the same position. As a result, you end up with double images or even ghosting.
In contrast, you end up with sharp images using a fast shutter speed like 1/125 s. That’s because the shutter opens and closes so fast that it freezes the motion of the moving element.
The caveat is that you can only use a fast shutter speed when there’s enough light. Sticking to a slow shutter speed is best in dim conditions. Again, use a tripod and camera remote with slow shutter speeds to avoid blur from camera shake.
Set the ISO for a Clean Exposure
Now, ISO is a little tricky because, in some ways, it’s separate from aperture and shutter speed. You can set a fixed ISO on your camera or choose Auto ISO mode.
If you’re a beginner, Auto mode is best because it lets the camera set the exposure for you. But as we mentioned before, high ISO also produces a lot of noise in low-light conditions. So, if you’re shooting at night, you have no control over the graininess of your images.
For a clean exposure, use manual mode and select a low ISO. In the daytime, ISO 100 is perfect. But if you are in dim conditions, set it between 800 to 3,200. Just remember that the grain in your image increases as you go up.
You can also set your ISO to auto but set a maximum value. That way, you know your camera won’t choose ISO 12,000 and produce a super grainy exposure.
Whatever ISO value you set determines the shutter speed and the aperture values to achieve proper exposure. For instance, a high ISO in aperture priority mode yields a faster shutter speed. Conversely, a low ISO results in a slower shutter speed.
The same concept applies even when you use shutter speed priority. A high ISO results in a smaller aperture, while a low ISO results in a wider aperture.
And what if the ISO is automatic? If you choose aperture priority, then the aperture size stays constant while the ISO and shutter speed change. Conversely, if you choose shutter speed priority, the shutter speed stays constant while the ISO and aperture change.
Shot with a Nikon D850. 200mm, f/9, 1/640 s, ISO 400. Greg Johnson (Unsplash)
How Do You Adjust Exposure in Manual Mode?
Manual mode is quite challenging for beginners in photography because they must know which settings to use. And it’s especially challenging to know that setting up one component means changing the others, too. Otherwise, the exposure won’t be correct.
So, if the manual mode in photography is complicated, why use it? The simple answer is that auto modes, including aperture and shutter speed priority, don’t always achieve the correct exposure.
Manual mode lets you change the ISO, shutter speed, and aperture to get the best exposure. So, how do you use manual mode? We show you how easy it is with a few easy steps.
Start by switching to either aperture priority or shutter speed priority. For the sake of demonstration, let’s choose aperture priority and select f/2.8 as the aperture size.
Point the camera at the scene you want to photograph and note the shutter speed and ISO. Then, switch to manual mode and set your shutter speed and ISO to match the exposure settings in aperture priority.
After you have all the settings, decide whether to move the ISO and shutter speed up or down.
If your exposure looks dark, you may want to bump up your ISO or lower your shutter speed. If it looks blown out (overexposed), you may want to lower your ISO or use a faster shutter speed.
To make it easy for you, adjust your settings in one-stop increments. In other words, don’t go from ISO 100 to ISO 800 right away. Go to ISO 200 first and see if the exposure improves. If not, keep going up one stop at a time until you get the desired exposure.
But it’s best to keep your ISO constant to save time and move the shutter speed instead. That way, you don’t have to focus on two things at once to get the exposure you want.
Do you see how easy it is to achieve the correct exposure using manual mode in photography?
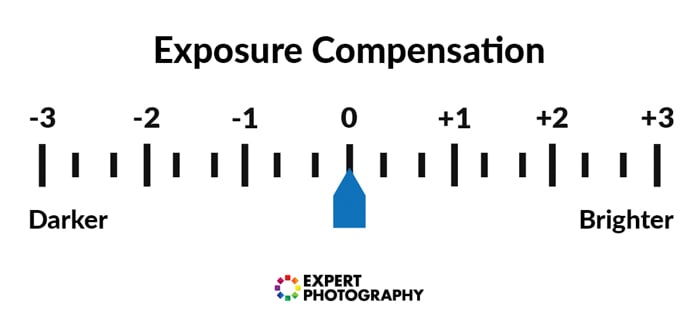
What Is Exposure Compensation in Photography?
You don’t always have to use manual mode to override your camera’s automatic exposure settings. You can use the camera’s exposure compensation to do so.
Let’s say you’re using aperture priority and are unsatisfied with the exposure. What do you do? Go to your camera’s exposure compensation settings (often a +/- sign). Then, increase the exposure (+) or decrease it (-).
After you set your new exposure setting, you only have to take a picture to get the exposure you desire. Exposure compensation is perfect for photos with many black-or-white areas.
Your camera doesn’t see black and white like humans do. Instead, it sees shades of grey. So, it’s best to turn your exposure compensation up when you see a scene with lots of white (like snow). That way, the snow looks white, not grey.
The same goes for scenes filled with lots of black. But instead of turning up your exposure compensation, you turn it down. As a result, you can be confident your blacks won’t look greyish.
How Can You Master Exposure in Photography?
Technically, the exposure triangle is a mathematical equation. The settings you use have predictable results. If you change your shutter speed by one notch, it only makes sense that the aperture should move by one notch.
Remember that if you increase one exposure setting, you must decrease the other or vice versa. What do I mean by this?
Let’s say your aperture setting is f/2.8, and your shutter speed is 1/100 s. If you widen your aperture to f/2, you must increase your shutter speed to 1/125 s.
So why increase the exposure setting to 1/125 s instead of decreasing it to 1/60 s? The main reason is that changing your aperture from f/2.8 to f/2 lets more light in.
To avoid overexposing your photo, increase the shutter speed to compensate for the extra light. That way, you can still correctly expose your image even after making adjustments.
Shot with a Fujifilm X-T4. 33mm, f/2.5, 1/600 s, ISO 160. Chris Williams (Unsplash)
Conclusion: Exposure in Photography
There’s nothing wrong with taking advantage of aperture and shutter speed priority instead of manual mode.
But even when you use auto settings, it’s essential that you still know how exposure works in photography. That way, it is easy for you to troubleshoot problems you encounter while taking pictures. Your camera doesn’t always get it right despite all the features it offers.
When the situation demands you use manual mode, you can be confident that you’ll get the shot using the exposure triangle.
Don’t miss out on our Infinite Exposures course to learn how to take perfect long-exposure shots!
- Learn to photograph waterfalls, waves, sunsets, and stars effortlessly.
- Discover how to balance movement and stillness in your shots.
- Master exposure settings easily, with or without a filter.


