Have you ever wondered, “How does a camera work?” You’re not alone. Our article will explain how this delicate piece of machinery works when we take a photograph.
Cameras have evolved greatly in the past few centuries, and photography has changed drastically. Today’s modern cameras result from countless years of development, but the basic principles remain the same. We will take you through all the steps to learn how a camera works!

How Does a Camera Work With Light?
To answer the question, “How does a camera work?” we need to know how light works. Photography would not exist without our understanding of light.
Without diving further into the wild territories of physics, let’s make the basics clear. Light travels in a straight path. It doesn’t curve (at least practically for us photographers). It gets reflected and absorbed.
For our eyes and cameras, light is a wave. It has the same properties as sound—it varies in wavelength, frequency, and amplitude—but it differs in energy level. The photographer’s task is to collect and capture light in unique ways.
Main Camera Parts and Roles
Aside from the first pinhole cameras (which don’t have glass), there are two main camera parts. These are the camera lens and the “light detector.”
The camera lens collects light and projects it onto a detector surface—either a roll of film or a digital sensor. Then, through various ways of processing, you get your final image shaped to your taste.
Photography is everything that happens between these steps—and even before that. You, the photographer, control it through your decisions and camera settings. First, we discuss the role of a lens in detail, and then we’ll discuss camera parts in detail.
Lens
The lens is light’s first encounter with the camera. Light passes through the lens, and through different optical formulas, the lens crafts how it projects the image. The camera lens is one of your most powerful tools of expression, so you should understand how it works.
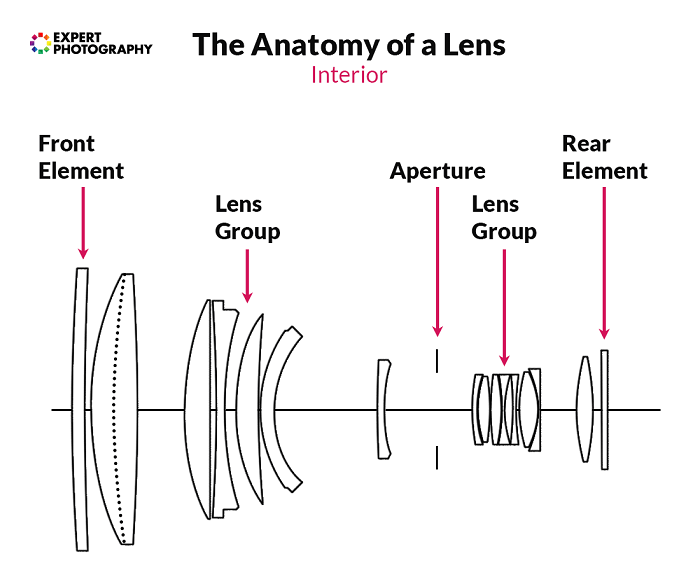
Optical Structure
Your camera lens is not only one lens. Manufacturers make a lens from numerous single lenses and lens groups.
The structure is the result of meticulous design and testing. Some standard focal length and aperture formulas exist, like the 50mm f/1.8 or f/1.4. These are very similar across different manufacturers, and they developed them a while ago.
Some advanced and extreme camera lenses have formulas that weren’t possible until recently. A lens’s optical formula determines the image it can project onto a sensor.
Focal Length
In simple terms, focal length defines the amount of zoom. A smaller or “shorter” focal length gives a wider angle of view. A larger or “longer” focal length gives the scene a narrower crop.
In technical terms, the focal length is the distance between the “point of convergence” of the lens and the sensor or film.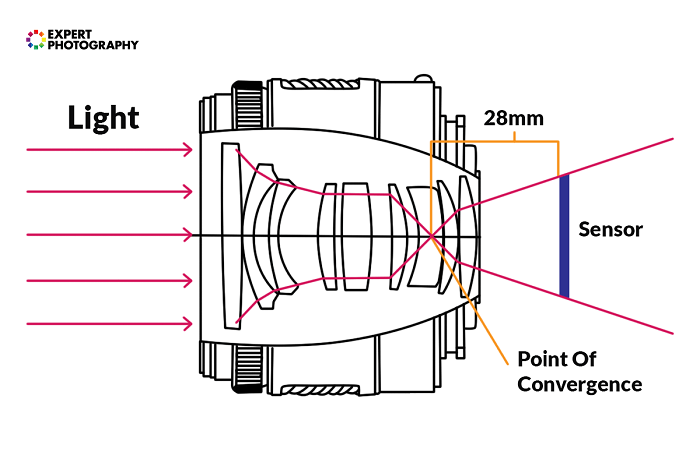
It’s practically impossible to design a lens with its point of convergence before the front element, but it can be behind it. This restriction means telephoto lenses must be longer (except for mirror lenses). Even wide-angle lenses can be surprisingly long.
Zoom lenses change their point of convergence back and forth. Prime lenses have fixed points, and the elements only move for focusing.
Aperture
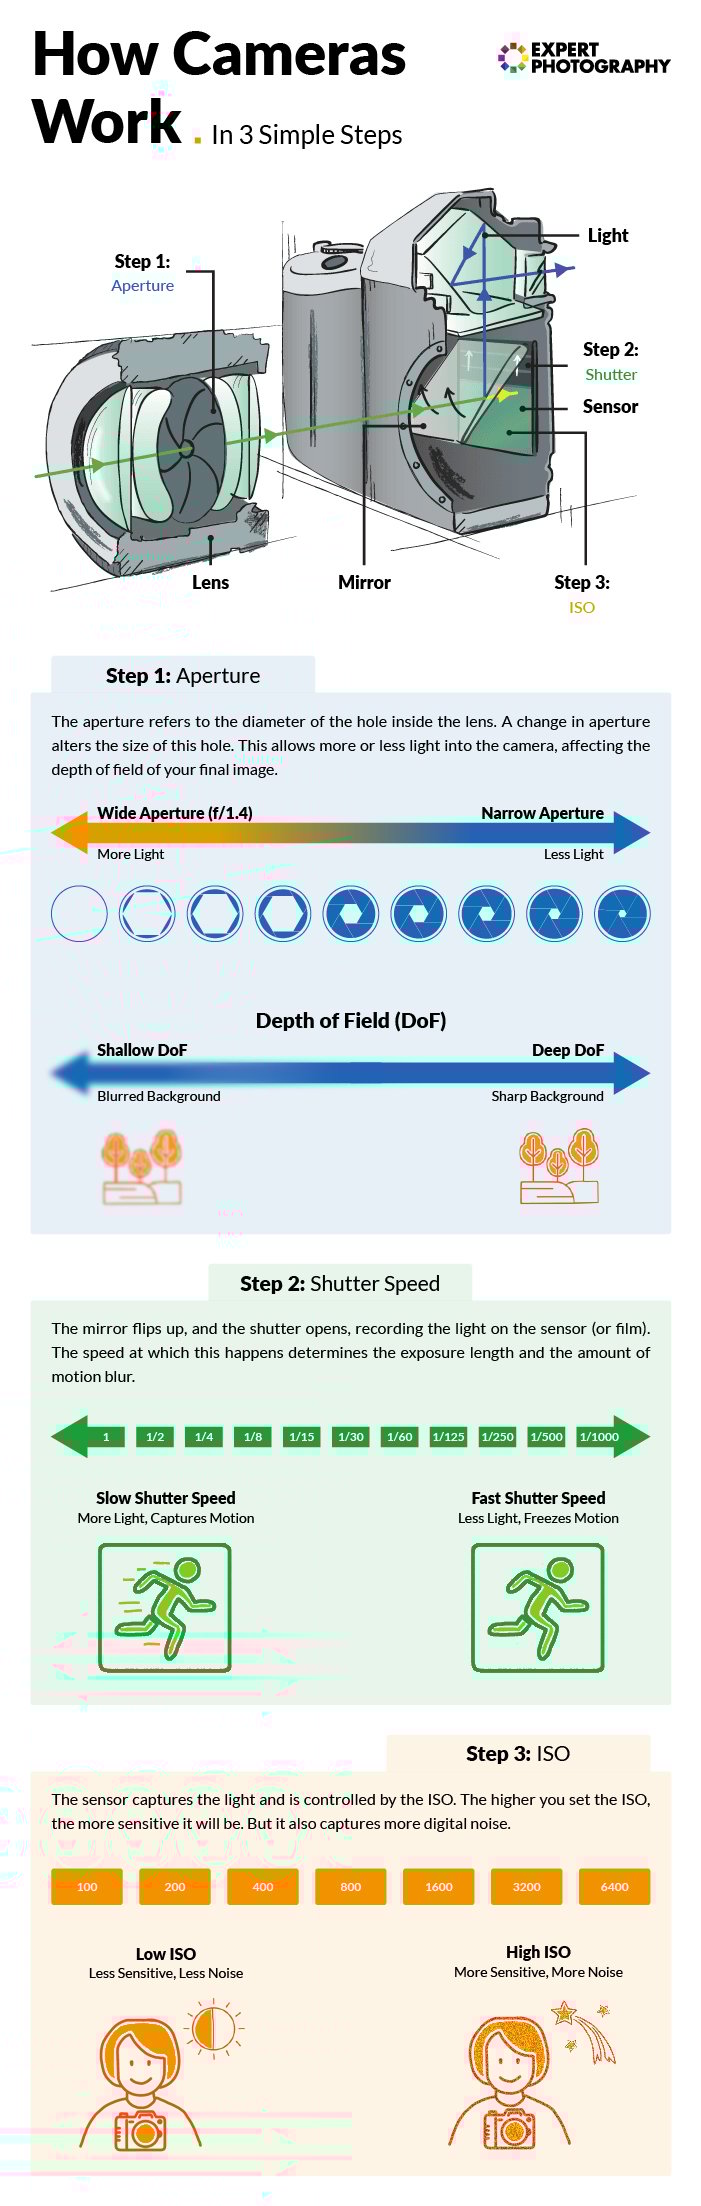
The diameter of the lens determines the maximum amount of light that can pass. In most lenses, there is an iris that narrows down its diameter. It works like the pupil in your eye—the narrower it is, the less light it lets in.
Also, with a tighter iris comes a deeper depth of field (more in focus) and less background separation.
Manufacturers express a lens’s aperture value in f-stops, which are ratios. You can calculate the f-stop by dividing the focal length by the lens diameter (at the iris). For example, the f-stop of a 50mm lens with a 25mm aperture diameter is f/2.0.
Of course, when you zoom in, the focal length changes. In lenses with a constant minimum aperture value, like a 24-70mm f/2.8, the aperture gradually opens up as you zoom in. This adjustment keeps the ratio the same throughout.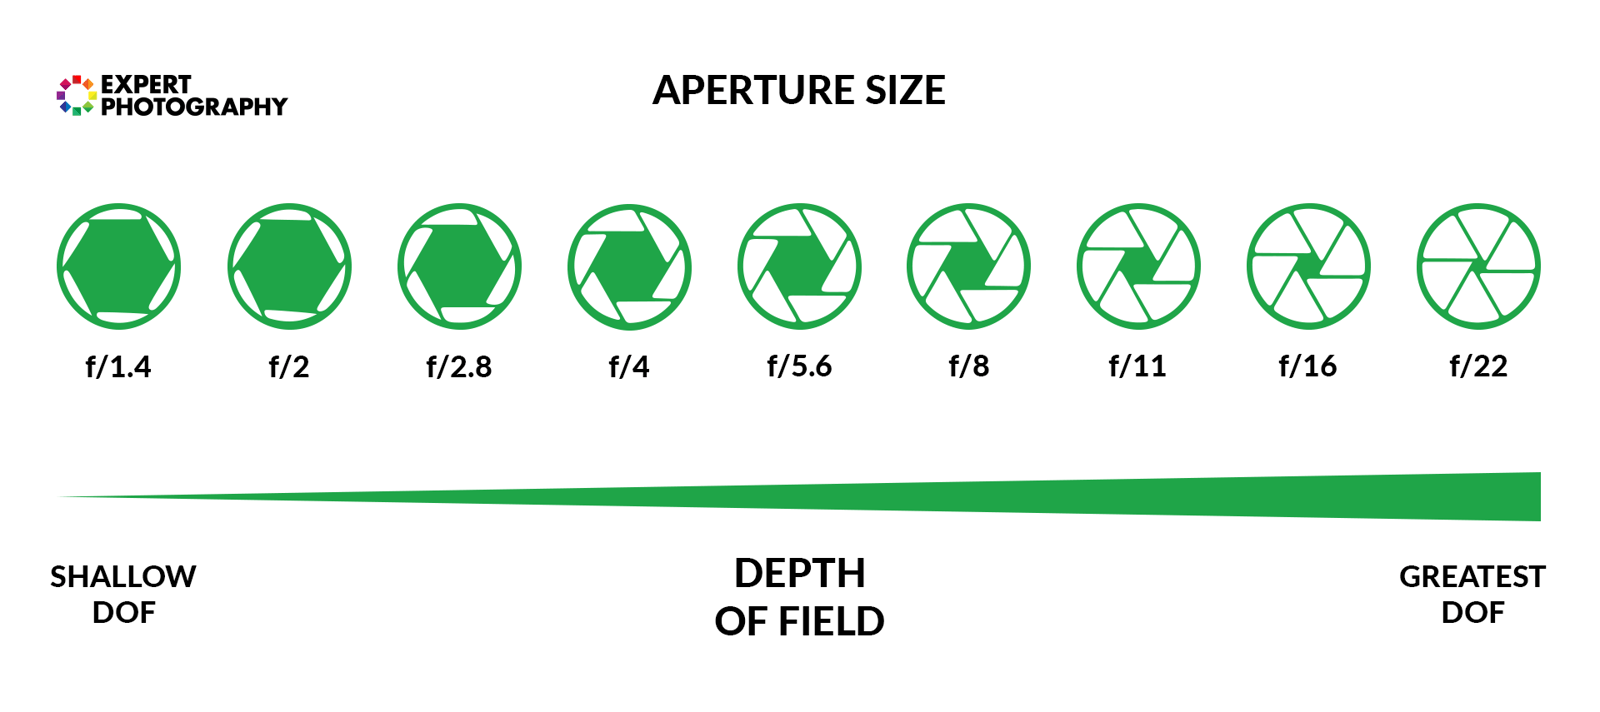
Focusing
Like your eye, a camera lens sees the world in focal planes. These planes are parallel to the front element of the camera lens and (in most cases) to the sensor. The exceptions are tilt-shift and extremely wide-angle lenses.
A lens element must move inside the lens to get a certain plane in focus. You can control this element with autofocus (AF) or manually by turning the focusing ring.
There is a focusing range that each lens is capable of. The closer the focusing element gets to the sensor, the further it focuses.
Except for macro-only lenses, most use infinity focus. Infinity is the plane beyond which practically everything is in perfect focus. Physically, it’s possible to go further, but it doesn’t make sense since the image gets blurry again after that.
When shooting close-up, the focusing element gets away from the sensor. Thus, it’s possible to make any non-macro lens capable of macro by adding extension tubes between the body and the lens.
Usually, the focusing ring is physically connected to the focusing mechanism inside the lens. In that case, manual focus (MF) gives you direct control.
In some lenses, there is only electronic control. It happens in heavy lenses like Canon’s EF 85mm f/1.2L II USM. It’s also often used in smaller lenses, where a normal focus ring is impractical. An example would be a pancake lens like the Canon EF 40mm f/2.8 STM.
Stabilization
In some modern lenses, you have an element that stabilizes camera motion. This part is usually a structurally distinct block at the back with one lens. With the help of a gyroscope, it meters and counteracts camera shake from unsteady hands or other movements.
The naming of stabilization systems differs from brand to brand. Canon calls its IS (Image Stabilization), Nikon has VR (Vibration Reduction), Sony has OSS (Optical SteadyShot), and so on. But they all do the same for the most part.
Weight and Ergonomics
A lens’s size and weight depend on plenty of factors. Faster apertures usually mean bigger lenses. A wide zoom range also results in longer lenses when zoomed in, but they are often retractable.
Also, the bigger the intended sensor size, the bulkier the lens has to be. Stabilization also comes with higher weight. Manufacturers usually design their lenses to provide the best balance with their cameras, but in some cases, this is not possible.
Fast telephoto and super-telephoto lenses must have huge front elements. So, lenses like the Canon EF 70-200mm f/2.0 and fast ultra-wide-angle lenses like Sigma’s 14mm f/1.8 may feel unbalanced.
Connection to the Camera Body
There are two types of camera lenses in how they connect to a camera. There are lenses fixed to camera bodies and interchangeable lenses.
Fixed lenses are mostly found on consumer-level compact and bridge cameras. Some brands, for instance, Leica, make top-level fixed-lens cameras. There aren’t many options with fixed lenses—you get what you get.
But there are DSLRs (Digital Single Lens Reflex) and MILCs (Mirrorless Interchangeable Lens Camera). These cameras let you change the lenses independently from their bodies.
Each camera manufacturer (or alliance) has standard lens mounts for connecting their lenses to their camera bodies.
Besides holding the lenses safely and steadily, each mount has an electronic protocol. This connection is necessary to provide power for autofocus and stabilization. Data links also transfer aperture, focus distance, zoom, and general lens information.
These are the most notable camera mount types:
- Canon RF for full-frame mirrorless
- Canon EF-M for cropped-sensor mirrorless
- Canon EF and EF-S for DSLR
- Nikon Z for mirrorless
- Nikon F for DSLR
- Sony E for mirrorless
- Sony A for DSLR
Camera
Light arrives at the camera after going through the lens, and the sensor or film detects the light.
Viewfinder
All DSLRs and many mirrorless cameras have viewfinders, which can be optical or electronic. In a DSLR digital camera with an optical viewfinder, it bounces onto a semipermeable mirror once the light arrives from the lens.
Most of the light reflects up to a pentaprism and then to the viewfinder. Some light reflects downwards through a secondary mirror into the autofocus sensor.

A mirrorless camera has no optical connection between the lens and your eye. The light always goes directly onto the sensor. From the sensor, the live view is transmitted digitally to the electronic viewfinder (EVF) or the back screen.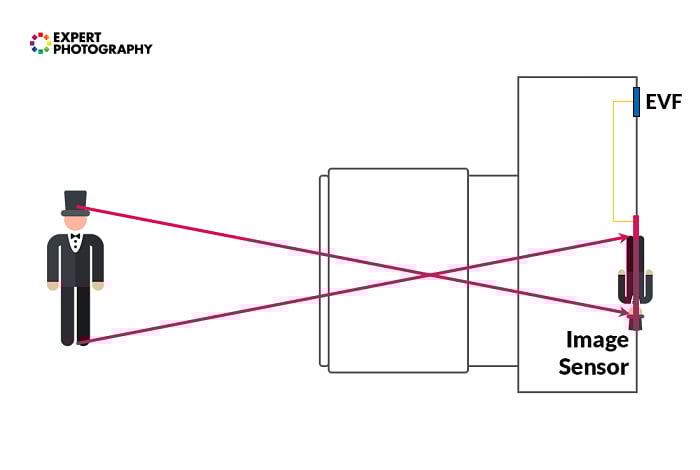
Shutter
The camera shutter is the mechanism that lets the light onto the film or sensor. It allows this for a set time (the shutter speed). Before the digital camera age, the only option was a mechanical shutter. They physically move an obstacle in the way of light.
The rolling mechanical shutter, found in most cameras, has two curtains. When you press the shutter button, the first curtain slides up and lets light onto the camera sensor. Then, after the set shutter speed time, the second curtain shuts, blocking the sensor again.
One of the rolling shutters’ disadvantages is that you can’t use a standard flash below a certain shutter speed. The shutter speed is usually around 1/200th of a second (1/200 s). Below that, they are not exposing the whole frame simultaneously.
A window between the curtains travels from one side to the other. In turn, a flash is instantaneous, so if you drop below that speed, only a band of the frame will be lit. You can avoid this problem by using high-speed sync.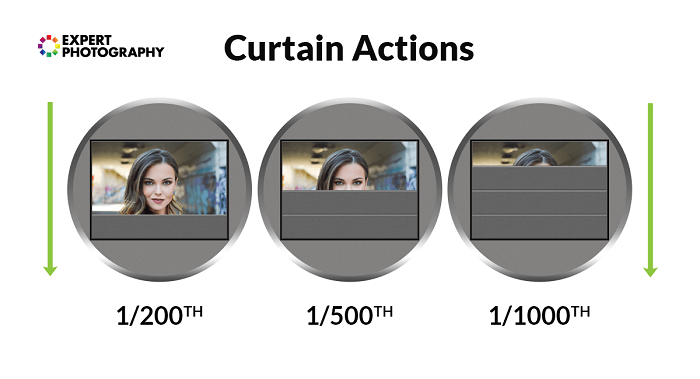
Electronic shutters are a product of the digital camera era. They’re used for quick, continuous image readout.
A rolling electronic shutter is in almost every digital camera. It works by gathering data from the sensor in blocks (usually rows of pixels) and proceeding downwards.
This process allows for silent shooting and very fast shutter speeds, sometimes 1/32,000 s. The downside is that fast-moving subjects appear distorted because of the asynchronous readout. Live View and video recording both use electronic shutters in consumer-level cameras.
In some advanced cameras, there is a global electronic shutter. This shutter reads the data from the whole frame simultaneously, solving the problem of banding distortion. It’s mostly used for professional video recording.
Sensor
Digital sensors are composed of pixels. Pixels are tiny solar cells that convert light into electricity.
Most digital cameras feature a standard single-layer CMOS or CCD sensor. CMOS is a newer technology that allows individual pixel readout and low power consumption.
Pixels are laid out in the Bayer mosaic arrangement using color filters. The Bayer mosaic consists of blocks of four pixels—two green, one red, and one blue.
Since each pixel is only sensitive to its own color, the result is an image with scattered red, green, and blue dots. The processor or your editing software has to perform “debayering” to achieve gradual tones and a smooth photograph.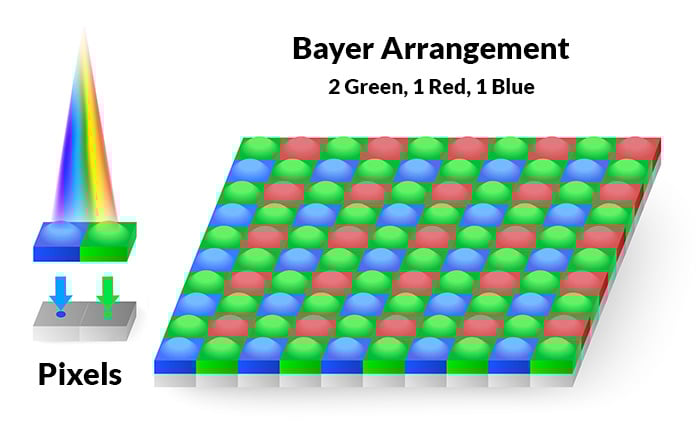
ISO Sensitivity
In film cameras, you swap the film for a different sensitivity film (ISO). In digital cameras, it’s a different process. When you (or your camera) set the ISO value, multiple things can happen depending on your camera and the exact ISO value.
Cameras with CMOS sensors (most digital cameras) have a tiny amplifier for each pixel. After the frame is exposed, it amplifies the pixels to a higher level, according to the ISO.
This is the only amplification until a certain value, usually ISO 1,600. Beyond that, ISO is a digital tag embedded in the RAW file or a digital amplification for JPEG files.
Digital Conversion and Processing
The data is converted to digital after being read from the digital camera sensor and going through the amplifier. This is the task of the analog-to-digital converter.
Most modern cameras convert to 16-bit but use only 14 bits of that. The extra two bits allow more flexibility in post-production and filtering.
Fourteen-bit (14-bit) means 16,384 possible values for every pixel. This results in immense color and tonal range in modern digital cameras.
The pixel data then proceed to the image processor. If you choose JPEG output, the processor performs several algorithms to filter, Debayer, and compress the image. The camera then writes the final image onto your camera’s memory card!
Note that light goes directly to the sensor in mirrorless cameras.
Conclusion: How Does a Camera Work?
You now know the answer to “How does a camera work?” You can apply this knowledge in your first steps as a photographer and when you decide on difficult technical questions. Understanding how your camera works opens up more possibilities in using your gear and its capabilities!
Check out our Photography Unlocked eBook to learn how to best use your camera!