Understanding your camera settings is vital if you want to improve as a photographer. You can take the easy road and shoot in auto mode, but you will never learn or get better.
Every photographer needs to know their camera settings inside out. But even learning the basics can seem daunting if you’re new to photography. There’s a lot of specialist lingo, and the camera menu can seem like a maze of technical jargon.
Thankfully, we’re here to help you understand your camera settings. We’ll take you through the basics, covering everything from f-stops to white balance. We’ll also look at more advanced settings so you have a solid knowledge base on which to build.
This is the perfect starting point for learning the camera settings and improving your photography skills.
- Learn to effortlessly set up your camera for any situation.
- Master the art of selecting the perfect exposure every time.
- Discover 10 composition rules that elevate your photos instantly.
Understanding Camera Settings
Taking yourself off auto mode can seem daunting for beginners. It’s like taking the training wheels off your bike. It can seem scary, but once you’ve made the change you have more control and more freedom.
Of course, there will be mistakes along the way, but that’s all part of the process of becoming a photographer.
Some beginners tend to jump straight to the flashy, exciting stuff. But learning photography is like learning anything else, and it’s always best to start with the basics.
That’s why we’re starting this article by looking at the most basic camera settings. These are the three exposure settings, which are used whenever you take a photograph.
From there, we move on to more advanced camera settings. We cover subjects like white balance and metering. We look at shooting modes, focus settings, and image file types.
Knowledge of these topics will allow you to pick up any digital camera and start shooting with confidence. Let’s continue so you can master your camera settings.
© Luke Lung
Exposure Settings
There are three main exposure settings. These are aperture, shutter speed, and ISO, and they are the basis of every photograph you take with a camera. They are the most important camera settings for any photographer.
When we take a picture, we are capturing an exposure. This comes from the days of film photography, where we would expose the film to light, the film emulsion would react to the light, and an image would be created.
While most people are using digital cameras these days, the principle of exposing the camera to light is still the same. But instead of film, we now expose the camera’s sensor to light.
Photographers use the three basic exposure settings to control the amount of light the camera let’s in. The key is to find a balance between the three, so your images are always perfectly exposed.
Aperture, shutter speed, and ISO make the three corners of the exposure triangle. It’s beneficial to think of them in this way because you can see how all three are linked to one another. You can see that changing one of these settings affects the other two settings as well.
We’ll look at each camera setting individually before looking at how they’re linked in the exposure triangle.
Aperture
The aperture is the hole at the back of the camera lens that lets light into the camera. One most modern cameras and lenses, the size of the aperture can be changed by the use.
The principle of aperture is simple. The wider the aperture, the more light comes through. The narrower the aperture, the less light comes through.
That means you need a wider aperture if you’re working in low light. If there’s plenty of light, a narrow aperture will do. There are more complicated aspects, but that’s the basic idea behind aperture.
The size of the aperture is denoted by an f-stop or f-number. These values come from the f-stop scale and tell us how big the aperture is. The scale also increases and decreases in equal increments.
Some find the f-stop scale confusing at first. This is because larger apertures have smaller f-stop numbers, and narrow apertures have larger f-stop numbers. This will make more sense when you see the infographic below.

Aperture other functions outside of exposure. The aperture size also affects the depth of field and image sharpness.
The depth of field refers to the size of your focal plane and how much of your image is in focus. If you have a shallow depth of field, the foreground and background will be out of focus. If you have a deep depth of field, everything near and far will be in focus.
Wide aperture settings give you a shallow depth of field, while narrow apertures produce a deep depth of field.
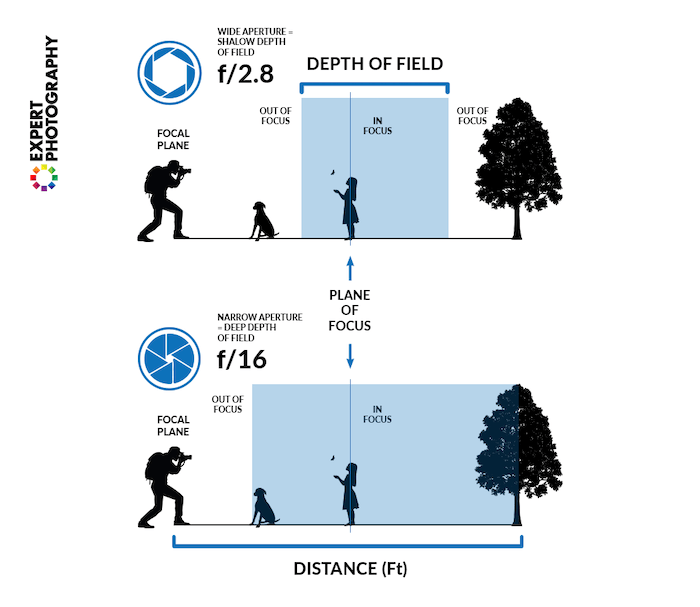
A portrait photographer might use an f/2 aperture to create a shallow depth of field. This will give them a beautiful blurred background or “bokeh”, an effect that makes their subject stand out.
Landscape photographers, on the other hand, like to use apertures like f/16 or f/22 so they get more detail from every area of the shot.
Narrow aperture or higher f-stops tend to give you sharper images. You can start to lose sharpness if you use anything below f/5.6, though this is less of a problem with modern equipment.
Shutter Speed
Your camera has a shutter that opens and closes quickly when you press the shutter release button. When it opens, light passes through and hits the sensor, exposing your image.
The shutter speed is the length of time the shutter opens for. In most cases, the shutter only opens for a very short time. We’re talking about fractions of a second.
Keeping the shutter open for longer allows more light to enter the camera. If you want less light to pass through, you need a faster shutter speed.
We measure shutter speed in fractions of a second like 1/500 s. This might be denoted simply as 500 on your camera, and this setting opens the shutter for one 500th of a second. If you set it to 1/250, it opens for one 250th of a second.
1/500 s is a fairly fast shutter speed, but some modern cameras now have super-fast shutter speeds of up to 1/32,000 s.
All cameras have slow shutter speed options, allowing you to keep the shutter open for half a second or a full second. Some cameras also have bulb mode, where you can keep the shutter open as long as you hold down the shutter release button.
Shutter speed affects more than just light intake. If you use a slow shutter speed, your image might be affected by motion blur, with fast-moving subjects becoming blurry. That’s why sports and wildlife photographers always use fast shutter speeds.
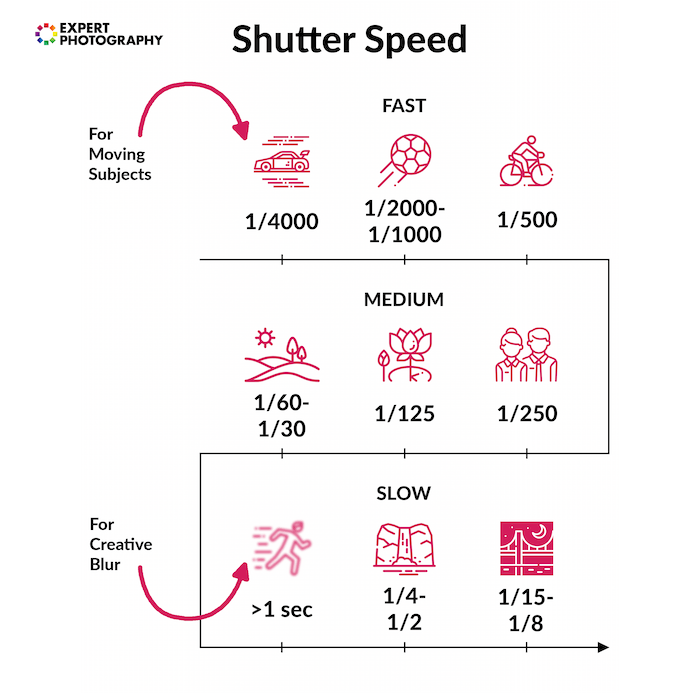
If you use a shutter speed of 1/60 or slower, your images will be blurry due to camera shake. Because the shutter is open for so long, it becomes sensitive to the movement of your hands. Even if you have a steady hand, camera shake will ruin your image.
You can use motion blur creatively, adding a sense of energy and movement to your images.
This is the trade-off with shutter speed. Faster shutter speeds give you less light but freeze fast action. Slow shutter speeds give you more light but increase the risk of blur.
ISO
ISO refers to the sensitivity of the camera sensor. In the days of film photography, each roll of film had a fixed ISO level. You couldn’t adjust it once the film was loaded. But with digital cameras, ISO has become an adjustable setting like aperture or shutter speed, giving you more exposure control.
Lower ISO settings are less sensitive to light than higher ISO settings. Setting your camera to 16,000 ISO allows you to work in low light and still achieve a good exposure.
However, picture quality deteriorates as you increase your ISO. The higher you go, the more you will experience digital noise. This is a grainy texture that reduces clarity, detail, and color accuracy.
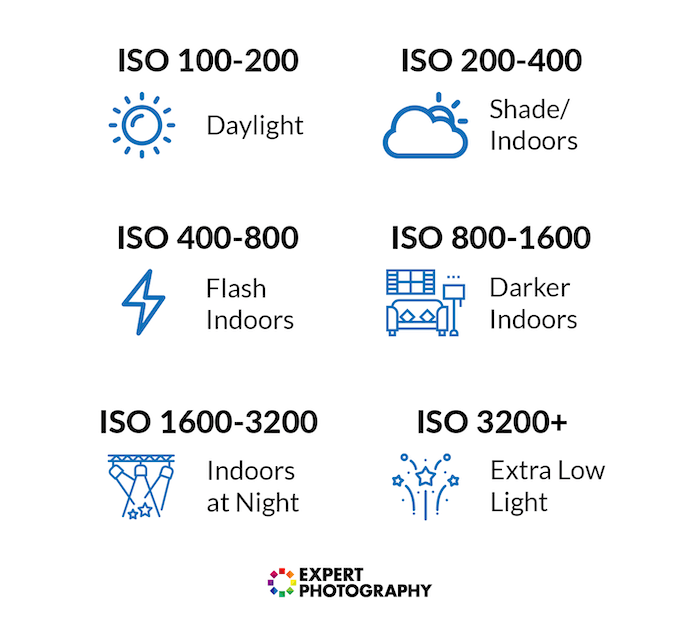
That’s why photographers try to keep their ISO as low as possible. Settings like 100 or 200 ISO give you the best image quality, but you can also use 400 or 800 without too much impact on picture quality.
Increasing your ISO level gives you flexibility when you’re struggling for light. But you have to be careful not to increase it too much. Otherwise, you’ll have very “noisy” images.
Exposure Triangle
The exposure triangle isn’t a camera setting you’ll find on your mirrorless or DSLR. Rather, it’s a way of thinking about the three main exposure settings, with aperture, shutter speed, and ISO making the three points of the triangle. It shows you how they relate to one another and how you can’t change one without affecting the others.
Capturing the perfect exposure requires balancing these three settings. That balance and the combination of settings will change depending on your environment and the effects you’re trying to achieve. But you will always need to find the perfect balance of aperture, shutter speed, and ISO.
Each of the three settings is measured in “stops”. These are equal increments by which you increase or decrease that setting. For example, if you change from f/8 to f/5.6, you have moved the aperture down one stop. Increase ISO from 100 to 200 and you’ve increased the ISO by one stop.
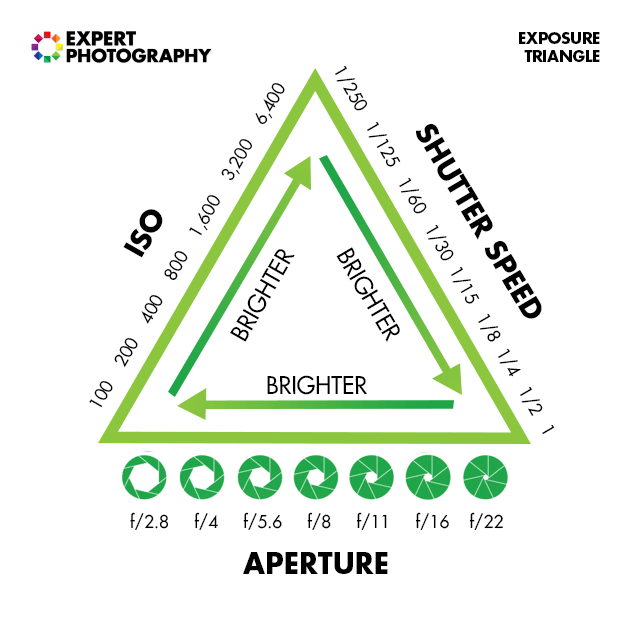
Changing one setting has a knock-on effect on the other two exposure settings. If you move one setting by one stop, you have to compensate by moving another setting by one stop in the other direction. Photography is a constant balancing act between these three exposure settings.
Other Basic Settings
The three camera settings that make up the exposure triangle are the must-know settings. But there are a few more important basic settings you should be aware of.
Mastering white balance and exposure compensation will make a big improvement to your results. With a little knowledge of each camera settings, you have much more influence over your final images.
White Balance
Light comes in different colors. We don’t realize it because our eyes adjust. But cameras don’t have the same ability to adjust to the different colors of light.
You might have noticed that some images have an overriding blue tone while others have a yellow or orange tone. This is due to the color of the light in your scene.
The color of light is related to color temperature, which is measured in the Kelvin (K) scale. Light with a high Kelvin score is considered “cold” and gives you pale blue light. We get “warm” light at the lower end of the scale, which is more orange and red in tone.
White balance helps your camera adjust to the color of light in the scene, giving your image a more natural look. With the right white balance, images look more real with true-to-life colors. Photos look more authentic and less synthetic.
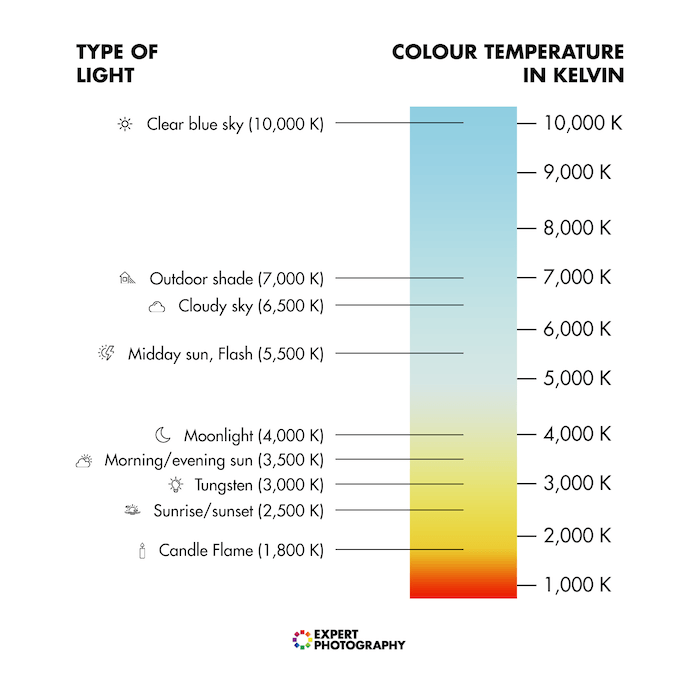
The goal of white balance is for whites to look true white, not blue, yellow, or any other off-white color.
Cameras are usually set to Auto White Balance (AWB) as default. This means the camera is adjust the white balance without you even realizing. The AWB does a good job on most modern cameras, but learning to set the white balance manually can make a big difference.
Semi-automatic white balance settings tend to be more accurate, especially if you’re dealing with one overriding type of light. These settings allow you to select different types of light, like daylight, cloudy, or tungsten. They give you more accurate whites in those specific conditions.
But it’s worth learning how to adjust the white balance manually. The best way to do this is to use natural white or mid-grey cards. Place them in your scene, take a test image, and set the camera to the Kelvin level that gives you the whitest whites.
Exposure Compensation
Exposure compensation allows you to override the camera’s automatic exposure settings. You won’t need this feature if you’re shooting with fully manual camera controls, but it’s handy if you’re shooting in any auto or semi-auto mode.
When using auto settings, the camera always looks for the “middle grey.” The camera wants a well-balanced exposure, and this works well much of the time. But it can struggle when you have inconsistent lighting.
A camera’s built-in light meter usually takes its reading from the middle of the frame. If the lighting is even across the scene, that’s no problem. But if some areas are much brighter or darker than others, you won’t get an even exposure.
If the camera is pointed at a darker area, it will try to brighten the entire image. This will overexpose the light areas so they look “blown out.” You have the opposite effect if you point the camera at bright areas of the image.
This is when you need to use exposure compensation. If you point the camera at a dark spot and the camera is overexposing the rest of the scene, you can adjust the exposure compensation by -1 EV (Exposure Value) to darken the image.
This gives you a more even exposure without having to adjust all the exposure settings individually.
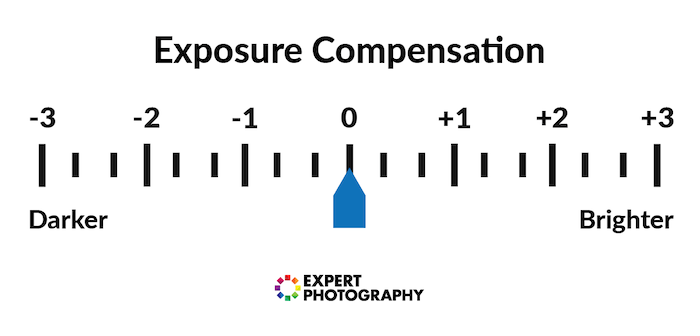
You can adjust the exposure value in equal increments called exposure values. An adjustment of +1 EV increases the necessary exposure settings to give you a brighter image.
Some cameras have a dedicated dial for exposure compensation, usually with the -1 EV and +1 EV noted. Other cameras have a button marked +/-. Press this button and the exposure compensation info will appear on the camera display.
Shooting Modes
Digital cameras have a range of shooting modes. Auto mode and Manual mode are fairly self-explanatory, but others like Aperture Priority and Shutter Priority might need more discussion.
This section covers all the main shooting modes, so you’ll be able find the perfect mode for your style of photography.
Auto Mode
Auto mode gives full control to the camera. it takes care of all the exposure settings, allowing you to shoot without getting bogged down in f-stops and ISOs.
Using auto mode is perfectly fine if you’re a beginner. You simple pick up the camera and start shooting. This helps to build enthusiasm for taking pictures and confidence in using a digital camera.
However, we don’t encourage beginners to stay on Auto mode too long. Most cameras deliver good results in Auto mode, and you might be having fun, but you won’t improve unless you take control of the camera settings.
You don’t need to jump straight to fully manual mode. As we’ll see, you have some stepping stones along the way. But Auto mode gives you very little creative control, so you won’t find your voice until you leave Auto mode behind.
Aperture Priority Mode
Aperture Priority mode is a semi-automatic mode found on all modern DSLR or mirrorless cameras.
This mode gives you control over the aperture setting while the camera controls shutter speed. By sharing the exposure controls, you aren’t bogged down with camera settings. It improves reaction times and lets you think more about composition.
You also set the ISO manually, but you won’t need to worry about ISO as often as the other two settings.
Aperture Priority mode is ideal if you want control over depth of field. You might have a scene where shutter speed is less important, but you want to create a bokeh (blurred background) effect.
It’s a good choice if you’re shooting a scene without much movement. It’s popular with portrait photography as well as fine art, product, and food photographers.
The mode is marked as “A” or “Av” on the control dial on your camera. For cameras without a control dial, switch the shutter speed dial to “Auto” to get the same effect.
Shutter Priority Mode
Shutter Priority mode is similar to Aperture Priority mode, only the roles are reversed. With this mode, you control the shutter speed while the camera takes care of the aperture.
You’ll use this mode when you’re dealing with lots of movement. You might want control over the shutter speed to keep your image sharp, avoiding motion blur with fast-moving subjects. Also, you might want to use a slow shutter speed to create motion blur.
© Kav Dadfar
Shutter Priority is commonly used by sports and wildlife photographers. But it’s a good option for any photographer dealing with movement.
To set the camera to Shutter Priority mode, find the “S” or “Tv” options on the control dial.
Manual Mode
Manual mode gives you complete control. You have full control over all three exposure settings, balancing them to find the perfect exposure.
There’s no power-sharing with the camera. You, the photographer, have sole responsibility over aperture, shutter speed, and ISO. That might seem daunting for beginners, but switching to manual mode is the best way to fully understand your camera settings.
The exact settings you have available will depend on the camera and lens you have. For example, the aperture range is limited by the lens you’re using. And you can only raise the ISO or shutter speed as far as the camera will go.
Manual mode is labeled “M” on the camera control dial.
Focus Modes
Focusing is another key aspect to photography. Everyone wants sharp images, which is why you need to understand the focus modes as part of your camera settings.
We cover the main focus modes, so you can keep your images sharp in any situation.
Manual Focus
With manual focus, you are in control of focusing the lens. The camera and lens don’t do any of the work, it’s all up to you.
Film photographers will be accustomed to shooting with manual focus. But focusing manually can be tricky for those brought up in the digital era.
It’s definitely worth trying manual focus. It really helps to train your eye and helps you develop your photography style. But it is another setting you have to worry about, which is why most people shoot with some kind of autofocus system.
Autofocus
Switch to autofocus mode and the camera will do the focusing for you. It detects your subject and brings them into sharp focus. This allows you to concentrate on exposure and composition.
Autofocus systems have become incredibly sophisticated. Some use hundreds of detection points spread across the frame that locate your subject in the scene. They can detect a subject and focus in a fraction of a second.
The high-end DSLR cameras had good AF systems, but newer mirrorless systems have put them in the shade. Even entry-level mirrorless cameras have advanced autofocus systems these days. The days of missing a shot because you couldn’t focus in time are gone.
Face/Eye-Detection Focus Mode
One problem with autofocus is that it can often focus on the wrong thing. If you’re capturing a product image, but the main product is one of many in the scene, the camera might focus on one of the others.
This can be a problem with portraits, too. The camera might focus on something other than your subject, ruining your portrait.
Mirrorless cameras have solved this problem with face and eye-detection AF systems. These actively look for human faces, making sure your portrait subject is in focus.
However, there’s still a problem if you’re using a very shallow depth of field. It might be the case that the tip of their nose is in focus but their eyes are out of focus.
Eye-detection AF gives you even more accurate focusing. You can use an ultra-shallow depth of field and the subject’s eyes will be in crisp focus.
Not all cameras have face or eye-detection AF modes, but they are becoming more common. You need to go into your camera menu to turn this mode on and off.
Continuous Focus Mode
Continuous focus mode tracks moving subjects, keeping them in focus as they move within the frame. This is incredibly helpful when photographing moving subjects.
This mode is called Al Servo AF on Canon cameras and AF-C on Nikon cameras.
When this focus mode is activated, half-press the shutter button and the camera will track your subject. That means the subject will be in focus whenever you press the shutter.
Some advanced cameras even support Continuous Focus mode with burst shooting. That means you can take a series of rapid-fire shots of a moving subject, and it’ll be in focus in every shot.
Continue Focus modes are not always 100% reliable and can lose the subject if they move erratically. But newer cameras now use AI to predict movements, giving you a more accurate continuous focus.

© Guillaume Techer
Metering Modes
All digital cameras have a built-in light meter. They use it to evaluate your scene and select the correct exposure setting when in auto or semi-auto shooting modes.
There are several metering modes you can choose from. And while the default modes are usually fairly reliable, the other modes can be handy when shooting specific types of photography.
Evaluative / Matrix / Multi Metering
This is the default metering mode in most cameras. It has a different name depending on the manufacturer but works in a similar way across all brands.
It’s called Evaluative Metering on Canon cameras, Matrix with Nikon, and Multi Metering on Sony and Fujifilm cameras.
This type of metering system separates the frame into zones, takes a reading from each zone, and then finds the exposure using an aggregate reading from all the zones.
It’s a reliable form of metering that usually finds a good exposure when you’re shooting in auto or semi-auto modes.
Evaluative metering is perfectly fine when your scene has even lighting. The trouble comes when you have a scene with uneven lighting, where you have brighter and darker areas. That’s when this type of auto-metering can fall short.
Spot Metering
Spot metering is where the camera takes a reading from a small spot within the frame.
The spot usually only covers about 5% of the frame, so the camera takes a reading from a very specific area of the scene.
The spot is centered on your focus point. If your focus point is a person’s face, the camera will find the perfect exposure for the face rather than the entire scene.
This is a good choice when your subject is brighter or darker than their surroundings. However, if there is a big different in brightness, it can leave areas over or underexposed.
Highlight Priority
Not all cameras have highlight priority metering, but it is becoming more common.
This type of metering protects highlights in your shots, preventing them from being overexposed. This is ideal if your subject is situated in a bright area of the scene.
The trouble is that it can be too aggressive in protecting highlights. It protects them at the expense of the rest of the image. It might also protect highlighted areas you don’t want protecting, making it inaccurate. Evaluative metering is more even and spot metering is more accurate.
© Hulki Okan Tabak
Image File Types
When you take a picture with a digital camera, the camera saves the image to the memory card. But in order to do so, it needs to great an image file. Digital cameras allow you to select which type of file you want your images saved as.
The two main file types are JPEG and RAW. They both have their upsides and downsides, so it’s a matter of selecting whichever works best for you.
JPEG
The JPEG is the most common image file type and the default image file on any new camera. They are not unique to digital cameras and can be read by most digital devices. That means you can open a JPEG file and view the image on a computer, smartphone, or tablet without specialist software.
They are compressed files, so they tend to be smaller and take up little digital storage. However, by compressing the file, it loses a lot of information. This restricts the possibilities in post-production, limiting your editing options.
Some cameras also give you a selection of JPEG options. They allow you to choose the size of JPEG file for each image. The bigger the file size, the more information it holds. This gives you better image quality and more editing options.
JPEGs are the best option if you want to take lots of pictures and are not interested in making sweeping changes when editing the images.
RAW
RAW files are uncompressed image files. This means they are larger in terms of storage, but they hold far more info than JPEGs. This gives you much more freedom when editing in photo editing software.
The trouble with uncompressed RAW files is that not many programs can read them. That means you can’t open a RAW file image on your smartphone without additional apps. You even need software like Adobe Lightroom to view RAW file images on a computer.
However, when you open the file in Lightroom or another editing program, you have incredible freedom to edit. You can do anything from minor touch-ups to major changes.
That’s why professional photographers always shoot in RAW. The files take up more storage space, but you have more creative control in post-processing.
Conclusion
To a beginner, a digital camera can seem like a complicated device. With all the buttons and dials, it’s hard to know what does what. And the markings are as understandable as hieroglyphics to the untrained eye.
But if you start with the basic camera settings, the camera soon starts to make sense. With practice and patience, you’ll soon be a confident photographer, able to shoot any genre at any time.
Aperture, shutter speed, and ISO are the three must-know settings. They are the very foundation of photography. But it’s easy to build on that foundation by experimenting with the other settings we’ve covered in this article.
Camera settings don’t have to be a mystery. And if you want to learn more, check out our full Photography for Beginners course.
- Learn to effortlessly set up your camera for any situation.
- Master the art of selecting the perfect exposure every time.
- Discover 10 composition rules that elevate your photos instantly.


