Understanding white balance is essential, as shooting with an incorrect setting can ruin your photos. Our article helps you discover more about white balance and how to best use it in digital photography.
Color in photography all seems so simple. We take a picture, and the color looks great… if we have the perfect white balance. How often have you returned home, uploaded images, and thought, “Hmm, I’m sure that sunset was more golden,” or “Wasn’t this snow much whiter?”
What Is White Balance in Photography?
White balance is a camera setting. It adjusts the colors in a photo to accurately represent how white should appear under different lighting conditions. It ensures a neutral color tone and helps to create true-to-life colors. It does this by compensating for the light source’s color temperature.
How our eyes see colors differs greatly from how our digital devices do. Our brain is smart and adapts to different lighting conditions. If you enter a room with a yellowish light, your eyes decode a piece of paper as white, even if it looks yellow at first.
Digital cameras are not that clever. They only try to guess the right color temperature. In digital photography, the settings on your camera and external lighting factors control the white balance.
There is a huge potential for your images to look wrong when you get them up on the screen. But there is a system photographers use to get color right from the camera to the final image.
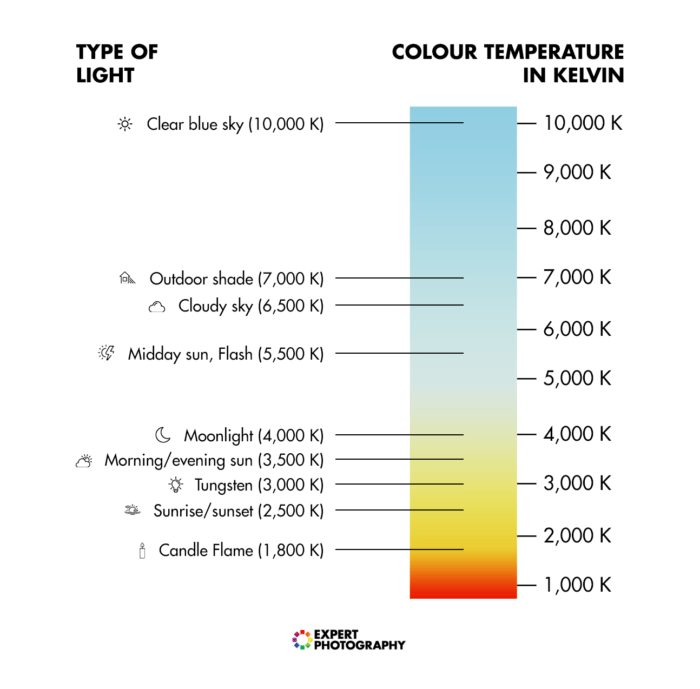
All light has a color that has a “temperature.” Different colors of light create different temperature hues in your image. The color temperature scale used for light is the Kelvin scale.
At the lower end of the scale, 2,000 to 4,000K shows warm light of reddish yellows. At around 5,500K, the color is pretty much what we see at noon on a sunny day. As the scale climbs, the light gets progressively bluer. At about 10,000K, we reach the very blue light of a typical flash gun.
How a Digital Camera Interprets Color Temperature
Our cameras have a separate temperature sensor that examines the color cast of the light. If we use the AWB (Auto White Balance) setting, we let that sensor guess and select the right color temperature.
For the most part, this sensor is very accurate. But a large block of a single color hue can fool it. A few examples would be a prominent blue car or a woman wearing a bright red dress.
In the latter case, the color sensor sees the image redder than reality. And it overcompensates by turning the image bluer and greener.
This overcompensation often happens with those beautiful sunset pictures. The overabundance of red light fools the camera sensor into adding bluer tones. This neutralizes the scene.
White Balance Camera Preset Options
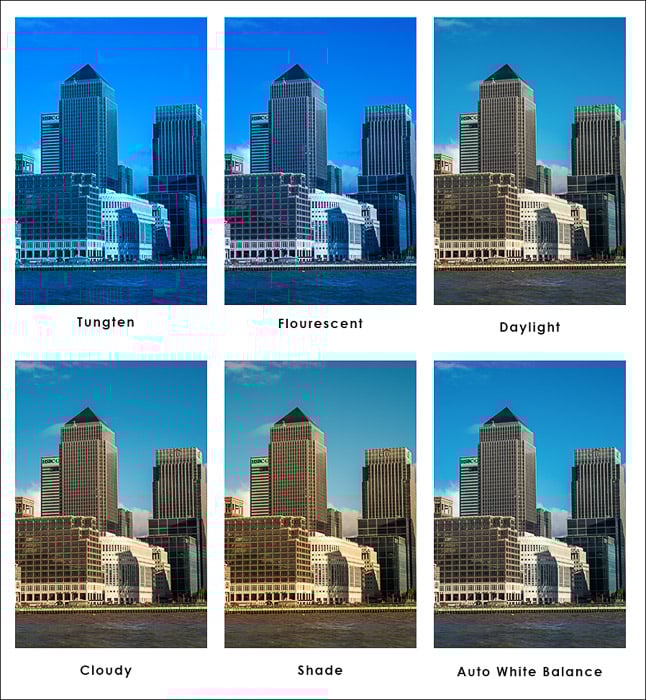
All modern digital cameras have Auto White Balance mode (AWB mode) and several presets. These include Tungsten, Fluorescent, Daylight, Shade, Cloudy, and Flash.
If you find that a deep, overcast day gives you too much blue, switch to Shade or Cloudy. These should warm your image up.
If you are shooting under tungsten lighting using AWB, switch to Tungsten. This balances out your color temperature. But use it only under tungsten bulbs, though. Otherwise, your photo turns blue.
You don’t always have to use a specific preset for a particular light. An excellent way to maintain the saturation of sunsets is to set your camera to the Shade or Cloudy preset. This adds extra warmth to the image and keeps that sunset looking real.

White balance presets are a quick and simple solution to getting good white balance photography. But they are not always perfect. Your best bet is to use a white object (or as close as possible) in your photo to set an automatic white balance.
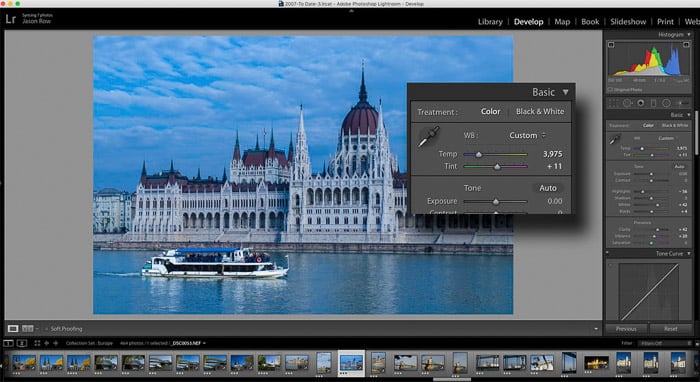
Afterward, you can alter the white balance with editing software like Adobe Lightroom or Photoshop. Preset white balance can only get you so far for accurate colors.
You can experiment with two other modes. We discuss the Preset (PRE) and the Kelvin (K) options later.
7 Practical Photo Examples With Preset White Balance Options
Auto White Balance is often suitable for daylight situations. In a different light, it’s guessing what the white balance should be. The most common example of this is when shooting indoors in tungsten light.
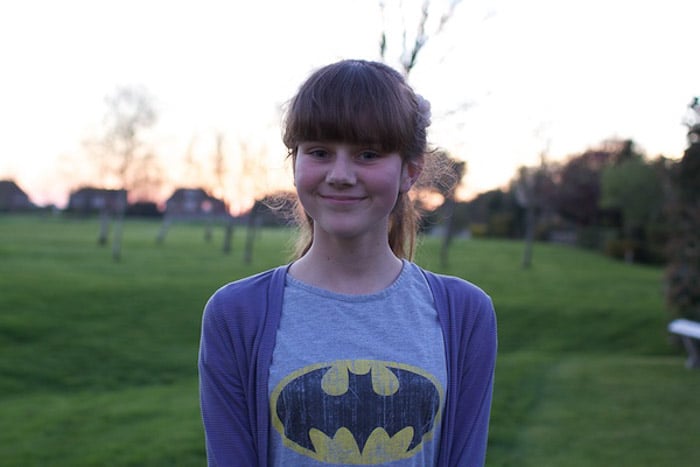
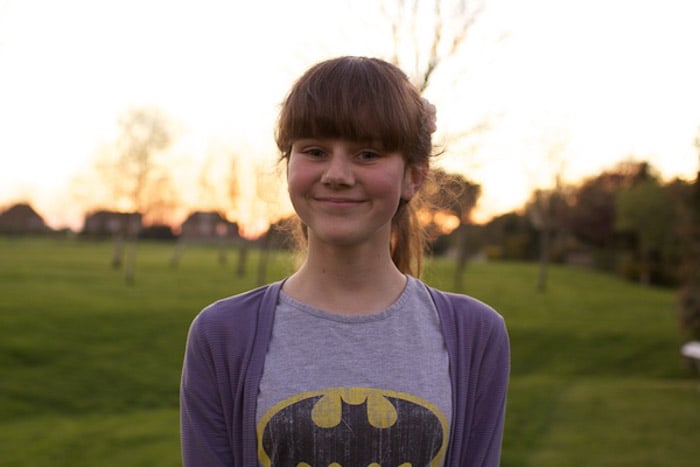
To show how the different modes affect the color temperature of an image, check out the photo below. The model had the sun setting behind her.
In typical digital cameras, these are the white balance settings you can choose from:
1. Auto White Balance (AWB)
Good if you don’t know what you’re doing. AWB mode works well in sunlight but is unsuitable for most situations.
 2. Daylight
Auto White Balance mode can be correct in daylight but imperfect. I would use the Daylight balance during the day. Most people tend to stick to auto. It’s because they find it the safest option in the beginning. But look how different it can be!
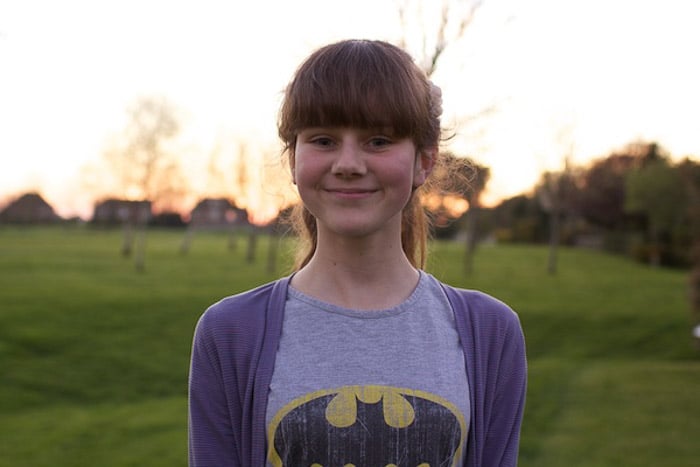
 3. Shade
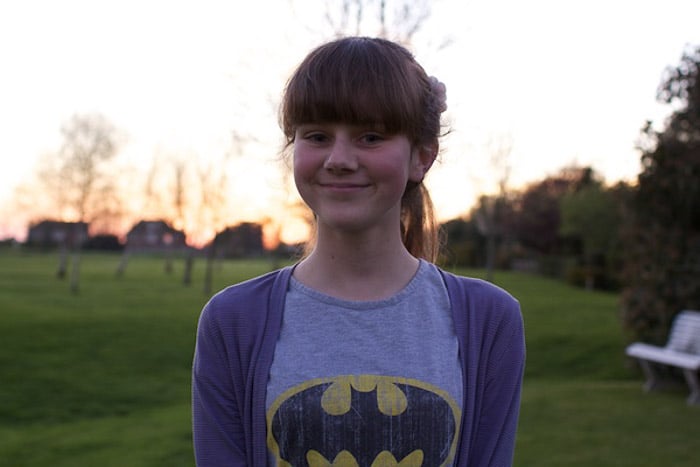
Auto mode makes photos look a little cold in the shade. Using the Shade preset makes them a lot more accurate.
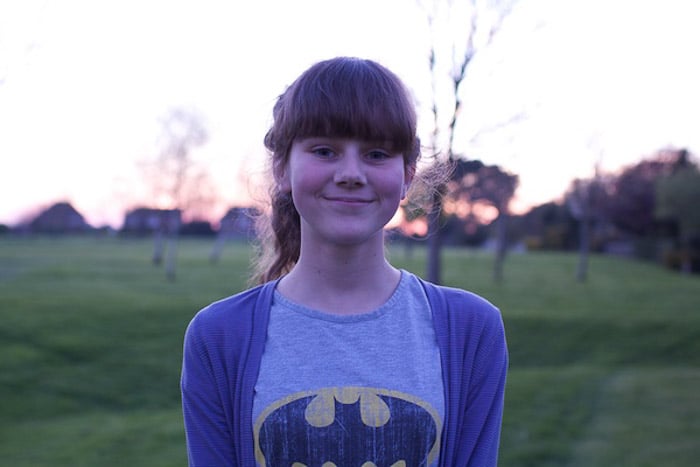
 4. Cloudy
Again, the Cloudy mode is pretty self-explanatory.
 5. Tungsten
Tungsten light comes from incandescent bulbs found in your home. Your photos come out very warm, with an almost orange color cast in this environment. Tungsten mode compensates for this with blue tones.
 6. Fluorescent
Fluorescent light comes from tube lighting conditions found in offices and hospitals. It results in cold color temperature and can make your photos appear blue. This is also why offices have that nasty, sterile feel. Fluorescent mode combats this.
 7. Flash
Flash mode compensates for the somewhat cold light of the camera’s flash.

As you can see, the Shade setting gives us the most accurate color temperature for this sunset portrait.
How to Customize White Balance With Preset (PRE)
The color sensors in our cameras read the light reflected from our scene. But it can get confused by large blocks of color. There is a technique to customize the settings, though. You only have to carry a gray card.
Gray cards determine which white balance settings your camera should use. These gray cards are 18% gray, which is a neutral hue.
To use gray cards, take a photo of the card in the same environment you’re taking your photo. The card should fill the whole frame of your camera. Then, set this as the white balance inside your camera.
To do this, go to your camera settings menu to set a custom white balance and select the gray card picture. This light information can be stored as a preset.
Because you took the gray photo in the same light as your photo, it knows exactly how much to adjust the balance if the light source does not change too much.
The camera will see the difference between the neutral hue of the gray card and your photo’s result. It then determines the white balance from that.
The reason you use a gray card and not a white one is simple. If you overexpose any color enough, it comes out as white. And white balance is about color, not brightness. This is the most accurate way to capture color on the cheap, and I can’t recommend it enough!
How to Set Color Temperature With the Kelvin (K) Option
You can also adjust the color temperature manually. Choose the K option and change the value. Your photo of the same scene will then be in a different color.
This is for professional photographers to set the color temperature value themselves. The scale is in Kelvin (K), named after the man who created it. You can set degrees K to get the ideal results.
For example, sunlight is approximately 5,200K. A different light has a different K value. Tungsten is around 3,200K.
But not all tungsten lights give out the same color temperature. If you are shooting under one that is less red, you can increase the color temperature. Try going from the preset 2,500 to 2,800K for a more natural look.
The more you decrease the value, the bluer your photo becomes. Increasing the K value leads to warm color tones. This method is excellent when you are shooting indoors with strobe lights.
Which White Balance Setting Is Best?
The best white balance setting depends on lighting conditions and the desired effect in your photos. You have four options to set the white balance for your photo:
- AWB: You can spend all your time shooting in auto mode and hope for the best. This is alright if you’re still trying to get to grips with exposure. But after that, I recommend you move on to other white balance settings.
- Presets: Try to produce accurate results using the preset modes inside of your camera. This is a step in the right direction. But they’re still ballpark figures and won’t always produce 100% correct results.
- Custom: It’s best to shoot in custom white balance mode. This is the most popular choice for professional photographers. It has a learning curve and requires carrying around a gray card.
- Light Color Temperature Meter: This is a very accurate solution but can cost a lot of money. It’s not a realistic option for most. But it is a must-have if you do a lot of studio work.
Tips for Shooting in RAW for Accurate White Balance
It’s best to shoot in RAW file format. For those who don’t know, RAW is an uncompressed file format. RAW files don’t have a set white balance. This allows complete control over the white balance in your editing program after you’ve taken a photo.
If you shoot in JPEG, the camera sets the white balance. You can still change it with an editing program, but the range of values is more limited.
When you shoot a RAW file, your camera measures and applies white balance as a reference. But you can change this in Adobe Photoshop, Lightroom, or any other RAW processing software, like Luminar Neo.
There is an issue here, though. If you shoot only RAW, you may have no real reference to the lighting setup in the original scene. You only see the camera’s interpretation of it. A better option is to use one of the techniques above when shooting RAW.
The RAW format gives you more freedom to play with during the post-production phase. But, even with shooting RAW, problems can arise from trying to find an automatic white balance.
For example, when you use mixed lighting. It means there isn’t one light source to base your white balance on. The natural and the fluorescent light in the same scene will fool your camera.
So, it’s your turn to decide which light source to use for the white balance. Choosing the natural light source as the base often results in more realistic pictures.
How Do I Adjust the White Balance in My Camera?
There is no exact answer to this. That’s why I left it to the end. Using the principles in our article, you can adjust the white balance settings on your digital camera. Changing the camera white balance very much depends on the make of your camera and the model.
Professional-level cameras often have a dedicated button to access white balance presets. You can also set a Kelvin value manually. This happens through buttons and dials on the body itself.
You can likely choose presets from a dial or the menu system on lower-end cameras. You can find this in the shooting settings. My advice is to experiment with different white balances on some non-essential photoshoots.
Conclusion: Understanding White Balance
It is important to understand color temperatures and white balance in digital photography. It’s about understanding how the color of light affects how your image looks. By dictating the photography white balance, you can set the mood and feel of a picture.
The automatic white balance mode won’t do this for you. So don’t be afraid to try different settings! Master the exposure triangle first, then study camera white balance as the next step.
As with many things in photography, the more you practice, the more confident you get. So, take the time to practice! We have two great articles about correcting white balance in Photoshop and Lightroom that you should check out, too.


