Corel AfterShot Pro 3 is a desktop RAW editor for organizing photos, making adjustments and exporting finished images. In our original test, we liked its folder-based workflow and highlight recovery. Its controls took some getting used to, especially when we moved between AfterShot and Lightroom.
About this review: First published in October 2023, this review retains our original photographs, screenshots and comparisons. It also keeps the score shown in the existing review. We checked Corel's product and support information on September 11, 2026. We have not run a new hands-on test or a current operating-system compatibility test. The original review did not record the exact AfterShot or Lightroom build numbers.
AfterShot Pro 3 remains on Corel's supported-products list. Its age alone does not mean it is discontinued. However, camera support and computer compatibility need a closer check before you buy.

I have used Lightroom since its first iteration. That experience shaped the comparisons below, but unfamiliar controls are not the same as missing features. This revision corrects our earlier descriptions of shadow adjustment, search, retouching and comparison views using Corel's manual.
For other options, see our Lightroom alternatives guide.


Original test: the city photograph before and after editing in AfterShot Pro 3.
Corel AfterShot Pro 3 Review: Key Features and Benefits
AfterShot brings browsing, editing and output into one workspace. You can work directly from a folder or import photos into a catalogue. Adjustments are saved separately from the original image, and exporting creates a new JPEG or TIFF. Corel explains that workflow in its AfterShot introduction.
The editor includes exposure and colour controls, highlight recovery, noise reduction and lens corrections. It also supports adjustment layers and selected regions, so you can change part of a photo without applying the same adjustment everywhere.
In our test, the main attraction was having file browsing and everyday adjustments close at hand. That made the application feel approachable once we understood the panels. It does not establish that AfterShot is faster on every computer or easier for every photographer.


Original test: the landscape before and after editing in AfterShot Pro 3.
Overview of Specifications
The card below describes AfterShot Pro 3. Its operating-system details are Corel's published requirements, not results from a new installation test.
| Published Platforms |
Published Platforms
64-bit Windows including Windows 11 / Intel Mac / Linux
|
| Compatibility |
Compatibility
See the dated requirements and limitations below
|
| Keyword and Metadata Search |
Keyword and Metadata Search
Yes with catalogue import
|
| Shadow Adjustment |
Shadow Adjustment
Fill Light and Fill Range
|
| Local Adjustments |
Local Adjustments
Layers and regions
|
| Retouching |
Retouching
Heal / Clone / Blemish Remover with mode-specific shapes
|
| Noise Reduction |
Noise Reduction
Yes
|
| Export Options |
Export Options
JPEG and TIFF
|
The latest release listed on Corel's update page is Update 7, build 3.7.0.446, released January 28, 2021. The release notes say to install Update 7 before adding the relevant Canon CR3 camera profile. Profiles are downloaded through Get More. Check your exact camera model; a supported file extension does not prove support for every camera that uses it.
Is there an AfterShot Pro 4 release date? The official product and update pages we checked still identify version 3. We found no verified AfterShot Pro 4 release date in those sources.
Corel's advertised “up to 4x faster” result is historical. Its 2016 benchmark compared a batch JPEG export against Lightroom CC 2015.5 on one Windows 10 computer. That is not a comparison with today's Lightroom, and our review has no recorded timings that would establish a current speed advantage.
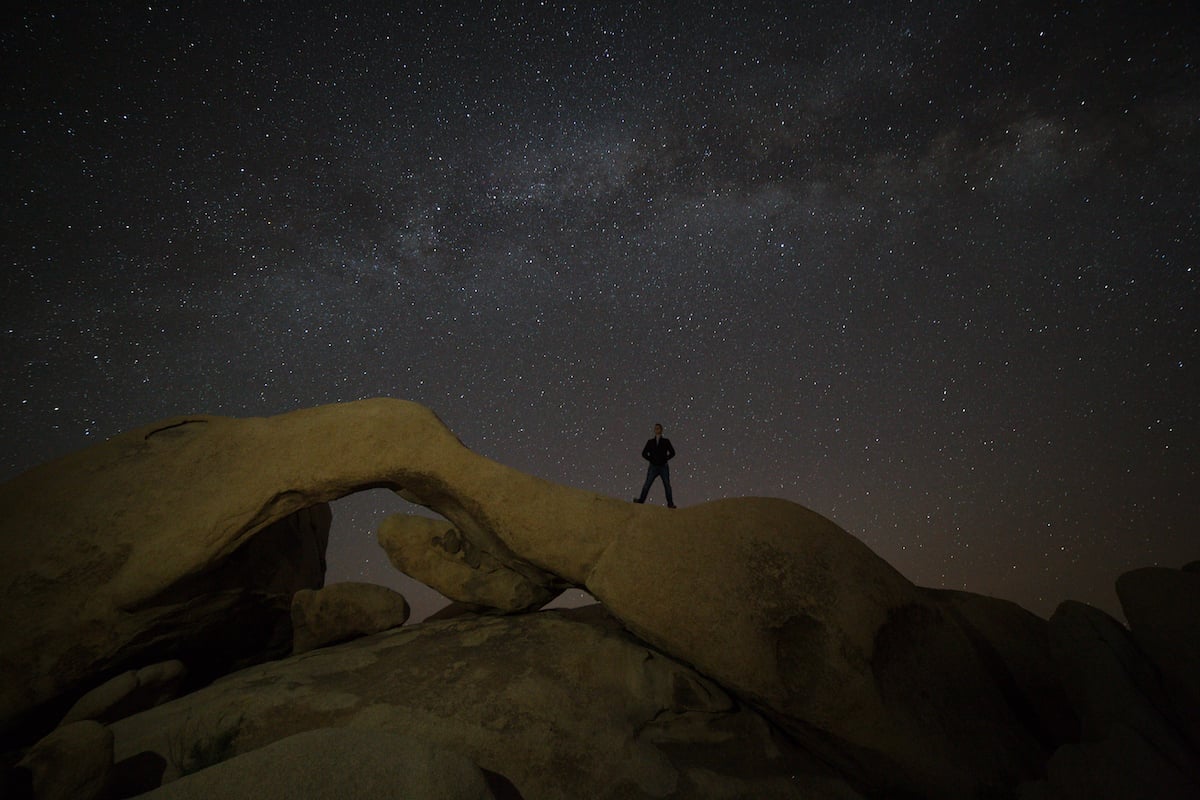
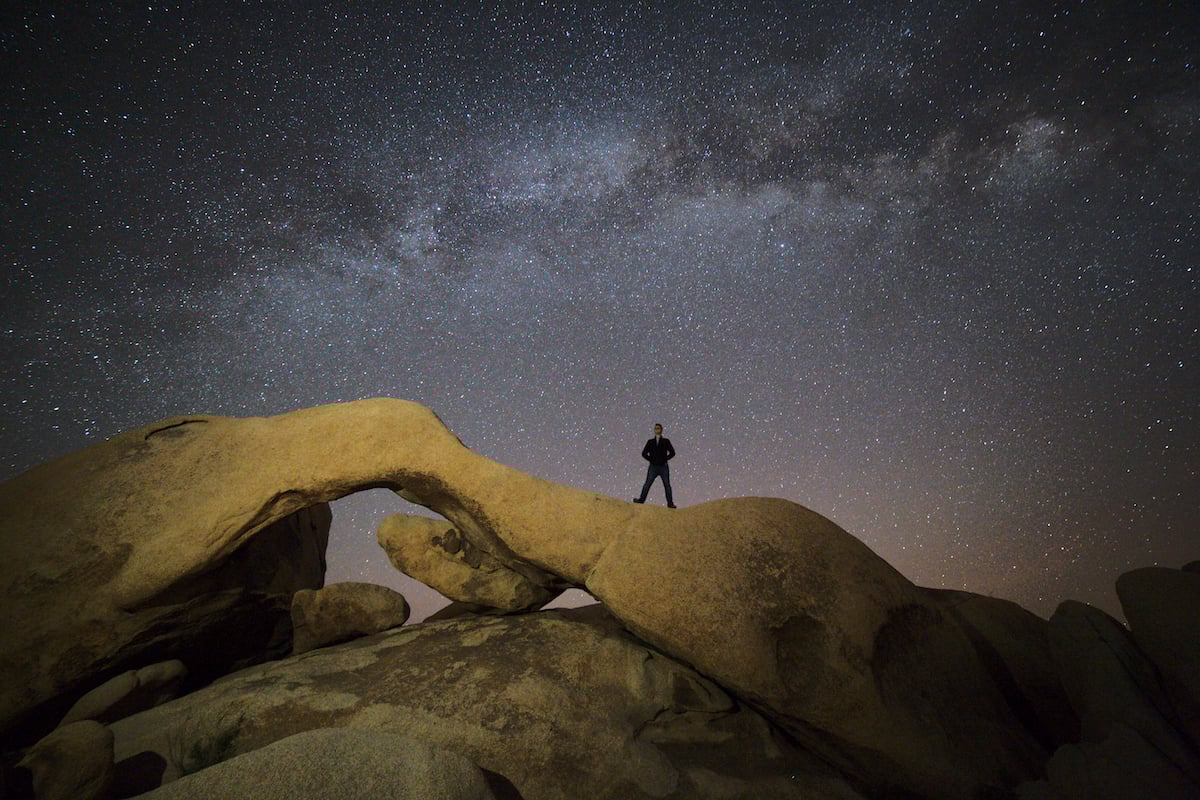
Original test: the night-sky photograph before and after editing.
Main Strengths
The folder workflow was one of the parts we liked most. We could browse photos and start editing without first building a catalogue. Ratings, labels and flags also made it practical to mark selections as we went.
That is useful when you want to select and adjust a folder of pictures in one session. For an archive that you need to search across folders, the optional catalogue has benefits that simple file browsing does not provide. We cover that distinction below.


Original test: the market photograph before and after editing.
Workspace and File Management
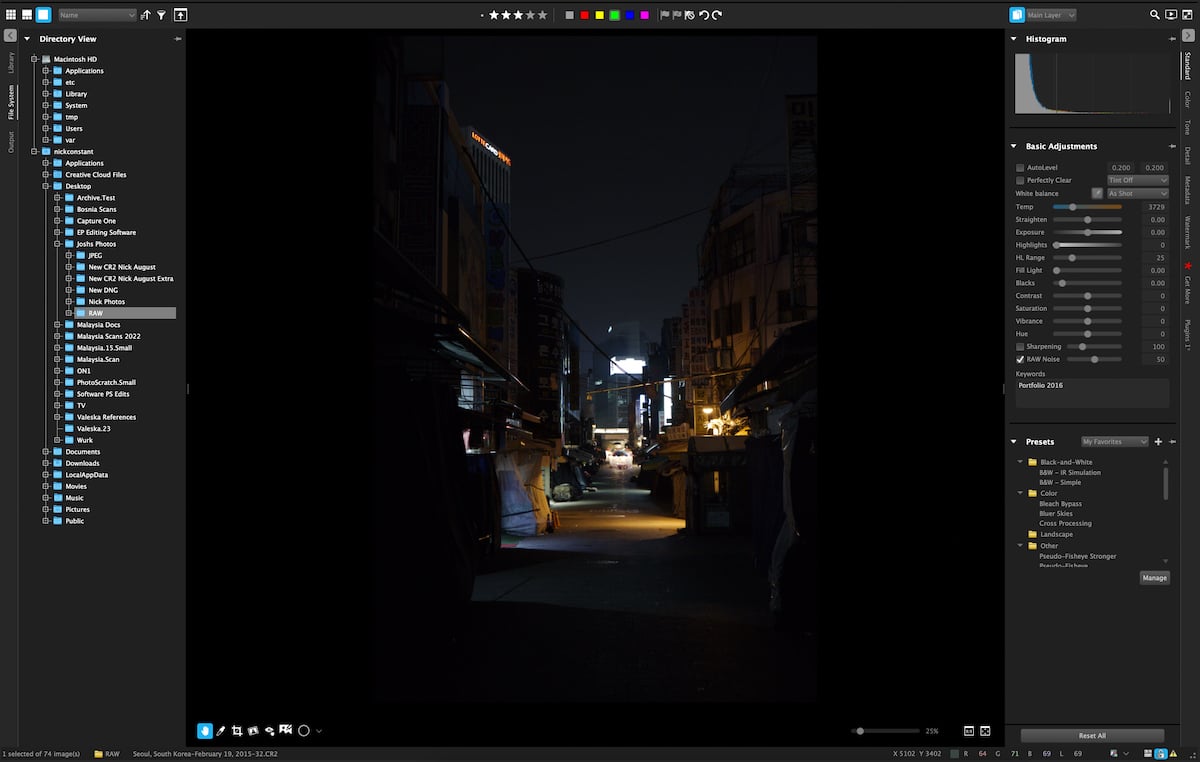
AfterShot's workspace has a familiar arrangement: browsing tools on the left, photos in the centre and editing controls on the right. The left panel has Library, File System and Output tabs. On the right, tabs such as Standard, Color, Tone, Detail and Metadata group the adjustment tools.
I found the large previews helpful when adjusting photos. Panels can be hidden to give the preview more room. The workspace guide also identifies the viewing and search controls, which are easy to overlook when you first use the application.
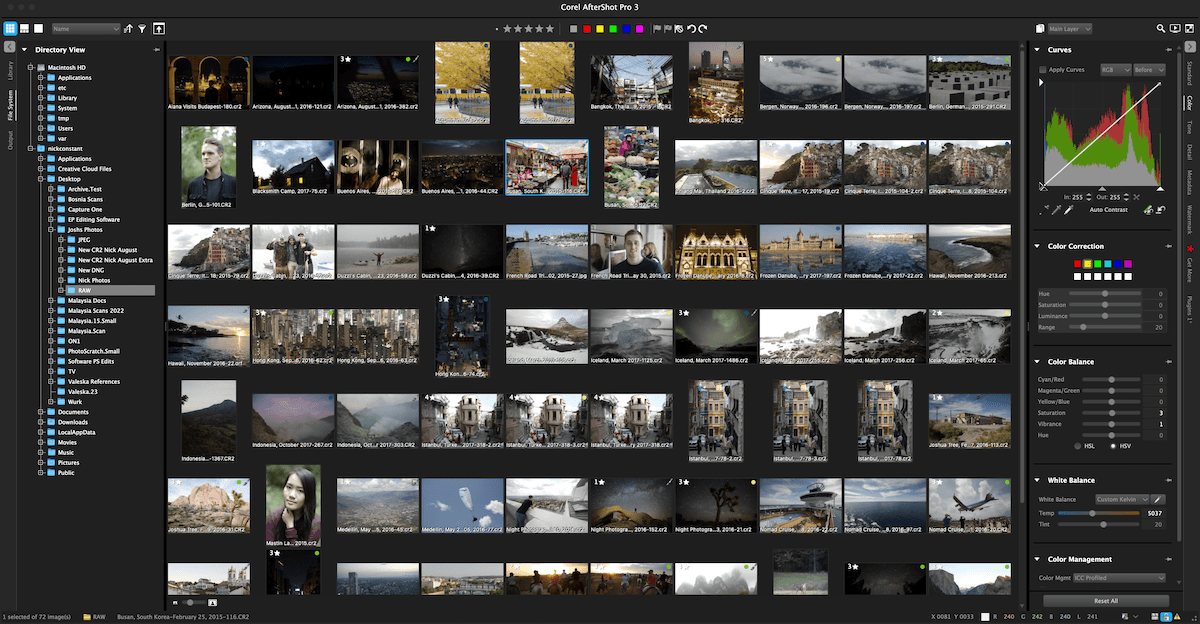
AfterShot Pro 3’s interface
Importing and Organizing Photos
The File System tab lets you navigate to a folder and work on its photos directly. Importing them into the Library adds catalogue features; it is not required just to make an edit.
The original review covered stars, colour labels and flags for organizing selections. The sort menu offered choices such as date, rating, focal length, shutter speed and white balance mode. These controls let you arrange a set of images without moving the files themselves.
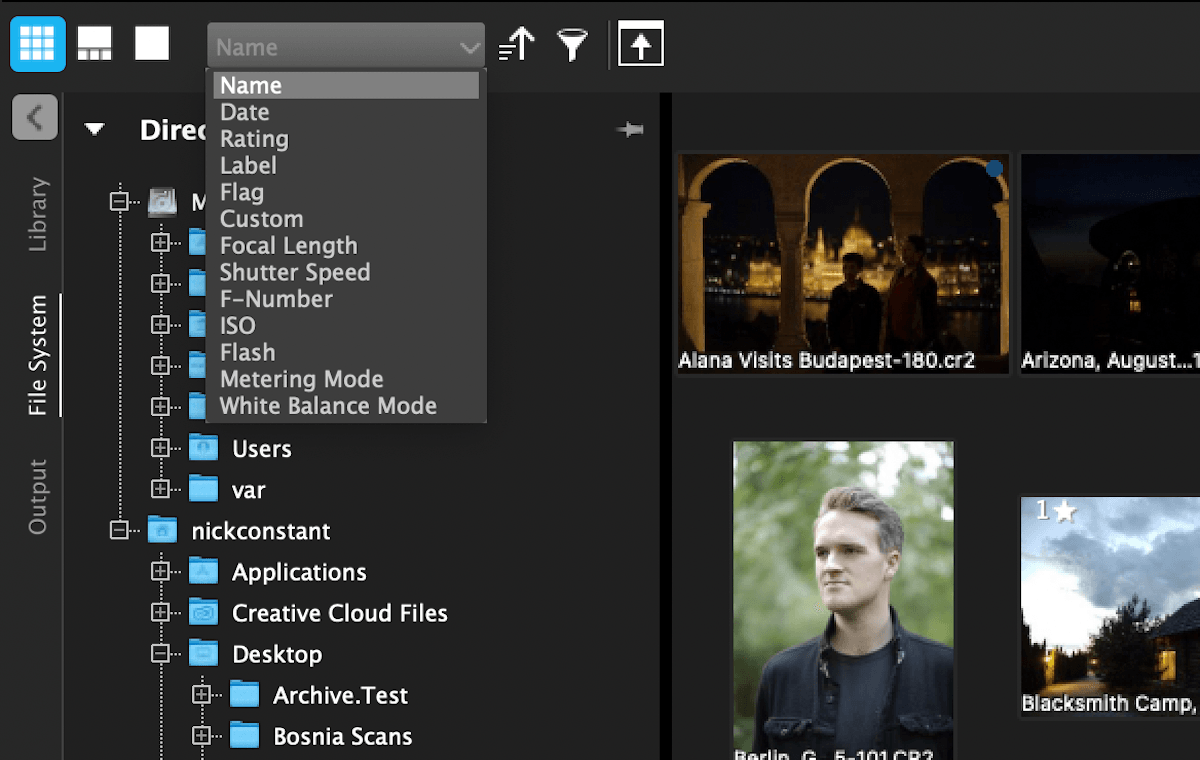
Example of sorting options in AfterShot Pro 3
Viewing Photos
We moved between a grid of thumbnails, a filmstrip and a large preview. Multi-Image View also let us inspect several photographs together, as the original screenshot shows.
Corel documents a limit of six versions in Multi-Image View. It can compare different photos or versions of the same photo. Lock Position and Zoom keeps their viewing position and magnification together. Our earlier claim that AfterShot lacked a useful comparison view was too broad.
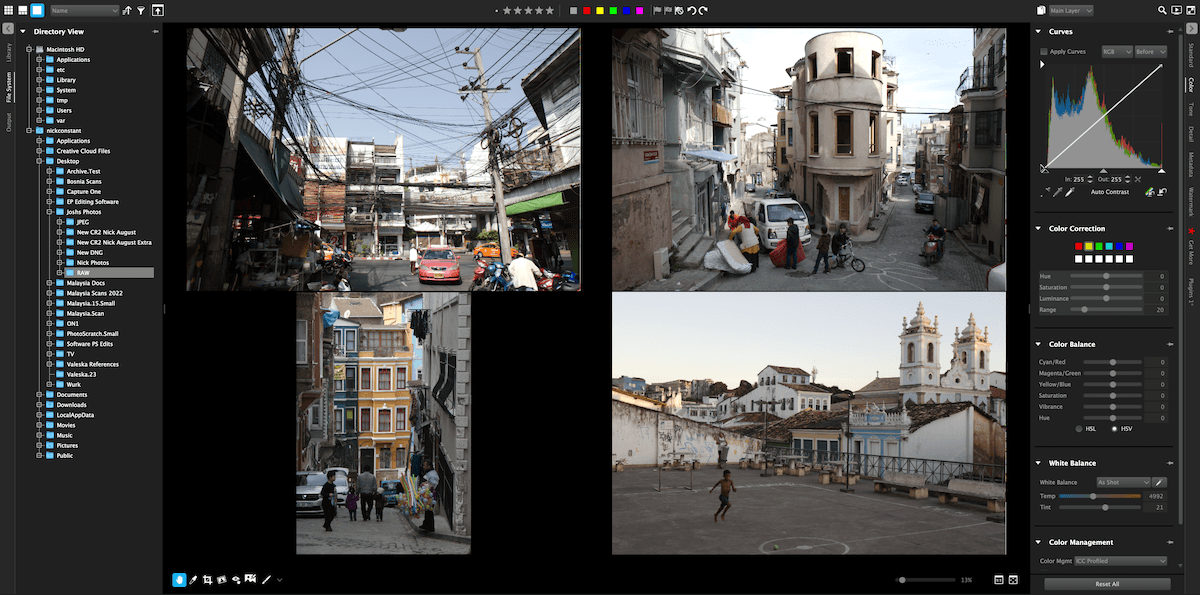
Example of Multi-Image View in AfterShot Pro 3
Search and Sorting Tools
The filter panel shown below narrows a selection by ratings, colour labels and flags. We found that straightforward for a folder of recently reviewed photos.
Filtering is only part of AfterShot's search system. According to Corel's Library documentation, importing photos into a catalogue enables searches by filename, EXIF, IPTC and other metadata. It also enables metadata browsing, offline browsing and an editing history that persists between sessions. Without importing, the editing log is limited to the current session.
Our original criticism of a missing search bar did not account for those catalogue tools. Use file browsing for direct folder access, or the Library when you need to find photos across a larger collection.
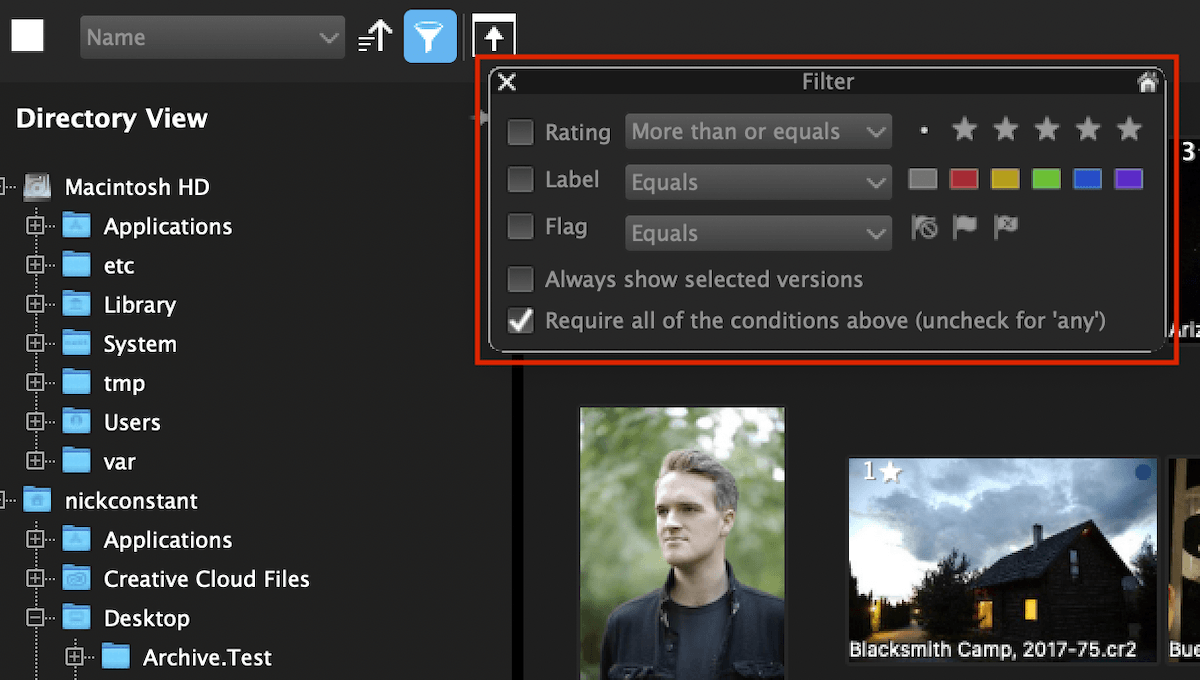
Sorting options in AfterShot Pro 3 of stars, colors, and flags
Image Development
RAW File Processing
The first comparison shows how AfterShot and Lightroom rendered the same courtyard photograph in our original test. AfterShot's version looked flatter and had a warmer, slightly green cast. Lightroom's version looked sharper to us. Those are observations about this example, not a rule for every RAW file.
The next two images are the enlarged crops used in that review, described there as 500% views. AfterShot's crop looked smoother, while Lightroom showed crisper detail. The exact application builds and a complete set of processing settings were not recorded, so these images cannot serve as a controlled comparison of the current programs.




Original comparison, in order: AfterShot render, Lightroom render, AfterShot crop and Lightroom crop.
Basic Editing Tools
AfterShot's sliders and numeric boxes gave us a familiar way to change settings. I particularly liked the large tone-curve display because there was room to place and adjust points.
The original test reported an exposure adjustment of −3 stops in each application. Lightroom's result looked darker, while AfterShot left more brightness in the lighter areas. The settings are not visible in these exports, so treat that value as the reported test setting.


Original exposure comparison: AfterShot first, Lightroom second.
AfterShot does have a shadow adjustment: Fill Light. It brightens dark areas, and Fill Range controls how far that adjustment extends into lighter tones. These controls are documented under Tone tools. Our earlier statement that there was no shadow adjustment was incorrect.
The Blacks control does a different job: it changes the black point. In the original comparison below, we used Blacks 30 in AfterShot and Blacks −75 in Lightroom. The results looked similar in overall depth, but these are different scales and settings. They do not establish equivalent slider behaviour, and they do not test AfterShot's Fill Light control.


Original Blacks comparison: AfterShot at 30, then Lightroom at −75.
Strong saturation and vibrance adjustments looked harsh in some of our test images. I preferred smaller changes. That remains a judgement about the settings and pictures used here; it does not support the original conclusion that AfterShot lacks basic tonal controls.
Preset Support
The built-in presets shown in the original review did not appeal to me. I preferred the option to create a personal preset because it lets you choose which adjustments to include and repeat a look across other images.
Corel's preset instructions describe using Add Preset after an edit, then managing presets in folders. That is a practical way to reuse a set of adjustments without treating every photograph identically.
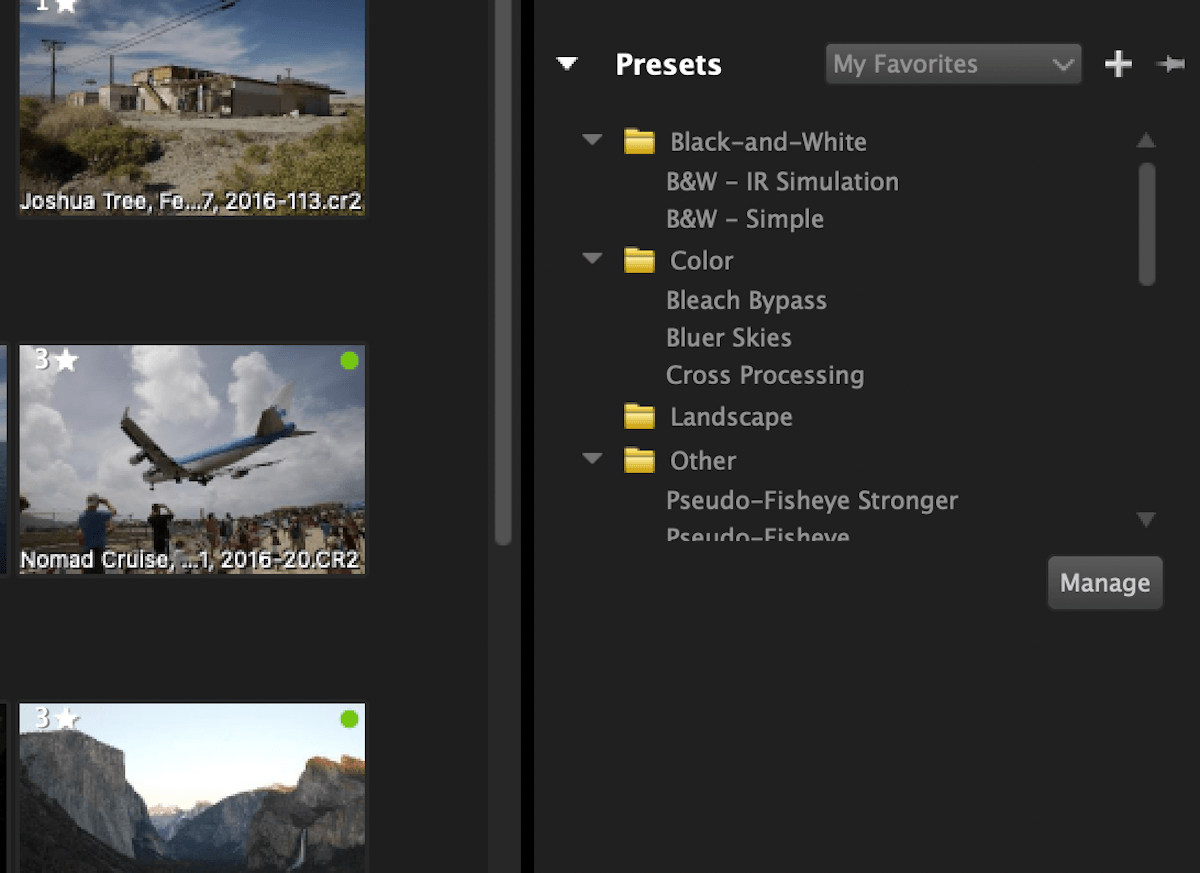
Example of presets in AfterShot Pro 3
Photo Manipulation Tools
In our original retouching test, we used circular regions and found the layer controls less direct than we wanted. Placing a circle and then adjusting its size took some practice. The screenshot below shows a circle on a Heal/Clone/Blemish layer, with Blemish mode selected.
That experience did not justify saying that all retouching was limited to spots. Corel's retouching manual makes a distinction:
- Heal uses circular regions and does not require a chosen source.
- Clone copies content from a source region into the selected destination.
- Blemish Remover supports Circle, Polygon and Curve regions. The manual explicitly excludes the Brush Region tool from Blemish mode.
For local adjustments, the separate selective-editing tools include a Brush Region tool as well as circles, polygons and curves. The available shape depends on what you are doing. We have not run a new test of those additional retouching shapes.
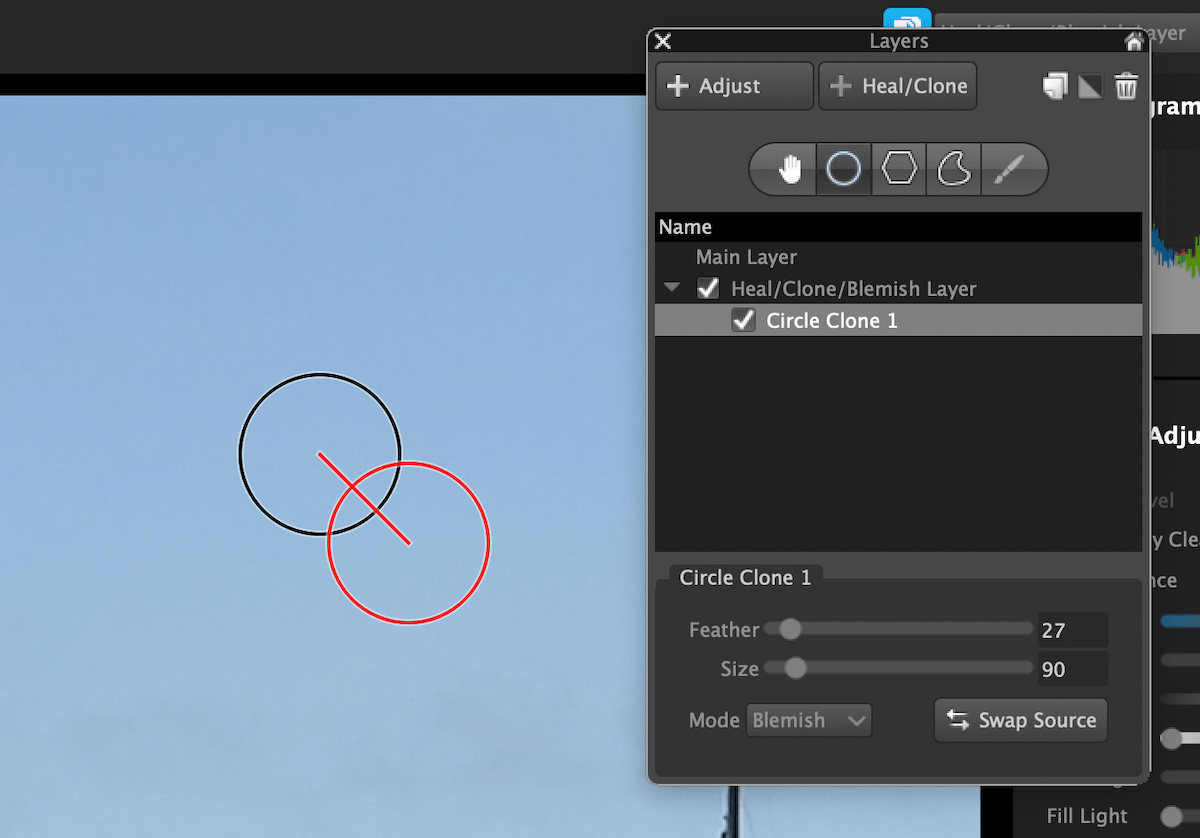
Example of Layers the Heal/Clone tool makes
Variety of Image Editing Views
For the original before-and-after example below, we created another version of the photo and displayed the two side by side. That let us compare the brighter edit against the original rendering without replacing the source file.
Corel calls these copies versions. Each can have its own adjustments and metadata, as described in the versions guide. Use Multi-Image View to compare them, then lock the viewing position and zoom when you want to inspect the same detail in both. A different layout from Lightroom does not mean the comparison function is absent.
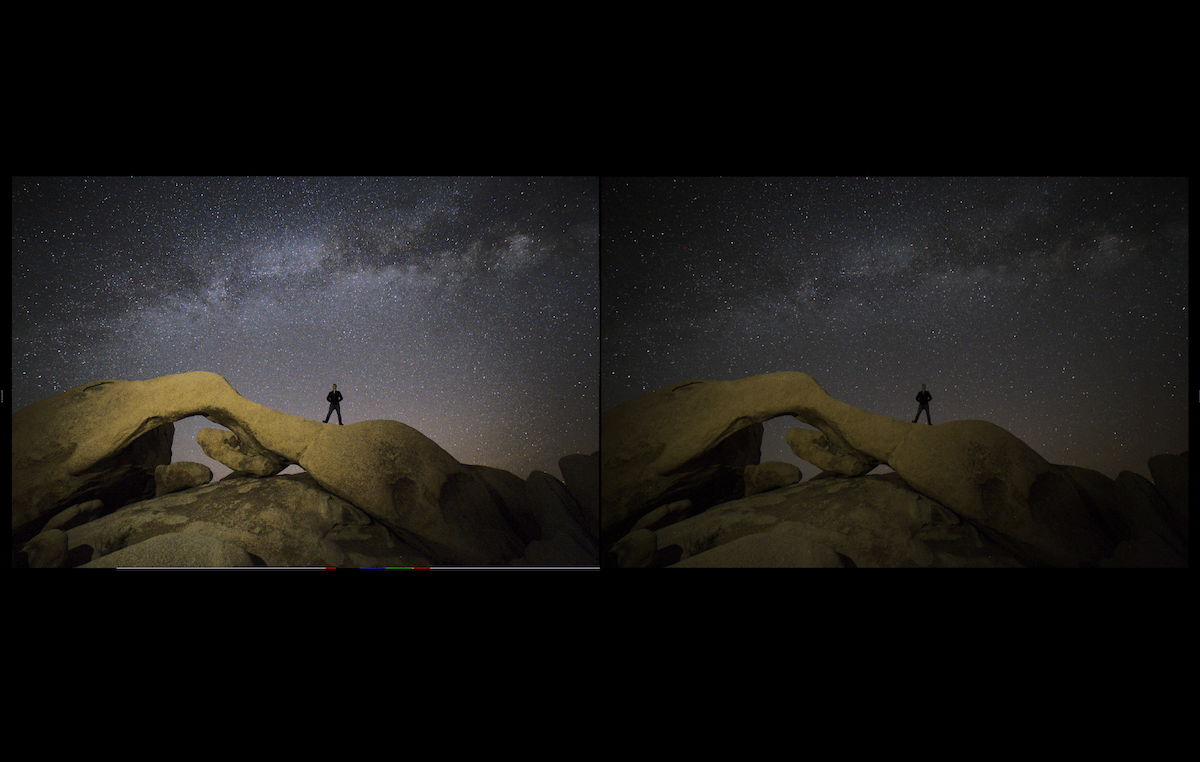
Digital copy in Multi-Image View compared with an unedited version
Advanced Editing Features
RAW Noise Reduction
In the original test, we used RAW Impulse Noise Removal and the RAW Noise and Threshold controls. AfterShot smoothed the noisy areas, but some detail also became softer. I preferred Lightroom's result for the roof and sign in this example.
These are the original before-and-after crops. They do not compare current AI noise-reduction features or establish which application now performs best. For a wider set of options, see our noise-reduction software guide.
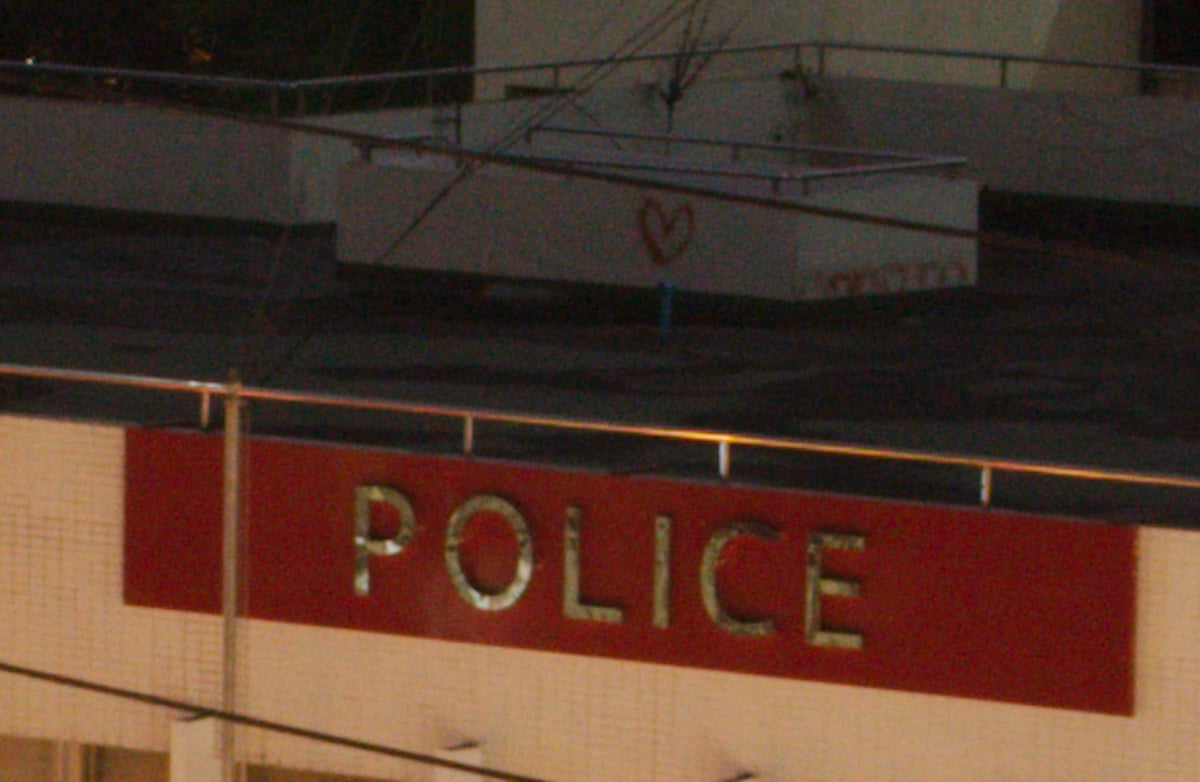

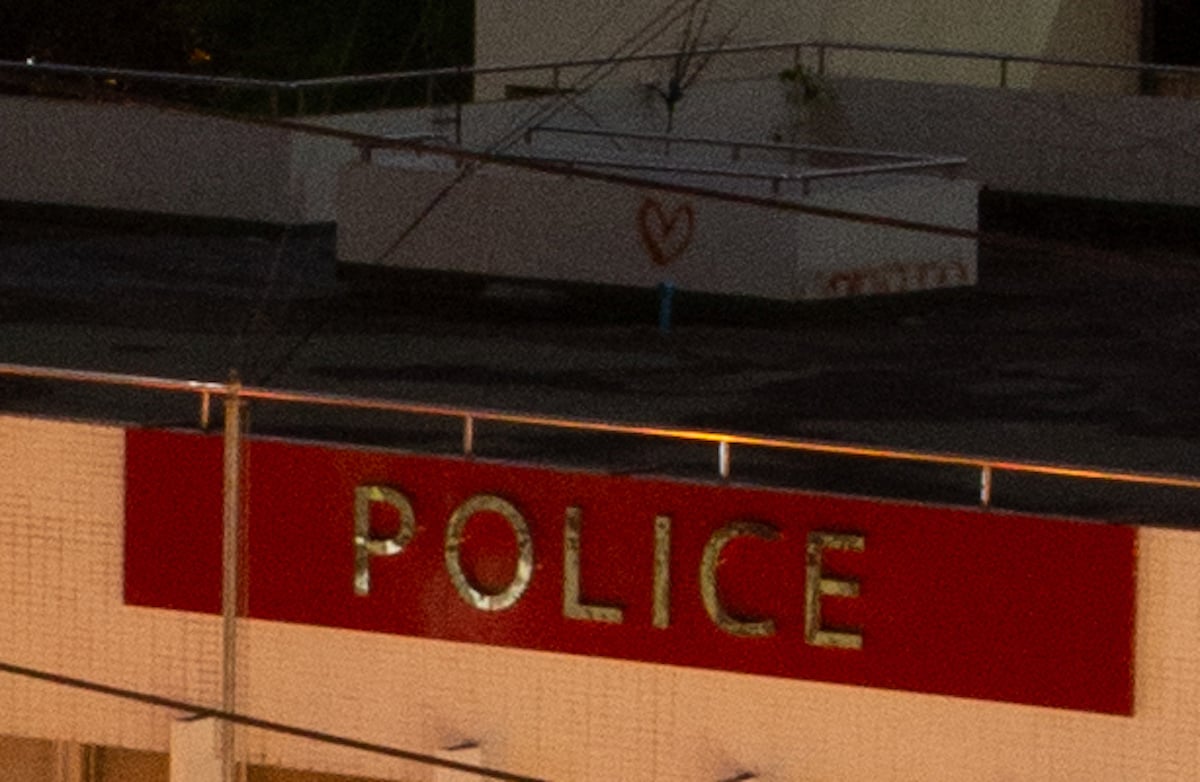

Original comparison, in order: AfterShot before and after noise reduction, then Lightroom before and after.
Highlight Recovery
Highlight recovery was one of my favourite tools in the original test. In the photograph below, AfterShot brought more structure into the bright area around the mountain while leaving the brightest part of the sky white. Lightroom's version made that part of the sky look greyer.
That made AfterShot's result more appealing to me in this example. It does not prove that its highlight recovery leads the market, or that it can restore detail that the camera did not capture.
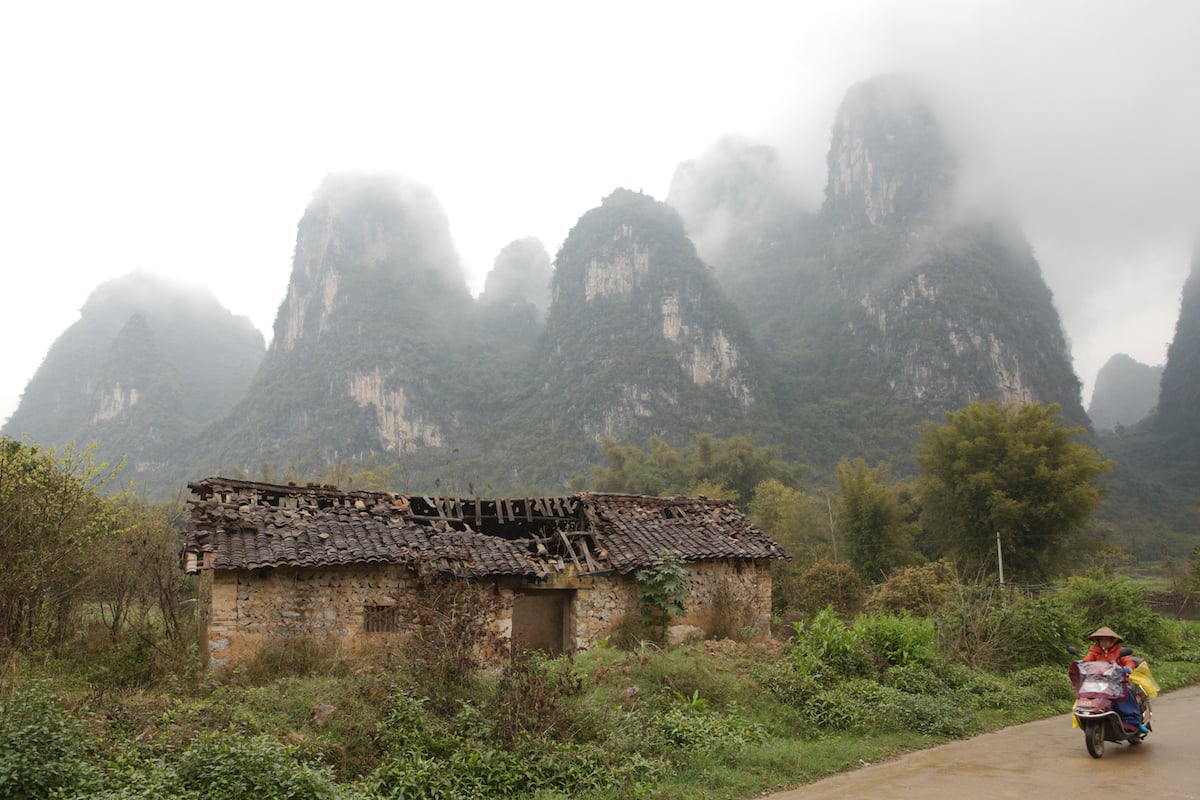
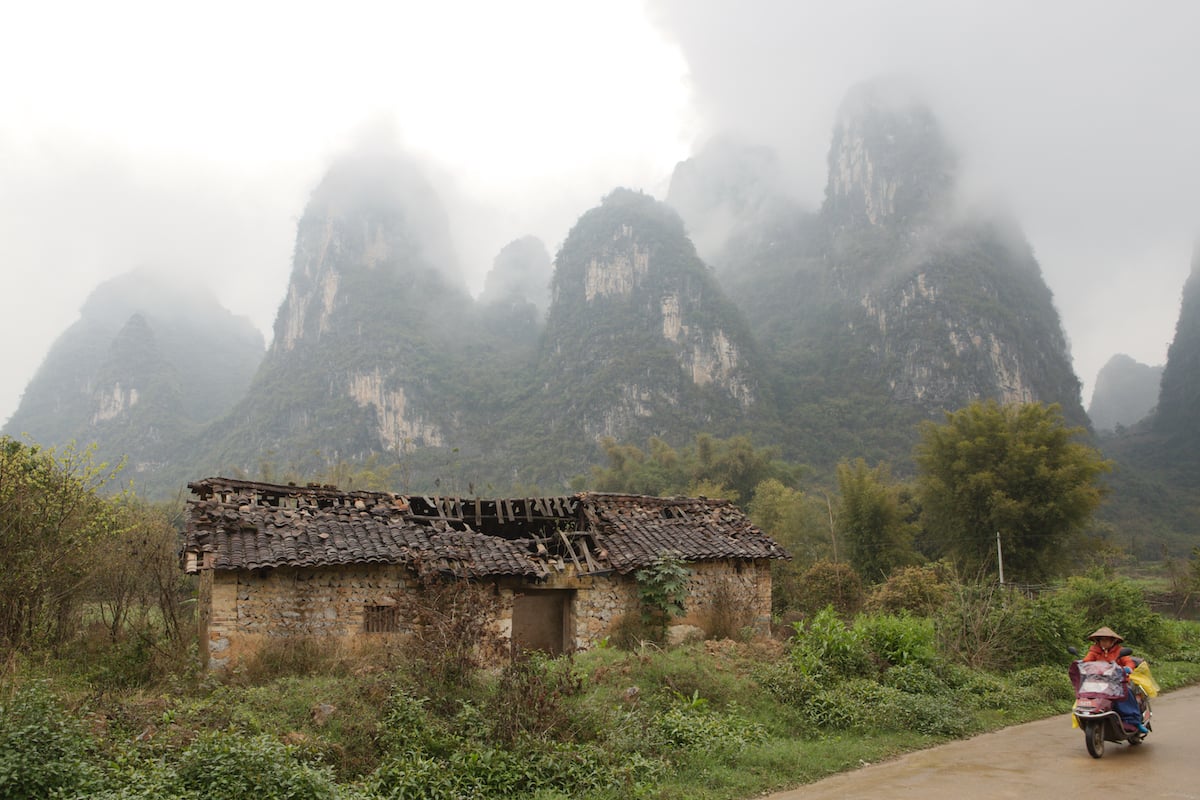
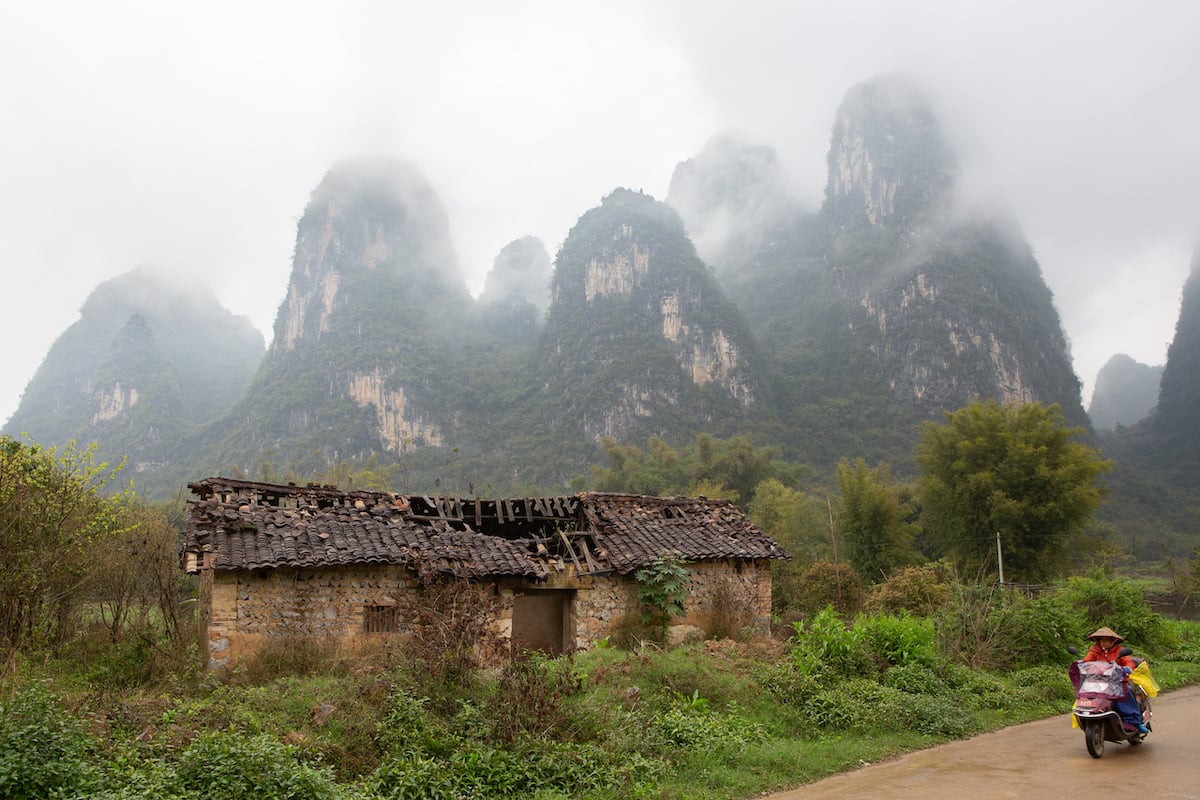
Original comparison: the unadjusted image, AfterShot's highlight recovery and Lightroom's highlight recovery.
Lens Corrections
The Lens Correction panel offers profile-based adjustments and manual controls. Our original screenshot includes options for chromatic aberration and vignetting. It also displays “Uncalibrated Lens” for the selected equipment, so it would be wrong to present this image as proof that a matching correction profile was applied.
Check the exact lens and camera combination before relying on automatic correction. Corel documents downloadable camera profiles in its update instructions, but that does not guarantee a matching lens profile for every setup. A profile list and a successful edit with your own file answer different questions.
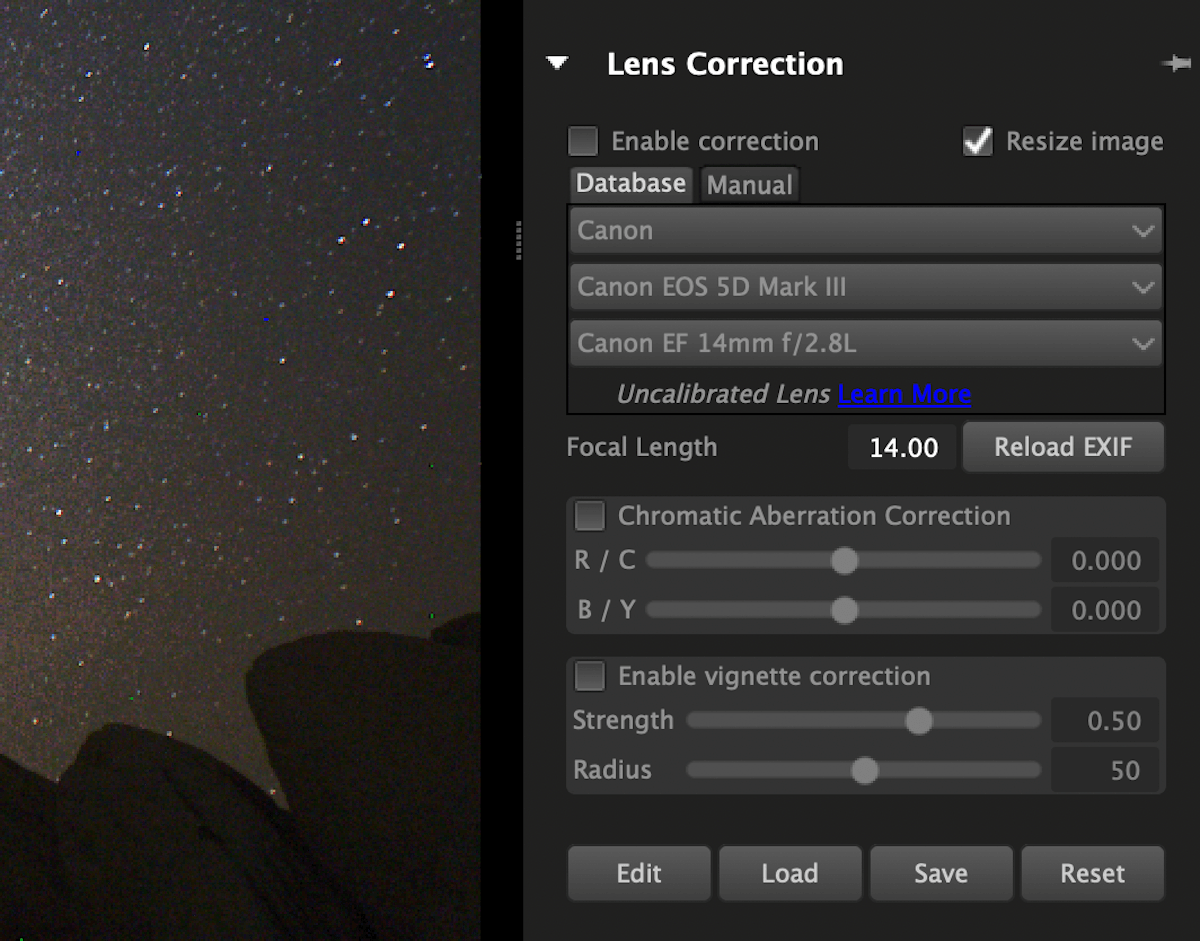
Lens Correction panel showing customizations available
Watermarking
The paraglider photograph below shows a text watermark from the original review. The watermark controls let you place, size and rotate it, with the option to save settings for later output.
A name or logo can identify your work when you share it. It does not prevent someone from copying the image. Keep that purpose in mind when choosing the watermark's size and placement.

Exporting and Sharing Images
AfterShot offers JPEG and TIFF output. In the original review, I liked how the export window organized choices for image size, naming, metadata and additional image settings. Presets let you repeat a set of output choices.
AfterShot also supports batch output. Corel's Quick Start guide describes selecting thumbnails and sending them to an output batch. This is the workflow to evaluate if your main task is preparing a folder of finished images.
The screenshot is from our original test. We have not checked current third-party sharing services or their account connections.
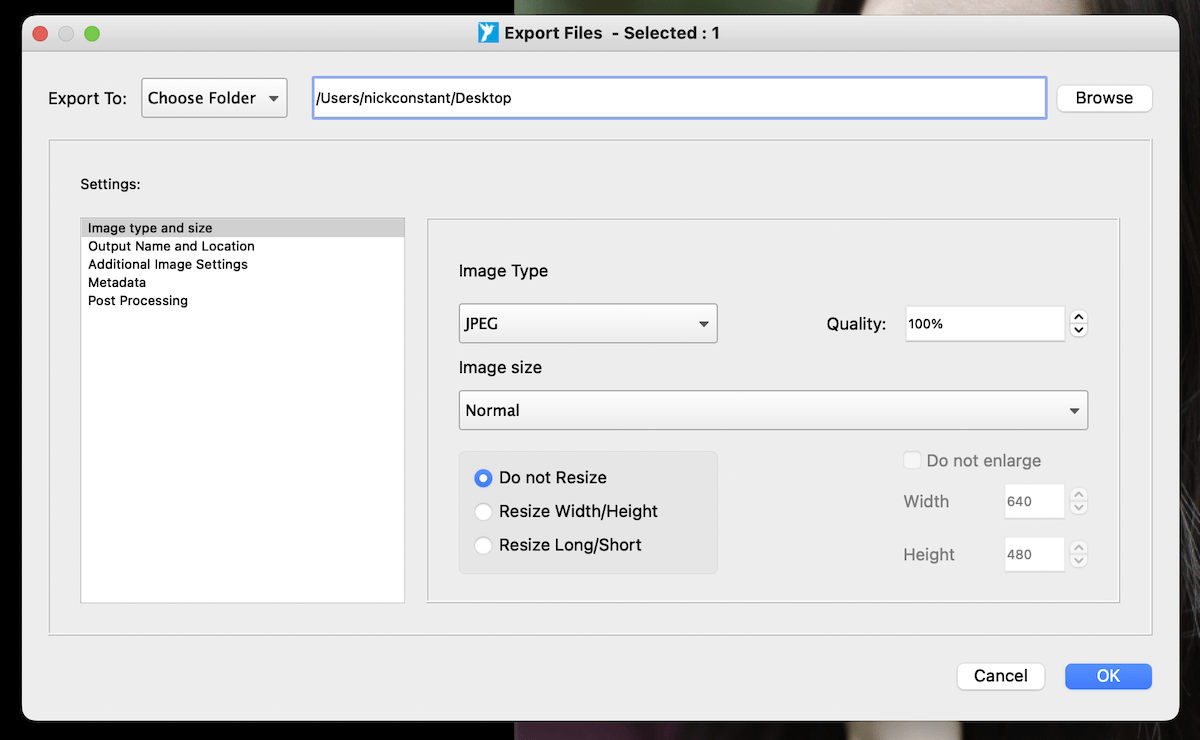
Exporting window in AfterShot Pro 3
Computer, Smartphone and Tablet Compatibility
Corel's published requirements list 64-bit Windows 11, 10, 8.1, 8 and 7. For Mac, they specify Intel hardware and OS X 10.9 or later, explicitly including 10.15. Linux is also listed, with Fedora 19 or Ubuntu 14.04 or later.
These published requirements contain old platform references. They do not establish that AfterShot works on every later macOS or Linux release, or on an Apple silicon Mac. We have not tested those combinations. Confirm your exact operating system, processor and RAW files before buying.
The product is presented as desktop software for Windows, Mac and Linux. The official pages we checked do not establish a native iPhone, iPad or Android version. A Windows tablet is a separate case: assess its hardware and Windows version against the desktop requirements, rather than assuming all tablets are unsupported.
AfterShot Pro 3 Purchase and Support
On September 11, 2026, Corel's current catalogue led to a checkout listing for AfterShot Pro 3 (Windows/Mac/Linux) as an electronic download. This confirms the exact product was being offered for sale at the time of our check. We did not complete a purchase or test activation.
AfterShot Pro 3 is sold with a perpetual licence rather than a required recurring subscription. That does not promise every future upgrade or indefinite compatibility. Corel's support policy distinguishes an ongoing right to use a version from its ability to keep working as hardware and operating systems change.
Corel currently lists AfterShot Pro 3 as supported, while the latest listed application update is from 2021. Those facts can both be true. Neither an old release date nor a working purchase page proves compatibility with a new camera or computer.
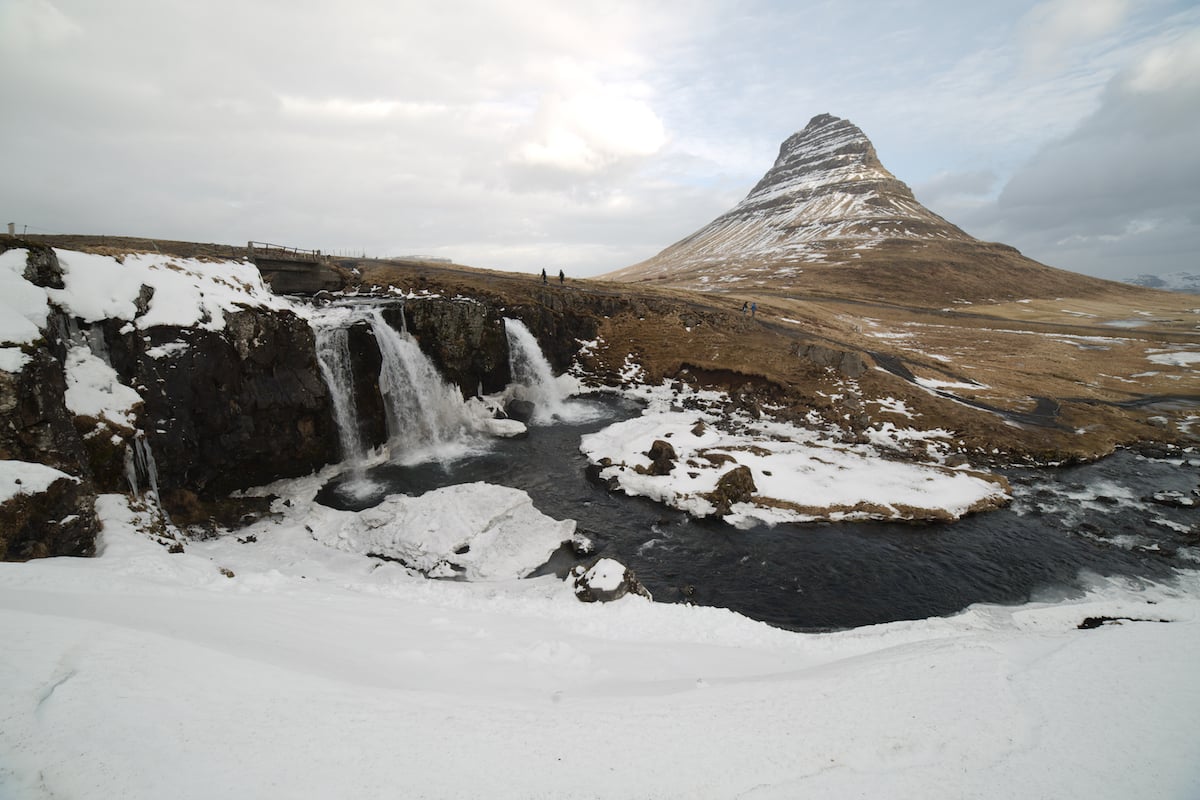
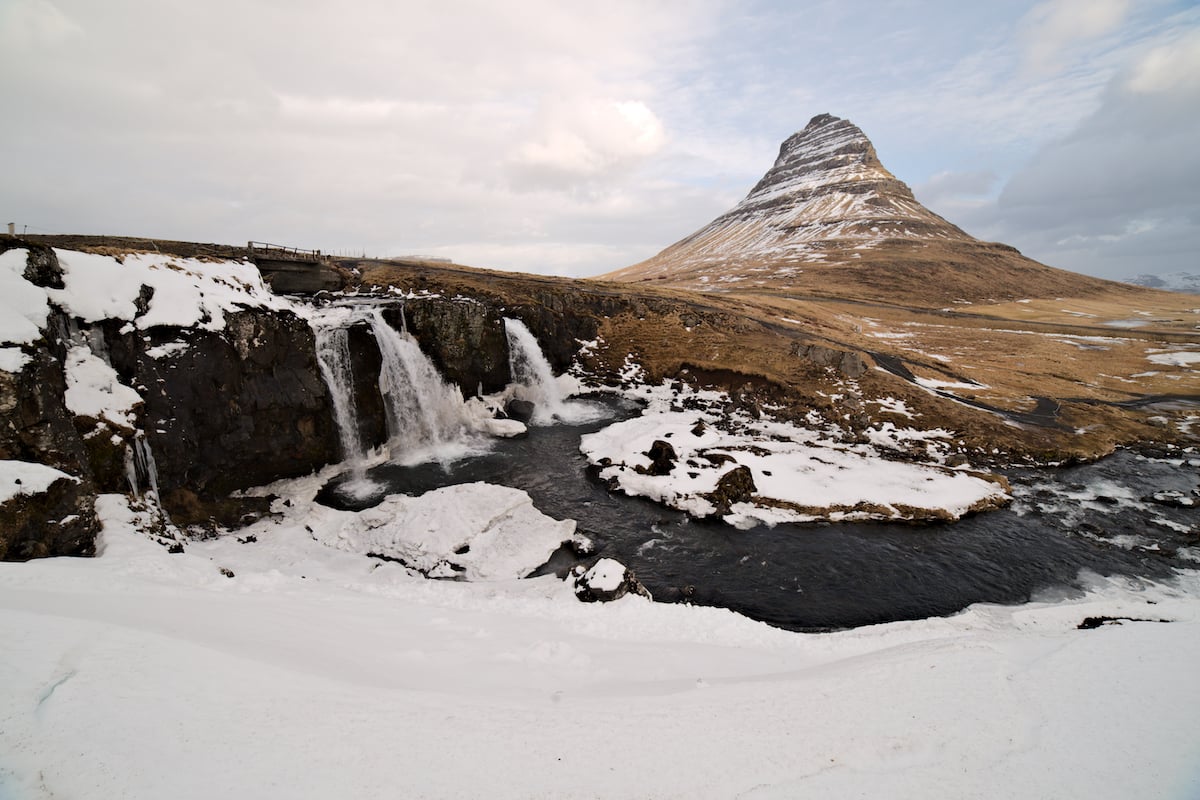
Original test: the waterfall photograph before and after editing in AfterShot Pro 3.
Alternatives to AfterShot Pro 3
Adobe Lightroom
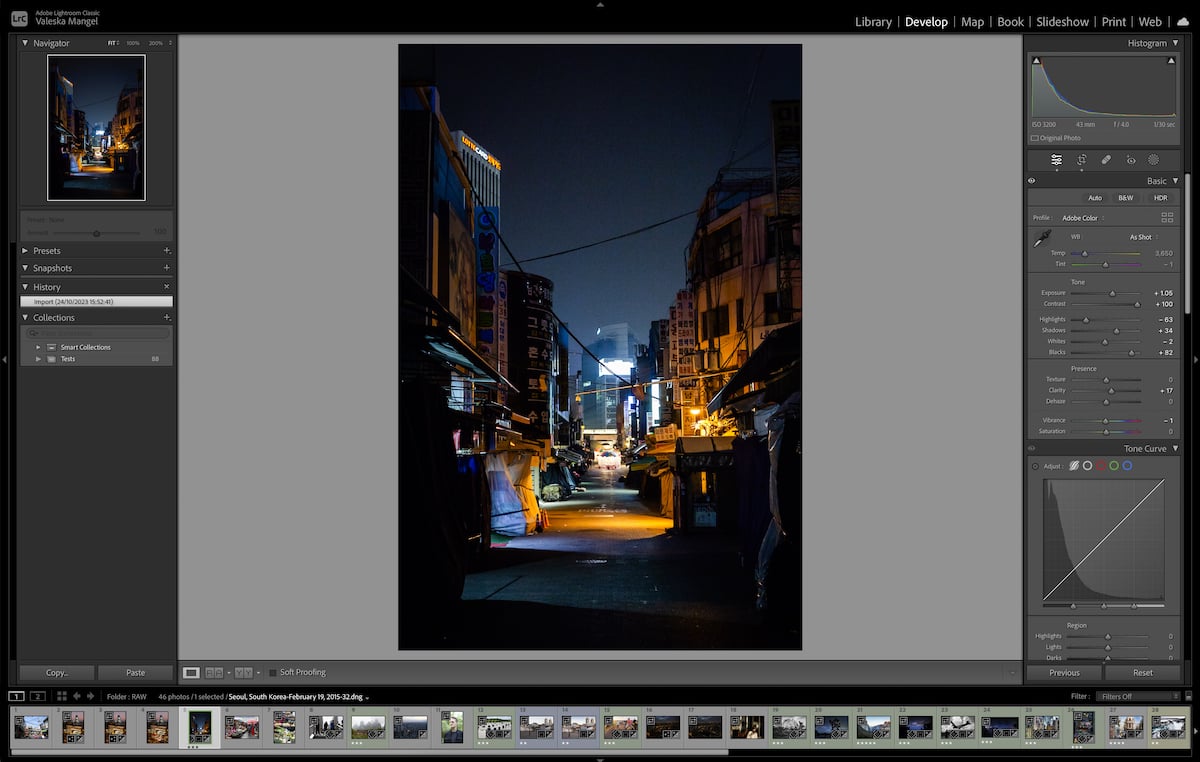
Our original comparison with Lightroom showed different renderings and controls rather than a single winner for every task. I preferred Lightroom's detail and noise-reduction results in the examples above. AfterShot's highlight recovery and direct folder workflow were the parts I liked most.
The two applications also use different names and scales for some adjustments. AfterShot's Fill Light is a useful example: overlooking it made our original assessment of shadow editing unfair. Judge each program's results and workflow after learning the relevant controls.
The screenshots below show the versions used for the original review. Read our Lightroom review for its separate assessment, or our Luminar Neo review if you want to consider another editor. The old speed benchmark above does not rank these applications today.
Final Verdict for AfterShot Pro 3
AfterShot Pro 3 gave us a useful combination of folder browsing, photo selection and RAW editing in the original test. Highlight recovery stood out in one difficult image. Other controls took longer to learn, and I preferred Lightroom's rendering in some of the comparisons.
Our earlier criticisms of missing shadow controls, search and comparison tools were not accurate. The corrected sections explain those features. Retouching also has more region options than our original description allowed.
The existing review score is unchanged. It has not been recalculated after these documentation corrections or validated in a new test. In particular, the tool and value ratings should not be read as a fresh comparison with current software. Use the image results and corrected feature descriptions alongside that retained score.
| Measurement | Score |
|---|---|
| Workspace | 76 |
| File Management | 81 |
| Raw Processing | 75 |
| Importing Exporting | 78 |
| Basic Editing Tools | 63 |
| Manipulation Tools | 67 |
| Advanced Editing | 65 |
| One-Click Editing | 65 |
| Range Of Tools | 69 |
| Value For Money | 82 |
| Total Score | 82 |
Who Do We Recommend AfterShot Pro 3 For?
AfterShot is worth assessing if you want to browse folders, rate photos and make RAW adjustments in one desktop application. The original examples show what we achieved with it and where we preferred Lightroom's results.
Before you choose it, confirm support for your camera, lens and computer. If the trial offered on Corel's product page is available for your system, use your own files to check the workflow. An existing user's successful setup is more useful evidence than an old minimum specification for a different machine.
The strongest case for AfterShot is a workflow you have tested and prefer. This review does not establish that it is the best current choice for every beginner, professional or older laptop.