If you shoot portrait photography at all, you’ve most likely considered getting into corporate headshot photography to expand your client list. One of the big advantages to shooting business headshots is that a client will typically have you do multiple portraits in one session. This means it’s a higher-paying shoot for you.
Corporate Headshots and Portraits
Setups are usually quick and editing is minimal. These types of jobs tend to be great for a business’s bottom line! Speaking of budgets, another advantage of working in corporate photography is that budgets tend to be bigger. You’re working with corporations, after all.
The process leading up to a shoot and the nuances of how to setup, execute, and deliver business headshots session can take a bit of time to learn, though.
Before we dive into headshot lighting, poses, and gear, let’s start by looking at how to first connect with corporations about potential photo shoots.
How to Connect With Corporate Clients
Getting corporate headshot jobs can seem challenging. The first step is always to develop a relationship with your ideal client. Early on in your business, you’ll most likely need to be the one to reach out to companies. Later on, companies may contact you directly for quotes.
Unless you have an existing contact that can do an introduction with the appropriate person, you’ll want to seek out the person in charge of marketing for the target client.
Marketing departments are typically the ones who take care of any professional photos needed for the website or a given campaign.
Give them a call or send an email. Be friendly, but direct. Let them know who you are, what type of session you’d like to do for their employees. Offer to send them information about your business to continue the conversation.
The initial contact is not the moment to do a sales pitch. Treat it as an initial ‘Hello’ to begin the discussion.
Before committing to a quote or a scope of work, be clear on what the client needs from you and what you’ll need to provide it for them. This can include how many individual shots, how many group shots, if they have a preferred backdrop or location, and required time frame for shooting and delivering.
If needed and possible, do a walk-through of the space where you’ll be shooting. That way, you can accommodate for any challenges. This is also where speaking with the marketing director can be helpful. They know what look the visuals need to have!
Whenever possible, schedule photos all in one day and during the morning. Most employees will be tired and may look less photo-ready after a full day of work.
Aim to have photos taken before lunch break, even if that means breaking it up into two morning sessions on back-to-back days. If you end up needing to do two visits to the location, account for that travel time and cost in your quote.
Shooting in an office setting often means that you’re subject to whichever space is available during the shoot time. Let’s take a look at different possible setups that you’ll encounter. We’ll go through how each space should be approached when it comes to lighting.

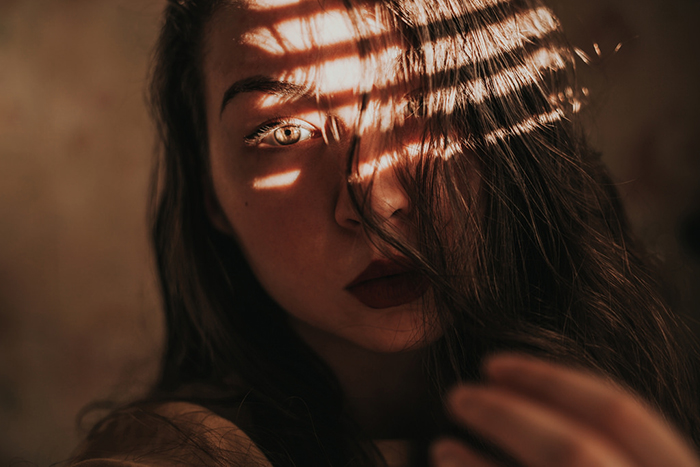
Indoor Setup With Natural Light
If you’re a beginner, this is the best setup to aim for until you get comfortable introducing lights. Make sure the light hits them in a flattering way. This is typically with the window at approximately 45 degrees from their face.
Once you find a good spot for them, you can begin getting them into a good body position and posture for the actual photo. Poses can vary depending on gender, height, weight, stature, and physical features. Feel free to experiment until you find the best one.
You may need to bring along a scrim to help diffuse the window light if the sun is too strong. A white sheet can also do the trick.
If you don’t happen to have anything to diffuse the light, another option is to move your subject farther away from the window. That way the light begins to soften and fade until it falls more flatteringly on them.

Indoor Setup With No Natural Light
It’s not uncommon to be asked to shoot in a room with no windows and terrible overhead lighting. This calls for a quick studio setup that can provide simple, yet effective, lighting for business headshots.
First you’ll want to find a blank wall to use as backdrop. You may need to bring a portable backdrop to set up. If you decide that you need to put up a portable backdrop, you’ll need a stand, background paper in your color of choice, and several clamps to keep the backdrop paper in place.
You can find kits online, but many local photography rental shops also offer these kits for rent.
When setting up lights, you’ll want a minimum of one key light (main light) with a diffuser such as a soft box. You’ll set this up at approximately 45 degrees from your subject. Then find the perfect angle to position them and the light just as you would by the window.
Remember that the first subject is usually the most experimental. Once you find the sweet spots for good angles, the pace will quicken between subjects.
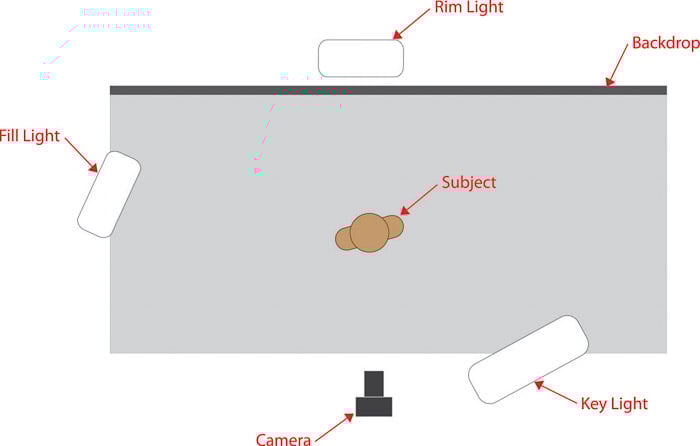
If you have a second light, you can set up either a rim light (from behind the subject to define them from the background) or a fill light (on opposite side of subject as the key light, but softer so it helps fill in shadows). Ideal setup would include all three, but excellent work can be produced with one or two lights only.
Below is a simple diagram that shows where these lights would be located.
Shooting Outdoors
Outdoor business headshots are handled exactly as any other outdoor portrait session. You’ll want to make sure that the look of outdoor portraits is in keeping with your client’s brand. You’ll also want to discuss any specific requests for lighting or locations.
When scouting a location, always look for areas of bright shade or what elements you would want in the background.
You can absolutely just use natural light. Incorporating a reflector or a single flash unit, however, will often help to add a bit of polish. If you’re just using natural light, you’ll want to make sure that the light on your subject is even. Often, this means finding that bright shade or making sure the sun is facing towards the backside of the subject.
Keep in mind that if the sun is facing the side or backside of your subject, you may need to use a flash so as to avoid having to overexpose the background.
If you’re adding in strobes or flashes, you’ll want to keep the setup simple. It should be as mobile as possible. The simplest setup is either just a reflector to help fill in shadow, or a single flash so that you can more evenly expose your subject with the background.
If using a flash, expose for the background. Let the flash be what lights up your subject. This is where having great background elements can play a big role in the overall look of the portrait.

What Camera and Lens Should You Use?
I’m a firm believer that the actual camera body you use doesn’t have a major impact on most photo shoots. Rather, it’s all about the lens!
For corporate headshots, as with all commercial work, you’ll just want to make sure that the camera you’re using can produce photos in the setup you have without graininess. If shooting with no windows, this means it should be able to handle low light very well.
When it comes to lenses, it’s best to have one that can open up wide. This means you can set the aperture to something in the 1.2 to 2.8 range. If you’re just starting out with photography in general, a good low-budget option is a 50mm/f2.8 lens.
If you have the budget to upgrade, something like the 24-70mm/f2.8 is a great range to have. It allows for wider shots when it’s a group, while also being great for individual photos.
My most highly recommended lens for portraits is the 70-20mm/f2.8. The only setback is that it requires you have a healthy amount of space between you and subject. Also due to its long reach, the compression is greater than with wider lenses. And the bokeh created with shallow depth of field is much softer.

Conclusion
Taking business headshots of any kind can be just like any other portrait session, but it does have its nuances.
Communication with the client is just as important as with any other client. Walk-throughs of the shoot location and clarity on branding are extremely helpful as well. These little aspects will ensure that your corporate client will come back to you for future photo needs!