These days, "headshot" can mean anything from a photo of the person’s head to casual portrait photography. A traditional headshot is tight on the subject and doesn’t show any of the body.
It can be overwhelming to figure out how to pose a single subject.
Not all headshot poses are the same. Corporate headshots are different from those you’d take for an entrepreneur or other professional, for example.
Let’s review some ideas on how to pose for a headshot.
1. Headshot Poses: Posture Is Key – Here’s Why
Let’s start with basics – good posture. Regardless of what pose you’re going for, it’s your job to keep an eye on your headshot client’s posture.
Give them gentle reminders to check their back and shoulders. This way they won’t start slouching.
A proper posture will help keep your client looking professional and polished. These photos are for professional use, after all.
A great simple direction to give to your clients is, "Keep your shoulders back and chest out. I’ll remind you between poses to check your posture."
Making sure the posture is strong is a great tip on how to pose people for headshots.
Mind the Chin
While we’re talking about posture, it’s important to keep an eye on the chin. Often, the chin will go up too high. This results in your client looking down at the camera.
You see too much of the neck, and the eyes and face look small in comparison. The chin needs to move down a bit, but be careful to avoid double chins forming from it moving down too far.
Tell them to lower their chin slightly down, while also moving their face straight forward a bit.
Clients often say it feels like they’re a turtle coming out of its shell! But it’ll get you the right photo.
While this move can feel strange, it can work wonders in photos. Wait until your client has followed this instruction. Then can adjust their face to find an ideal angle for them.
Often, adding a slight tilt to the head or slight movement of the chin to either side can make a big difference! For business headshot poses and headshot posing alike, this is very important.
Chin is slightly down and turned to her right. This opens up her face to the camera and gives a defined jawline.
2. Get Your Clients Moving to Get Them Comfortable
Nothing loosens up a photo subject quite like having them take action. This can mean anything from holding an object in their hands to dancing.
As long as it feels appropriate for a professional portrait. This means that if they hold an object, it should relate to their profession somehow.
If they’re jumping, it should align with their branding. Same goes for any other unconventional photo activity.
Some common requests to get your client moving are to have them walk towards the camera at a natural pace.
Or to chat with you about something. Their weekend plans, their kids and their business are all good topics.
If you ask them to chat about something, try to keep the topic light and fun. This ensures their facial expressions don’t get too serious or stiff.
If they have a brand that allows them to get silly, take advantage of that. Have them do something unconventional. The more the photos stand out while matching the client’s branding, the better.
The best headshot poses come from the client walking toward the camera. Its a great tip on how to pose for a headshot.

Having your client sit can offer a connection to the surroundings. It will also make her feel more comfortable in front of the camera.
4. Use Your Surroundings to Avoid Awkward Portraits
Rather than having a client standing on their own, have them lean on something. This can be a slight lean on a nearby wall. You can also use a fence or railing, or even a nearby table.
The main tip when having your clients lean is to have them do a very slight lean. It should be enough to add interest, but not so much that their weight shifts too much to one side.
If they lean with too much weight, you’ll see the shoulders start to hunch up too close to their head. Their body will also start to close up.
Lots of people may feel more comfortable sitting when headshot posing solo in front of a camera. Sitting can often make a person slouch and close up their body to the camera, though.
To avoid this, it’s critical to keep that posture in check. Turning the body to one side while keeping shoulders open is a great tip. This ensures that your client still has a friendly and approachable vibe.
You’ll want to shoot from a point a little above their eye line. This is more flattering as an angle. Since you’ll see their legs in this pose, make sure their clothing below the waist is appropriate.
Ensure you have the best surrounding possible to ensure the best headshot poses. If you can’t improve background, crop tighter for more professional headshot poses.

Using your surroundings to lean or hold will add interest. It will also make your subject feel more relaxed, and look more natural.
5. How to Pose Hands and Arms
One big concern when deciding headshot poses is what to do with the hands. There are a few options that you can always refer to as needed. A classic headshot pose is to have your client cross their arms.
When having your client cross their arms, you want to avoid the pose looking closed. To avoid this pitfall, have your client loosen the arms, relax their hands, and take a deep breath to help relax.
Also, the crossed arms pose tends to work best when your client isn’t facing the camera straight on. The slight turn of their body fixes the rigidness of their square shoulders and crossed arms. It makes the pose appear more casual and approachable.
For both men or women, putting hands in their pockets is another good option. With men, you can play with the option of putting the whole hand in the pocket versus putting only a thumb.
For women, putting hands in pockets gives a very casual feel. Be sure that it’s aligned with their branding. The main pitfall to watch for on this pose is that the should don’t go up towards the ears too much.
Shoulders should remain relaxed, posture remain upright. And be sure to check the chin position as mentioned in our first tip.
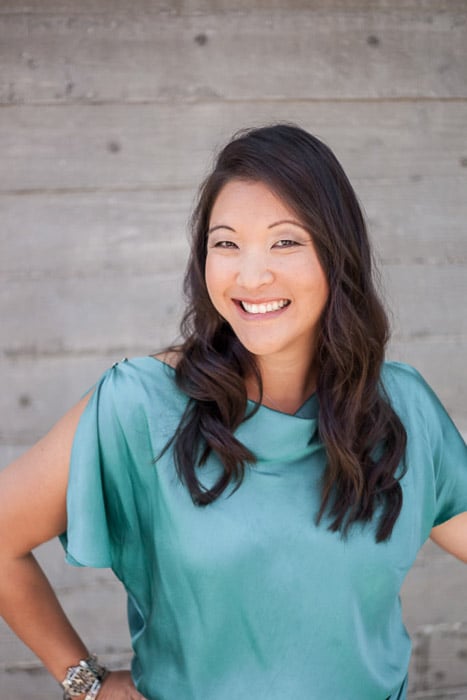
When capturing female headshots, another option is to put one or both hands on the hip. Two hands on hips is a stronger power pose, which can come off unapproachable at times.
More often than not, putting only one hand on a hip is the better option. For this pose, the key is for the hand to be loose on the side of the hip.
If the hand is at the top of the hip or on the waist, the pose becomes more formal and uptight. Lowering the hand to mid-hip and relaxing the hand so it lays on the body will help to keep the feel modern.

Putting her hand in her pocket slightly opened up her right arm to create separation from her torso.
6. How to Ensure Smiles Don’t Look Frozen
The final tip is not so much about the actual body pose, but will help to ensure that the face looks natural. Often, your client will start to smile as soon as the camera points in their direction. They’ll hold that smile for far too long.
What results is often a smile that looks forced and eyes that don’t have a natural twinkle to them. To avoid the frozen smile or blank stares, tell your client to look away.
Once you have your settings in place and your shot is framed how you want, count to three. This is when your client can look up at the camera with a fresh smile.
You can say to your client something like, "Relax as I get my settings ready. Look away and don’t worry about me just yet. When I’m ready to start, I’ll count to three, and on three you can look at the camera and give me a nice big smile."
What this does is give you a natural-feeling smile with more personality. This also lets you create a rhythm where you do a few rounds of shots with each pose. It becomes your equivalent to a director calling "Action!".
A smile is very important in how to pose for a headshot. It gives a sense of humility and works well for female headshots. For professional headshot poses, try just a hint.

Having this client look away until the last moment helped to capture a natural look in the face and eyes.
Conclusion
These days, the term ‘headshot’ is often used to refer to all sorts of professional portraits.
With broader expectations from today’s professionals come challenges of creating better headshots. Especially for a single subject to look comfortable, natural, yet professional.
While each location and client will have different needs, the posing tips above will give you starting points for any photo session.