How to Transfer Photos From an iPhone to a Computer
It’s no secret that we take a lot of photos with our iPhones. And while it’s really easy to snap a picture and share it with the world, sometimes you want to keep those memories for yourself. So what do you do when you want to transfer photos from an iPhone to computer? It’s actually not as hard as you might think.
How to Transfer Photos From An iPhone to Computer (Mac)
Your iPhone and Mac are both made by Apple, and designed to sync together easily. As a Mac user, you have more options for how to transfer photo from your iPhone, with a smoother, more user-friendly experience. Let’s take a look at those.
The first thing to look at is how to transfer photos on your iPhone to your computer.
Photos or iPhoto
Photos replaced iPhoto several years ago as the primary storage app for your images on a Mac. When you connect your iPhone to your computer, it will open these apps, and give you the option to download your photos to them.
You can select to download all your images or only some.
Want to do this through the cloud? That’s possible with iCloud photos. It lets you sync images between devices by dropping them into the app or removing them.
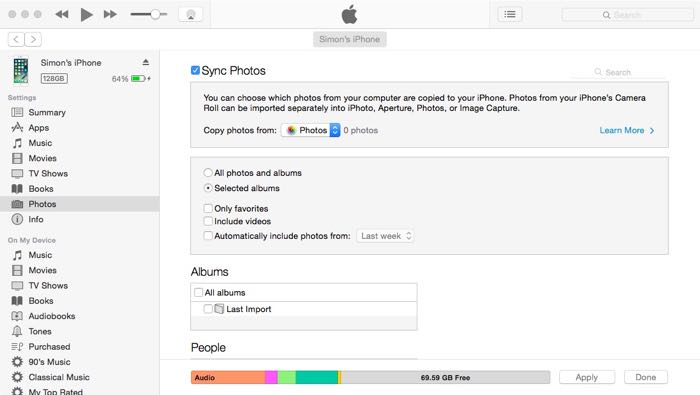
You can use iTunes to transfer photos to and from your iPhone.
Airdrop
You can use Airdrop to transfer files between devices. You can do everything through a Bluetooth connection, so you don’t even need Wi-Fi. This feature is especially useful on the go when you don’t have access to the internet.
You will need to have Wi-Fi turned on though, as the connection is a point to point between devices.
Cloud Services
In addition to iCloud photos, there are plenty of options for cloud storage for your photos. The whole point of cloud storage is to allow access to files between several devices.
You’ll need to download the app for each of your devices to make this work.
- Google Drive – You’ll need to download the Google Drive app to your phone, then open a Google account on your Mac. Once you have logged into the same account on both your computer and your phone, you will be able to transfer photos between devices.
- Dropbox – Another widely used cloud service is Dropbox. You can either download the app or use a web-based program to access the cloud storage through your Mac. You will need to download an App to access this through your iPhone.
- iCloud – This is apples cloud storage service. You’ll need to login through your Apple ID to access your iCloud drive on your Mac. On your iPhone, this is accessible through the “files” app on your phone. Then click on the photo you wish to transfer. Click the transfer icon on the bottom left, and then scroll down to “save to files”. The file will now sync to your iCloud and be accessible on the iCloud drive.

Airdrop is another nice option, but it’s only available when all the devices are Apple.
How to Transfer Photos from iPhone to Mac Via E-mail
One of the oldest methods of transferring files is to attach them to an e-mail, and then send it to yourself. There are often limits to file size when using e-mail, but this option works in a pinch.
Once you have sent the e-mail from your phone, log in to the e-mail account, which you sent them to on your Mac. It’s a case of downloading these files off the e-mail now.
Some e-mails allow you to upload the photos to a cloud-like service.
Transferring Photos From a Mac to an iPhone
Once you’ve filed and edited your photo on your Mac, you’ll want to transfer it back to your iPhone. It’s a great idea to make a gallery of pictures on your phone so that you can show people your work.
Here are some options.
iTunes
Connect your phone to your computer and sync it with iTunes. Your iTunes program will pick up the albums you have made on iPhoto, and you can then sync them with your phone.
If you’re using iCloud photos, then you will be able to do this wirelessly.
Be careful when you sync photos though, as it can remove images that are on your phone but not on the photos app.
Airdrop
Airdrop works in both directions, so you’ll be able to upload your photos in this way as well. Enable Bluetooth and Airdrop for both your iPhone and Mac.
An icon showing your phone will appear in the airdrop section of your computer. Now drop the photos onto the icon, and they will upload to your phone.
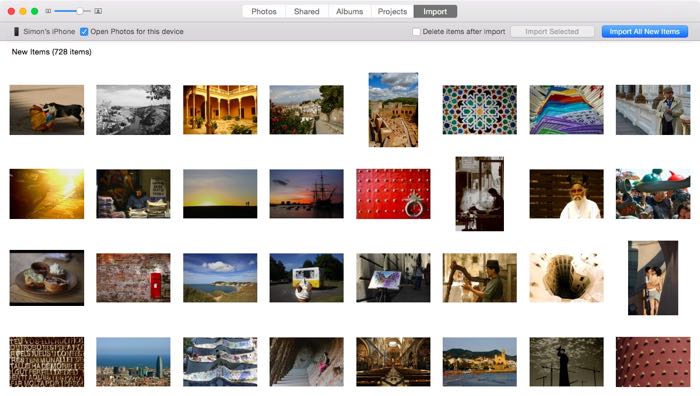
The photos app is another way to transfer photos to either your PC or your Mac.
Cloud Services
The awesome thing about cloud services is that they are a two-way street. You can upload from any device, and it will appear in your cloud storage.
This means that you can use any of the programs listed in the cloud services section when transferring from the iPhone to the computer.
How to Transfer Photos to a PC
Transferring photos from an iPhone to your PC is not quite as straightforward as it is on a Mac. It’s still effortless to do though.
Many of the programs used to transfer images to a Mac have a Windows version too.
How to Transfer Photos to a PC Using iTunes
The iTunes app works on a PC also, so the first step is to download it. After that, connect your phone to your computer via a USB cable. This will open your device within the iTunes program, and you’ll want to select the photos tab.
Now you can choose the folders you want to upload on your computer or select all folders. Click start, and it will open your apple “photos” app, which you also need to have downloaded.
Within the app, select the import photos tab, and download your photos.

Use google drive from your computer to transfer photos to and from your devices.
How to Transfer Photos Using Cloud Services
Using cloud services is an excellent way of transferring photos from your phone to your PC. For the most part, it also doesn’t matter if you’re using a Mac or a PC.
Google Drive and Dropbox, for example, work the same way for both iPhone to Mac and iPhone to PC photo transfers.
But what about iCloud? You don’t need a Mac to use iCloud. All you need is an Apple ID, which you should already have for your iPhone. If you don’t, you can create one online on Apple’s website.
A PC won’t come with an iCloud drive already installed though. Visit Apple’s website to download iCloud for Windows. Once you’ve installed it and logged into your account, you’re free to transfer photos between your phone and PC.
Transferring From a PC to an iPhone
You’ll want to transfer your photos back to your phone after editing. Or you might want to upload pictures taken on a different camera to your primary camera.
The options for this are similar too, and you can use either iTunes or Cloud Services.
Any of the cloud services mentioned in this article will work on a PC as well.

The green ticks on dropbox indicate the file has been uploaded, and is ready to sync.
Common Questions
How do I move photos from my iPhone to my hard drive?
The simplest method is to connect your phone to your computer via the USB cord. Then you’ll need to download an app such as this photo transfer app, available for both PC and Mac.
After that, you can transfer the files. If you have Wi-Fi, you don’t even need a USB cable.
How can I transfer photos from PC to iPhone without iTunes?
There are several ways you can do this. The easiest way is to download a photo transfer app to your PC. This allows you to both download and upload photos between devices.
You can also use the Google Drive app. You can then upload your photos Google Drive on your PC, and they will sync to your phone.
How do I download pictures from my iPhone to my computer windows 7?
Once again the photo transfer app will allow you to do this and will work for Window XP or later versions.
Conclusions
There are plenty of options for transferring photos from your iPhone, whether you use a Mac or a PC.
Do you use any of the above methods, or do you have another option which you prefer? Let us know in the comments below.
For more great tips for iPhone users, check out our complete guide to smartphone photography or macro iPhone photography.
Before you go, check out this video.

