A simple DIY flour photoshoot is a great way to create whimsical and ethereal images to wow your friends and followers. All you need is flour, a balloon, and some creativity!
It’s a fun and easy way to add some magic to your next photoshoot. So, look no further than flour clouds!
How to Do a Flour Photoshoot With a DIY Flour Cloud Gun
When I tried to make a dynamic image with flour the first time, I discovered that simply throwing some flour in the air is not a very smart way to take a picture.
First, the motion of the flour is almost uncontrollable. Second, it tends to fall in unappealing chunks instead of beautiful clouds.
Scattering the scene with a strainer works better. But it doesn’t have the energy of a miniature explosion. And doesn’t look half as exciting. The solution? It came in the shape of a DIY device I created. I like to call it the “cloud gun.”
You can see the difference between the stranger and the DIY cloud gun in the levitation shot below. The former produces a beautiful powder flow on a small scale, but it doesn’t look very dynamic.
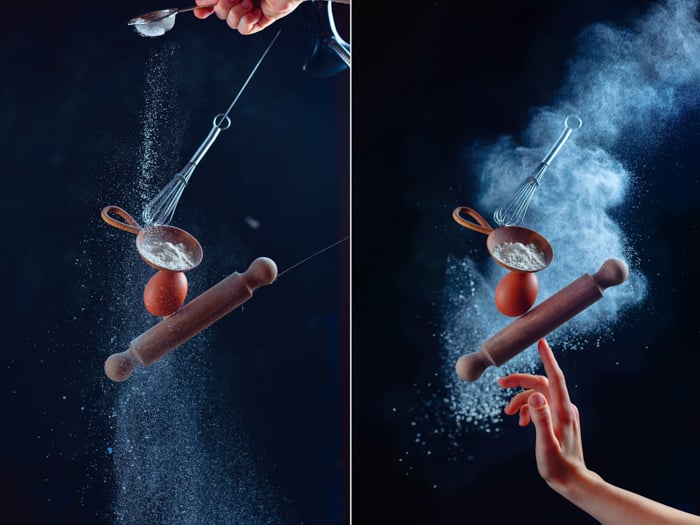
Flour cloud made with a small strainer (left) vs a DIY cloud gun (right).
Step 1: Plan the Flour Photoshoot With a Sketch
It’s a good practice to start with a sketch. It helps you find the purpose of the flour to be in the frame in the first place. If you’re shooting hard candy, flour would be out of place. But cookies or muffins would look great, or baking utensils without any food.
The baking theme is an obvious and the most versatile choice. But flour also works with many variations. I would love to see your take on flour clouds with a pasta theme!
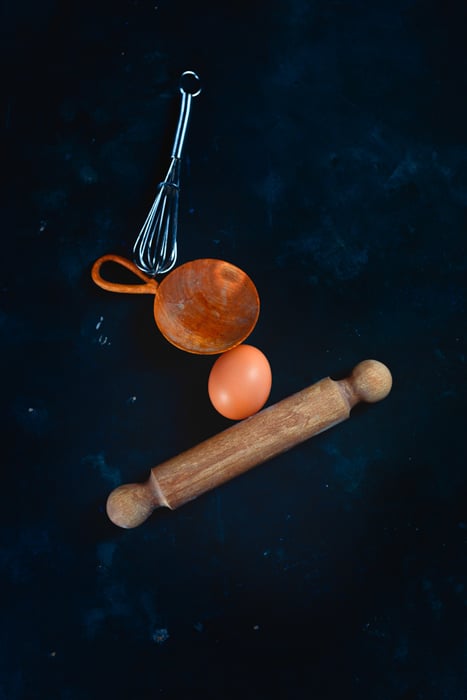
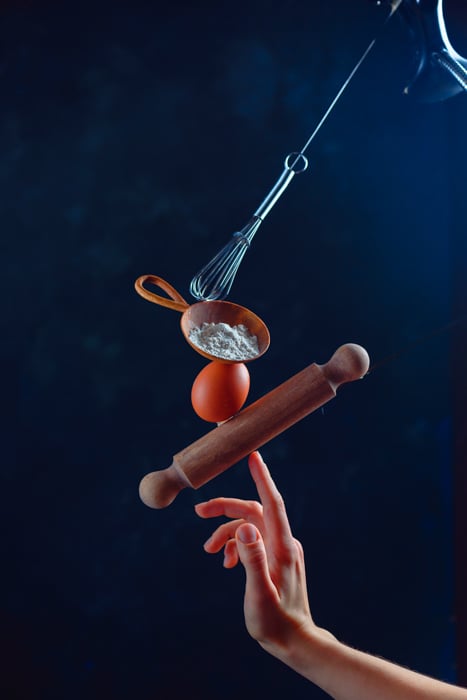
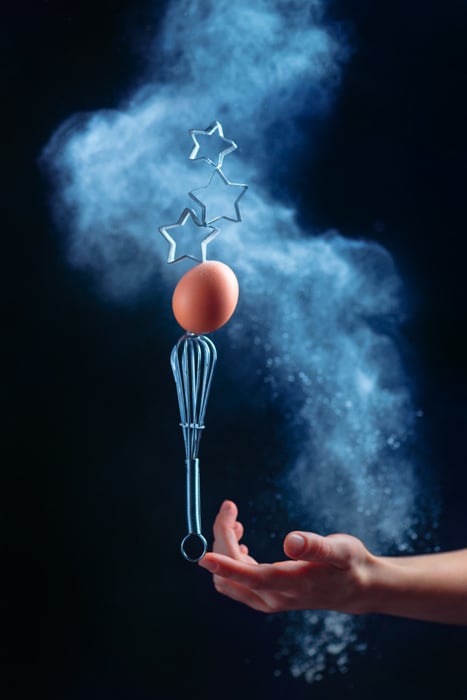
Make a sketch and decide which food props you need and how to arrange them. In my case, that was a simple composition with a rolling pin, a whisk, an egg, and a scoop of flour balancing on the tip of my finger!
That meant I needed those items in my still life. And I also need some means of keeping them in this levitating position.
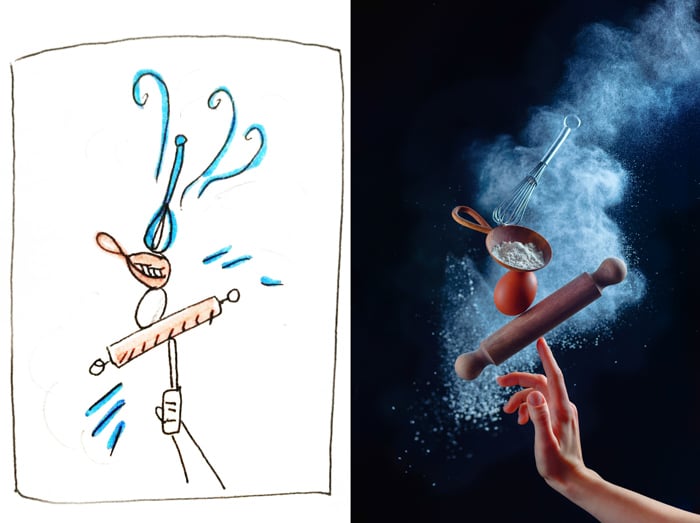
My sketch (left) and final image (right).
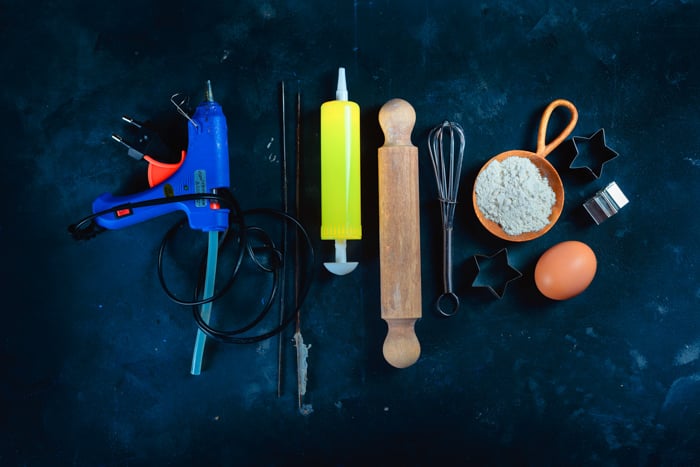
Step 2: Gather the Props and Equipment
The list of props you need for this shot is short and simple:
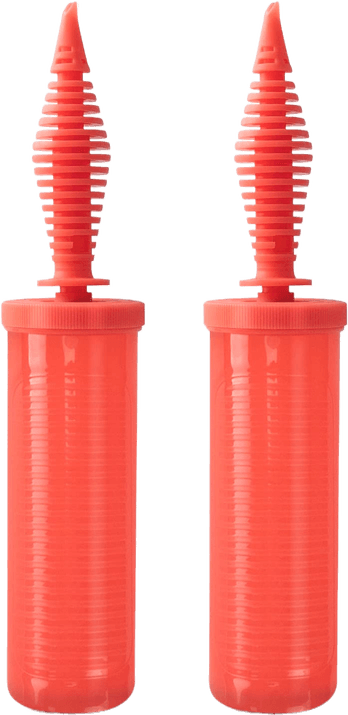
- A small balloon pump (found in party supply stores)
- Paper cone
- Some flour
- Still life components (e.g., various kitchen utensils like a rolling pin, whisk, wood utensils)
- Knitting needles (a wooden skewer or something similar will do)
- A means to fix everything steady in the air (e.g., a glue gun)
- Clamp stands for lights or embroidery
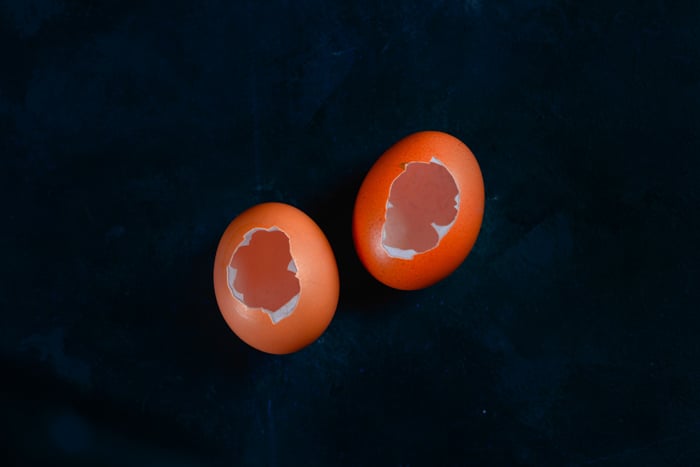
I had an egg in my composition. It wasn’t a fresh egg. It was an empty shell. I recommend using eggshells because it saves you a great deal of trouble! Shells are lightweight, making them easier to glue and hold in place.
And if an eggshell falls for some reason, well, it would be only a cracked shell. You won’t have a wet, sticky disaster or lose a perfectly good breakfast! Working with empty eggshells instead of eggs saves you a lot of time and grief.
As for photography gear, the required kit is a camera, tripod, and any light source suitable for shooting at high speed. In my case, it was two flashguns (speedlights or speedlites) with a strip softbox and a large diffuser.
You also need a camera remote. Or you can get some help from an assistant.
You can use almost any lens you want. But something like a 105 mm lens would be the best choice. That way, you can keep your camera farther from the action and safer from any powder that could get between its moving details.
Step 3: Make a DIY Flour Cloud Gun and Test It
Making a cloud gun is very simple. Take a balloon pump and a piece of paper. Wrap the paper into a cone and attach it to the balloon pump with some masking tape. Use thick paper, and don’t make the cone too wide.
That’s all! Fill the paper cone with flour and push. And there’s your fantastic flour cloud! Try it several times to find the optimal amount of flour for your specific device. Now, let’s try to create not only a flour cloud but a well-thought-out artistic still life.
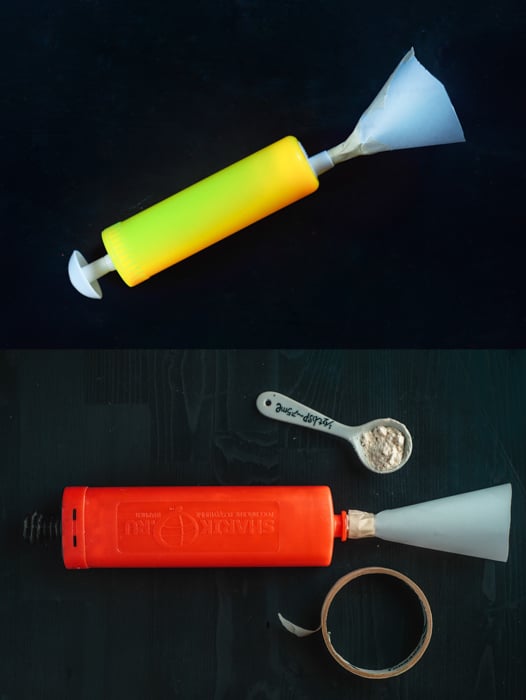
Two variations of balloon pumps I used to produce flour clouds.
Step 4: Secure Objects in Place With Glue and Knitting Needles
After the cloud gun, the most essential thing you need is a support system for your still life. I love to control as many aspects of the scene as possible. So, I fixed everything in place and removed any visible supports during post-processing.
The cheapest and easiest way to keep the rolling pin and whisk in the air is with a couple of knitting needles, a holder, and a glue gun. Glue a knitting needle (or equivalent) to a rolling pin at one end. Then, fix another end with a clamp stand.
Make sure you keep your composition at a proper height. You need enough space to place your hand below the rolling pin later. I made it look like I had the entire construction balancing on my fingers.
As clamp holders, I used simple ones for embroidery and scrapbooking. They’re cheap, easy to find, and very useful. Don’t make the mistake I made. Avoid using string or thread! They don’t work well unless you can fix your objects very, very well with them.
Plus, don’t hang items only on a wire because they swing and rotate. Under a flow of flour powder, this can be a total headache. I tried using wire in the past (pictured below). But it was such a big pain. I’ll never do that again!
Any motion can make photo edits afterward rather difficult. So make sure nothing moves during shooting.
Step 5: Arrange a Steady and Still Composition
You want to arrange your still-life objects, leaving some space for the flour cloud. It’s best to make a test composition as a simple flat lay before you hang everything in the air. That way, you can make sure your props look good together.
You will use the glue gun and thin but strong supporting elements. The latter can be easily removed later in post-production. I made a test composition on a table (pictured below) without gluing or hanging anything to see how it looked.
I started by fixing the rolling pin in the air with a glue gun and a couple of supports. I ensured plenty of space beneath the rolling pin to make it look like I was balancing everything with my finger.
Then, I glued on an empty eggshell and added a wooden scoop on top of it. I glued a whisk to another knitting needle and affixed it at the top of the whole structure. I made sure everything was steady and still.
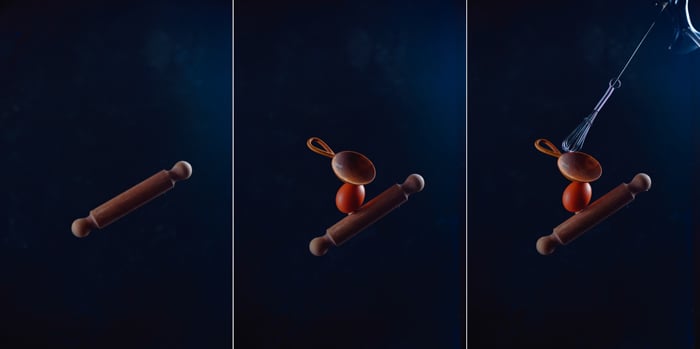
Gradually build a balanced composition and construct.
Step 6: Use Two Light Sources to Light the Scene
The lighting was very simple. I used only two speedlights. The key light was in a small strip softbox on the right side and lightly lit the scene from behind. It lit the powder and made it glow.
The fill light was another speedlight. I set it behind a large diffuser on the left side. It lifted the shadows and added more volume to the objects of the still life.
If you don’t have a second light source, use a reflector. It may just cost you some depth of field. (The decreased light is a good incentive to open your aperture or raise the ISO slightly.)
I set the speedlights on high power to create a long pulse to freeze the motion, producing a blurry image like the one below.
Since we’re working with pulse light, set your shutter speed to the flash sync speed. This is often between 1/160 and 1/250 s. From there, take a test shot to establish what maximum aperture you can get without underexposing an image.
Set your camera in continuous shooting mode to take several shots in a row. And set the manual focus on the main object.
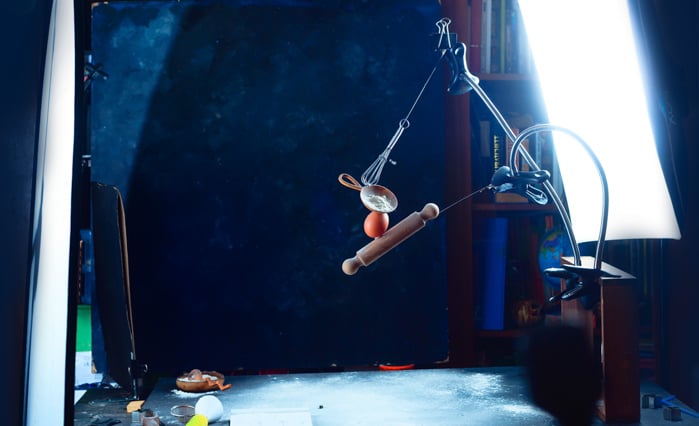
The lighting setup and the supports that held the construction in the air.
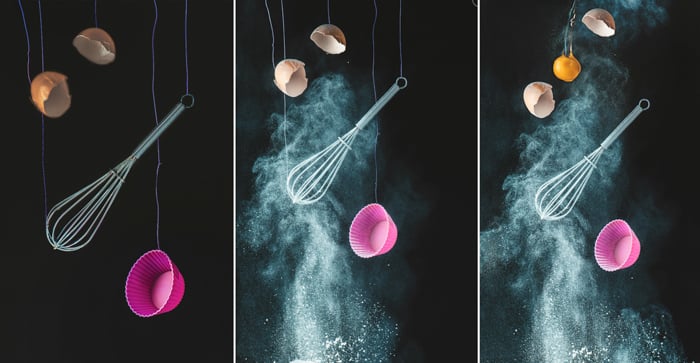
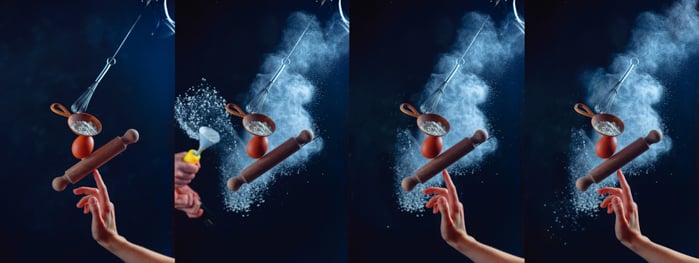
Step 7: Take a Sequence of Photos to Merge Later
The idea is to take several shots that you can merge later with photo editing software. If you want to have your hand in the scene, as I do, start with that photo. Everything will be covered with flour after that, and shots may become hard to merge.
Touch your construction with your finger from the bottom like you’re holding it up and take a picture. Next, we can add the flour cloud action!
The first still shot.
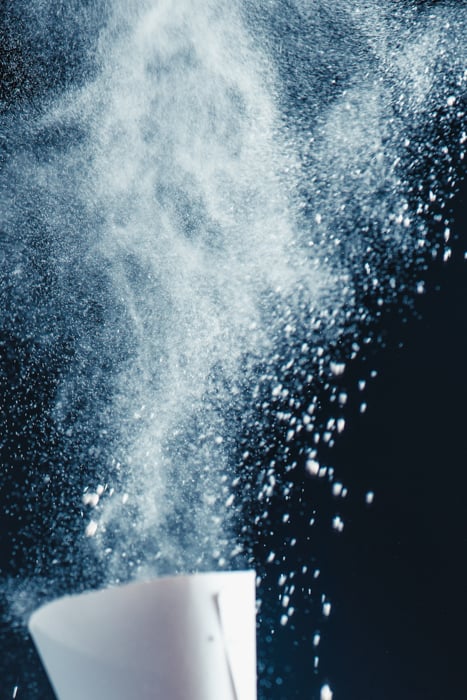
Fill up your flour gun with flour, make a cloud, and take a sequence of shots. Try to point the flow of powder a bit from below and behind (pictured below). That way, the cloud touches the objects but won’t cover them or make them look dusty.
You can still take a couple of shots with a cloud in front of objects and use them to conceal the supports in post-processing. But make these shots the last in the series.
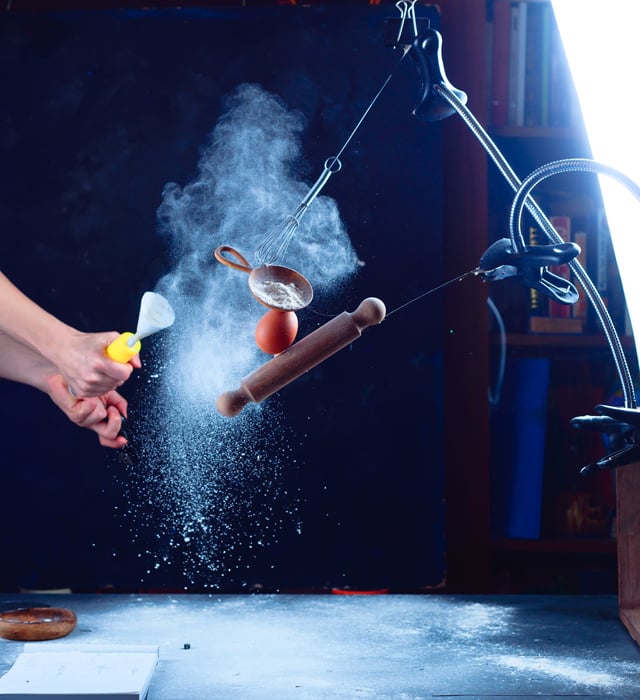
Producing a powder cloud and simultaneously using a remote shutter release.
At this stage, you can add other moving parts as well. This can be falling sugar, flying egg yolks, dripping honey, splashes of milk—whatever you find suitable.
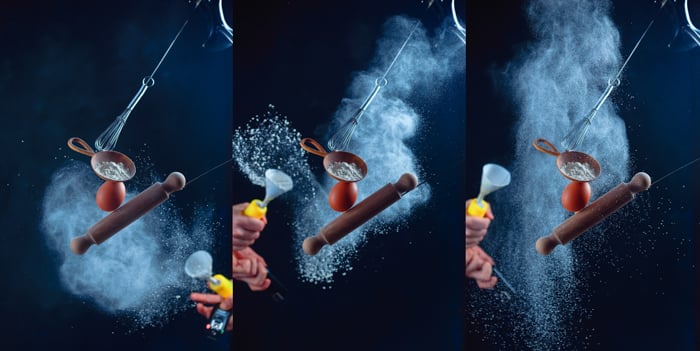
Flour cloud shots.
Remember to keep flour away from open fire! It is extremely flammable. I can’t imagine you’d have an open fire in this setup, but I must warn you.
Shooting similar flour cloud images.
Step 8: Edit Your Magical Photo in Post-Processing
Choose the most beautiful cloud. You’ll give the picture a little polish in Photoshop or alternate software. First, you want to merge the flour cloud image and the shot with your hand.
Place each image on a separate layer and use a Layer Mask to remove the parts you don’t want to see. After that, delete all visible supports. That’s very easy to do with the Clone Stamp tool.
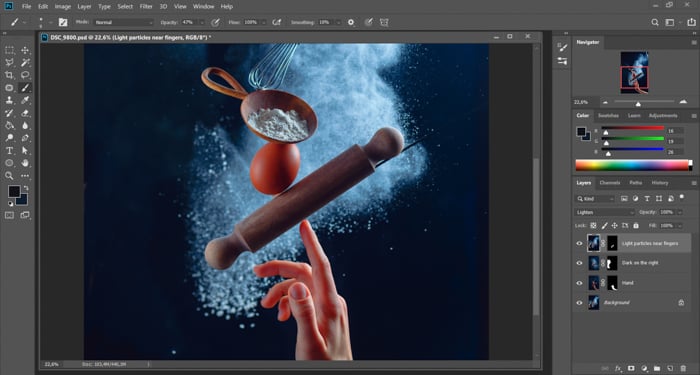
Use Layer Masks to merge several shots.
The stages of post-processing, combining two shots, and deleting the supports.
Then, you can adjust colors and contrast. That’s all! Your creative action still life is ready.
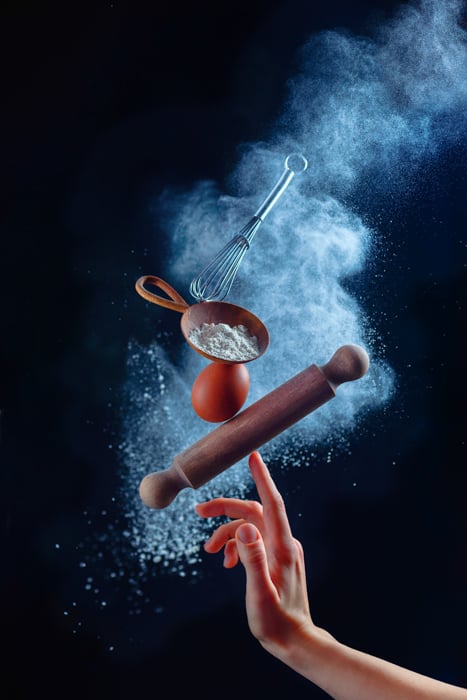
Final image. © Dina Belenko
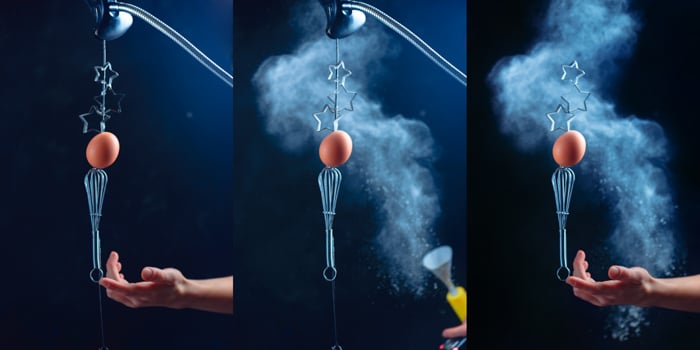
Here are a couple of photos made with the same technique.
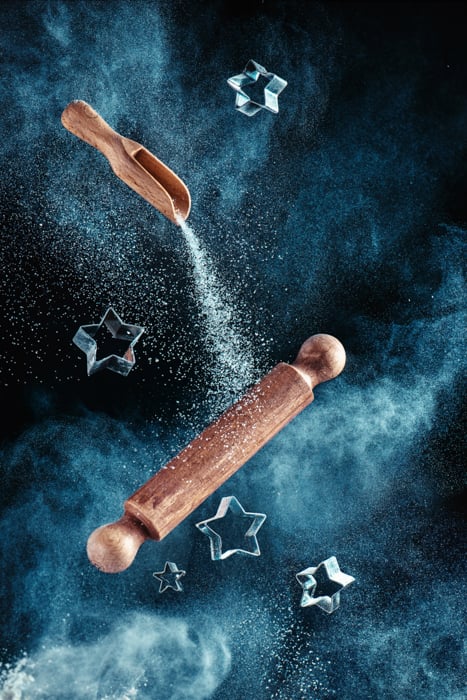
© Dina Belenko
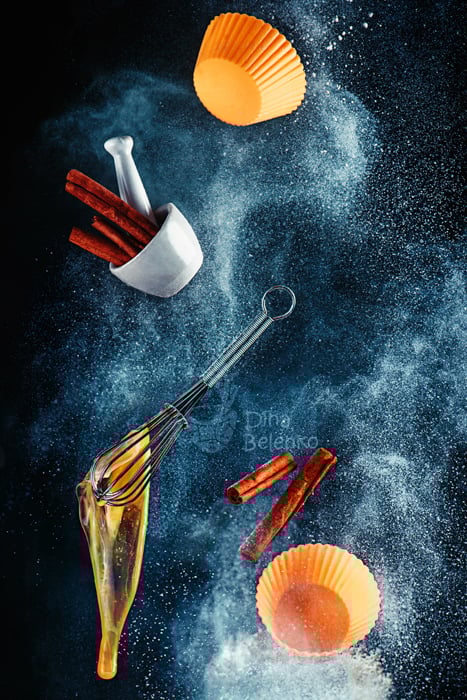
© Dina Belenko
© Dina Belenko, the creator behind our Creative Photography Cookbook
Conclusion: Flour Photoshoots and Flour Clouds
This trick is very simple but versatile. The best thing is our DIY cloud gun works with any powder you can find. So, if you’re not into baking, you can use it in other ways.
© Dina Belenko, the creator behind our Creative Photography Cookbook
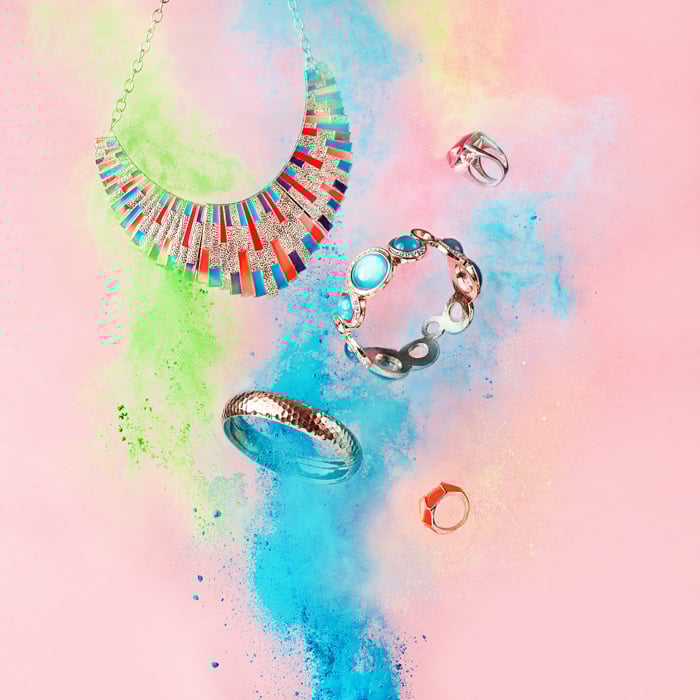
Add a creative (and explosive) touch to jewelry photography with clouds of multicolored powder!
Or you can dive into decorative cosmetics and fashion photography with exploding eyeshadow or other makeup powders. Try this trick and find your own unique ways to use it!
For more incredible still-life photography tricks and tips, buy our Creative Photography Cookbook!