As any photographer knows, we often spend more time in front of a computer than we do behind the camera. Between importing, editing, exporting, and sharing, our workflow is not even close to done when we press that shutter button! It’s time to speed up your Lightroom workflow with these 15 essential Lightroom keyboard shortcuts!
As you look through our list, note that these Lightroom shortcuts work for both PC and Mac computers. If there’s a difference in key sequence between PC and Mac, it will be noted.
Lightroom Shortcuts in the Library Module
The Library Module is where you import, organize, and export your photos. It only makes sense, then, that the Lightroom shortcuts for the Library Module are huge time-savers for your Lightroom workflow!
1. Flag Selected Photos [P]
With the digital age of photography comes the freedom to shoot way more photos than we need! This means that culling (sorting) photos is more important than ever.
As you sift through your images to select the ones to actually edit and use, one way to mark those selections is with a flag. Rather than clicking on the flag icon, you can press P to quickly flag the photo that is currently selected. If you want to flag a photo as rejected, however, you can press X and the flag will appear in black and with a small x in it.
2. Give Star Ratings [1-5 for stars, 6-9 for colors, 0 to reset]
Using star ratings and colors can be helpful if you want to rate shots or classify photos into different groups. Perhaps you want to separate each pose from a portrait session, or you want to group together each section of a wedding day.
Star ratings and color labels are all applied by number. Star ratings are applied with keys 1 through 5. Color ratings are applied with keys 6 through 9. Pressing 0 will reset the star rating to none.
While you’re speeding up your culling, be sure to turn on Caps Lock. This tells Lightroom to immediately jump to the next photo of the set once you set a color or star rating to it. This helps to shave yet a few more seconds off your workflow by not having to advance to the next photo with the arrow keys or mouse.
Lightroom Shortcuts in All Modules
3. Switch Between Lights Out Modes [L] and Full Screen [F]
If the workspace within Lightroom feels too cluttered, the different Lights Out modes may help!
To access these options, press L. Keep pressing L to rotate through the Lights Out mode view options.
Lightroom is normally on Lights On mode, pressing L once will take it to Lights Dim mode, and pressing L once more takes it to Lights Out mode. Yet another press of L will take you right back to the standard Lights On mode.
While we’re on the topic of decluttering your view, going to Full Screen will clear everything but the photo and maximise the image size on your screen. To toggle in and out of Full Screen mode, simple press F.
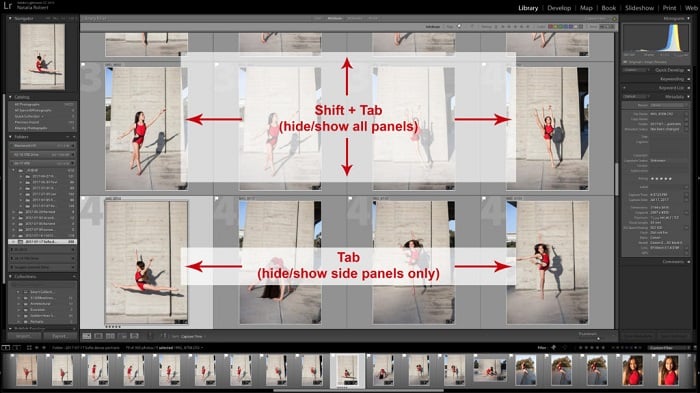
4. Toggle Side & Top/Bottom Panels [Shift + Tab]
If you want to get rid of those pesky side and top/bottom panels, a quick way to do that is to press Shift + Tab.
Press it once more to get the panels to come back. If you’re just concerned about the side panels, press just the Tab key to toggle between showing and hiding those.
5. Select Multiple Photos [Shift + click]
When selecting photos from the strip on the bottom panel, sometimes you need to select several photos in a row. Rather than clicking on each one individually, you can use the Shift key to help.
One method is to begin with one photo selected, then press Shift + click on the final photo you need to select. The Shift key tells Lightroom to select everything in between your original choice and the photo you clicked on.
If you’d like to only use the keyboard to select your group, start with one photo selected. Then press Shift + right/left arrow key.
As you move right or left, Lightroom will add each of those photos to your selection. Be sure to hold the Shift key down the entire time, though. Once you lift your finger from the Shift key, Lightroom stops adding to your selection.
Keyboard Shortcuts in the Develop Module
In the Develop module, there are plenty of shortcuts to help you manoeuvre between brushes, crops, and zooming. The Lightroom keyboard shortcuts that we’ll be going over involve the key tools that you find just above the Basic Adjustments panel. We will also see how to quickly create presets to save time during repetitive edits.
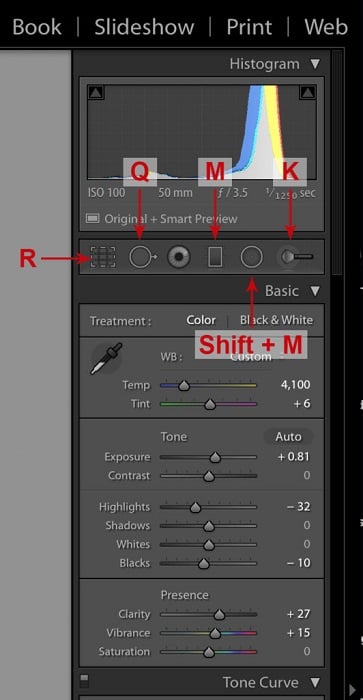
6. Crop Mode [R]
To enter crop mode, you can click on the crop square on the far left of the tools. However, you can also press R to access this same crop mode.
Simply press R, make your adjustments, then press R once more to exit crop mode.
7. Rotating Crop Orientation [X, while in Crop Mode]
While you’re in crop mode, though, you may want to change the orientation of your crop. To quickly do this, press X while in crop mode.
Pressing X while in crop mode will switch between landscape and portrait orientations. Once you’re done selecting your orientation, you’re still in crop mode so simply press R to exit that.
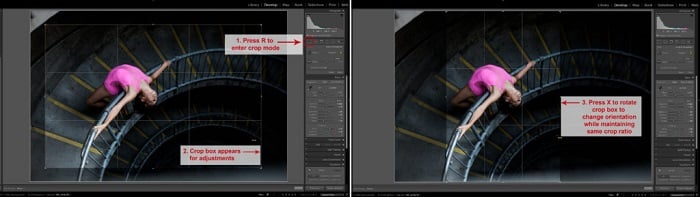
Press R to enter Crop Mode, and adjust crop box (on left). To maintain proportions but rotate the orientation of crop, press X (on right).
8. Access Heal/Clone Brush [Q] and Toggle Between Heal/Clone [Shift + T]
The Lightroom brushes are incredible tools for editing, so let’s begin with the Heal/Clone brush. To enter this brush mode, press Q.
Once in this mode, you’ll be in either heal or clone mode within that brush tool. If you need to switch from one to the other, simply press Shift + T to toggle between heal and clone bush modes.
Just as you pressed Q to enter this brush mode, you can press Q to exit it when done.
9. Graduated Filter [M]
The graduated filter is a powerful tool with many uses. To access the graduated filter, you can press M. Use this filter to help create or reduce vignetting, balance out light temperature, or create fun color effects!
Once done, press M once more to exit the graduated filter mode.
10. Radial Filter [Shift + M]
Next in this line-up of tools is the radial filter. This one is similar to the graduated filter but simply applied in a radial pattern rather than linear. To access the radial filter, press Shift + M.
Adjust what you’d like, and then press Shift + M once more to exit.
11. Adjustment Brush [K]
The final brush in our line-up is the Adjustment Brush. This is probably the most versatile brush in Lightroom because it can be adjusted, erased, and applied freely anywhere in the frame.
To active the adjustment brush panel, simply press K. Here you’ll be able to finesse your image, then press K once more to exit the adjustment brush mode.
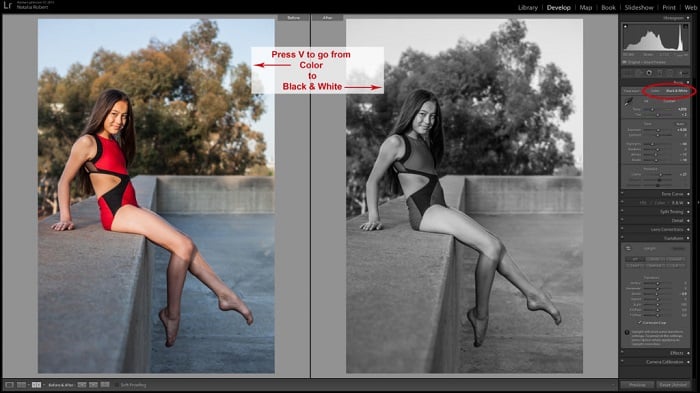
12. Convert to Black and White [V]
Sometimes playing with color treatments is fun, too! If you’d like to quickly switch to black and white mode, press V to convert.
Not happy with your photo in black and white? Press V once more to return to color mode.
13. Highlight Clipping [J]
Clipping can be an issue in some light conditions. Our histogram can help to make sure we’re avoiding clipping in either highlights or shadows.
To quickly get a peek at whether your photo has any clipping, simply press J. If there is any clipping in the frame, you’ll see it appear as either red or blue.
Anything that shows in red is clipping in the highlights, and anything that shows in blue is clipping in the shadows. To stop seeing the red or blue areas of clipping, press J once more.
14. Copying Settings [Command + Shift + C] and Pasting Settings [Command + Shift + V]
Often we find ourselves making the same changes to a whole lot of photos. To save some time, you may consider just copying the settings in one photo so that you can then paste it onto others. It essentially works the same way as when you copy and paste text, but you’re copying and pasting Lightroom adjustments.
Once you have a photo with edits that you want to be able to copy, press Command + Shift + C (on a PC, press Control + Shift + C).
You’ll see a dialog box open, where you’ll check the boxes of what settings you want to copy. Usually, you’ll just leave the boxes as is and then click "Copy".
Then go over to a photo where you’d like to paste these same settings, and press Command + Shift + V (on a PC, press Control + Shift + V).
You can continue to paste on as many photos as you’d like, but it will save you from having to manually adjust each and every photo!
15. Access The Shortcuts List [Command + /]
If you’re hungry for more Lightroom shortcuts, you can always ask Lightroom!
In each module, you can press Command + / (on a PC, press Control + /) and a window will appear with a list of the shortcuts that apply to that module.
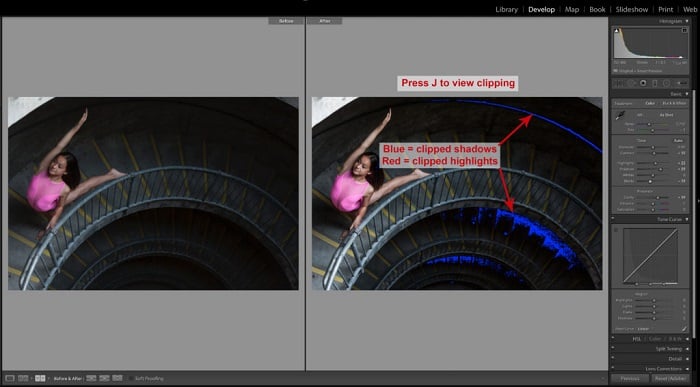
Sample clipping in shadows, shown with bright blue.
Bonus Tip: Exporting After Editing [Command + Shift + E]
Once you’re done with your edits, select the images you want to export and press Command + Shift + E (on a PC, press Control + Shift + E). This will open up the dialog box for exporting your beautiful finished photos.
Conclusion
Lightroom is a very powerful tool for editing and organizing your photos. Learning just a few of these keyboard shortcuts for Lightroom will help to shave time off your workflow! Before you know it, you’ll have more time for shooting or quality time with loved ones.
To learn more about lightroom, don’t miss out on our Effortless Editing course!