Some photography tasks are impossible without a good camera tripod. Image stabilization and high ISOs don’t solve everything. From landscape to product photography, a good tripod is essential.
We’ve selected some of the best tripods available at various prices. That range is from very affordable to extremely expensive. Our top pick is the Manfrotto BeFree Advanced. It is super-compact but has an impressive load capacity and a tall, maximum height.
Our Top 3 Choices for the Best Camera Tripod
What Is the Best Camera Tripod?
We think the best tripod for photographers is the Manfrotto BeFree Advanced. But there is always a payoff when choosing a tripod. The most stable ones, used by TV news crews, are absurdly heavy and bulky. The smallest, lightest ones will struggle to keep your camera steady.
We’ve chosen tripods that balance those two ends of the spectrum. Before we examine each of them in detail, here is a summary of our recommendations.
- Easy setup and transport
- Innovative leg angle selector
- Quick power lock lever
- Lightweight and compact
- Supports up to 8.8 lb / 4 kg
- 360-degree panorama head with bubble level
- Durable aluminum alloy legs
- Quick-release leg locks
- Lightweight and portable
- Maximum load of 17.6 lb / 8 kg
- Quick-release plate for easy mounting
- Durable aluminum construction
- Easy-to-adjust locking mechanisms
- Compact and lightweight
- Supports cameras up to 8.5 lb / 3.9 kg
- Staggering 88 lb / 40 kg load capacity
- Max height of 6.4 ft / 1.95 m
- Fully adjustable legs with ergonomic twist locks
- Rubber feet for extra grip on any surface
- Modular design for easy customization
- 6.6 lb / 3 kg load capacity for DSLR and mirrorless cameras
- Quick-release clip for fast set-up
- Flexible legs for secure positioning
- Sturdy rubber-coated metal for durability
- Lightweight and compact for easy transportation
- Adjustable torso length
- Durable aluminum frame
- Full-size comfort and support
- Lightweight and compact
- Compatible with TQC-14 Quick-Change Camera Plate
- Lightweight and durable carbon fiber construction
- Easy to set up and dismantle
- 360-degree panorama, ball head for max flexibility
- Includes phone and camera mount attachments
- Supports up to 11 lb / 5 kg of equipment
- Includes ball head and carrying case
- 4-section legs for easy adjustment
- Quick-release leg locks
- Lightweight and durable carbon fiber construction
- Supports up to 22 lb / 10 kg
- 63.4" / 163 cm max hieght and 19.7" / 50 cm minimum
- 4-section legs and adjustable head angle
- Lightweight and durable carbon fiber construction
- Includes carrying bag and quick release plate
- Load capacity of 17.6 lb / 8 kg

- Sturdy aluminum construction
- Adjustable legs and center column
- Quick-release leg locks
- Bubble level indicator
- Supports up to 15.4 lb / 39 kg
10 Best Tripods for Photographers
Let’s examine what we’ve chosen in more detail. Then, you can decide which has the perfect features for your needs.
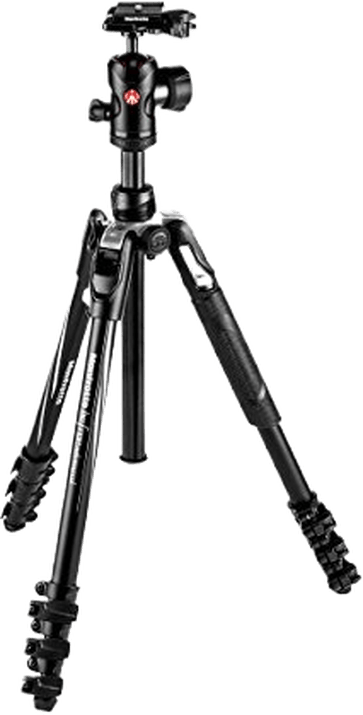
1. Manfrotto Befree Advanced Tripod
| Brand |
Brand
Manfrotto
|
| Maximum Height |
Maximum Height
59.5 inches / 151 cm
|
| Weight |
Weight
3.5 lb / 1.6 kg
|
| Maximum Load |
Maximum Load
17.6 lb / 8 kg
|
| Folded Height |
Folded Height
15.8 inches / 40 cm
|
| Other Key Features |
Other Key Features
Compatible with Arca-Swiss and Manfrotto plates
|
| Best For |
Best For
Anyone looking for an affordable and compact tripod
|
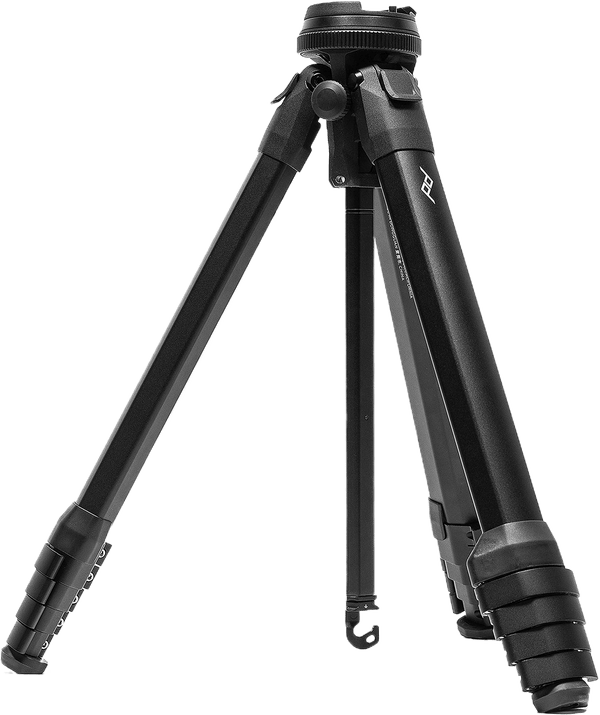
The Manfrotto BeFree Advanced is one of their most popular tripods. Manfrotto is a quality tripod brand with offerings in all price ranges. The tripod is lightweight and quick to set up.
The legs are in four sections. And you can twist or lever locks. The locking levers are Manfrotto’s QPL Lever Lock system used on their professional-level tripods. You can adjust the legs independently at different angles, and the tripod converts to a monopod.
The tripod comes with a Manfrotto 494 Center Ball Head. It has easy adjustments with ergonomic and independent controls. The one thing missing from this model is a bubble level. The tripod plate is compatible with both Arca-Swiss and Manfrotto quick-release plates.
This camera tripod includes a “spider” feature that lets you add accessories like lights or reflectors to the tripod.
The BeFree tripod is made of carbon fiber or aluminum. It has a limited load capacity but easily supports mirrorless and smaller DSLR camera systems. The black tripod has red or blue accents and a light carrying case.
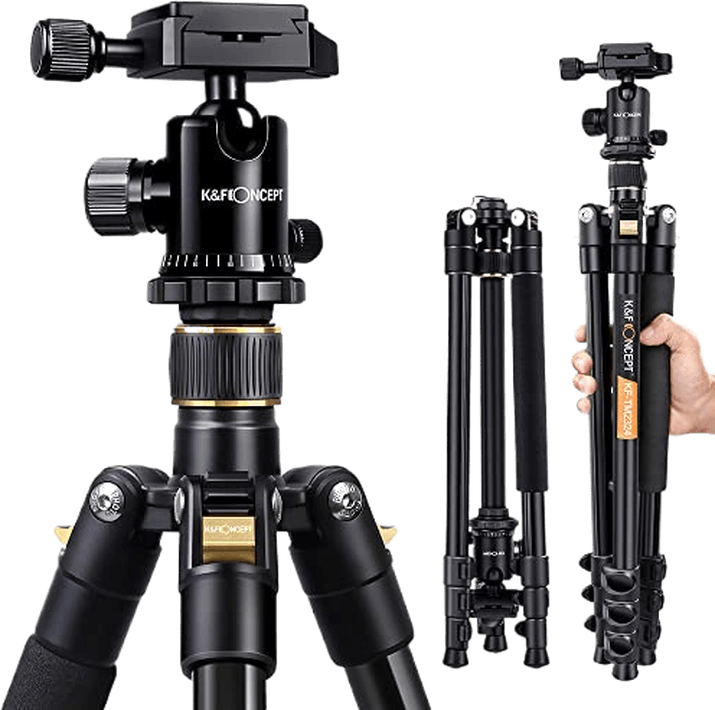
2. K&F Concept 64-Inch Tripod
| Brand |
Brand
K&F Concept
|
| Maximum Height |
Maximum Height
62.2 inches / 158 cm
|
| Weight |
Weight
2.8 lb / 1.3 kg
|
| Maximum Load |
Maximum Load
22 lb / 10 kg
|
| Folded Height |
Folded Height
18.5 inches / 47 cm
|
| Other Key Features |
Other Key Features
Arca-Swiss compatible, quality carrying case
|
| Best For |
Best For
Anyone on a tight budget or looking for a travel tripod
|
The K&F Concept 64″ is a popular lightweight budget aluminum tripod. It is one of the lightest and least expensive tripods on our list. Despite the price, it has a quality feel and works well.
The legs are in three sections with quick flip leg locks. The legs can be angled independently for uneven terrain.
The camera tripod has a 1.1-inch (28-mm) large ball head designed for stability. It holds 10 kg, which is okay for most cameras and lenses. But it may struggle with a weighty telephoto lens.
For telephoto lenses, buy a tripod mount ring or a telephoto lens bracket for better balance. It has an Arca-Swiss compatible quick-release plate and a bubble level.
The tripod is black with gold accents and comes with a high-quality bag. If you are on a budget or need an occasional travel tripod, this K&F Concept is a practical place to start.
3. Peak Design Lightweight Aluminum Camera Tripod
| Brand |
Brand
Peak Design
|
| Maximum Height |
Maximum Height
60 inches / 152.4 cm
|
| Weight |
Weight
3.4 lb / 1.56 kg
|
| Maximum Load |
Maximum Load
20 lb / 9.1 kg
|
| Folded Height |
Folded Height
15.4 inches / 39.1 cm
|
| Other Key Features |
Other Key Features
Two lockable leg angles, ergonomic ball head
|
| Best For |
Best For
Anyone wanting a sturdy but very portable tripod
|
A lot of thought has gone into the Peak Design Aluminum Travel Tripod. It is svelte and sleek with a matte black finish. This aluminum Peak Design travel tripod is one of the highest-rated tripods on Amazon. The more expensive carbon fiber version closely follows this.
The tripod legs have four telescoping sections with lever locks and two lockable angles. This lets you work as low as 5.5 inches (14 cm) off the ground. It’s fast to set up and take down.
It has Peak Design’s unique ergonomic ball head and an Arca-Swiss compatible quick-release plate. A small bubble level built into the head helps you level the tripod.
The ball head swivels freely and is quick and easy to use. But there is no way to lock it to sweep only horizontally, making panoramas difficult. You can switch out the ball head with a universal head adapter. I often change to a gimbal when shooting wildlife.
It is not just that this Peak Design Tripod folds up to one of the smallest on the list, but the diameter is also compact. The entire tripod is about the same size as a water bottle. Everything is streamlined with no protruding knobs.
The tripod also comes in a waterproof soft case of the same quality as Peak Design’s coveted bags.
4. 3 Legged Thing Winston 2.0
| Brand |
Brand
3 Legged Thing
|
| Maximum Height |
Maximum Height
60 inches / 152.4 cm
|
| Weight |
Weight
3.6 lb / 1.6 kg
|
| Maximum Load |
Maximum Load
17.6 lb / 8 kg
|
| Folded Height |
Folded Height
15.4 inches / 39.1 cm
|
| Other Key Features |
Other Key Features
Monopod and boom functionality, rubber feet, weight-balanced locks, two color options
|
| Best For |
Best For
Holding heavy gear
|
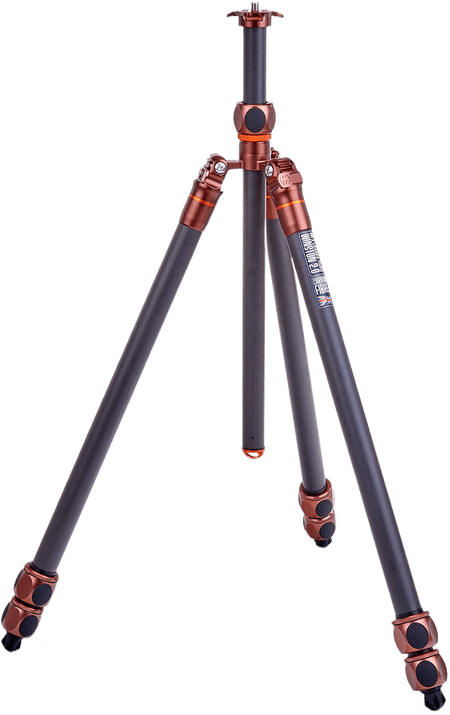
The British-made 3 Legged Thing Winston 2.0 comes in earth bronze or metallic slate grey. And it scores well in all the major categories. The head can support a maximum load of 88 lbs (40 kg)—more than you ever need!
The height range of 5.7 to 6 ft 4.4 inches (14.5 cm to 1.94 m) also lets you take pictures while standing up. (Unless you’re very tall) Also, this eight-layer carbon fiber tripod weighs only 4 lb 8 oz (2.05 kg).
The folded length of 24.1 inches (61.2 cm) is bearable unless you want to put it inside your camera bag. In that case, you’d be better off with the Leo 2.0, which folds down to just 14.7 inches (37.3 cm).
Once you’ve mounted your camera, the tripod shows great stability. You can even convert the 3 Legged Thing Winston 2.0 into a monopod, boom, or tabletop version.
On the other hand, there’s no thread on the crown to mount accessories, like an iPhone mount. And there’s no quick-release mechanism to remove your camera. But if you’re looking for a heavy-duty tripod for your heavy gear, this is the best tripod for photographers.
5. Joby GorillaPod 3K
| Brand |
Brand
Joby
|
| Maximum Height |
Maximum Height
11.8 inches / 30 cm
|
| Weight |
Weight
0.86 lb / 400 g
|
| Maximum Load |
Maximum Load
6.6 lb / 3 kg
|
| Folded Height |
Folded Height
2.7 inches / 7 cm
|
| Other Key Features |
Other Key Features
Ball head, flexible legs, rubber feet, built-in bubble level
|
| Best For |
Best For
Unorthodox camera mounting
|
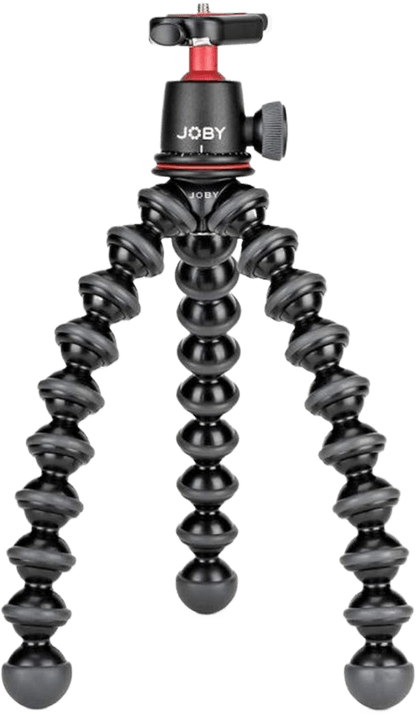
The Joby Gorillapod 3K has a bold and unique design. As far as mini tripods go, there’s not much else like it.
The flexible legs give you excellent creative control. You can shoot in any location on any surface. And you don’t even need a surface to work on. It’s also strong enough for most cameras.
You can bend and manipulate the flexible legs any way you want. It can stand up straight with a maximum height of 11.8 inches (30 cm). Or you can spread and bend the legs for a lower angle.
This flexibility is great for uneven surfaces and rough terrain. You can even wrap the flexible legs around poles and tree branches. This versatility gives you a world of freedom as a photographer.
The camera plate is connected to the legs with a ball head. This gives you a fantastic range of movement, helping you shoot from any angle. And it allows you to pan and tilt with a smooth motion.
It’s ideal if you need to change the angle while filming. And it also has a built-in bubble level to help you achieve perfect alignment.
The GorillaPod can handle a load of up to 6.6 lb (3 kg). So you can use a mirrorless or DSLR. And despite its strength, it doesn’t weigh you down. It only weighs 0.86 lb (400 g), meaning you can take it with you on any photography trip.
The Gorillapod 3K is the best mini tripod for any environment.
6. Really Right Stuff Ascend 14
| Brand |
Brand
Really Right Stuff
|
| Maximum Height |
Maximum Height
61.3 inches / 156 cm
|
| Weight |
Weight
3.19 lb / 1.4 kg
|
| Maximum Load |
Maximum Load
30 lb / 13.6 kg
|
| Folded Height |
Folded Height
18.6 inches / 47 cm
|
| Other Key Features |
Other Key Features
Arca-Swiss ball head, low minimum working height of 5.1 inches / 13 cm
|
| Best For |
Best For
Anyone willing to pay top money for a quality tripod
|
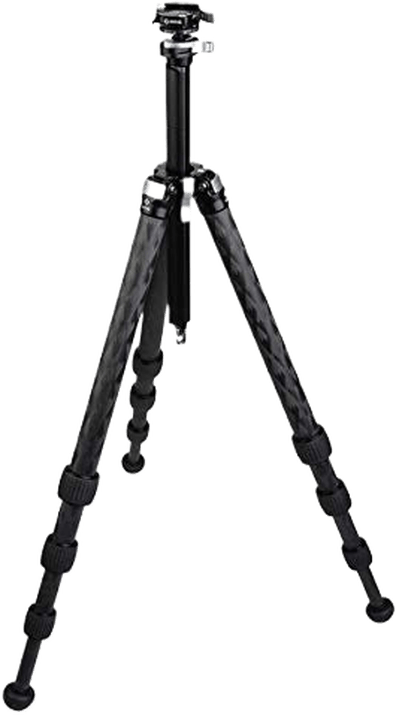
The Really Right Stuff (RRS) Ascend 14 is an all-in-one carbon fiber travel tripod. The long version provides extra working height yet still compacts into a backpack.
The legs have four sections and twisting lock mechanisms. Four angle-stop positions let you independently position the legs for the most flexibility.
The head is an integrated Arca-Swiss ball head. It is recessed into the legs and tucks away for the smallest profile. The head can be removed and replaced with a universal adapter. This lets you mount a different head on the tripod. (There is also an Ascend 14 that comes with a ball head)
You can remove part of the center column to lower the tripod to the ground. The minimum working height is only 5.1 inches (13 cm).
RRS is the gold standard for camera tripods and accessories for many professional photographers. But quality comes at a price. The Ascend 14 is the most expensive offering on our list, which is the only detail I don’t like.
7. 3 Legged Thing Leo Kit 2.0 Carbon Fiber Tripod System
| Brand |
Brand
3 Legged Thing
|
| Maximum Height |
Maximum Height
57.7 inches / 147 cm
|
| Weight |
Weight
3.4 lb / 1.5 kg
|
| Maximum Load |
Maximum Load
66 lb / 30 kg
|
| Folded Height |
Folded Height
14.7 inches / 37.4 cm
|
| Other Key Features |
Other Key Features
Telescopic central column, available without head
|
| Best For |
Best For
Anyone looking for an innovative mid-range tripod
|
The 3 Legged Thing Leo 2.0 is a mid-priced ultra-compact professional-level travel tripod. If you are looking for a tripod, you cannot go wrong with one from 3 Legged Thing. You can find a 3 Legged Thing tripod in all price ranges.
It is incredibly modular and flexible. This carbon fiber tripod is one of the lightest on our list but has the most load capacity at 66 lb (30 kg). You can mount any piece of photography equipment to this tripod!
The center column is telescopic, like the legs. You can expand it vertically when you need extra height and compact it down again when you don’t. You can detach all three legs, making this a handy tabletop tripod. The legs can also be used as a monopod or a boom arm.
It includes six one-quarter-inch and one three-inch threaded holes for mounting many accessories. It comes with a ball head. But you can order the Leo tripod legs separately.
The Leo is in the mid-price range. But 3 Legged Thing has less expensive tripods. If you are buying your first camera tripod, try the popular Patti.
You can order the Leo in metallic slate grey or earth bronze color, and it comes with a nice carrying bag. The build quality on this tripod is exceptional. Amazingly, something so small and compact can handle a heavy camera system.
8. Benro Mach3 Carbon Fiber Tripod
| Brand |
Brand
Benro
|
| Maximum Height |
Maximum Height
69.7 inches / 177 cm
|
| Weight |
Weight
6.4 lb / 2.9 kg
|
| Maximum Load |
Maximum Load
35.3 lb / 16 kg
|
| Folded Height |
Folded Height
23.2 inches / 59 cm
|
| Other Key Features |
Other Key Features
Available in carbon fiber and aluminum, geared head, two different length center columns
|
| Best For |
Best For
Photographers looking for precise adjustment and stability
|
The popular Benro Mach3 Tripod is only the legs. But pair it with Benro’s top-selling GD3WH 3-way geared head, and you have a winner. This is for photographers who need stability and precision adjustments.
The tripod is solid and sturdy with a quality feel. The Mach3 comes in carbon fiber or the less expensive aluminum versions. You have the option of ordering the tripod with three or four sections. The four-section version is more stable. There is even an extra-long option if you need a taller tripod.
The tripod comes with both a long and a short center column. The short column is just 2.5 inches (6.35 cm). This lets you get very low to the ground when you splay the legs wide. The legs can be adjusted independently and have twist locks with magnesium castings.
The head has 3-way independent movement and individual release controls. It has an Arca-Swiss compatible plate and three bubble levels for precise leveling.
This head moves slower than a ball head, but you get precision. If you’re looking for a ball head instead of a geared head, try the Benro Triple-Action Ball Head with PU60 Quick-Release Plate.
This is one of the heavier camera tripods on the list, especially with the geared head. Combined, the system weighs 6.4 lb (2.86 kg). But that is a plus when you need extra stability. If you want a lightweight travel tripod, check out Benro’s MeFoto options.
The Mach3 is black with blue accents and has a dust cover and case. This combination is one of the more expensive options on our list. But you can rest assured that you have one of the best tripod combinations on the market.
9. Gitzo Carbon Fiber Tripod Kit
| Brand |
Brand
Gitzo
|
| Maximum Height |
Maximum Height
69.7 inches / 177 cm
|
| Weight |
Weight
5.8 lb / 2.6 kg
|
| Maximum Load |
Maximum Load
28.7 lb / 13 kg
|
| Folded Height |
Folded Height
26.6 inches / 67.6 cm
|
| Other Key Features |
Other Key Features
Three-way magnesium head with fluid damping
|
| Best For |
Best For
Anyone looking for a top-quality versatile tripod, whatever the cost
|
The Gitzo Mountaineer is a winner if you want a quality tripod with more weight and stability. This is a professional tripod for landscape photographers who value stability over everything.
Gitzo is a high-end tripod company with a large selection. Some are priced in the thousands for the legs only. But many photographers swear by the brand.
The Mountaineer has carbon fiber legs. You can buy the tripod legs only or as a kit. The legs have a choice of three or four sections. They have twist locks and a leg angle selector for quick and easy setup.
The Mountaineer comes in Series 1, 2, or 3. It is of different heights and can carry a variety of loads. If you need a taller camera tripod to handle heavier equipment, try the Mountaineer series 3.
This Gitzo Tripod Kit has a three-way fluid head of ultra-lightweight magnesium for precise shots. It has an independent fluid cartridge for each axis that smooths the movements. The kit also has an Arca-Swiss-compatible rubberized plate with a quick-release mount.
Gitzo tripods are not cheap. But you pay for the brand and the quality of the design.
10. Vanguard Alta Pro 263AB 100 Tripod
| Brand |
Brand
VANGUARD
|
| Maximum Height |
Maximum Height
68 inches / 172.7 cm
|
| Weight |
Weight
5.4 lb / 2.4 kg
|
| Maximum Load |
Maximum Load
15.4 lb / 7 kg
|
| Folded Height |
Folded Height
28.2 inches / 71.6 cm
|
| Other Key Features |
Other Key Features
180-degree swinging center column, Arca-Swiss compatible head
|
| Best For |
Best For
Anyone looking for an affordable intermediate tripod
|
The Vanguard Alta Pro 263AB is one of the taller camera tripods on our list at 68 inches (172.7 cm). But it is not the most compact when folded.
This tripod has an extremely flexible center column. You can move the hexagon-shaped center column through various vertical and horizontal positions. Then, lock it into place with a swivel and lock system. This is great for studio and macro photography, where you may work with awkward angles.
It has three aluminum alloy legs with flip locks that adjust independently at three angles. The tripod feet have retractable spikes under the non-slip rubber feet.
This version of the tripod comes with an SBH-100 ball head. The head comes with an Arca-Swiss compatible quick-release plate and bubble levels. You can order the legs with different heads, including a pan head and one with a grip.
The Vanguard Alta Pro aluminum tripod is one of the heaviest on our list. But you can order it in a lightweight carbon fiber version. The tripod is black with orange accents and comes with a carrying case.
Best Tripod Buyer’s Guide
I cannot tell you how confused I was when I started looking for a tripod. Experienced photographers around me swore by major brands like Manfrotto, Gitzo, and 3 Legged Thing. But each brand makes dozens of different tripods.
Even looking at tripods from one company did not narrow down my search. I bought my first tripod almost randomly. It ended up being a good buy, but that was sheer luck.
Choosing a Camera Tripod
Choosing the best tripod is daunting. There are so many options, and they vary drastically in price. Some photographers use inexpensive tripods. Others pay thousands!
Let’s look at the features that distinguish tripods. The best camera tripod is the one that works for you. No matter your budget or gear, you will find the best tripod.
Do You Need a Tripod?
First, do you need a tripod? Many photojournalists, travel photographers, and street photographers do not use a tripod. But for landscape photographers, a tripod is a constant companion. It goes with them everywhere.
You need a tripod if you photograph at slow shutter speeds. Landscape photographers use longer shutter speeds to take photos in low light, like at night or when the sun is below the horizon. They also sometimes use long shutter speeds to blur water or clouds.
Camera tripods are also essential when taking time-lapse videos and panoramas. Studio photographers may also need a tripod to lock in a composition.
Macro photographers may need a tripod to take many shots of their subjects with different focus points. Later, the images are blended or focus stacked in post-processing. The subject mustn’t move between exposures.
The best camera tripod depends on the type of photography you do. The best travel tripod is light and compact. But the best tripod for video may be heavier and allow the camera to pan and move smoothly.
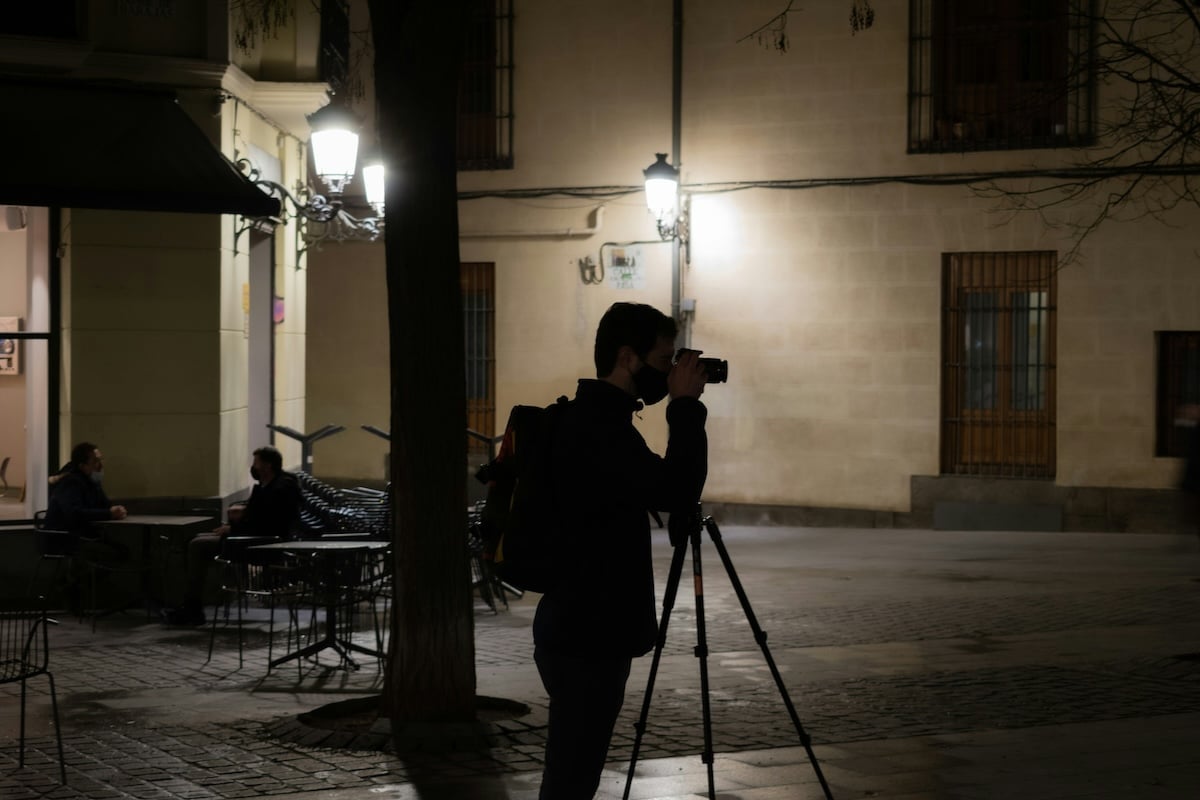
A tripod is essential when shooting at night.
Main Features of a Tripod
Like people, tripods come in different heights and weights and have different strengths. The best tripod is largely a matter of personal preference and based on your type of photography. To help you narrow down the choices, let’s look at the features of a tripod from head to foot.
Price
Of all the camera accessories, tripods vary the most with price. You can buy a mini phone tripod for a couple of bucks. At the other end are top-of-the-line tripods priced well into the thousands.
You can get a good tripod at different price points. Some photographers are happy to spend more if it means having more stability. Others would rather put their money into a camera body or lenses. We’ve included a selection of expensive, mid-price, and more budget tripods.
Height, Weight, and Strength
Tripods can be small tabletop affairs, but we focused on tripods set up on the ground for this review. They can reach at least 48 inches (122 cm) tall. The best tripod height brings your camera to eye level when you stand.
If you are tall, you will want to consider a taller tripod. But you also want a tripod that will go low. Some tripods do not have a center column, or the center can be removed. This allows the tripod to be almost at ground level.
Photographers who travel and hike with their camera gear value lightweight tripods that fit in a backpack or camera bag. But lighter is not always better. A tripod with extra weight is more stable if you work in windy conditions.
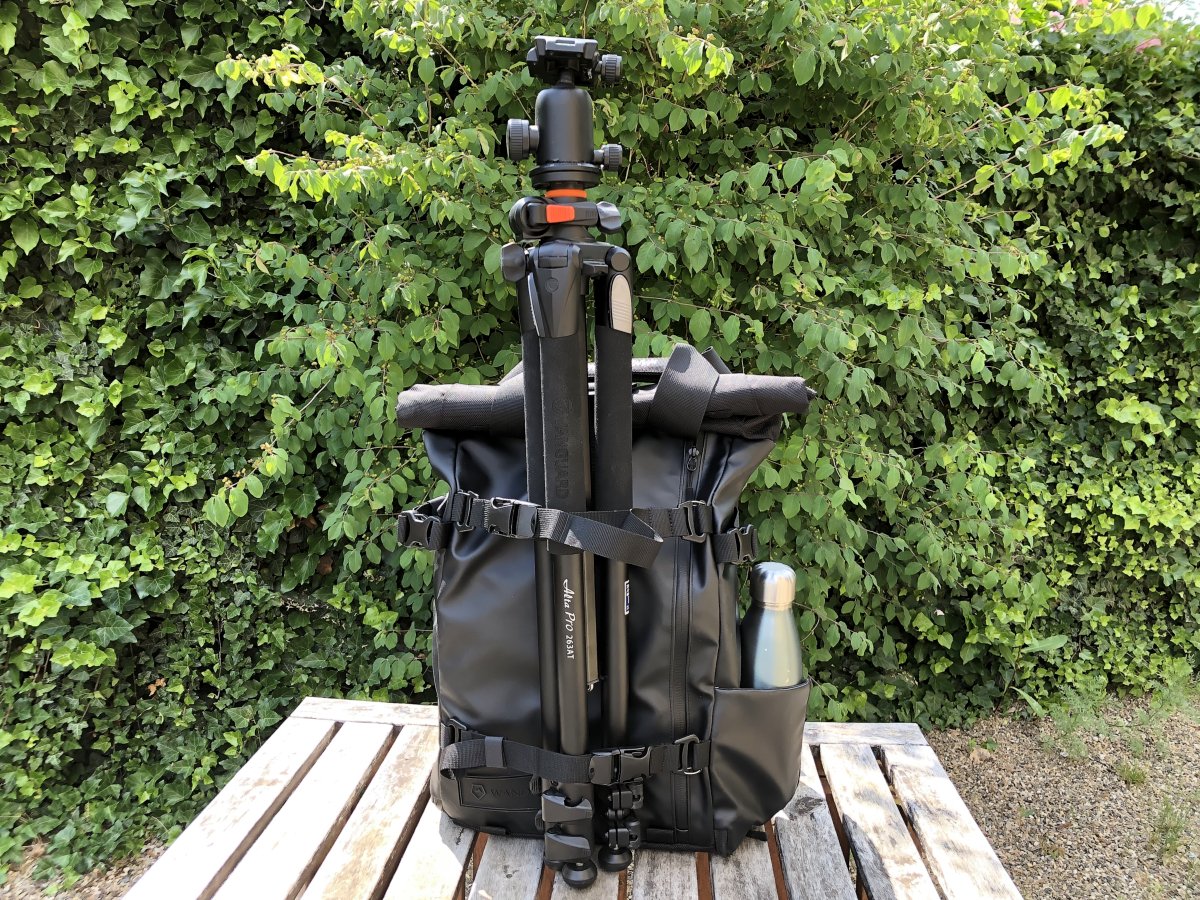
The Wandrd Prvke camera backpack with several tripod holder options
Studio photographers do not move their tripods far. They may prefer the more stable, heavier tripods. The weight of a tripod somewhat depends on the materials used to make it.
Carbon fiber tripods are lighter and stronger than standard aluminum. But they are also more expensive.
Load capacity is how much weight the camera tripod can support. This is important if you have heavy camera gear. A big DSLR and fast telephoto lens can add up in weight.
Make sure you get a sturdy tripod that can carry the load. If you work with lighter mirrorless systems, load capacity isn’t as much of an issue. Travel photographers and hikers also want to know how small a tripod folds for packing into backpacks or suitcases.
Camera Tripod Head
In this review, I focus on tripod kits. A kit includes both the legs and the head. Most budget and mid-priced tripods only come as kits. Some higher-end tripods sell legs and heads separately.
On all the tripods reviewed here, the head detaches from the legs. You can easily change or upgrade to a different tripod head.
A good camera tripod head should move easily, but hold your camera in place firmly. You do not want a head that is difficult to adjust or one that slowly moves with the weight of your camera. And you do not want one that drops your camera!
Ball Head
A ball head is the most common type of tripod head. Ball heads hold the mounting plate and swivel freely when you release the tension. Many photographers find this type of head the most flexible. Ball heads let you quickly move your camera in any direction.
There are other tripod head options, though. For instance, a three-way head gives more precise movements but is slower to adjust. There are also panoramic tripod heads. Wildlife photographers often use a camera gimbal.
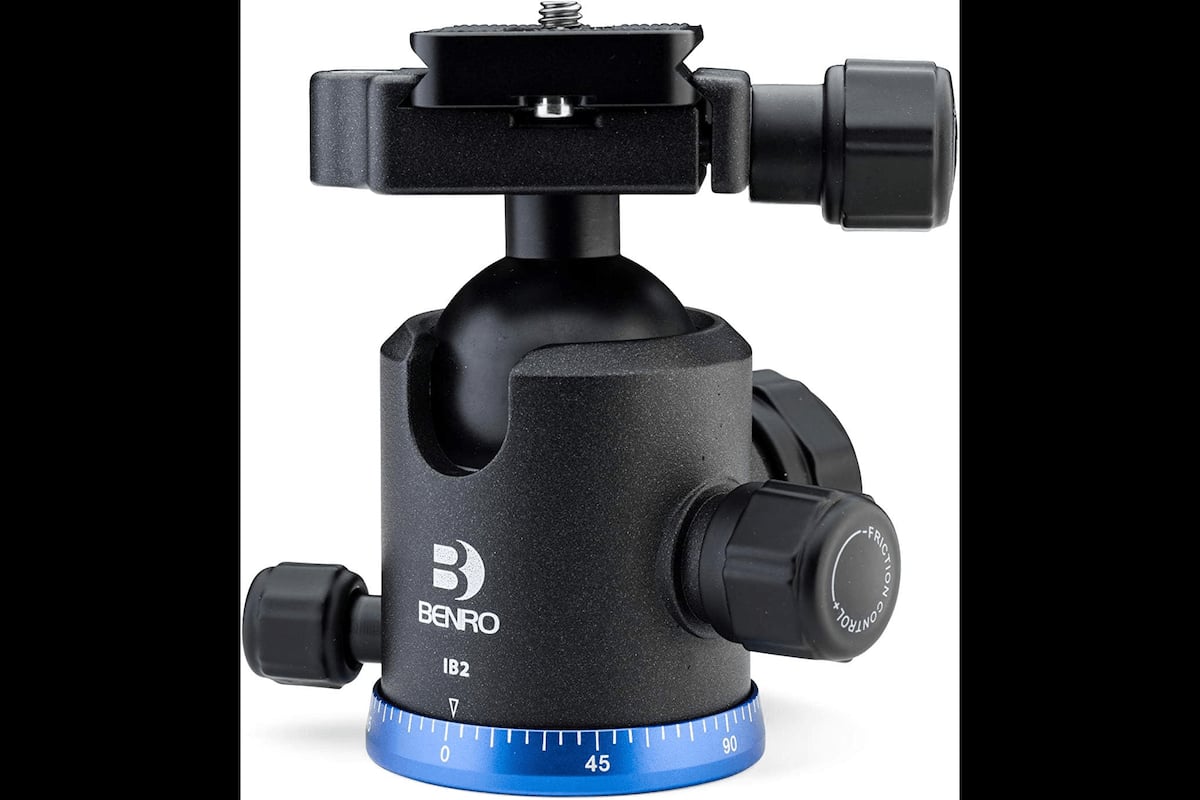
The Benro Triple-Action Ball Head
Quick-Release Mounting Plate
When searching for camera tripods, you will probably run across the term “Arca-Swiss.” Arca-Swiss is a system that allows you to quickly mount your camera on a tripod. It’s two pieces. There is a plate with side grooves that screws into the bottom of your camera.
The plate fits into a clamp on the tripod, holding it in place. Tripods that are Arca-Swiss compatible fit any Arca-Swiss plate.
Arca-Swiss is the most common type of quick-release mounting system, but it is not the only one. Manfrotto tripods have a quick-release system.
Photographers who use tripods a lot often mount an L-bracket to their cameras. This has Arca-Swiss grooves on both the side and the bottom. This lets you easily switch from landscape to portrait orientation. L-brackets are specifically made to fit your camera body.
Center Column
Most tripods also have a center column that holds the tripod head and can be extended for extra height. This makes the tripod less stable, so most photographers only extend the center column in a pinch.
The best tripods tighten the center column with a twisting lock. Avoid camera tripods that raise the center column with a crank mechanism. Cranks are slow, and the mechanics can fail.
Many tripods let you reverse the center column and mount the head underneath. This hangs your camera upside down, letting you shoot at a low angle.
On other tripods, you can remove the center column for low-angle shots. Sometimes, you can insert the center column at an angle to the tripod. This works more like a boom.
Center columns sometimes have a hook underneath to hang photography sandbags or a camera case. This adds more weight and stability to the tripod.
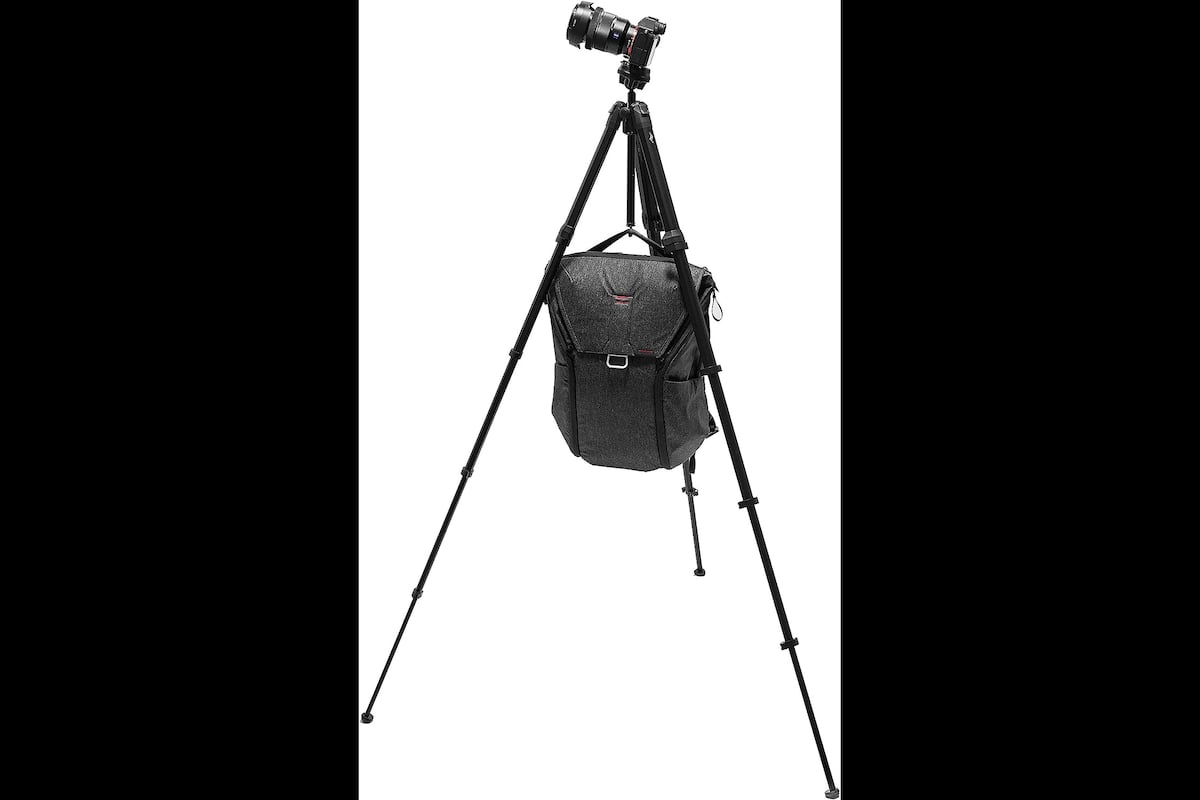
A camera bag hanging from the Peak Design Travel Tripod‘s center column
Camera Tripod Legs
Tripods, by definition, have three legs. Usually, these are in three, four, or five telescopic sections that give you control over the tripod’s height. You can extend all the sections or just one or two.
The legs lock into place with either a lever or a twist lock. Many photographers find lever locks faster to set up.
With the twist-lock system, you release the leg by twisting the lock. Then, you twist them in the opposite direction to tighten them. Twist locks are fine if they do not need more than a half turn to loosen and retighten the legs.
The best tripods let you independently adjust the legs at different angles. This lets you stabilize your camera on uneven surfaces. For instance, you can have two legs in the regular position, and one splayed out, supported by a wall or fence.
Some camera tripods have support structures between the legs. These structures add stability but limit flexibility. When collapsed, the legs may swing up over the head to save space. Some have a detachable tripod leg that can be used as a monopod.
Camera Tripod Feet
At the tip of the legs are rubber or plastic feet. Sometimes, the material is non-slip to keep your tripod from slipping on wet or icy surfaces.
The camera tripod may have metal spikes under the rubber, or you may be able to attach optional spikes. Use spikes to keep your tripod stable on wet or soft surfaces.
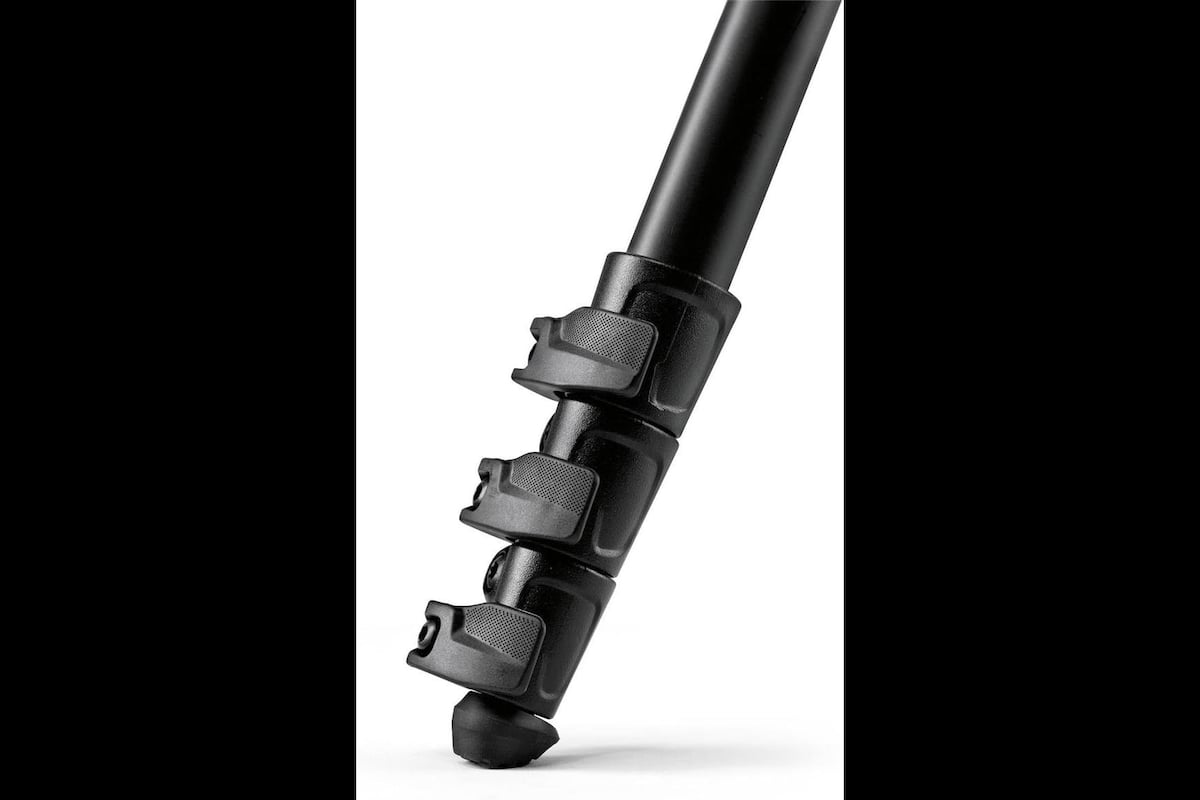
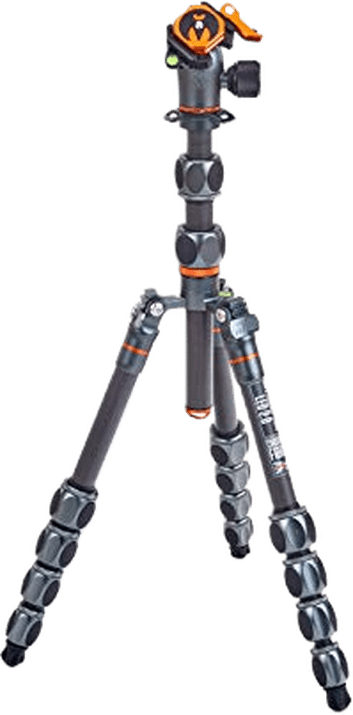
Tripod leg detail on our top pick, the Manfrotto BeFree Advanced
Conclusion: Choosing the Best Tripod for Your Needs
Whatever your main need for a camera tripod is, there’s one for you. Let’s say you want to make money from food photography. You will need a sturdy tripod. But it probably won’t need to be as stable as if you’re outdoors in the wind taking long-exposure landscapes.
Our top pick is a great compromise between value and features. The Manfrotto BeFree Advanced copes with most situations very well. And because it is so portable, you are more likely to carry it.