Creating a reflection in Photoshop is a great way to add depth and interest to an image. There are several ways to create a reflection, but the most common is to use the Mirroring tool. In this tutorial, we’ll show you how to create a realistic reflection in Photoshop using a simple photo of a building.
How to Easily Create a Reflection in Photoshop
There are many methods of making reflection images in Photoshop. Each step has alternative ways of achieving the same results.
In this article, you learn how to add a water reflection to an image. We go through the process step-by-step.
Step 1: Choose a Photo to Add a Reflection
Making the right choice of photograph to create a reflection for is a first and very important step. Not all photos are suitable.
Pre-visualize how a Photoshop reflection will look on the photo. See if elements in the foreground overlap with the area you want to make a mirror image of. This makes it more complicated.
Choose a photo with a clean line at the bottom of the part you want to reflect. This means the result can be more realistic looking.
For this tutorial, I have chosen a photo of a house at dusk. I have cropped the bottom of the photo where there was nothing of interest.
If I had not cropped it, there would be too much dark space between the house and the reflection. Keep this in mind when you choose a photo to use.
Step 2: Double the Canvas Size
© Kevin Landwer-Johan
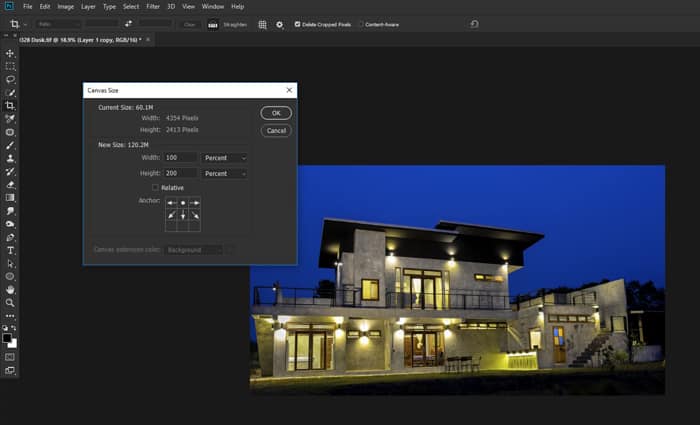
Open the image you have chosen. Now you need to double the size of your canvas to make room for the Photoshop reflection. Ctrl+Alt+C (Command+Option+C) opens the canvas and resizes the window.
Next to the Height input box, click on the drop-down and choose Percent. Change the Height percentage to 200.
On the Anchor diagram, click on the arrow at the top center. This means the new canvas space is added under your image. Then click OK.
Step 3: Make a Duplicate Layer
Unlock the layer by clicking the padlock icon in the Layers panel. Duplicate the layer by selecting the layer and using Ctrl+J (Command+J) on your keyboard. And rename the layers to make it easier to track which one you are working with.
Make both layers Smart Objects by right-clicking them in the Layers panel. Then choose Convert to Smart Object. Then drag the duplicated layer into the space below your original layer.
Step 4: Flip the Lower Layer and Add Blur
© Kevin Landwer-Johan
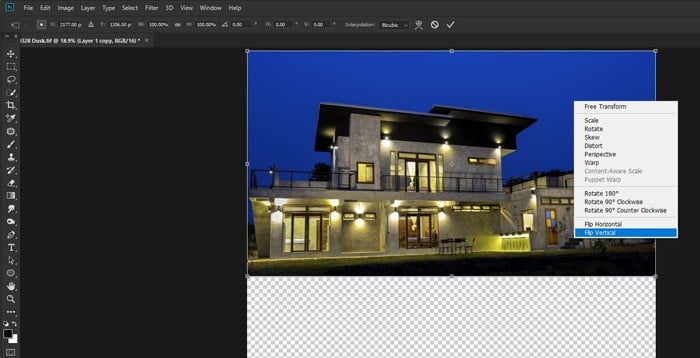
The lower layer will be your reflection, so you need to flip it vertically. Do this using the Transform tool, which can be initiated using Ctrl+T (Command+T) on your keyboard. Right-click inside the image and select Flip Vertical. And press Enter on your keyboard.
From the top menu, choose Filter > Blur > Motion Blur. Make the angle 90 degrees and the distance a value, so it looks good. This varies depending on the size and resolution of the image you are working with. I set my pixel distance at 20 in this example.
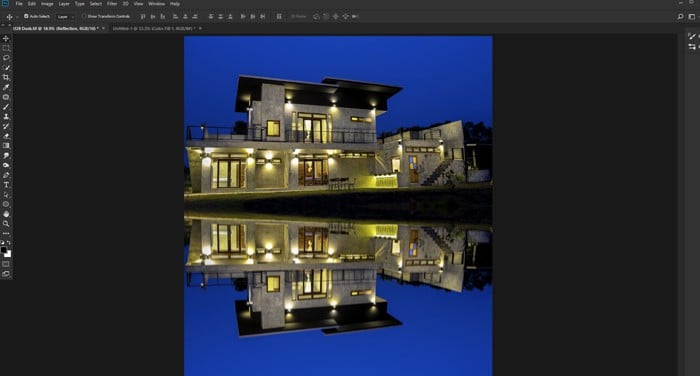
Nudge the layer up, so there is no gap between it and the top layer if you need to.
© Kevin Landwer-Johan
Step 5: Create a New File
Now you need to create a new file to help make the reflection more realistic. Don’t make this file too big. Make it the same shape as your reflection image but a smaller size. Otherwise, Photoshop may not be able to save it. I made mine 30% of my reflection image size.
Next, select the Paint Bucket Fill tool and fill the image with black. Unlock the background layer by clicking on the padlock icon in the Layers panel.
Step 6: Add Noise and Blur for Texture
© Kevin Landwer-Johan
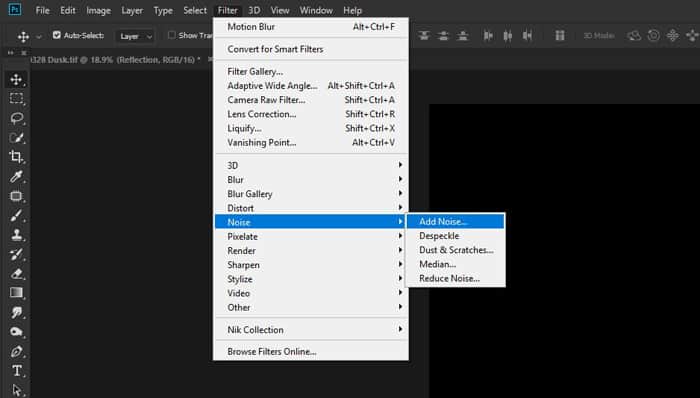
Now you can add some noise to the black layer. And you can begin building a texture to add to your reflection layer.
From the top menu, select Filer > Noise > Add Noise. Make the Amount 400% and select the check box for Uniform. Then click OK.
Next, you need to add some more blur. Select Filter > Blur > Gaussian Blur and set the Radius to 1.5 pixels. And click OK. You will see a speckled look in your image. But it is not textured enough yet.
Step 7: Emboss the Texture
© Kevin Landwer-Johan
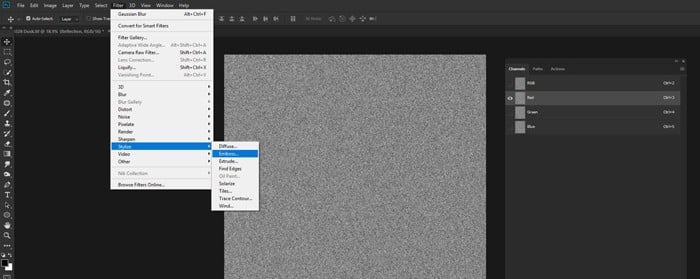
Open the Channel Panel and click on the Red Channel. Choose Filter > Stylize > Emboss from the top menu.
Set the Angle to 90, the Height to 5, and the Amount to 500. And click OK.
Select the Green channel and Filter > Stylize > Emboss from the top menu. Set the Angle to zero, the Height to 5, and the Amount to 500. And click OK.
Turn on all the channels by clicking RGB. Go back to your Layers panel. Right-click the layer and select Convert to Smart Object.
Step 8: Stretch the Perspective
© Kevin Landwer-Johan
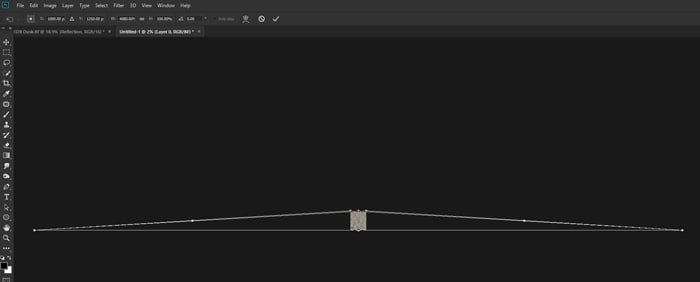
With the layer selected, press Ctrl+T (Command+T) on your keyboard to bring up the Transform window. Right-click inside the image and choose Perspective.
Zoom out a long way, so your noise image is small on your monitor.
Click on either the bottom left or bottom right handle on the Transform box and drag it horizontally. This stretches the base of the image and helps distort the noise. So it looks natural when you incorporate it into your reflection image. Press Enter and zoom back to 100% (Ctrl+Alt+0 or Command+Option+0 on your keyboard.)
Resize your noise image, so it fills a little more than the lower half of the canvas. To do this, press Ctrl+T (Command+T) again and drag the top handle down to just about halfway. It can now fit your reflection layer. Name and save the image where you can easily locate it for the next step.
Step 9: Add a Displacement Layer
© Kevin Landwer-Johan
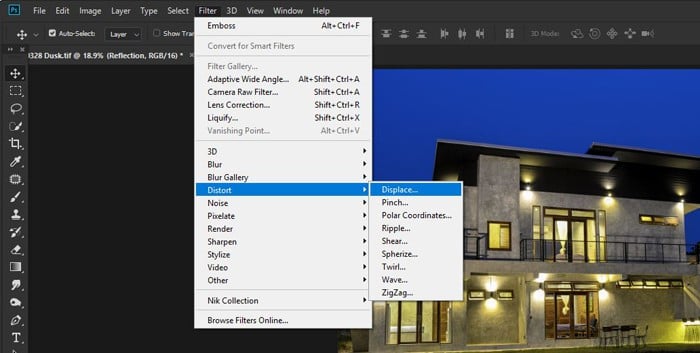
Go back to your main image. Click on the reflection layer and duplicate it by pressing Ctrl+J (Command+J) on your keyboard. Name it Reflection Copy.
Select the new layer. It should be above the other reflection layer. Then choose Filter > Distort > Displace from the top menu. Set the vertical and horizontal scales to 10. You may need to change this if it does not look good. It depends on your image size and resolution.
Click OK. A new window opens where you need to select the distorted image you just created and saved. This adds the texture you created as a displacement layer.
If the ripple effect is too large or too small, undo that step. Redo the step again but choose a higher or lower number for the displacement scale. Experiment with this until you are satisfied with the way it looks.
Step 10: Tweak the Reflection
© Kevin Landwer-Johan
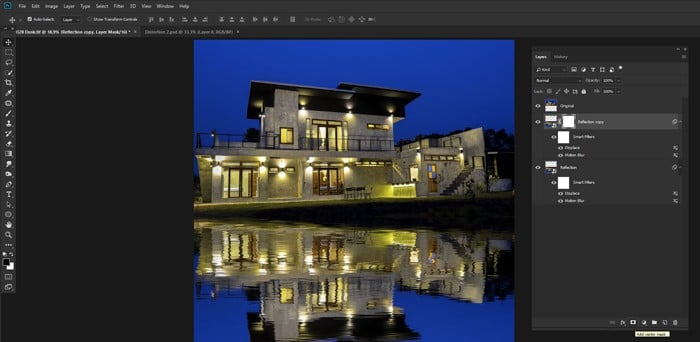
On your Reflection Copy Layer, click on the Layer Mask icon at the bottom of the Layers panel. Select the brush tool and set the color to black.
Right-click anywhere on your image and set the brush size to large and the Hardness slider to 0%. Click anywhere outside that window to close it.
Set the brush opacity from the options panel above your image to 20%. Now paint from side to side over the top half of your reflection layer where it meets the top layer. This reduces its opacity by 20%.
Keep repeating this until your reflection looks more natural. Make sure you have your layer mask selected and not your actual layer.
If the layer mask is selected, you will paint 20% black onto it rather than erasing 20%. By doing this, you are minimizing the effect of the ripples. It produces a more natural sense of depth.
Select the bottom two layers, right-click on them in the Layers panel, and select Merge Layers.
© Kevin Landwer-Johan
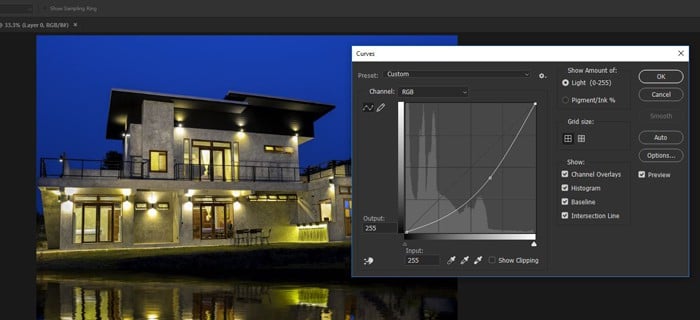
Lastly, bring up the Curves window by pressing Ctrl+M (Command+M) on your keyboard. Click and drag down the middle of the Curves adjustment line. This darkens the reflection layer. Drag the curve adjustment just low enough so that it looks natural.
A reflection in the water is normally a little darker than what’s being reflected. Finally, crop the bottom of the photo if you need to.
Conclusion
Making a reflection in Photoshop is often much easier than capturing one with a camera. Use these simple steps to create an interesting mirror image. You can enhance somewhat dull photography!
The key is choosing the right image, as not all photos are suitable for creating a reflection. As you experiment and gain experience, you learn which photos the technique works well on.

© Kevin Landwer-Johan
Try to understand this technique and practice. You can then adapt it to create other reflections. You may not wish to add the distortion you created with the displacement layer. If you leave this step out, it results in a more mirror-like reflection. This can be a cool effect for products and portraits.
The most important is to remain flexible. Try out different methods based on this tutorial. Doing this helps you develop your own creative post-processing style… For more photoshop tips, check out our post on how to flip an image in photoshop next!


