Have you ever looked back at the days when you were starting out with photography? Everything was so fun and thrilling. Where has all that excitement gone?
You might be stuck in a photographic rut or looking for some creative photographic ideas. Photoelasticity is an easy and fun project you can do. You’ll come up with great arty pictures and give your creativity a boost.
What Is Photoelasticity?
Photoelasticity determines the stress distribution of material through experiments.
At this point, I can almost see the puzzled expression on your face. Remember this: Photography is as close to science as it is to art.
In fact, the study of what happens to light is one of the most valuable scientific tools. It’s even used to investigate the characteristics of everyday materials.
The stress stored inside a material can create a colorful fringe pattern under the right circumstances. Photoelasticity for a ripped film of clear plastic shows that the unstressed part of the film is homogeneous in color. But near the rip, a rainbow of colors appears.
This rainbow is where all the stress went when I stretched the film past its breaking point.
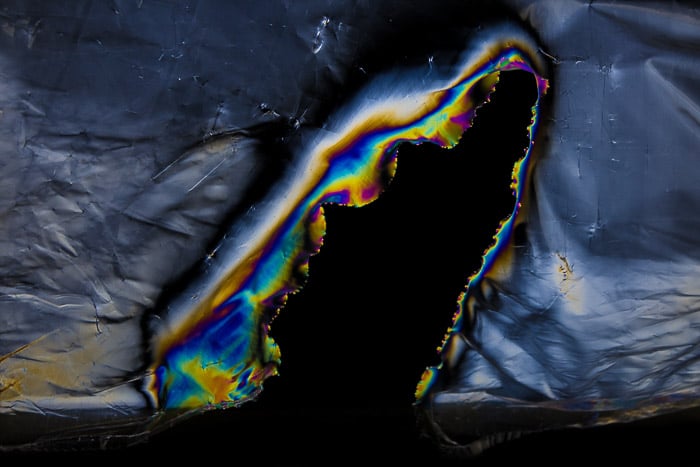
While stretching and tearing apart this plastic film, a lot of stress was concentrated locally in the material. It can be detected in the form of colorful fringe patterns with photoelasticity.
How to Use Photoelasticity at Home
To play with the artistic side of photoelasticity photography, you don’t need any fancy equipment.
All you need is are some clear plastic objects, a polarizing filter and a source of polarized light.
Unfortunately, conventional light sources such as the sun, bulbs, LEDs and flashguns do not emit polarized light.
If you are wondering what light source you should use, you are looking at it right now. The LCD screen of your computer, your tablet or your cellphone, all emit light polarized in one plane.
You can verify this by looking at your screen through a polarizing filter. You can then observe how it turns darker and then solid black as you rotate the CPL filter more and more.
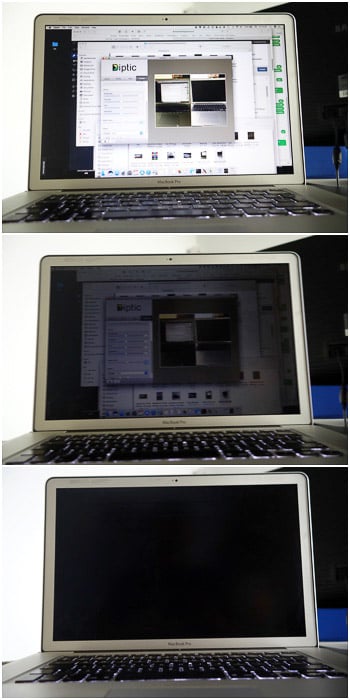
The effect of a circular polarizing filter on the LCD screen of my laptop.
By rotating the polarizer you are selecting different polarization planes. This blocks more and more the amount of screen light passing through the filter.
When you rotate the polarizer 90 degrees, you have suppressed all the screen light.
How to Set Up for Photoelasticity
The images below show the effect of a simple plastic wrap placed on my iPad screen. The first image without, and the second image with a polarizer.
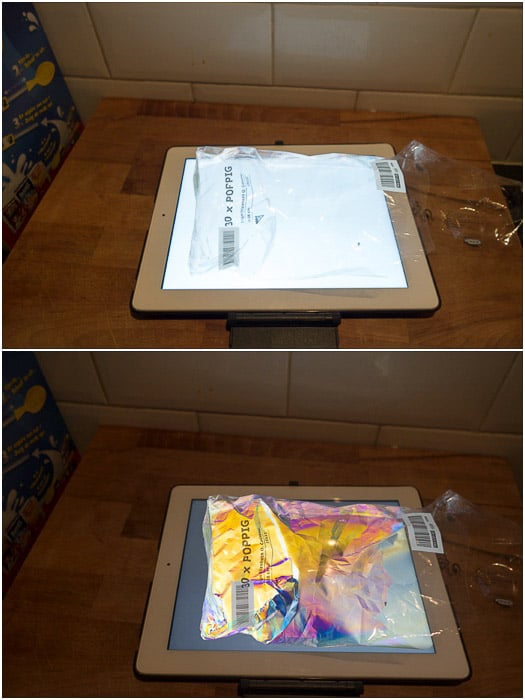
A simple plastic wrap displayed on my iPad screen as seen with and without polarizing filter.
To photograph the colorful fringe patterns of larger objects, I prefer to use my laptop. I can have the monitor flat on a table and arrange objects on top of it, or I can place it vertically.
Like that, it lights the objects from farther behind (like in the image below).
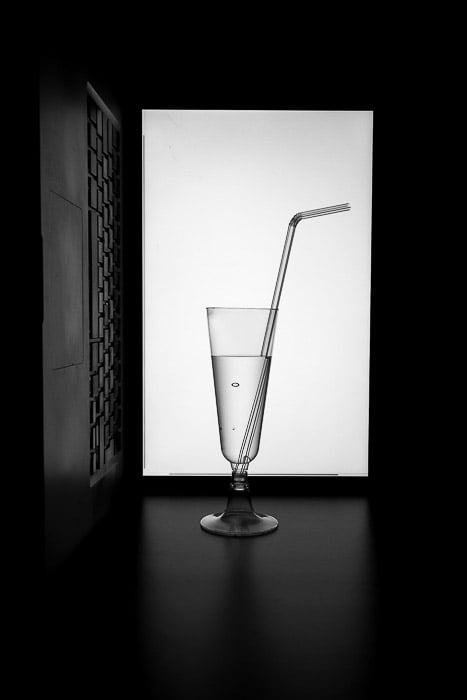
To photograph the plastic glasses with the straw I placed my laptop on its side and move it in the background. For this photo, the polarizing filter was not used, thus no fringe pattern is visible.
Cameras and Camera Settings for Photoelasticity
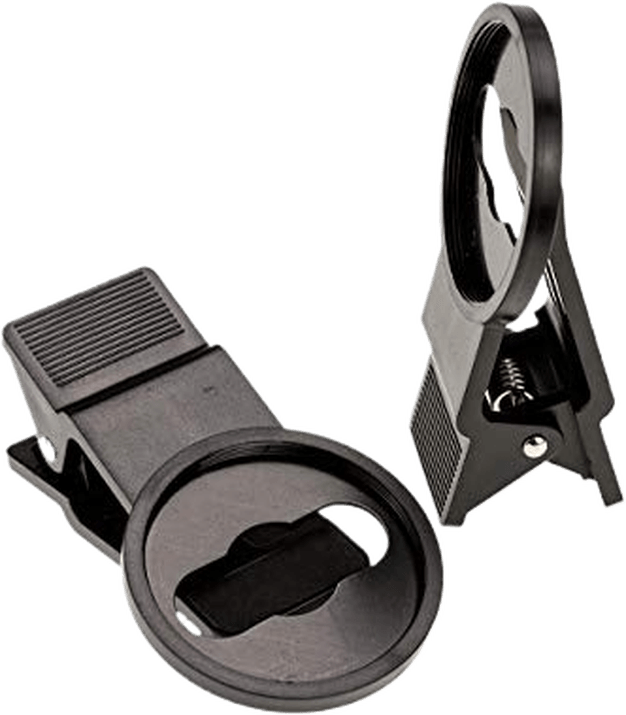
For this project, any camera will work, including compact cameras and camera phones. If you cannot mount a filter, hold the polarizing filter in front of your lens, and you will be fine.
Or you can buy a filter adapter. The Akoak 37mm Filter Clip allows you to use 37mm filters with a camera phone such as the iPhone.
By hand holding a polarizing filter in front of the lens of my Apple iPhone 7, it was easy to photograph the photoelasticity fringe pattern of a plastic glass.
I prefer to work in manual mode to have consistent exposure throughout the photo session. I took most of the photos presented here with my Sony RX100 Mk2 compact camera.
I tend to focus the scene manually. If the objects are displayed directly on to the monitor, I try to shoot with the widest aperture possible. That way, I’ll have the shallowest depth of field, and I’ll be able to blur the screen pixels as much as I can.
The only thing that remains to do is to visualise a white image full screen and to crank up the screen brightness.
What to Photograph
I have already said you should photograph objects made of transparent plastic. But plastic is a very generic term. To be honest, I cannot tell you exactly which kinds of plastic will work and which ones will not.
Grab every semi-transparent or clear plastic object you can find and try for yourself.
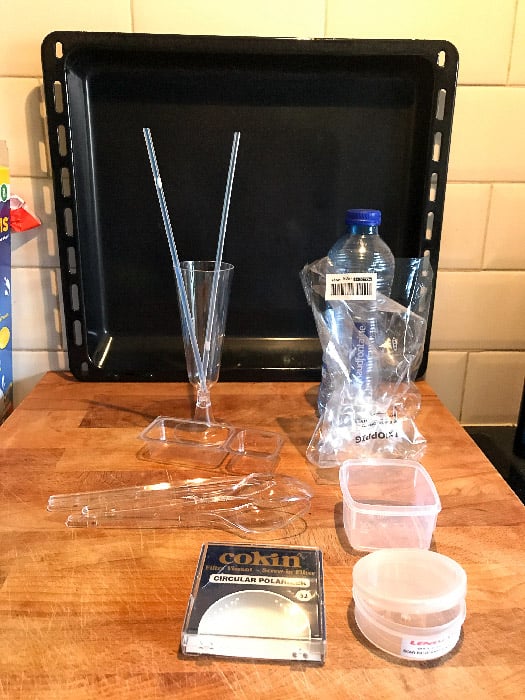
Some of the materials I have used to explore photoelasticity: filter cases, plastic glasses and food containers, bottles, plastic films used to wrap stuff, cutlery, etc.
This is where most of the fun comes from, and this kind of treasure hunt can get you addicted. The next time you’re at the grocery store, you might end up buying more plastic than food.
Let’s see some results in detail.
Plastic Bottles
One of the first materials I tested was a plastic water bottle and I got almost no fringe pattern.
Plastic bottles for the food industry are made of PET (polyethene terephthalate). This is a type of amorphous plastic material.
I suspect the degree of crystallinity and/or the fabrication process of the material plays a huge role. Some other PET containers show stronger fringe patterns, but I am not an expert on this.
What I know is that this kind of material does not work well for this project.

I was not able to get a good fringe pattern with any of the PET bottles (water, coke, etc.).
Plastic Cases
Rigid plastic containers, such as filter cases and CD cases, work well. If you look at them in the light of your computer screen, you might even see a faint fringe pattern with the naked eye.
Those objects are usually made of polypropylene (PP) material. This is a much more dense and crystalline plastic than PET.
Sometimes you can know what kind of plastic an object is made of from the recycle symbol. Unfortunately, not all plastic objects have an impressed recycle symbol.
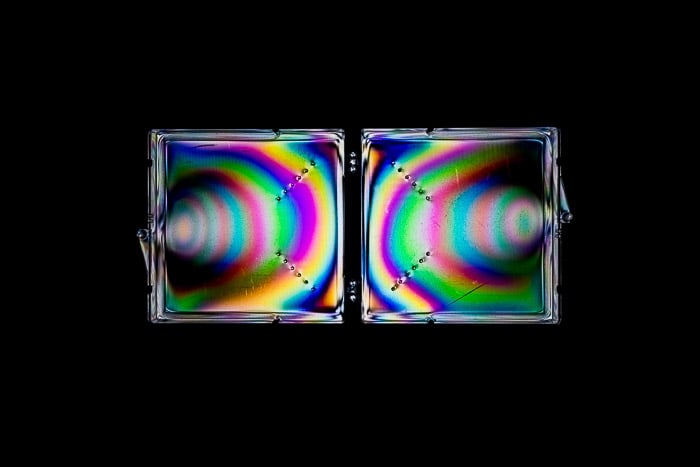
The case of my polarizing filter shows a pretty strong fringe pattern.
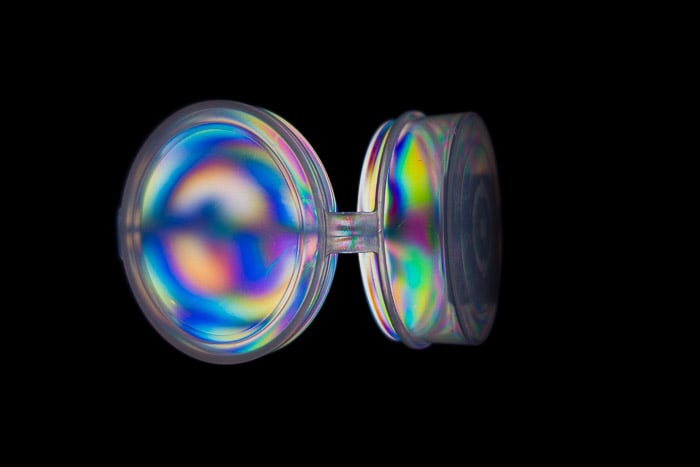
The case of my Lensmate filter adapter also displays a nice pattern.
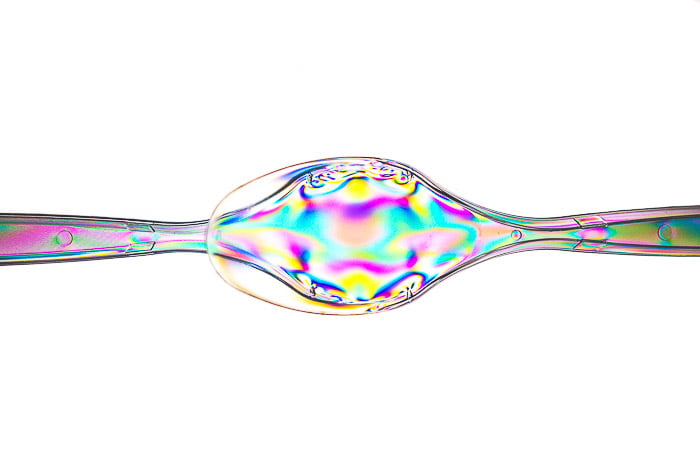
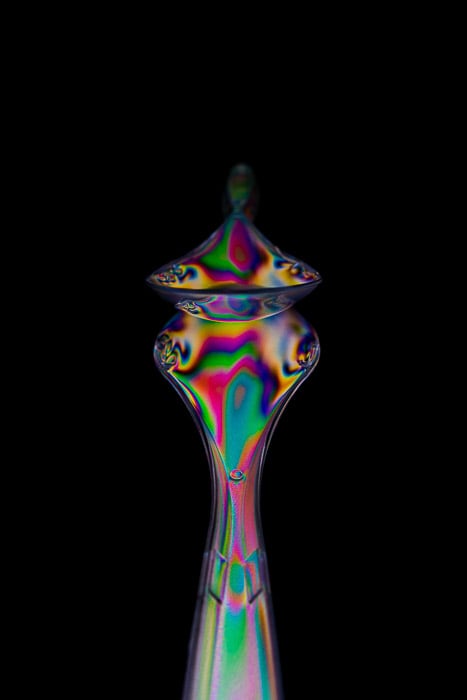
Plastic Cutlery, Glasses and Straws
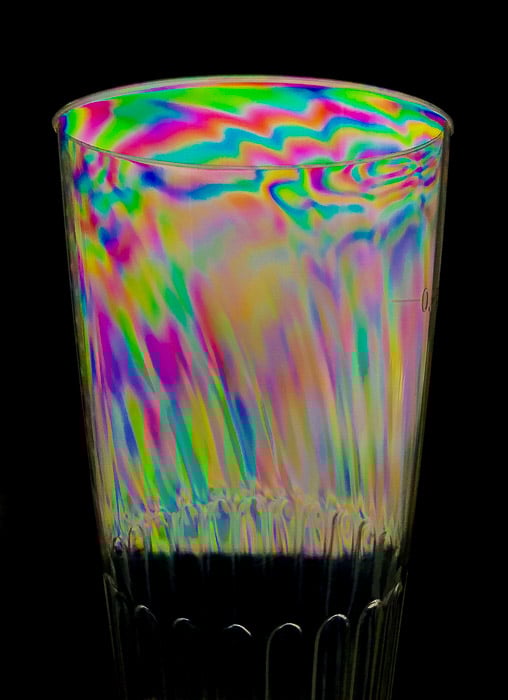
Clear plastic material like cutlery, glasses and straws look stunning.
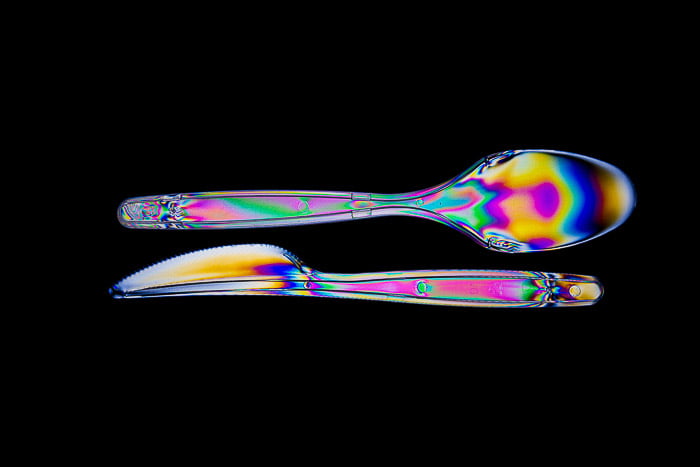
Clear plastic knife and spoon arranged on top of my laptop screen.

A classic glass gets much more photogenic with photoelasticity.
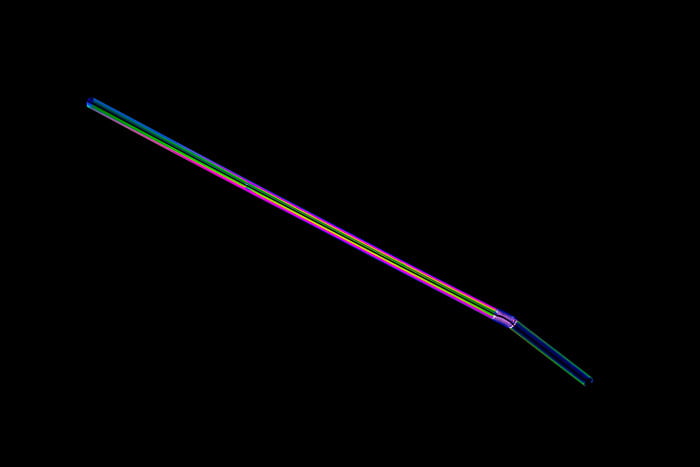
A simple straw or a lightsaber?
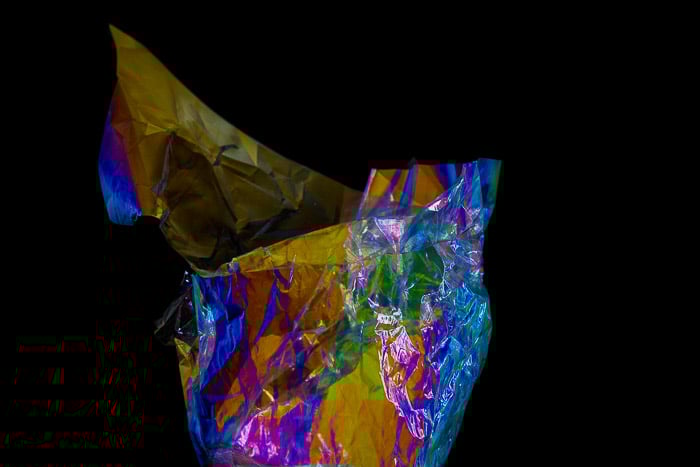
Plastic Bags, Food Packaging and Other Food Containers
Do not limit yourself to experimenting only with material made of hard plastic. Plastic sandwich bags can give amazing results creating compelling abstract images.
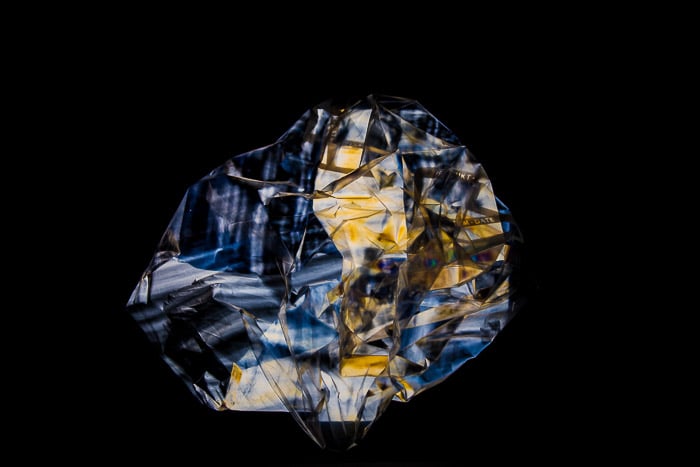
This plastic bag intended for freezing food looks like a precious gemstone.
Plastic food packaging used to wrap some salty corn cakes can also be used to create nice abstract images.
Small food containers usually have lots of stress in them. They should display a great, symmetric, fringe pattern.
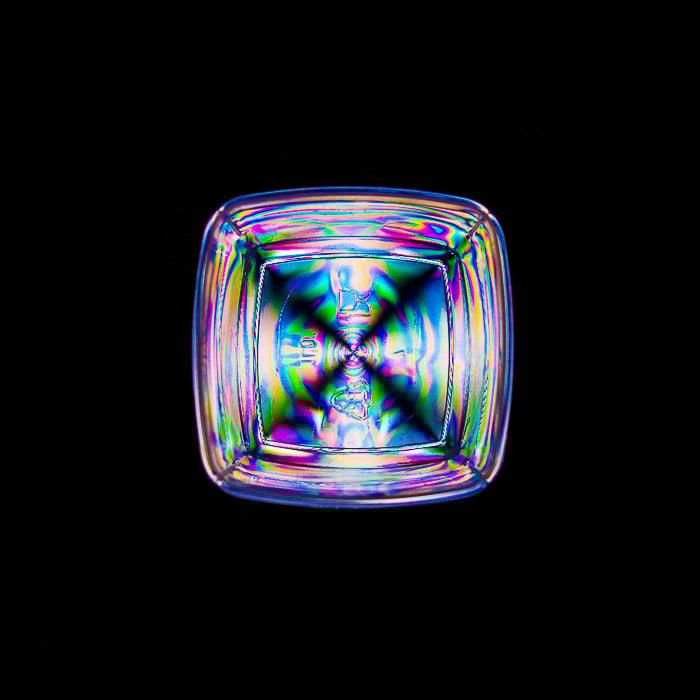
A small food container made in PP. You can see the recycle symbol with the letters PP in the lowest half of the bottom of the container.
Low Key or High Key?
You may have noticed that, until now, I have shown you only images in low key style. You don’t have to suppress the light of the screen with your polarizer for photoelasticity to work.
I like the low key style more, but high key images are great as well.
High key image of two superposed spoons made from polypropylene.
Low key image with the spoons in the same configuration as before, but taken from a different angle.
Experiment With Different Objects for Photoelasticity
Once again, this project is all about fun, and you should not take it too seriously. Look around you and don’t be afraid to experiment and test wild ideas. Worst case, you lose a few seconds of your life trying something that did not work.
When things work, though, the reward can be huge. I had this Lego model of the ISS (International Space Station) hanging around at work.
It has a great array of clear plastic solar panels. Needless to say, I tested it.

My Lego ISS model gets more interesting thanks to photoelasticity.
Getting Creative With Photoelasticity
As I said, photoelasticity is so easy and fun to do that you will soon begin asking yourself: “Now what? I want more!”
You have experimented with different objects and seen how they respond to photoelasticity. Now it is time to get more creative.
You can combine different objects together while playing with the composition and message of your photos.
Composite Images
The previous photo of the ISS is great because it looks like it is in space. I could have stopped there, but I am into astrophotography as well.
I decided to do a composite image using a shot I took of the moon, the ISS and the space shuttle approaching it.
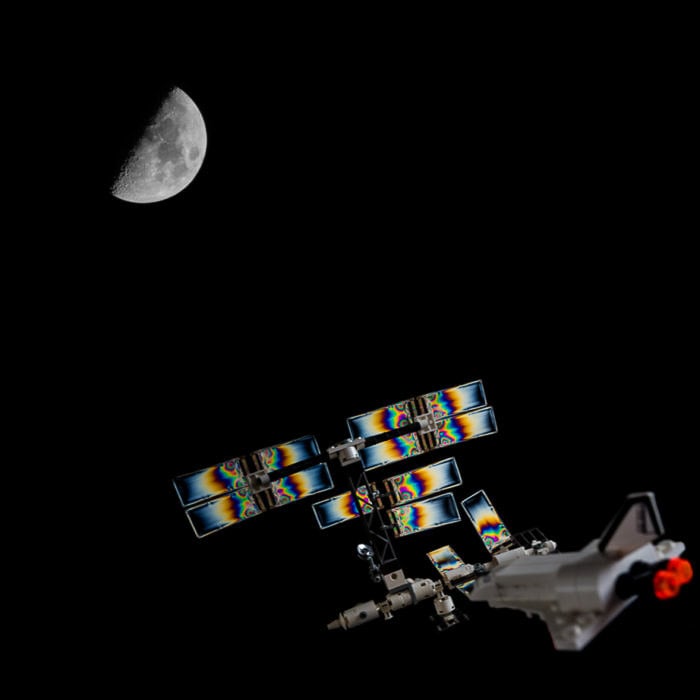
Composite image of an old photo I took of the Moon and one taken while playing with my ISS model.
Go With The Flow and Be Creative
Water has a refractive index quite different from that of air. If you partially submerge something in it, like a stick, the stick will look broken.
The part of the stick outside of the glass will appear to be in a different position to the submerged part.
Here I did the same, using a straw instead of a stick. Air bubbles were a welcome accident.
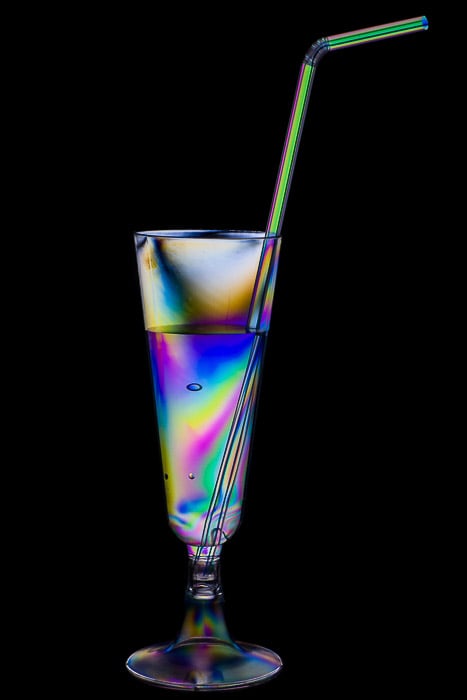
A glass, water and a straw. This is the result obtained with the setup shown earlier in the post.
Usually, the creative process is a continuous flow of ideas, each one based on what you did before. Wouldn’t it be nice to have two glasses forming a heart with their straws? Yes, it would!
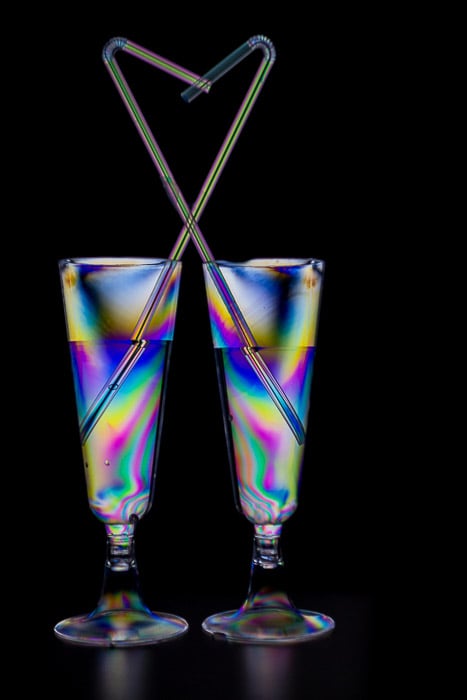
Two glasses with straws arranged to form a heart-like shape.
The next results were so unexpected that they looked like magic to me. A spherical food container turned into a magic ball floating in the hand of a wizard.
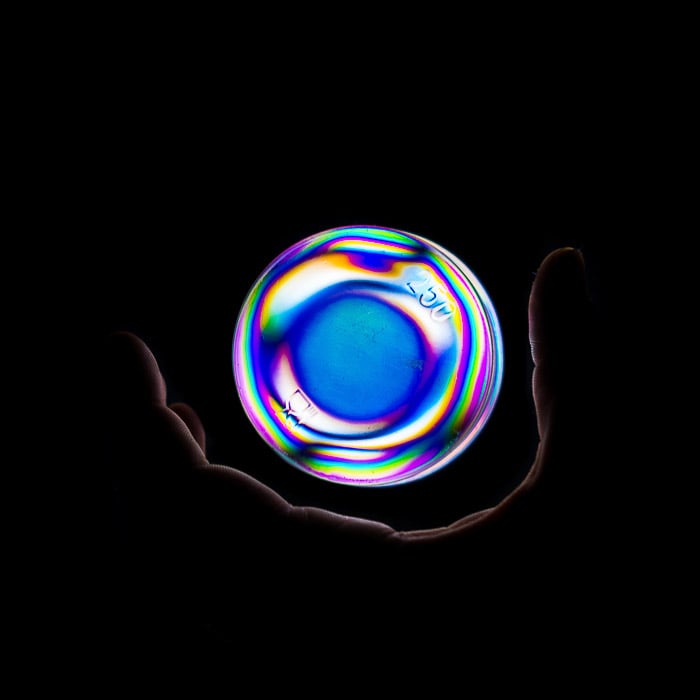
The colorful spherical fringe pattern on this food container makes it the perfect prop for a photo with some magic feelings.
Two Artistic Practical Uses For Photoelasticity
All these images can wake up your photographic enthusiasm and creativity. They will also get you quite many likes on social media. But their usefulness ends there.
Or does it?
Before concluding this post, I want to give a couple of examples for when this kind of work has a practical use.
If you are good at drawings (which I am not), you can craft your art for yourself. You could get something different by creating a mask of your drawing to put in front of plastic wrap.
This will show strong, colorful fringe patterns.
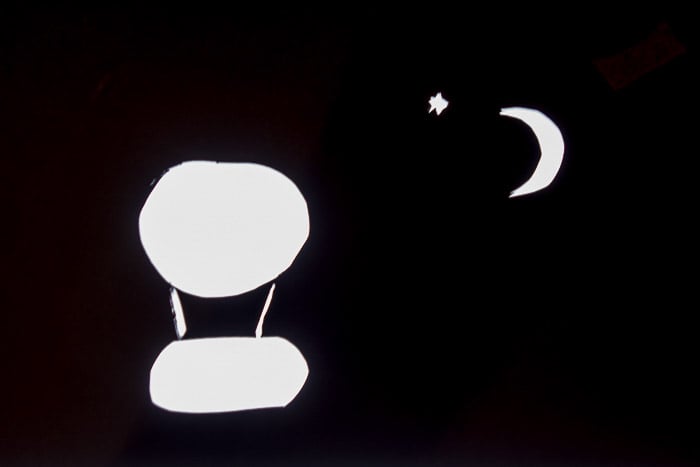
The masks for the images below were carved directly into a black sheet of paper.
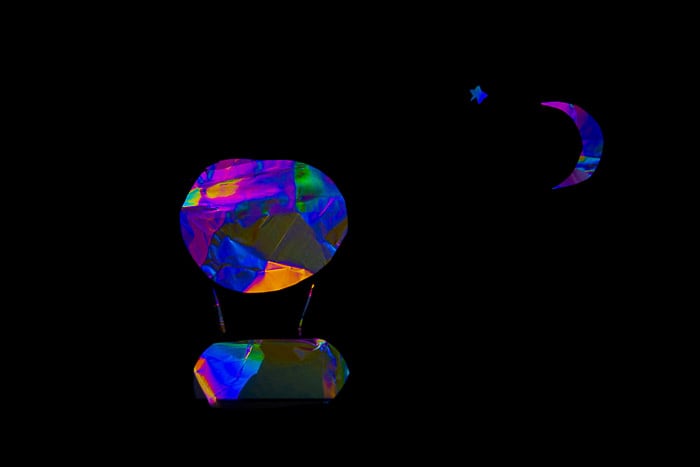
While I am not good at drawings, I had some ideas, like this hot-air balloon rising into the night and a sailing boat.
Finally, if you are a graphic artist, you can put photoelasticity to good use. It provides you with the tools to create colorful abstractions you can use to fill in a text.
I used the photo of the corn cakes packaging to fill in this text in Adobe Photoshop.
Conclusion
I hope this post has ignited your curiosity. Give photoelasticity photography a try!
Remember: don’t overthink it. Never stop having fun and experimenting with materials and ideas.
Examples of Photoelasticity Photography
Photoelasticity photography is one of the topics we cover in our creative photography course, Wow Factor Photography.
Below are some of the photos taken by our students. If you'd like to learn more, check out the course here.
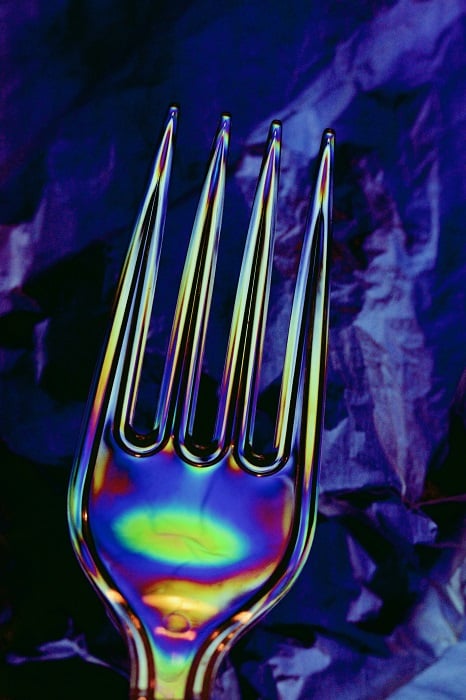
Photo by Pamela Siimonsson
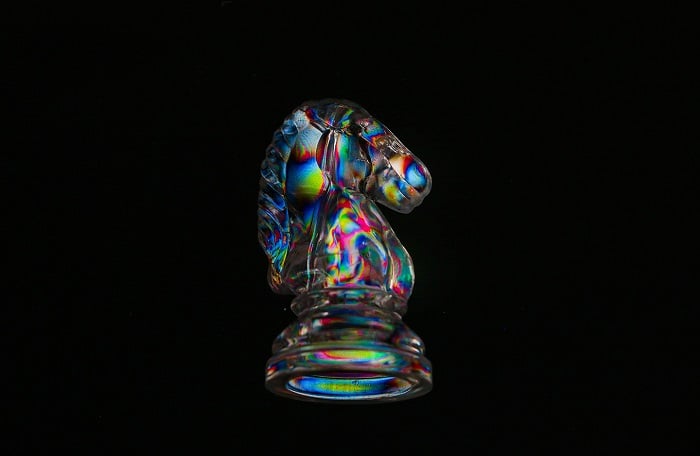
Photo by Ni Ni Tun
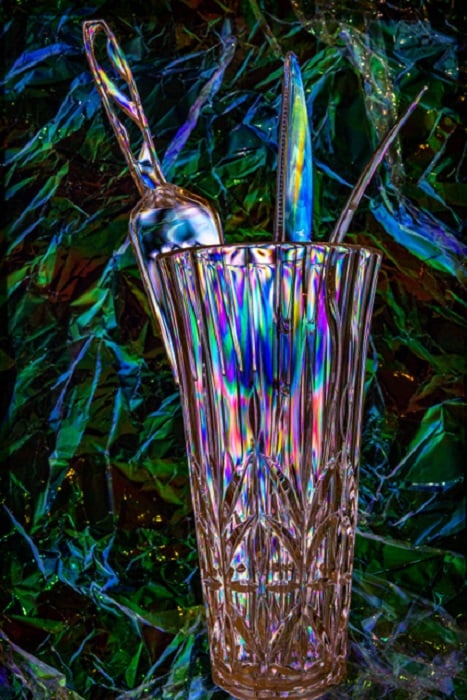
Photo by Carolyn Randall
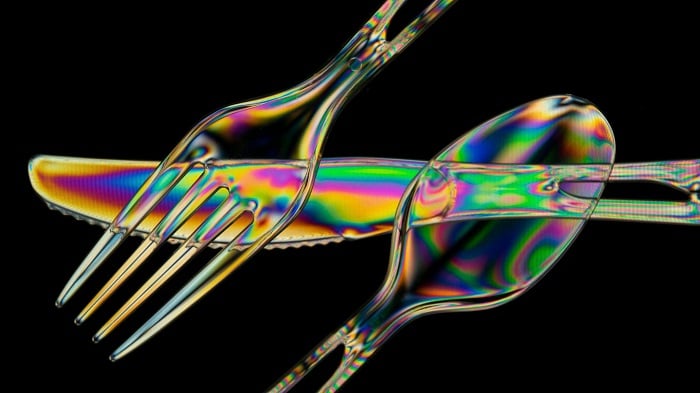
Photo by Leonard Kinstra
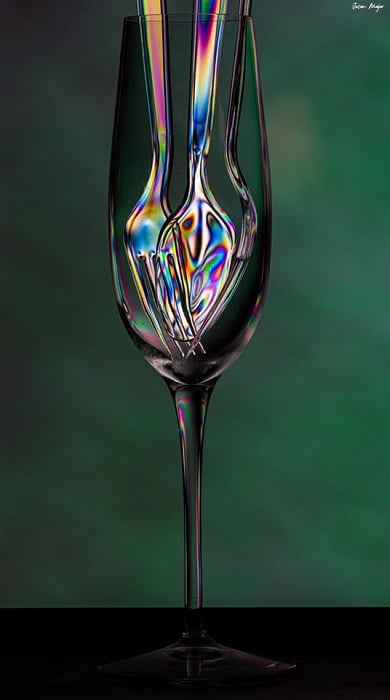
Photo by Jason Major
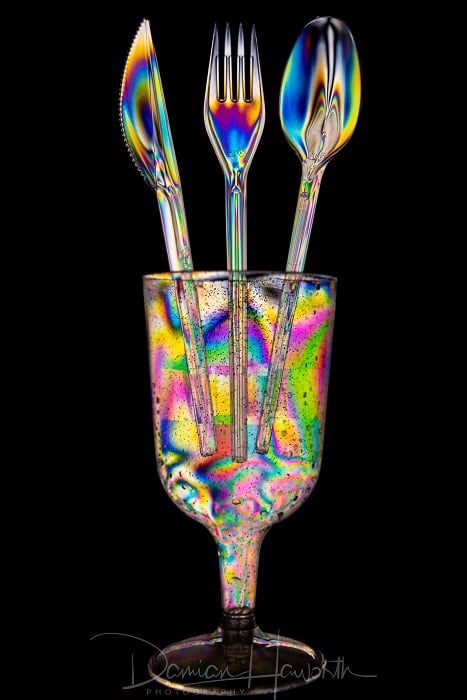
Photo by Damian Haworth
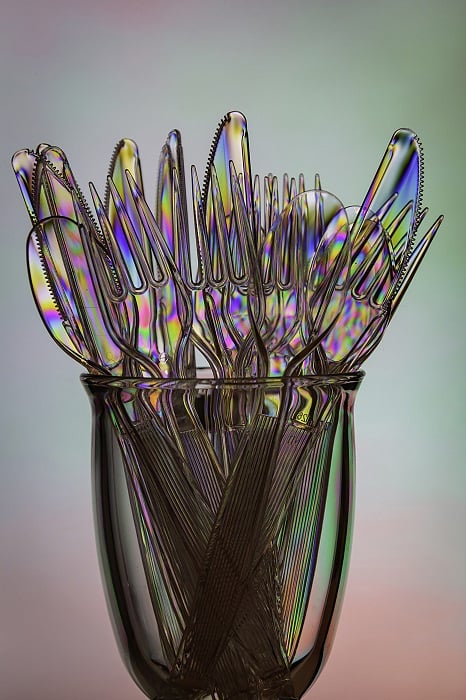
Photo by Allen Morrell
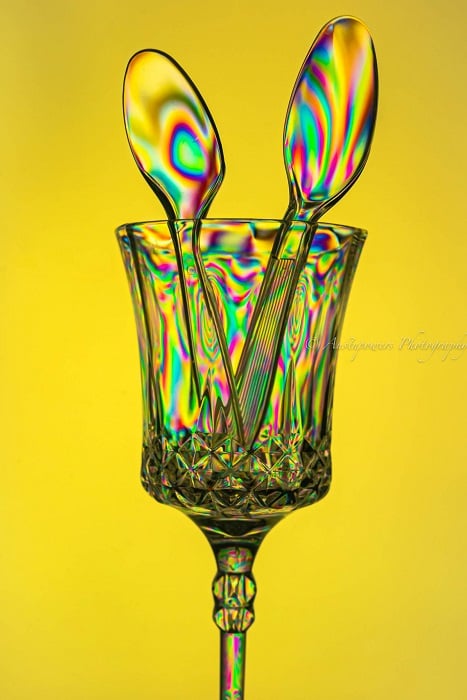
Photo by Mark