There are times when you want to capture your subject without a background. You may even have a brief, where the image is for use on a white page. High key photography is the technique you’ll need to know for this.
The concept of high key photography is easy, but the execution can be tricky.
Read our article below to know what high key photography is, and how to achieve it.
High Key Photography: What Are High Key Images?
Lights. And more lights. That’s how you do high key photography. Adding a little contrast, but not too much, also helps. This is different from low key photographer, where high contrast is what you want.
High key photos are mostly light. One main light, the key light, provides the primary illumination. One or more lights, or reflectors, are then utilised to fill in all or most of the shadows.
High key photography is all about balancing the light ratio.
Unbalanced lighting will result in too much shadow. This is not integral to high key photography. The key light must provide the primary illumination for the photo.
Other lights then must have a lower output to complement the main light. Balancing the secondary lights will reduce shadows cast by the key light.
How to Manage Your Tone Range for High Key Photography
High key lighting results in photographs with a narrow tone range. There won’t be much difference in the light reflecting off the lightest and darkest parts of a high key photo.
Including a small amount of dark shadow or tone in your high key photos will provide some depth to them.
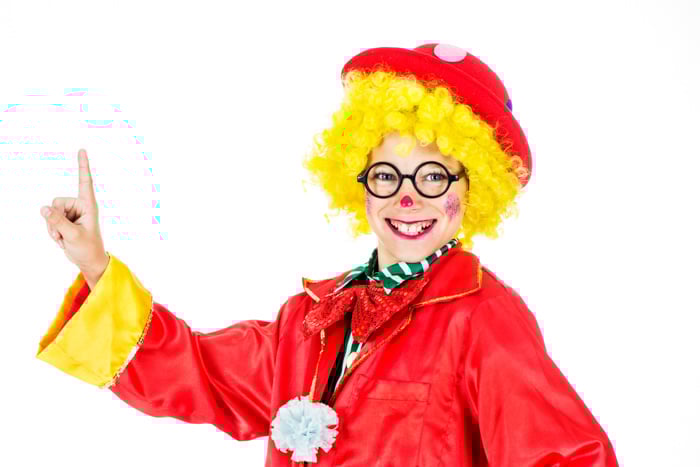
Kevin Landwer-Johan
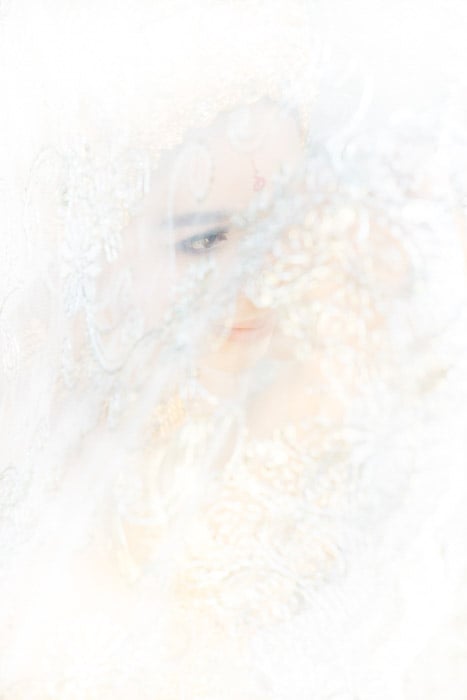
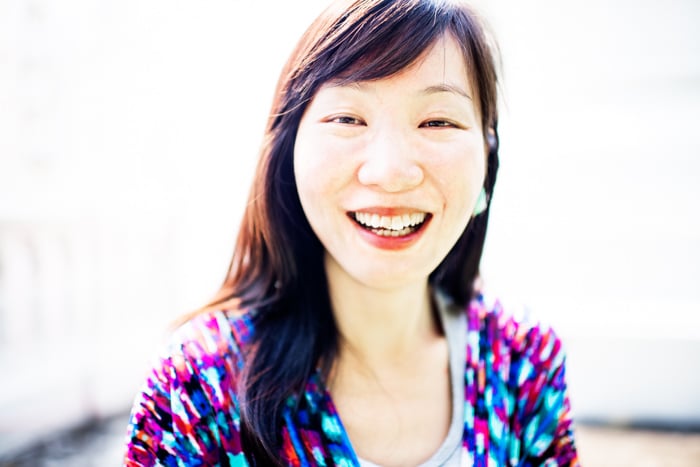
In this photo, there is very little shadow. Because of this, very little depth. This provides an aura of mystique. Her eye, the only darker tone in the portrait, provides some sense of depth and a focus point for the viewer.
I took this photo outdoors with two reflectors. The model is holding a large piece of white lace fabric above her. This also assists in creating a high key portrait.
Had I used only available light, with no reflector, the shadows would have been dark. The result would not have been a high key portrait.
Filling in the shadows with the reflectors and using the lace fabric gave me the look and feel I wanted.
Use Shadows to Create That High Key Look
Balancing light and shadow is foundational to a good photograph. You can create and change the mood of a photograph with the careful manipulation of light and shade.
Images with heavy, dark shadows will convey a moody atmosphere. This is a very different feeling from photos made with high key lighting.
As you are setting up your high key photo start with one main light. This is your key light. Watch where the shadows are falling.
Place your secondary lights or reflectors so that they fill in the shadows.
Kevin Landwer-Johan
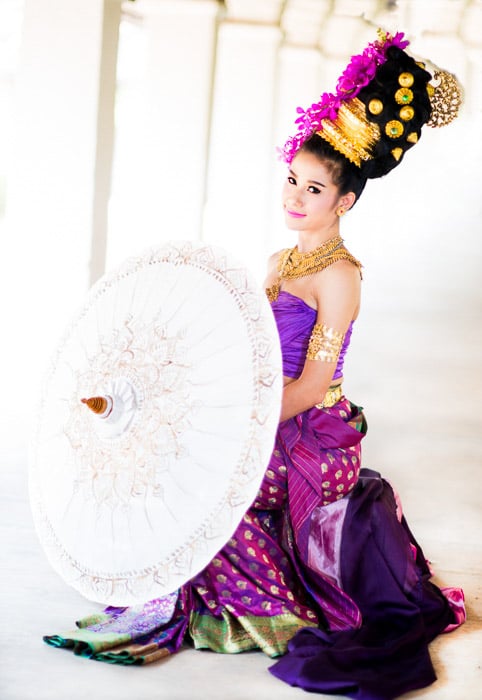
Setting up for this photo I positioned my model facing the light coming between the columns. This is my key light. As she faced the light, the left side of her face was in the shade.
I placed a large reflector close to her, outside my frame, to bounce light into her and fill the shadows.
How to Control the Continuous Light Ratio
Working with continuous light is easier when making high key photos. This is because you can see where the shadows fall.
You need to control the amount of light from your secondary lights. This way you keep the shadows limited.
Using Continuous Electric Lights
LEDs or other sources of electric light are controllable in three ways:
- Adjust the light output with a dimmer
- Move the light closer or further from the subject
- Add diffusion to the light.

Kevin Landwer-Johan
If your lights have an output control this is the easiest method to use. Once you have your key light set up, place your first secondary light so it fills in most of the shadows.
You can achieve this by placing this light at an approximate angle of 45° to your main light. Then adjust the light strength to a little softer than your key light.
There will be a little shadow on the side of your subject which faces this light.
If there are still shadows you want to fill in, you will need another light or reflector. Look at your lights and the direction of the shadows.
Decide which light is causing most of the shadow. Now add another light/reflector opposite this shadow. Adjust the light so it fills in the shadow but doesn’t overpower your other lights.
Kevin Landwer-Johan
If your light source has no dimmer, move it closer to your subject. This increases the amount of fill light. Move it further away to soften the light on your subject.
Using a reflector, experiment with the position of it until you create the right balance.
Working with electric lights you can also add a diffuser to help control the output. A diffuser will reduce and soften the light. Soft light creates less shadow than undiffused light from a small source.
A diffuser will also have the effect of making your light source appear larger. This will help make a good high key photo.
Using a Flash
There are too many variables when discussing flash. Here, I will stick to a few basics in this article, covering the essentials.

Kevin Landwer-Johan
Using studio strobes or flash units, the same balancing light idea applies. Diffusing flash is vital in creating high key photos. The light coming from a small source, like a flash, is strong.
It creates a dark, hard edge shadow unless diffused and filled in. Using a softbox or umbrella will provide more pleasing light.
Place your key light where you want the main light to fall on your subject. Then add one or more lights to fill in the shadows. Try them first on the auto settings.
If you are happy with the balance and there are no dark shadows, this is the easiest setup.
When automatic settings are not producing the light you want, you have a few alternatives. First, keep your lights on auto and adjust your secondary light(s) to underexpose by one stop.
Take a few photos and check the results. If the ratio is still producing too much shadow, set your key light to manual output. Now you will need to experiment some to find the balance.
Kevin Landwer-Johan
How to Find the Light Setup That Works Best for Your Image
Start with the key light on quarter power. This will give you some flexibility when setting your other lights. Keep your secondary lights on auto and check the results.
If you are not satisfied and there’s too much shadow, set the secondary light(s) to manual. Adjust the output so it is one stop less than your key light.
If your key light is set to one-quarter output, your other light(s) will be set to about one eighth. Moving your lights closer or further away from your subject will also affect the results.
The type and amount of diffusion will impact the output too, as will the size of the diffuser. These variables need experimentation as they are different in each situation.
I have suggested using auto settings for your strobes first. This is because manual control of this type of lighting can be challenging if you are not used to it.
Use manual if you have time to. Familiarise yourself with the characteristics of your light. This will give you greater control over them.
Kevin Landwer-Johan
Spread the Light for Better High Key Images
The more you can spread the light, the more effective your high key photos will be. The aim is to cover as much of your subject as possible. Using large light sources will aid you in achieving the spread of light.
A small light source produces a harsher light and harder-edged shadow. The larger your light source, the more the light will spread and the softer the shadows will be.
If you only have a small light source, such as a flash, it is best to add a diffuser.
Attaching a softbox or photographic umbrella will make an impressive difference. Your light will spread and softer and even over your subject.
Adding any diffusion to your light will reduce the amount of light hitting your subject. So the more powerful your lights the better.
Example 1

Kevin Landwer-Johan
For this high key studio photo, I used a white background with two powerful strobes behind it.
I lit my subject with two more strobes. They were facing away from them and pointing at two large white reflective boards. These were 2.4 meters tall and 1.2 meters wide.
These large surfaces scattered the light and softened it. This ensured my subjects were evenly lit with a nice soft light.
Reflectors are a great tool when working on high key photos. If you don’t have enough lights or prefer natural light, use reflectors.
Even a small well-placed reflector can help cut out dark shadows or even serve as a key light.
Example 2

Kevin Landwer-Johan
I was working inside my studio when I set this photo up. I had two continuous halogen lights on the white background. The girl was lit with two small flash units.
One flash had a small 60 cm square softbox on it and was outside the left of my frame. Even though the softbox was small, it was close to my model the light was soft.
The other flash pointed at a fold out reflector on my right. Bouncing the light off the reflector increases the light surface and spreads it. This produces a nice soft light on my subject.
By setting the flashes manually at the same level, the light produced is soft, even high key lighting.
How to Keep Your Images Looking Natural
With almost any style of photography, there is a way to make the desired result look natural.
I love to find situations where the available light will produce a high key portrait.
I was with a friend at one of the many temples in Chiang Mai, Thailand. It was near the middle of a bright sunny day.
She was in the shade and there was a lot of light reflecting off the surrounding buildings in the courtyard. The sunlight was harsh, but we were in the shade.
The light reflecting off the large white surfaces provides soft and bright illumination. I have also overexposed this photo to enhance the feeling.
High Key Photography Background Lighting
Balancing the background light well is important. You do not want a dark, moody background for a nice high key portrait.
Choosing a white or light colored background will help but is not necessary. If you have enough light on a darker background this can also produce pleasing results.
For this portrait, I positioned my model so the background became overexposed. The light coming from her left was a little stronger than the light from her right.
Both these light sources were a little lower than the light in the background. The light was balanced, diffused and from large enough sources to drop most of the shadows.
Camera Settings and Post Processing
Having your camera set to overexpose can help in creating high key photos. Choosing to let more light affect the sensor helps reduce the shadows.
Post processing, as with any style of photography, can help enhance the lighting. Start by lowering the contrast.
Then lessen the amount of blacks and shadows. Boosting the whites and highlights will also help. It will enhance the high key lighting effect.
Producing a balanced, soft lighting for your photos will give you the best results.
Attempting to make a high key photo during post-processing will be more difficult. This is especially true if there’s a lot of shadow areas in the photo.
Why Use High Key Lighting?
High key lighting produces photos with a good feeling and upbeat emotion. Advertisers often prefer this style of photo to help present their products. This is because they have a feel-good mood to them.
Comedy shows use a high key lighting set up. This is because it provides the desired atmosphere.
Eliminating most shadows from photos presents the subject pleasing manner. Whether you are photographing a product, person or flower, go for high key photography.
An even, soft lighting set up produces a pleasant outcome.
Kevin Landwer-Johan
High key photos convey little or no drama that using low key lighting will produce. Deep hard-edged shadows of low key photos convey the opposite.
Lots of drama, a sinister impression and a darker feeling.
Painting with lots of light will transform a moody scene into a happier one. Ensuring it finds it’s way into the areas where the darkest shadows lurk.
Conclusion
As with most things photography, there are many ways to achieve similar results. Having a vision for the high key photo you want to create is the best place to start.
Once you have a clear idea about your photo, then set about painting light on your subject. This will bring out the best of it and reduce the shadows.
High key photography is as much about lighting and camera settings as it is about the mood you will create. Choosing the right subject to convey this mood is also essential.
Don’t think you have to stick to the ‘rules’ or ideas I have outlined in this article. Use them as guidelines and then experiment.
Watch where the shadows are falling and then fill them in with reflectors or other lights. This will produce good feeling high key photos.