Have you ever wondered what makes outstanding outdoor portrait photography?
Below are 10 pro tips that will help you prepare your shoot. And teach you to take amazing natural light portraits using daylight as the primary source.

10. Outdoor Portrait Photography: What’s the Best Time of Day?
Outdoor portrait photography means at a specific time in order to avoid harsh shadows on the model's face.
"Golden hour" is the 2-3 hour gap right after sunrise or right before sunset. To get the best light, try going 2-3 hours before sunset or 1-2 hours after sunrise.
The sun at these times is pretty low and doesn't cause contrasting shadows. It does provide you with great outdoor portrait lighting.
A gloomy cloudy day produces soft light for outdoor portraits with a natural, rounded look. This light is a little bit harder to manage. If your day turned out to be cloudy, pictures would get a very specific, silverish ambience.
You have to be careful in this kind of setting as a lot of detail can get lost. Especially if you chose the wrong angle or position the camera straight against the sky.

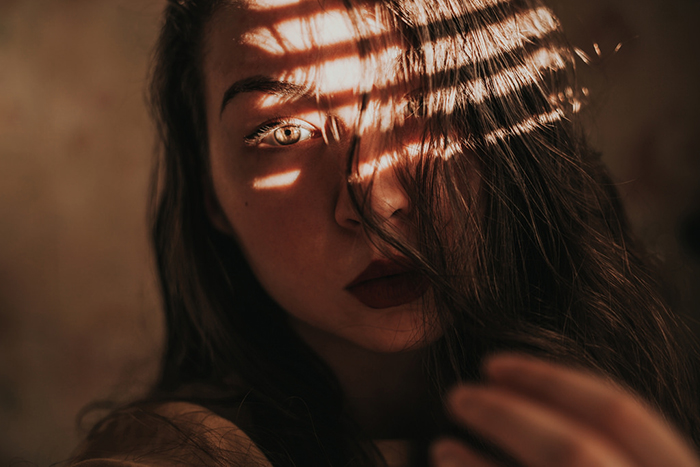
Portrait of Ilya Kisil in Luxembourg © Daria Huxley
Finally, make sure you plan the location for the shoot in advance. Where will the shoot take place? Do you need special permission to photograph there? If you do, how long in advance do you have to make all the necessary arrangements? How big is the place and how much variation of light can you get? Consider transportation time and cost as well.
For extra light in your images, try a wide aperture. A shallow depth of field allows you to keep your ISO 100 for greater quality, and your shutter speed low.
This is a great tip for portrait photographers to gain better results. You may find that aperture priority is the best mode to use. Go from close-up portraits to wider shots.
What About the Best Season for Outdoor Portraiture
Ask yourself: what is the season right now? What is interesting about it? You may even find that using cloudy day photography settings will help get the best from adverse weather.
You could make use of snowflakes in winter, beautiful colorful leaves in fall, sunny warm days in summer and beautiful trees in blossom in spring.
Every season presents lots and lots of opportunities for a successful shoot in natural light. Outdoor portraits with camera settings for cloudy day photography can give you wonderful images.

Four seasons: Spring, Fall, Summer and Winter. © Daria Huxley
10. Create a DIY Outdoor Portrait Studio
Building an outdoor photo studio gives you all the control of studio photography. But you also get an abundance of natural light. You don’t have to waste time setting up studio lights and flashes. You already have all the light you need.
A DIY outdoor portrait studio can be anything from a few bed sheets pinned to a wall to a gazebo-type structure. It depends on the time and materials you have available.
Finding the best position for your DIY portrait studio is your first objective. You need a location that is well-lit. It doesn’t have to have direct sunlight. But you do want a space with good illumination.
If you do choose a location with direct sunlight, position your subject, so the sun is behind them. The direct sunlight will be too intense head-on. And it might be uncomfortable for your subject.
With the sun coming from behind, you have more control. Reflectors are a fantastic tool for manipulating natural light. And they’re ideal for outdoor portrait photography. With the sun behind the subject, you can use the reflectors to redirect the light back to the subject’s face. They give you more control over intensity, lighting angles, and contrast.

You can use good-quality photography backdrops. You can see our list of the best backdrops in this article. The portable ones are good for outdoor studios. But you can also use the larger ones.
If you don’t have the budget, you can use DIY solutions. You can use bed sheets or large pieces of material. You can also use natural elements within your environment. Stone or brick walls give you a nice textured backdrop. Or you can use wooden fences or hedges.
You’ll need something to hold you’re backdrop. You can use ten poles to make a frame, as you can see in the image below. You can attach a pole to a wall for the material backdrops. Or you can put your carpentry skills to the text by making a wooden backdrop rig.
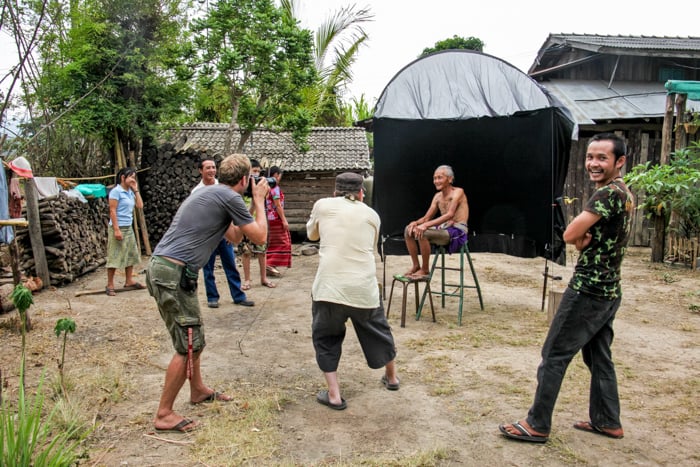
Photographing grandpa with the first version of my natural light outdoor studio.
9. Tell a Story to Add Depth to Your Outdoor Portraits
You could be photographing your friend or a professional model from an agency. But you have to have a clear idea on the purpose of the project.
The picture or series of pictures have to tell us a story.
Think about the tale you want to tell to your viewer: who is your model? Why is he or she dressed this way? How did they get to this place? What are they doing in the picture?
Having a story behind the image makes the viewer more interested in the story. Use outdoor portrait lighting to place emphasis on this idea.
Here are some ideas for natural light portraits shoot to spark your imagination:
- a lost girl in the woods wandering around trying to find the way home;
- a young guy with a thoughtful expression is sitting on the stairs inside of a building smoking a cigarette;
- two girls are walking on the street, pointing out curious things they discover;
- a couple is sitting on the bench by the river, holding hands, and so on…
Are you photographing indoors? Try using a silver reflector. This is best used for black and white photography, as the silver adds a colder temperature to the image.
Instead, for color, use a white reflector to bounce light back into the image.

Portrait of Sergey Sarkissian on the stairs in Saint Petersburg © Daria Huxley
8. Why Wardrobe, Hair and Make-Up Are Important
The story that you have formulated will give you an idea for selection of the right wardrobe for your model. Think about hair and makeup as well to complete the overall look.
If you are shooting natural light portraits in the park, choose light clothes. This will help avoid dark, underexposed areas on the model's body. This way, outdoor portrait lighting will work well.

Portrait of Olga Guseva in park in Saint Petersburg © Daria Huxley
7. Working With Non-Professional Models
One of the key elements of a successful photo shoot with people – is creating the mood. A photographer should act as an emotional balancer on set.
Many people, especially non-professional models, often get tense in front of the camera. This shows on the photographs.
It is the photographer's duty to make their model comfortable and at ease. If the person is your friend or if you know each other well, it is rather easy.
But if you have never seen each other before or only met once, tension could be an issue. This might not be the time for the most intense close-up portraits. Especially at the start of the session.
There are different techniques to help you get through. You can offer your model to go to a cafe or take a walk before the shoot, for example.
Use this extra time to get to know them better. This helps to build trust and helps the model to relax on set.
Jokes are a very strong catalyst, but do not force them. Wait till both of you get comfortable with each other and then go shoot. After all, no matter how serious the project, it is always great to have some fun!

Friends in Brühl, Germany © Daria Huxley
6. Go Beyond the Classical Portrait Look
Don’t be afraid to go off the beaten path. Is there an abandoned building in your neighbourhood? Do a little research and if it's safe, go check it out, especially if you’re into street photography.
Try various locations, angles and poses for your model. This way you’ll discover where outdoor portrait lighting can work its wonders.
Try a wide-angle lens or telephoto lens, rather than the usual standard lens. Play around with your focal length for better results.
Get creative! Experiment with the plot. Breathe in and go for surrealism – sometimes it is great fun!

Portrait of Yuliya Kudinova in the yards of Saint Petersburg © Daria Huxley
5. Use Bokeh for More Interesting Backgrounds
Now let's get technical. What you have in the background of the frame is very important, even if it's blurred. The name for it is bokeh.
Sometimes this very feature makes the photograph stand out. You need to use a shallow depth of field and a wide aperture for this effect.
There are many objects that produce interesting bokeh. Try small branches of the trees, snowflakes, raindrops, lens flares, flowers, or streetlights. Any textured backlight also works.

Self-portrait shot during winter in Saint Petersburg © Daria Huxley
4. Shoot in RAW for More Control in Post-Processing
Most modern cameras allow you to choose the format to take pictures in. Two basic options are JPEG and RAW.
Unlike JPEG, RAW allows you to make considerable adjustments to your original file without losing quality on the post-production stage.
In order to work with RAW files on your computer, you would have to get a specialized software: a RAW converter program.
Adobe Lightroom is the standard in the industry, although some photographers prefer Aperture from Apple.
Both programs are rather intuitive and user-friendly and support the majority of cameras on the market.

Portrait of Andrei Matorin in Bushwick, Brooklyn © Daria Huxley
3. More Photos Mean More Choice
This is one of the secrets to outstanding outdoor photography. Take many shots. Outdoor portraits are no exception. Take one or two duplicates for every shot you take, so later you have something to choose from.
You never know when the crucial element in your balanced composition can get out of focus and ruin the shot.
Or a spark of emotion or the right angle of your model could make the shot.
Shooting more than you need is one of the best outdoor photography tips. It works even for outdoor headshots.

Triple portrait of Oleg Gergel in Frankfurt, Germany © Daria Huxley
2. How to Post-Process Outdoor Portrait Photography
Taking a great picture is 80% of success. The remaining 20% lies in post-production. Here you can showcase your unique style and get creative, but be careful and do not overdo it.
Even the best shot can be spoilt by unskilled Photoshop use. You want to keep the feel of that outdoor photography lighting.
It is a good technique to select a sample picture from a photographer whose style you like. Try to match the colors and the look of your picture with the reference.
The more you practice the better you will get. Sooner or later you will be able to develop your own signature style in natural light portraits.
Tip for copyright. Do not place your copyright horizontally. It distracts attention from the actual picture.
If you want to place a copyright, put it in the bottom right corner. Turn it vertically, so it doesn't drive away the viewer's attention, but is still readable.
Never use frames or other decorative elements on your photographs.

Portrait of Isabel Restrepo by the window in Bushwick, Brooklyn © Daria Huxley
1. Show Off Your Work on Social Media and Beyond
Finally, show your work! Post your natural light portraits online, order the prints and show them to people!
Listen to what they have to say. Constructive criticism might not always be pleasant to hear, but there is a lot you can learn from it!
If people give you amazing ideas for future shoots, write them down. Photography is often subjective and people's tastes often differ. But you can significantly develop your aesthetic by learning from professionals.

Portrait of Daria by the Hudson river in Irvington, NY © Daria Huxley
Conclusion
Portrait photography, like any art, takes practice. These tips and tricks can save you time and energy. Whether you are a professional or a hobbyist.
Now grab your camera and take an adventure to your next masterpiece! Get out there and grab some awesome outdoor portraits.
For more great tips, check our article on using the Sunny 16 rule for a balanced exposure when shooting outdoor portraits during sunny days.