Tree photography is all about capturing the majesty of nature’s beauty. Trees can grow over millennia old and outgrow almost anything on Earth.
And they make a fantastic photography subject, challenging your imagination and creativity.
In this tutorial, I will teach you the ins and outs of tree photography.
1. Tree Photography: The Concept
Let's start with the idea of capturing individual trees. For me, forest photography started with the enchanting visuals found in the Lord of the Rings Trilogy films by Peter Jackson.
I've studied the cinematography of these movies to the point of being able to conjure up images of Fangorn Forest just about anywhere, given the right conditions.
Then there's Magic: The Gathering; a collecting card game set in a fantasy world. The artwork displayed in these cards often boasts crazy perspectives and interesting points of view.
A selection of these cards occasionally comes with us on workshops into the darkest of forests before I tell students to set their tripods insanely low and point the camera towards the forest canopy. But more about that later.
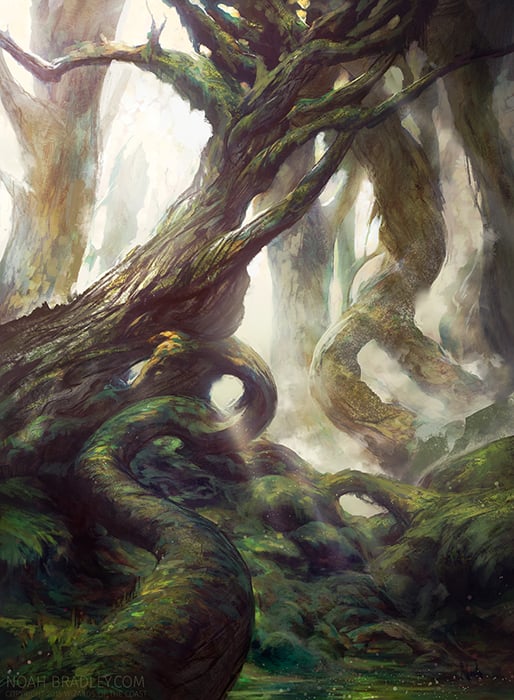
The art of Magic: the Gathering fuels my inspiration for crazy perspectives and moody post-processing. (Image courtesy of Noah Bradley – © 2015 Wizards of the Coast)
2. How to Find the Right Trees to Photograph
Of course there's the challenge of actually finding trees that are photogenic enough. While I certainly prefer beeches because of their stature, potential age and often ominous-looking branches, gnarled oaks can also work well.
While each forest has its beauties, I do think that it's best to visit woodland areas that are older. The potential for an epic tree hiding away in the forest, rises with the forest's age. The broad-leaf woodland is the area you want to explore for this type of photography.
In some parts of the world, spectacular alternatives can be found. Think of the ancient bristlecone pine in the Southwest of the US for example. Or take the lone laurel trees of Madeira Island, which grow among perpetual mists.
“Galadhrim” The old forest is a place of wonder, of ancient and restless souls that have seen men come and go. Wars have been fought here, weddings have been held here. Trees tell stories that are as tall as their stature, and broad leaf trees like this beech work very well as a photography subject.
How to Look for Awesome Trees Online
You can find virtually everything online these days. Even the girth of trees around the globe. There's this website with a huge database of the most stunning trees that are still around, called MonumentalTrees.Com.
At the time of writing this, there are 34,455 trees documented around the world, with trunks ranging from anything from a couple of meters to more than 30 meters in circumference. The website features an interactive map, helping you explore your local area digitally before heading in to the forest.
Found your tree? Mark its location on your phone and visit your tree when the light is good.
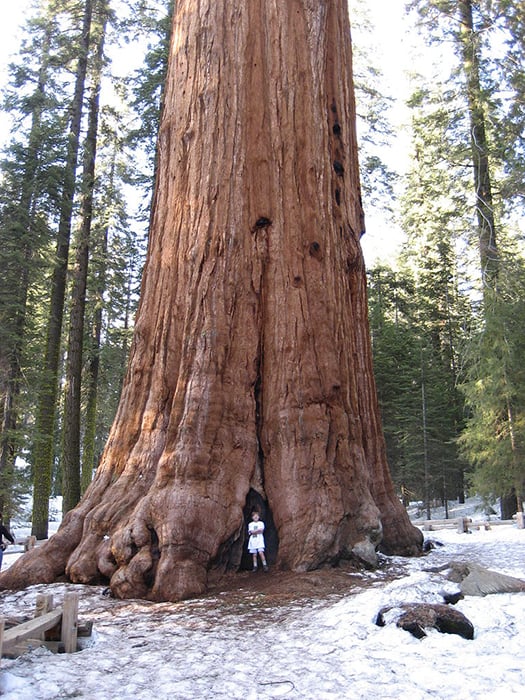
General Sherman, the largest tree by volume in the world. (Photo by Neil Parish).
4. How to Choose the Right Light for Tree Photography
Tree photography means that you're working with natural light. And the most ethereal atmospheres can only be captured in the right conditions. But did you know that it doesn't even have to be a misty day to catch those mystical rays?
Godrays (which are actually called crepuscular rays) can be found in the forest occasionally, but it depends on the amount and height of the foliage blocking the sun. Try to be on location at about two hours after sunrise.
When the sun barely rises above the undergrowth, the slightest amount of moisture from the night before evaporates under the influence of the rising sun. That results in a fleeting moment of foggy conditions when you can photograph the elusive shafts of light punching through the leaves.
Shafts of light or not, definitely go out in the early morning.
The best advice I can give you considering the time of year is to plan around summer. The trick is to choose a month in which the trees are in leaf and to combine that with changing weather conditions.
Alternating temperatures create all sorts of interesting light conditions for photography. These occur the most in late May, late September and early October.
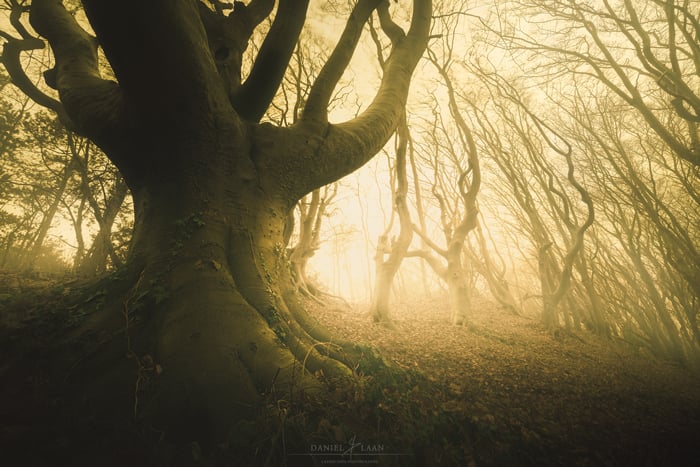
"Forest of Metaphors II" – It helps when you know the landscape well. Fog not always happens in the early morning. Here, we have an old beech in the late afternoon sunlight after a fogbank drifted in from the sea near "Bergen" in the Netherlands.
5. Which Lens and Perspective to Use
Now that you’re here, it's time to pick which lens works well for the type of tree picture you're after. While that's largely dependent on the size of the tree, perspective also plays a role.
Let's dissect two very different approaches.
The Lonely Tree Perspective
A short telephoto zoom like a 70-200mm lens is your best friend if you're looking to isolate your subject. Such a perspective can be technically quite straight forward, but finding a nice tree in an empty space under the right conditions is much harder. Meadows, moors and heathers are the areas of interest here.
Place the tree in the dead center of the frame to create a strong but simple composition. Look what happens to the atmosphere of your shot when placing the tree more to the left or to the bottom. For that zen-appeal, an empty sky around a single tree can work quite well.
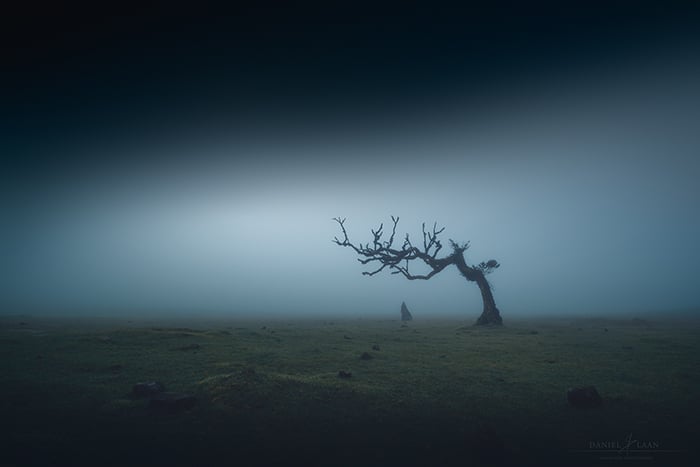
"Whispers in the Fog" – I've asked my wife to pose under this Laurel tree in the Madeiran Fanal, while pointing a 70-200mm lens in her direction. Slightly more sky and a toned-down palette make this image look uneasy – as if we're witnessing a scene from a horror film. Pay attention to how the foreground is simple, but detailed enough on the left to offset the tree. The rocks anchor the composition and determine the ends of the image.
Always shoot from a tripod to minimize shake and get your result looking sharp. Then set the ISO as low as possible and set your camera to aperture priority mode. With a medium aperture of about f/7.1 to f/14, you are able to create sharp results of free standing trees.
The Frog Perspective
A completely different approach to tree photography is the close-up wide angle shot. Here's how to do it. Set your tripod very low, get as close to minimum focus distance on your foreground as possible and aim upwards.
Vertical compositions work best when you're not working with an ultra-wide angle lens like an 11mm.
This bottom-up perspective is a bit more difficult to pull off. Because we're getting close to our foreground, we can't focus on both the tree and the foreground in one shot.
Furthermore, using minimum focus distance on a wide angle lens creates a distorted view. Objects like plants, roots and flowers in the immediate foreground can appear larger than the tree.
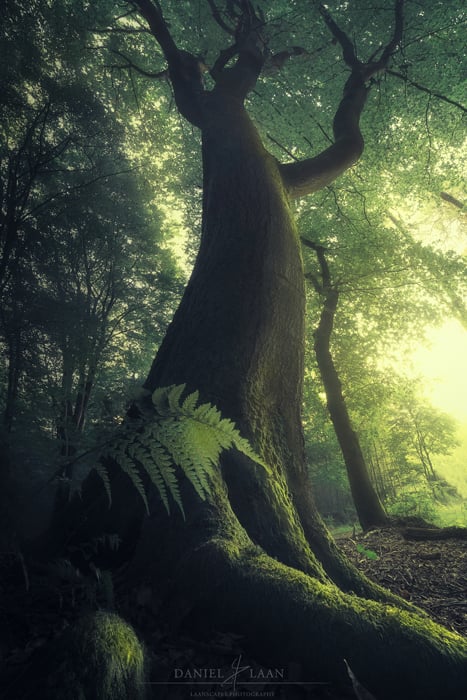
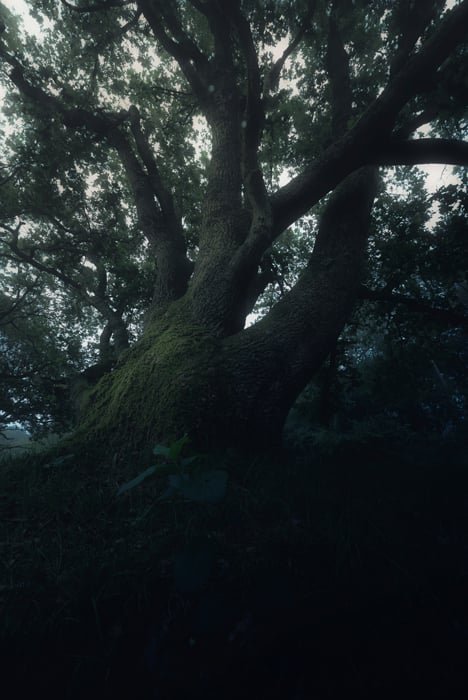
"Arboreverie" – A beech tree in "Speulderbos", the Netherlands. Achieving accurate focus can be challenging when the leaves are swaying in the wind, so start with motionless foregrounds.
Your goal is to find an interesting foreground, with a bright background behind the tree to make it stand out. So take your time and walk around the tree while making a couple of test shots before moving on to a more advanced shooting technique.
6. Focus Stacking and Exposure
The easiest option to get as much of your image in focus as possible is to set the aperture to f/22 while aiming for a third of the distance into the frame. But if you really want to go the extra mile, focus stacking is the best tool to get the sharpest images.
Small apertures like f/22 will introduce diffraction and that degrades the overall sharpness of your tree.

When focus stacking, think of your lens' focus ring like a pie chart. The smaller your aperture, the fewer pieces you need for the stack. However, larger apertures will result in sharper results.
Here's how focus stacking is done. Switch to manual focus. In aperture priority mode, dial in an aperture of about f/8 and turn the focus ring all the way towards the minimum focus distance. Underexpose your shot a bit through the exposure compensation on your camera.
Now take note of the exposure settings when you half-press the shutter.
Instead of fully pressing the shutter button, set the camera to manual mode at those ISO, aperture and shutter speed. Release the shutter. Now turn the focus ring away from you, but slightly.
Do this 4 to 10 times, depending on the focal length and the chosen aperture of the lens you're using. With a diagonal fish-eye, you are done with 4 shots at f/6.3. With 30mm lenses at f/14 though, you’ll benefit from an additional 4 exposures to smooth out the stack.
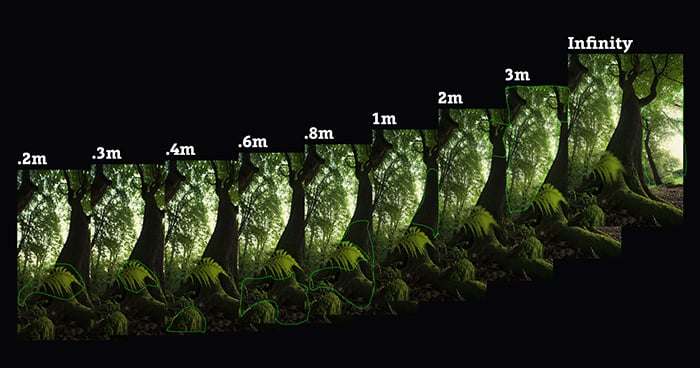
Because of the fern swaying in the wind in the foreground, I chose f/4 to shorten the shutter speed. That did require more images in the focus stack though. It took 9 shots to get the result displayed earlier.
7. How to Review Your Work
With your camera pointed upward, it can be difficult to judge the results. Unless you dig a hole to put your head in to be able to view the screen.
A tilting screen or a tether to your smartphone can come in handy in these situations. Don’t let the ability to view your screen get in the way of your creativity.
Extreme angles will create extremely cool tree photos.
8. Combining the Images in Photoshop in 3 Easy Steps
We've made it back from the forest without getting lost. Now it's time to process our image in Photoshop.
We need Photoshop instead of Lightroom for this, because we are working with a focus stack. The first thing to do is to have all of the images as layers in one document.
Open Files as Layers
Go to File > Scripts > Load Files into Stack… and browse your files. Select of the files you want in the stack and uncheck the two boxes at the bottom of the screen.

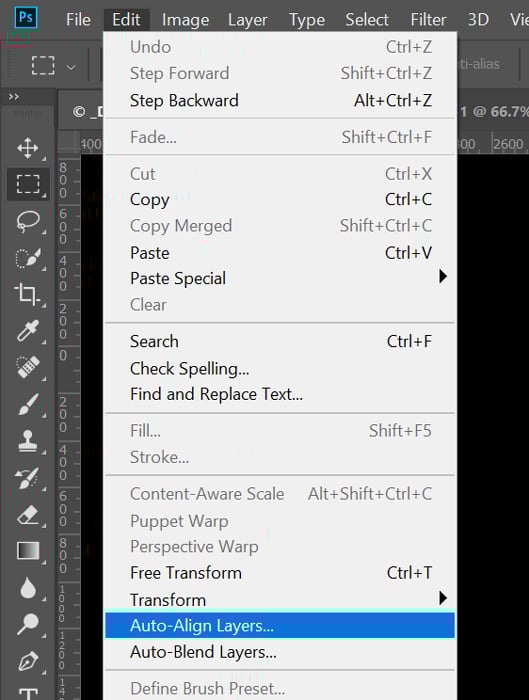
Align Your Frames
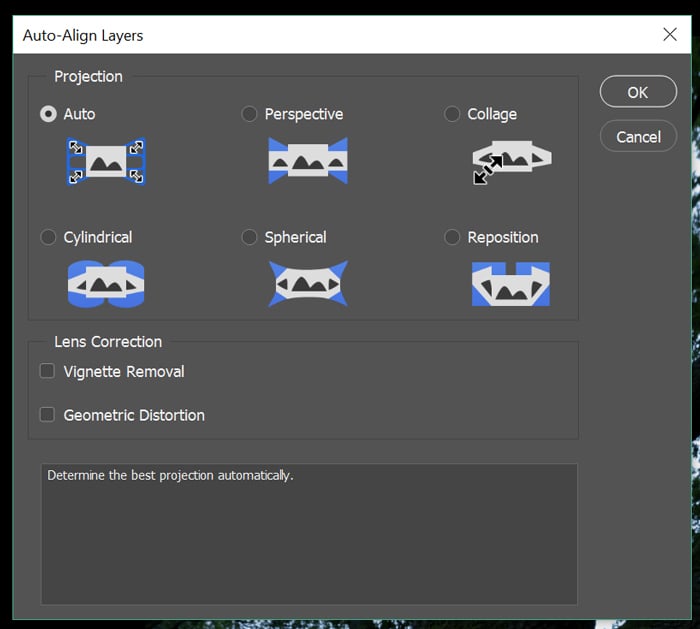
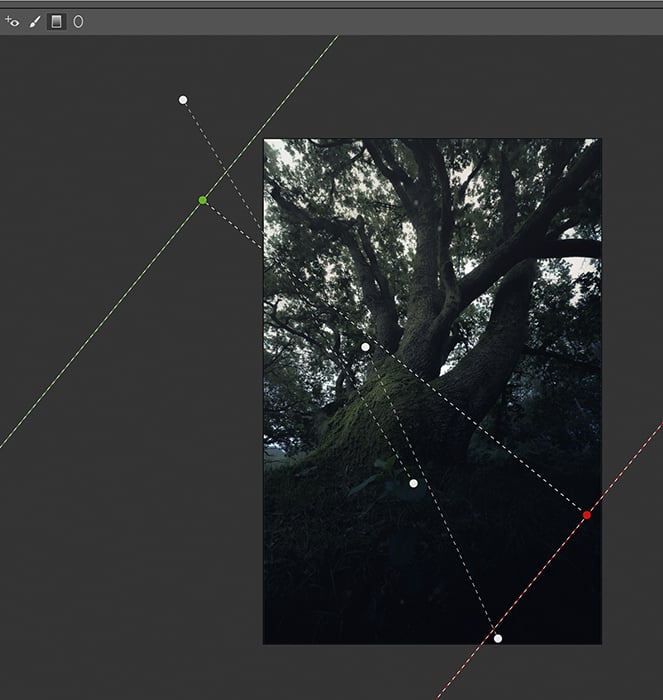
With all of the frames of your tree opened in Adobe Photoshop as layers, we're first going to align them to cancel out any sort of shifts to the stack of frames. Go to Edit > Auto-Align Layers.
Select "Auto" projection and make sure the boxes are unchecked here as well.
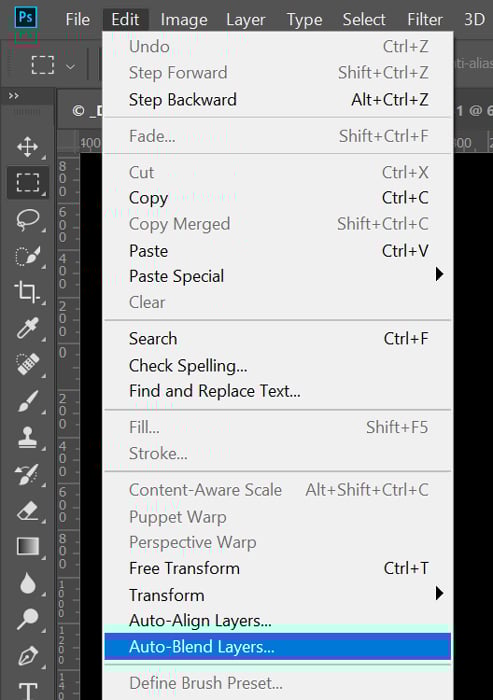
Blend Your Layers Automatically
Now we're ready to actually blend the images together. Photoshop has this feature built in, but it's rather crude. However, if you're looking for a quick result then this is the way to go. Point to Edit > Auto-Blend Layers and select Stack Images.
Then check the "Seamless Tones and Colors" option. Leave the other checkbox unchecked and press OK. Photoshop now calculates the areas that are in focus and masks out the rest. Simple and fast.
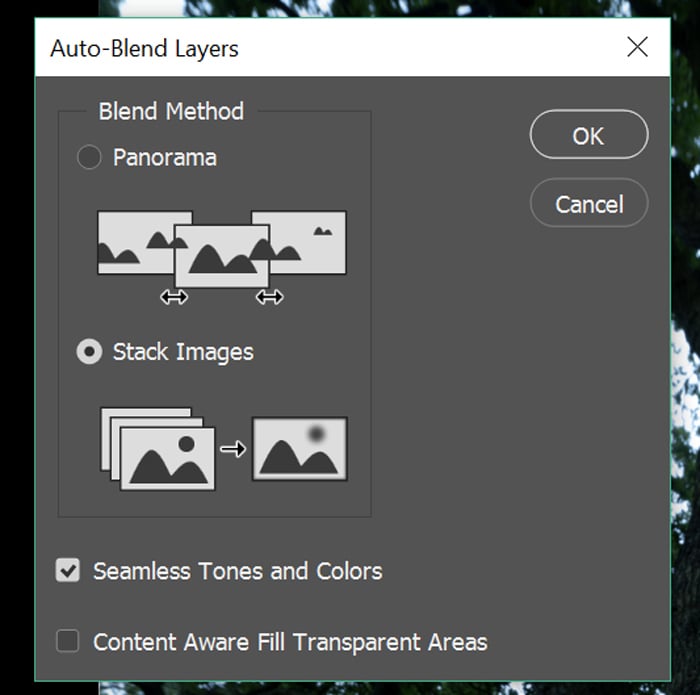
A better alternative to that last step is masking out parts of each layer by hand, but that is very time-consuming to do it properly. However, if you want the absolute best results, then hand-blending your focus stack is always the best option.
9. Here’s a Simple but Effective Post-Processing Technique
For a great moody result, you have all the tools that make Lightroom so effective, right here in Photoshop. First, merge everything onto a new layer by pressing control+alt+shift+E.
Now go to Filter > Camera Raw Filter.
By combining curves with some selective tools like the Gradient Filter Tool, you can make your tree photography come alive. I've darkened the image significantly, while raising the shadows.
I've also added a glow effect by decreasing Clarity and Dehaze to make it more mysterious and dreamy.
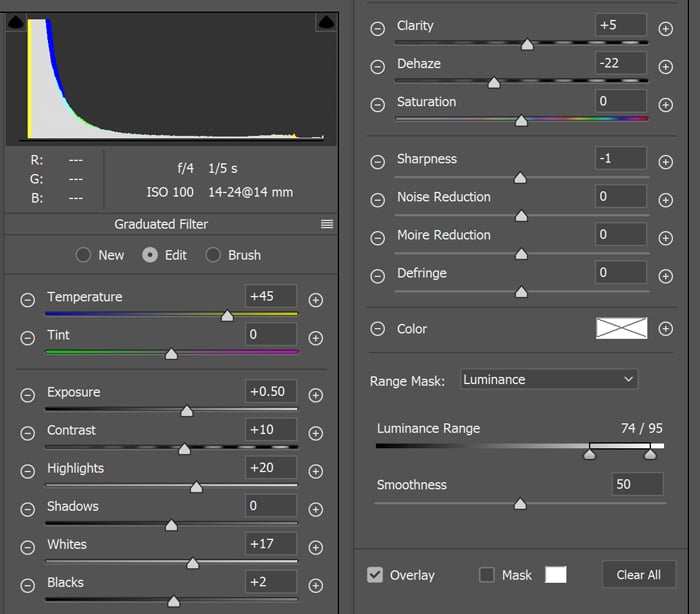
These are the settings that I’ve used for the most important gradient filter. It runs from the top-left to the bottom-right along the natural light source. It’s more yellow and brighter and affects only the brightest parts through a range mask.
Experiment with that powerful new feature in Camera Raw.
Make the image darker and introduce some blue in the the darkest areas with split toning. Then balance out the color by altering the color temperature for mysterious tree images, straight out of a fantasy film.
Key Points for Making Great Photos of Trees
Here's my best advice for ethereal-looking pictures of trees.
- A wide-angle lens works best when you get up close and personal with your subject. Get low, close and point up for dramatic impact.
- Getting close involves challenging focusing situations. Learning to focus stack overcomes the limitations of technology and yields the sharpest results.
- The best time to photograph trees is shortly after sunrise, when the sun climbs above the tree line and helps to dissipate moisture from the night before.
- A camera with an articulating screen or tethering your smartphone makes sure you don't alter the composition between judging the exposure and the start of a focus stack.
- Go ahead and explore MonumentalTrees.com to find epic trees in your local woodland.
- As for post-processing: Get great, moody results with minimal effort through the Camera Raw Filter in Photoshop.