Making selections of people in Photoshop can be difficult. But the Refine Edge tool in Photoshop makes it a lot easier and quicker! This is especially true when you have to select hair or fur, making it perfect for pets and portraits.
Here is our step-by-step guide to using this very helpful tool in Photoshop!
It’s best to pick a simple image if you want to learn how photoshop smooths edges. Pictures with a uniform background are perfect for practicing with the Refine Edge tool.
Keep away from images with busy backgrounds until you’ve got the hang of it.
I’ll use this photo to photoshop the smooth edges of the girl and remove the background.

Start with making a rough selection of your subject. I’ll use the Quick Selection tool. But you can also try the Magic Wand tool and the Object Selection tool.
The selection doesn’t have to be perfect, but make sure not to leave out large parts.
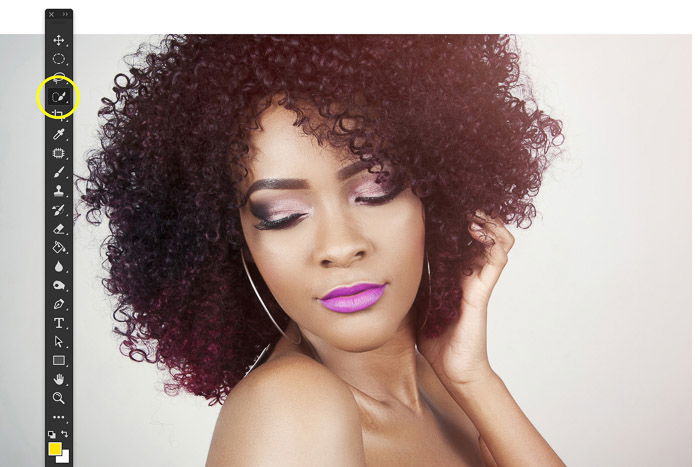
Where is Refine Edge in Photoshop? This feature can be difficult to find, especially after the recent updates. But here’s what you need to do:
First, go to Select in the menu and click on “Select and Mask.” The Refine Edge window will pop up.
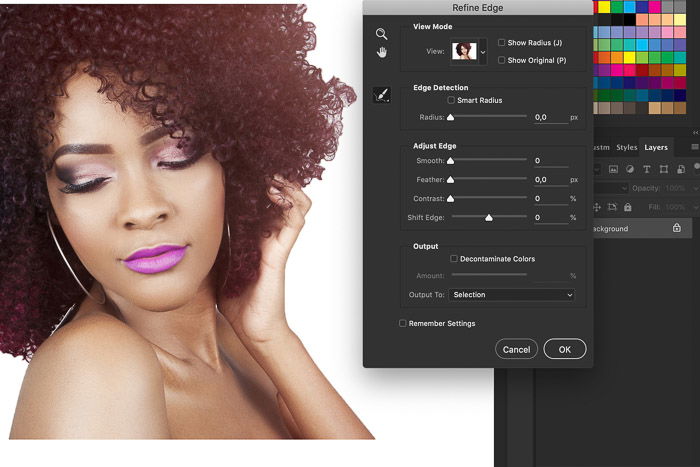
Select a view mode of Refine Edge, depending on the colors of the photo you are using. In my case, the white background is perfect to see the selection and what I’m doing.
Use different modes to learn which works best for the selection you want to make.
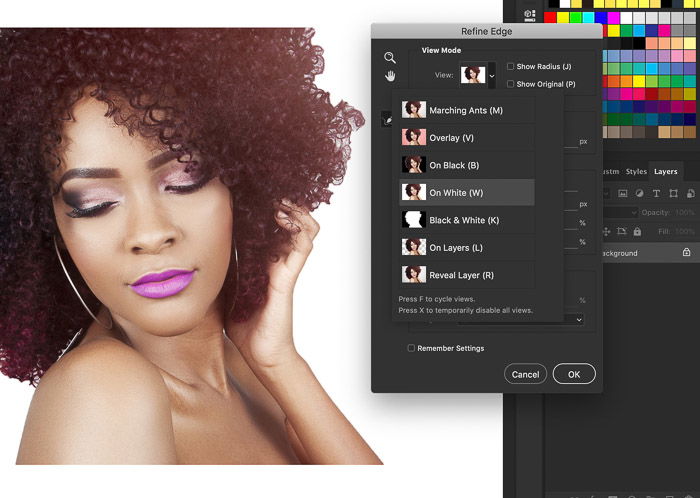
The selection in my example is OK but far from perfect. There are still grey areas in the hair, and the edges are rough. Adjusting the edges will fix this.
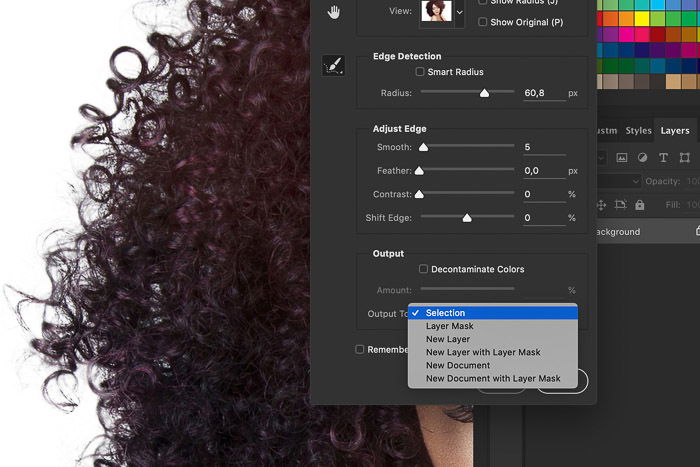
Start with Radius. Increase the value of the slider to make the edges of the selection softer and more natural.
For the most part, the radius determines the final result.
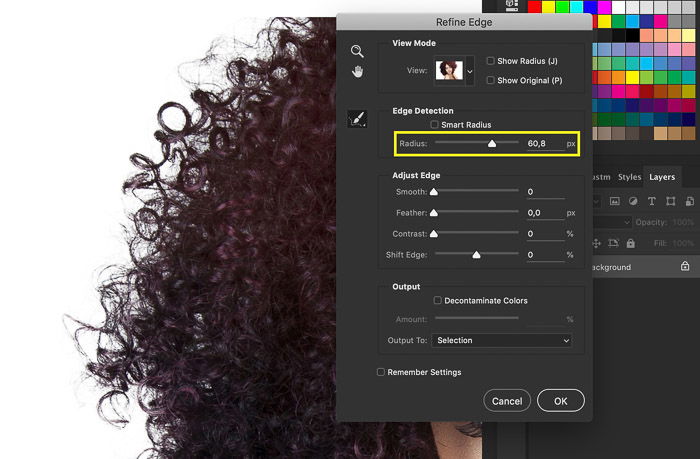
Use the four other sliders in the Refine Edge window to get the best and most natural result.
The Smooth slider smooths out the edges. Keep it low because it takes away from your selection. In my example, I used this slider to smoothen the edges of the hair.
The Feather slider helps to blend the selection more into its eventual background. Keep it low as well.
The Contrast slider adds more definition to your edge. Using too much will create harsh edges.
Move the Shift Edge left or right to shrink or expand the selection.
So what if the Refine Edge tool fails to make a precise selection? If so, then you’ll need to refine your selection.
The first tool you’ll need is the Quick Selection tool, which you’ll find in the Select and Mask box. Press Shift + left-click to add areas to your selection. And press Alt + left-click to remove details you don’t want to include.
If you still have trouble getting a precise selection, then it’s time to use the Lasso tool.
First, press OK to get out of the Select and Mask box. Now choose between the Lasso, Polygonal, and Magnetic Lasso to create a selection.
Hold the Shift key and click around the section you want to add.
Now hold the Alt (or Option) key and click around the section you want to remove. Make sure you make your selection as precise as possible. So follow all the corners and the edges.
Now you might be asking, why not let Refine Edge tool do the job? If your selection is too rough, it may end up creating inaccurate samples. It would help a lot if you allow the Refine Edge tool to see the “edge” better by creating a precise selection.
Before you output, you can check the “decontaminate colors” box to remove color fringe. This step is necessary when your subject is against a contrasting color background.
Select one of the output options to finalize the selections. Usually, New Layer with Layer Mask is the best option. It allows you to edit the section even further without losing the original photo.
And here’s the result of using Refine Edge in Photoshop on another background.

Using the Refine Edge tool in Photoshop for busy backgrounds requires the same steps.
The only issue is that your selection tools will have a difficult time selecting the edges of your subject. So you’ll need to go in and manually adjust the details for a more precise selection. But as long as you have a clean selection, you shouldn’t have any problems using the Refine Edge tool at all.
There’s no better way to select hair or fur than using the Refine Edge tool in Photoshop.
Practice with subjects on different backgrounds. The background affects how difficult making the selection will be. Start with uniform backgrounds and then move on to busy and colorful ones.
Try our Effortless Editing with Lightroom course to become an editing expert!