Reflections show up often in the most impressive landscape photos. The iconic ones are beautiful snow-capped mountains with a lake in front acting as a mirror.
But reflections are not only great for landscapes. Even in street photography or architecture, you can create stunning images with pools of water after a downpour.
It’s not difficult to find inspiration for reflection photography. Look for a river or a lake if you’re doing landscape photography. Wait for the rain to pass and search out puddles if you’re in the city.
But finding a body of water is not enough. And that’s where this article comes in.
If you want to improve your photography skills with some amazing reflections, keep reading.
5. Reasons Why Angles are Crucial in Reflection Photography
Capturing a good reflection in a photograph is very often a matter of getting the right angle.
Reflections are generated thanks to a source of light. But this source of light can’t show up in your image.
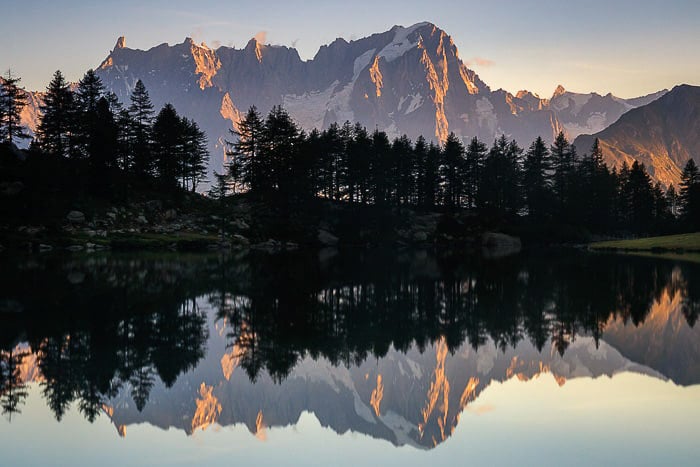
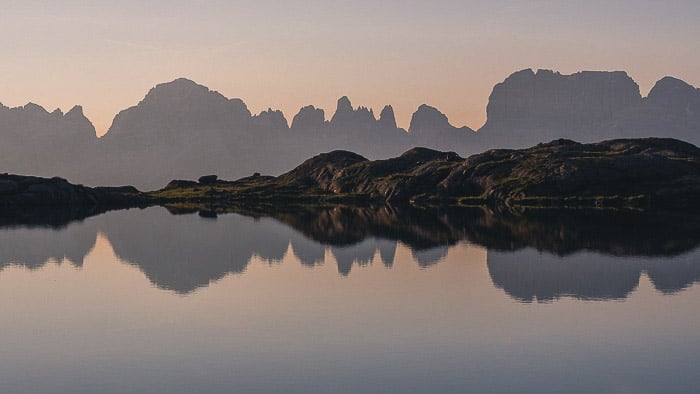
Take this image for example. A landscape photograph of a small alpine lake reflecting the dark tree silhouettes surrounding it.
When composing such a scene, you must be careful to keep the sun out of your image. If it is in your composition, it will be reflected in the lake and ruin your shot.
The sun would considerably reduce the reflection of the main element and the contrast of the scene.
It’ll make your reflection almost completely unreadable.
It’s all a matter of finding that right angle. There’s no one composition fits all though. You have to take your scene into account, adjust your position or your camera’s, and ensure you keep the sun out of your image.
That’ll be the best angle to bounce the rays of light off your chosen mirror surface.
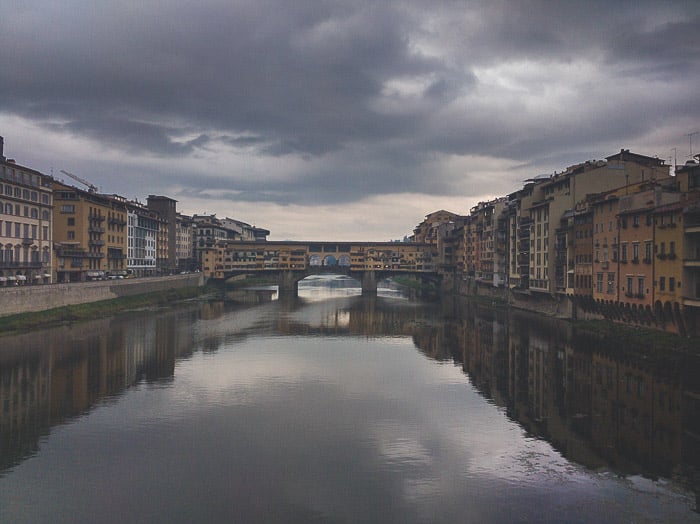
Reflection in Florence, Italy
The best time for reflections is usually in the early hours of the day or in the evening. The mist and the colored clouds of the sunset are a great subject.
Or with an overcast sky, the reflection can help to make an otherwise boring sky interesting.
You can also look for shade. If your mirror is in a shaded area, this will help you emphasise the reflection.
Weather also plays an important role in photographing reflections.
On one hand, reflections can improve a composition when you have a grey sky or one completely clear of clouds. But some situations can complicate your life, and ruin your images.
For example, too much wind will ruin your reflections. So will a downpour.
When doing reflection photography, aim for calm weather, and a completely still body of water. You can’t get reflections on streams and mountain rivers. The water is too impetuous.
4. Forget Composition Rules for More Interesting Reflections
Photographing reflections is quite easy from a technical point of view. Once you’ve got the right weather and settings down, what will really make your image is your composition.
It might be easier to photograph reflections in the city at first. You can find a puddle reflecting a beautiful 200 year old building, and that’s your shot. Fill the frame with the puddle and the building reflected in it. And you’ve got yourself an interesting image.
Don’t let ‘proper’ composition rules constrain your photography choices. This is especially true of reflection photography.
Some of photography’s most common rules are the rule of thirds, and not placing either your subject or the horizon in the center of the image. When it comes to reflections, however, you’ll want to do exactly what these rules tell you not to.
This is due to the precise and almost ‘geometric’ nature of natural reflections.
Think of a reflection in the calm surface of a lake. It sometimes make sense to balance the composition along a central line.
In fact, I often find myself placing the reflection line right in the middle of the frame to achieve symmetry.
I make sure I have the same amount of sky or ‘air’ both above and below. Simple but always effective.
3. Why You Should Not Use a CPL for Reflection Photography
The simplest way to obtain a reflection is to use a composite surface of water as a mirror. A pool of water left by the rain, a river, the water of the sea that remains on the rocks when the tide is withdrawn, a lake, etc.
And under these conditions it is easy to find yourself using the polarising filter. But in this case, even in landscape photography, the CPL filter is more harmful than useful.
If you read this article on the characteristics of the CPL you will understand in a moment why. Here’s the short version.
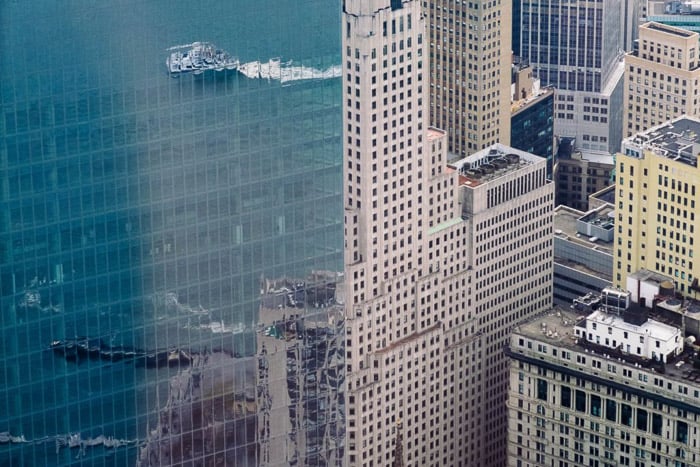
The CPL filter “kills” any possibility of reflections on water and on non-metallic surfaces. Even if you are not creating a photo with reflections on the surface of the water but instead use the mirrored surface of a skyscraper, the CPL will close this possibility.
So you have two possibilities: either completely avoid the CPL or use it to the maximum of its constructive characteristics. You can focus your attention and the polarising effect somewhere other than your reflective surface.
Avoid CPL to not kill reflections
If I was to photography reflections on a building, I’d avoid the CPL since it can damage the composition.
When it comes to landscape photography, I use it more often than not though. Even when I want to get a composition with reflections. To avoid the CPL killing my reflection, I rotate the polarisation in such a way that it does not affect the reflection.
Instead, the CPL is focused on other areas of the image that it can improve, not harm.
2. Camera Settings for Reflection Photography
Shooting settings also play a key role in achieving good reflection photography.
Aperture
First of all make sure you set your aperture to a sufficiently small value. This can be useful in any situation where you are looking for a reflection.
If you take a landscape photograph, you will probably already have a tripod. Use it to close the aperture. And don’t forget to check that the subject is in focus even in the reflected part.
I start with an aperture of f/9.0 or f/10 to try to maximise the depth of field and consequently have the whole scene in focus. If it is not enough, go to f/16.
f/11 helps me to have everything in focus
Shutter Speed
This is most important for those of you photography landscape reflections.
Mount your camera on a tripod and try to lengthen the shutter speed. This will help you make the surface of the water smoother. Since the water is your reflective surface, the reflection will appear clearer and more pleasant.
Extending the shutter speed also means having to keep the other parts of the composition under control. For example, clouds might start to form stripes, or you will see the sun moving inside your photograph.
A long exposure helps me to obtain reflections
Filters
Since we said before that it would be better to avoid the CPL not to lose the reflection on the water, you will need ND filters to extend your long exposure.
In case you need to balance the exposure, you can use GND filters instead. Even these filters help to lengthen the shutter speed.
If you have a good tripod, a longer shutter speed won’t be a problem. Use a remote shutter release or your camera timer to avoid vibrations as much as possible. If you have a DSLR, raise the mirror before taking a picture.
The line between a clear reflection and a complete mess reflected in the water is really small.
These settings will help you achieve the former, and avoid the latter.
1. Get Creative With Reflection Photography
Photography of reflections is great for getting creative with your images. You can even use this type of photography to create your own photography style.
Reflections confuse and amaze the observer. Whether it’s a puddle showing an inverted building, or an amazing landscape that boggles the mind. Take advantage of this photography trick to stir curiosity in your viewers.
Use horizontal or vertical reflections. And don’t forget about sideways ones! Especially if you are shooting in an urban environment.
You can use any reflection to make it harder for viewers to understand where up and down are in your image. Get them to wonder which side is the reflection, and which one isn’t! This will keep their eyes glued to your photos for longer.
Try distorting reality by showing an upside down world, Inception-style. Or you can hide your self-portrait in the reflection, or a silhouette. This will make the viewer feel like they’re inside the photograph too.
You don’t have to stick to natural reflections in photography either. Look at buildings, artificial pools, or even sparkling objects. They all provide great opportunities for creative reflections in photography.
Robert Katzki
Conclusion
Reflections are often all around us and allow us to obtain unique and often impressive photographs.
If you want to explore reflections in photography, go out looking for ponds, windows and other reflective surfaces. Or lose yourself in nature and take great unique landscape photography with reflections.
It’s a fun way to step outside your comfort zone and improve your skills!


