Knowing how to change the aspect ratio in Lightroom is a great skill to know. That’s because photographers love to share our work with others through print or social media. But it’s often hard to guess what the viewer will see. Sometimes the edges of the photograph are cropped off or a border mysteriously appears.
Once you understand aspect ratio, you'll never get these surprises.
Choosing an aspect ratio fixes the size of your image crop. This is helpful when printing and framing your work or formatting your photographs for social media.
Lightroom makes it very easy to change image proportions. You can select from popular presets or create one of your own.
How to Change The Aspect Ratio In Lightroom
Aspect ratio is the relationship between the width and the height of your photograph. Many digital photographers crop freely, but you are fixing the relationship between the two dimensions of your frame when you set the crop ratio. If one dimension changes, so do the others.
Instagram uses a square (1:1) format. The width of the photograph is the same as the height. If your image is 20 cm across, it will also be 20 cm high. If you increase one dimension to 30 cm, the other dimension also increases to 30 cm. Another popular size is 4:5 because images print as 8 x 10" (20 x 25 cm). Other popular aspect ratios are 3:2, 1:1, and 16:9.
Each camera has a native aspect ratio. My iPhone 11 creates a 4:3 image and my Sony uses a 3:2 ratio. A ratio of 4:3 doesn’t mean that your photos are 4 inches by 3 inches. This means that you can print any size that retains these proportions without cropping the scene. For instance, you could make a 6 x 8″ (15 x 20 cm) print, or a 30 x 40" (76 x 101 cm) print.
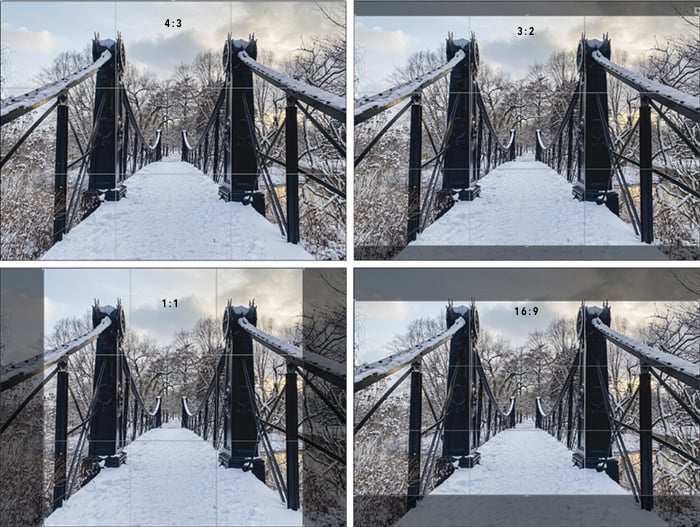
Preview of iPhone photograph showing 4 different crops: 4:3, 3:2, 1:1, and 16:9. The darkened areas will be cropped out.
Why Aspect Ratio is Important
What might be confusing is that common print and framing aspect ratios do not always correspond with the ratios used by camera manufacturers. Printing an image without first selecting an aspect ratio leads to unwanted cropping or unexpected borders.
Some cameras allow you to change the aspect ratio in-camera. But doing it in post-processing allows you the most flexibility. Lightroom simplifies the process.
It’s worth learning how to change the aspect ratio. You’ll never have to struggle with printing or unwanted cropping.
How to Change the Aspect Ratio in Lightroom
To set an aspect ratio for your photo, follow these steps:
Step 1. Open the Crop Tool
Go to the Develop Module and select the Crop tool (rectangle outlined by marching ants). The tool looks different in Lightroom Classic and Lightroom CC. The hotkey is "R."
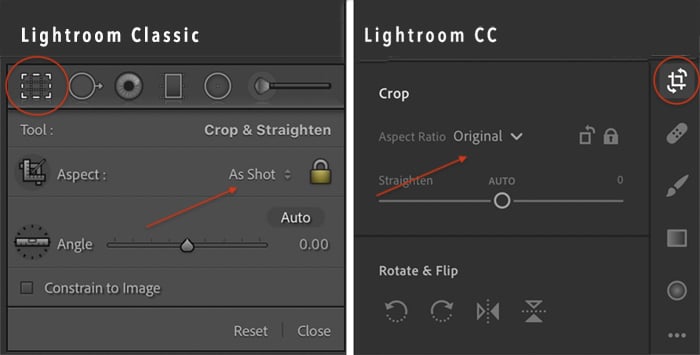
Step 2. Open Menu
Click the crop aspect ratio drop-down menu. The default setting is either "Original" or “As Shot.” Lightroom includes many popular presets. You also have the option to create your own.
Step 3. Select a Preset
From the list provided, select a crop size. If you don’t see the size you want, select “Enter Custom.” Enter either a ratio or the exact measurements. Lightroom will alert you if your measurements fall into one of the presets. Otherwise, a new preset is created.
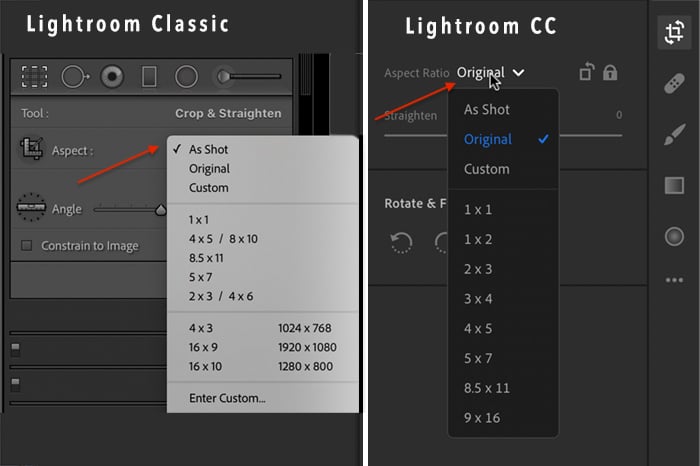
Screenshots of Lightroom cropping tool showing aspect ratio presets.
When you select a frame size different from your camera's default, you will see that some of the composition is cropped. Lightroom will hide the darkened areas in the final image.
You can adjust the cropping in Lightroom by dragging the overlay from side to side or up and down. You can also drag in from the corners to make the crop smaller. The scene will always retain the same proportions. You don't have to think about exact measurements. Only the relationship between height and width.
Change the orientation of the crop by clicking the “X” key to toggle back and forth from portrait to landscape. Notice that the padlock symbol is locked. Unlocking the padlock lets you freely crop without adhering to specific dimensions. You can also select a custom size.
Customizing Aspect Ratio in Lightroom
Select the "Enter Custom" option if you want to set a new image size. Many photo printers have a maximum of 13 x 19" paper size. To see how this will print, enter these dimensions in the pop-up box.

Lightroom crop tool showing a 13:19 ratio. Notice that the side of the composition is cropped.
Many photo printers have a maximum of 13 x 19" paper size. I can enter these dimensions in the pop-up box to see what parts of my image will be cropped when I print. With this image, I moved the crop to preserve the left side of the composition.
Conclusion
Changing the aspect ratio in Lightroom is necessary when printing or posting online. Lightroom’s Crop tool includes presets for common ratios and allows you to select a custom frame size. Once you get the hang of it, you’ll find it a rather versatile tool in altering your images.
Your prints will look exactly as you envisioned them.
Check out our Lightroom Preset Collection to get a practical and solid start to your post-processing journey.