Lightroom preset settings are a popular and simple way to post-process your photos. You can use them on individual images or during batch editing.
This article will show you how to install, create, and use Lightroom Develop presets to improve your images.
What Exactly Are Lightroom Preset Settings?
Lightroom presets are a series of editing instructions carried out in consecutive order. They are a saved set of adjustments that you can apply to any photo to achieve a particular look.
Presets can consist of any combination of edits that you make to an image. These are then saved to be available at a later time.
Where Can I Find Lightroom Develop Presets?
Lightroom comes with several built-in presets. You can import presets or create your own.
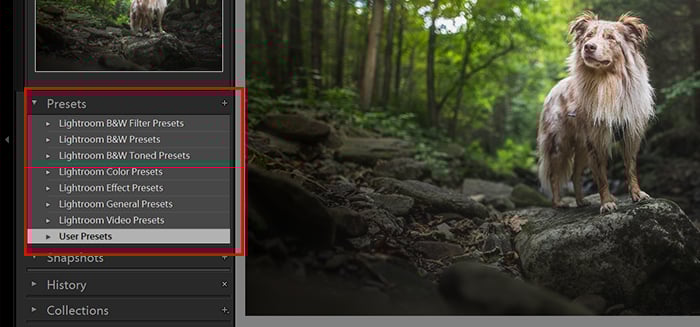
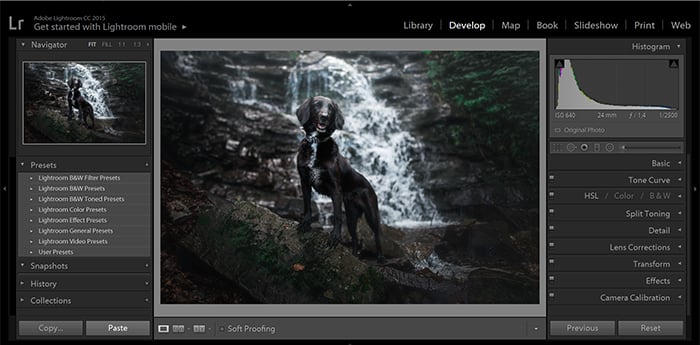
To find the presets, open the Develop Module in Lightroom. The preset box is in the left-hand panel. If you cannot see this, press F7 on your keyboard. Or you can click the triangle in the middle of the left side of the program window.
Open the drop-down box to reveal the pre-installed presets. These include categories such as Color, Black and White, Sharpening, and Classic.
There are two Classic categories. These include presets for a retro film look or more general image enhancements.

How Do I add Presets to Lightroom?
Lightroom Develop presets are available for free and as paid packages. A quick online search will reveal many websites where you can download them.
Photographers often create these for a specific look and feel. You can import these Lightroom users’ presets and add them to yours.
Download the preset you have chosen. After this, find your Lightroom folder and open the Develop Presets folder. You can copy any downloaded presets here. Once you restart Lightroom, they will appear in the Presets tab of the Develop module.
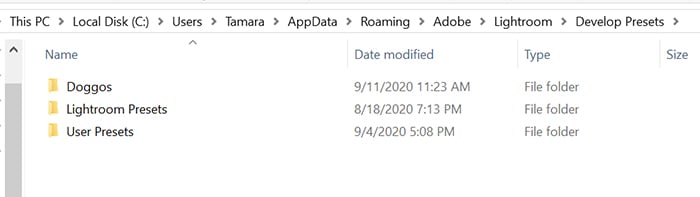
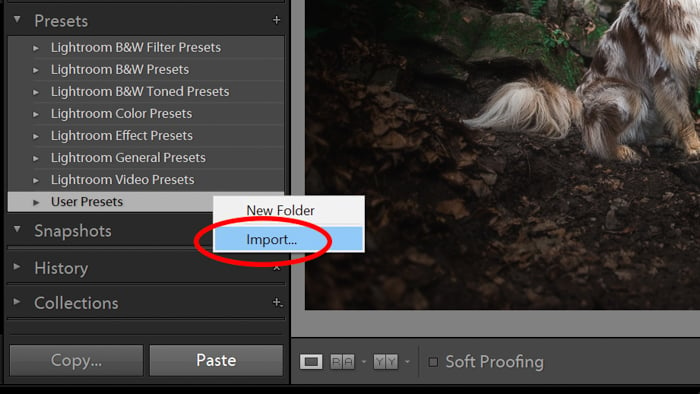
In case you can’t find the Lightroom folder, you can add the presets one by one. Right-click on User Presets and choose Import. You will need to select the preset from the folder you downloaded it to. The file extension has to be “lrtemplate” or Lightroom won’t recognize it as a preset.
Move your mouse over the name of each preset. This way, you can see the effect the develop preset will have on your selected image.
Why Use Lightroom Develop Presets?
Using Lightroom Develop presets saves you time. You can make the same series of edits instantly on more than one image. Once a preset is applied, you can export the image or make further edits.
Presets can also help you develop a consistent look and style for your photo editing. By using several Lightroom presets, your photographs can be:
- Colorized
- Sharpened
- Dehazed
- Corrected
- Or edited otherwise
I recommend you limit the number of develop presets you use. This method will build a portfolio of photographs that have a coherent look concerning post-processing.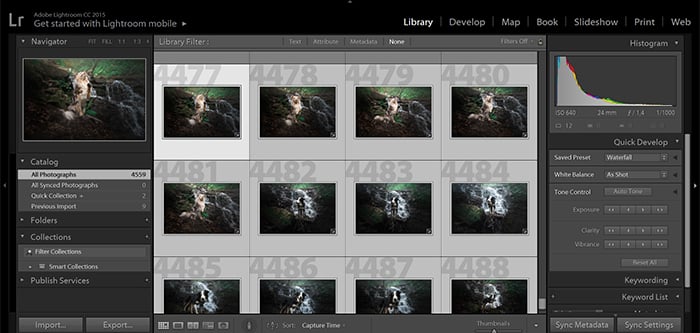
How To Create Lightroom Develop Presets
You can look for an appropriate preset online, or you can create your own develop preset in Lightroom. To create your own Lightroom Develop preset, you have to save a series of edits you’ve made. Once you have them saved, you can click on the preset and apply the edits to one or more photographs.
Creating your own presets is straightforward. It's even easier when you have a particular series of edits you make to your photos.
When you plan to make new Lightroom preset settings, it's good to have a clear idea of the outcome you want. It is more efficient than making more changes than necessary.
Choose a photo—preferably a RAW file. Open it in the Develop Module in Lightroom. Using the editing panel on the right-hand side, make the edits you want until you are satisfied with your photograph.
To save the preset, you can:
- Go to Develop in the top menu and choose New Preset
- Click on the + beside the Preset box in the left-hand panel and select Create Preset
- Hold down Ctrl/Cmd+Shift+N on your keyboard.
This will bring up a dialog box where you can name your new Develop preset and choose a category you want to store it under.
You can also work through the checkboxes and decide which of the edits you made that you want to include.
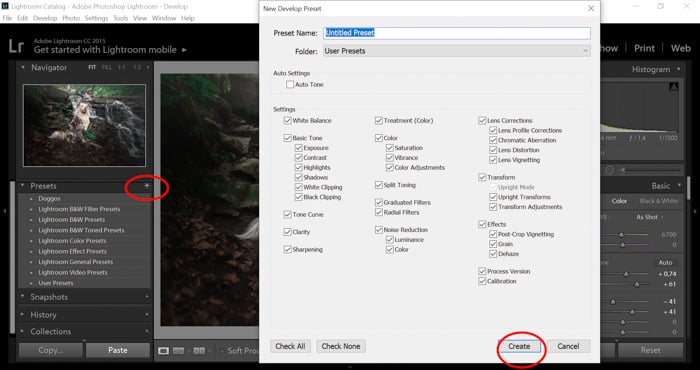
Generally, you will keep all these boxes checked except for the Lens Profile Corrections. It would not be a good idea to apply the incorrect lens profile. The only way you would want to have this box checked is to make Lightroom Develop presets for each lens you use.
After applying the preset, you will see the sliders on the right sidebar adjusting themselves automatically.
Applying presets may not give you the precise look you want for your photo. So you might find you want to make changes to some images after applying a preset. You can further refine your edits in the Develop module just like you would typically do.
How to Apply A Preset to Multiple Photos in Lightroom
When you have a series of similar photos, you may want to add a Lightroom preset to them all. Sets of photos taken with the same lighting conditions can be treated with the same preset.
To apply a preset to multiple photos in Lightroom, begin with the Grid view in the Library module.
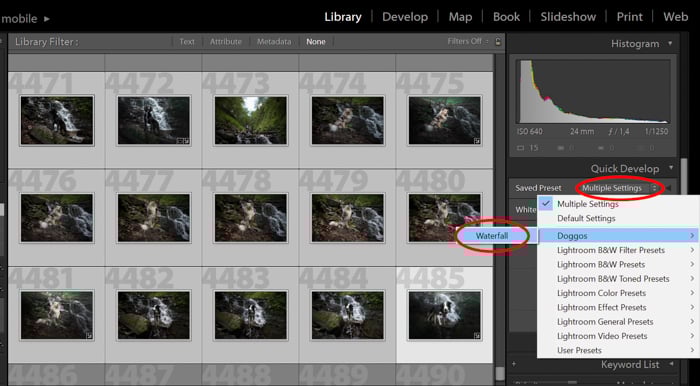
Select the photos you want to apply the preset to by holding the Ctrl/Cmd key and clicking on the thumbnails.
Once you have made your selections, open the Quick Develop box in the right-hand panel. Here you will see a drop-down menu called Saved Presets. Default Settings is the item it will show.
To select another saved preset, click on the drop-down to reveal the list of all your saved presets. This will include the presets Lightroom came with and any you have imported or created yourself.
When you make your preset choice, it will be applied to all the photos you’ve selected.
You can also apply Lightroom presets to one image and then copy the Develop settings. To do this, right-click on the photo and select Develop Settings > Copy Settings. Or you can use Ctrl+Shift+C on your keyboard.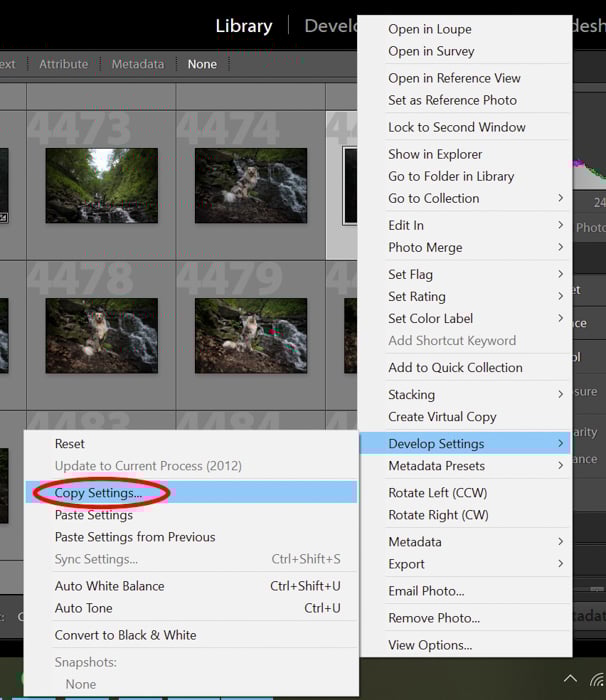
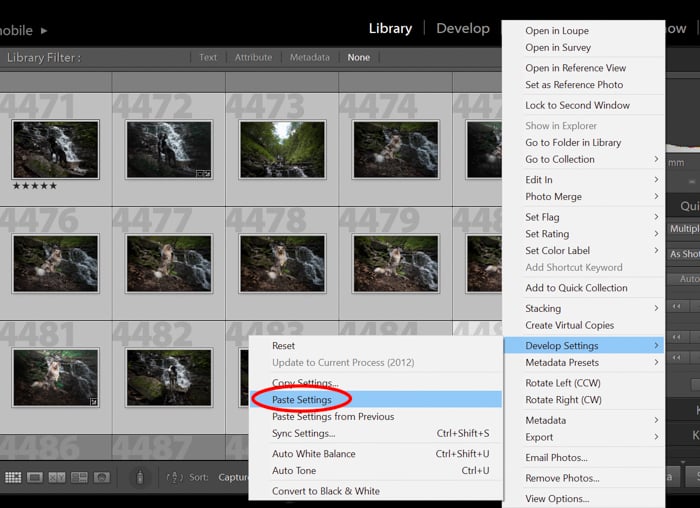
Then select the images you want to apply the settings to and select Develop Settings > Paste Settings when you right-click the image. Or use Ctrl+Shift+V on your keyboard.
Go through these batch-edited photos after applying the preset. You will most likely find that the pictures give the same overall impression. This is what you need to build up a consistent portfolio.
You can easily create your own style and impress everyone with your beautiful photo collection by creating new presets.
Conclusion
Applying presets can be a huge time saver when you are editing large batches of photographs. Using a limited number of Lightroom Develop presets can emphasize style throughout your portfolio.
You can also save them as your own presets if you make the same type of edits when post-processing in Lightroom.
We hope that this article has helped you with creating and using presets in Lightroom. You’re now one step closer to having a stunning and stylish photography portfolio.
Try out our Effortless Editing course to master all the secrets of professional editing in Lightroom!