A great skill to learn is how to batch edit in Lightroom. Batch editing lets you apply adjustments to multiple images at the same time. This can save you hours, especially if you edit an event or photoshoot with similar lighting settings.
Today, we discuss several methods for batch editing in Adobe Lightroom. These methods can range from editing several images through presets to batch editing your photos’ metadata. By the end of our article, you will have the skills to save hours editing on the computer.
Batch editing in Lightroom involves multiple approaches to changing settings across many images. These settings can be visual adjustments that enhance our photos. Or they can be metadata edits to help future picture sorting methods.
Batch editing is most helpful for applying base adjustments across various photographs. It lets you set an editing style for your images and fine-tune them later.
Batch editing in Adobe Lightroom is especially helpful with clients. You can send them a wide range of images before proceeding with more in-depth edits.
Both Adobe Lightroom versions take different approaches to batch editing. Due to how the programs operate, most methods do not work the same on each version. We outline these differences in each section. Here is a list of each method and the version it works in:
Works in Lightroom CC:
Works in Lightroom Classic:
Works in both versions of Lightroom:
We will now discuss various methods for editing settings in multiple photographs simultaneously.
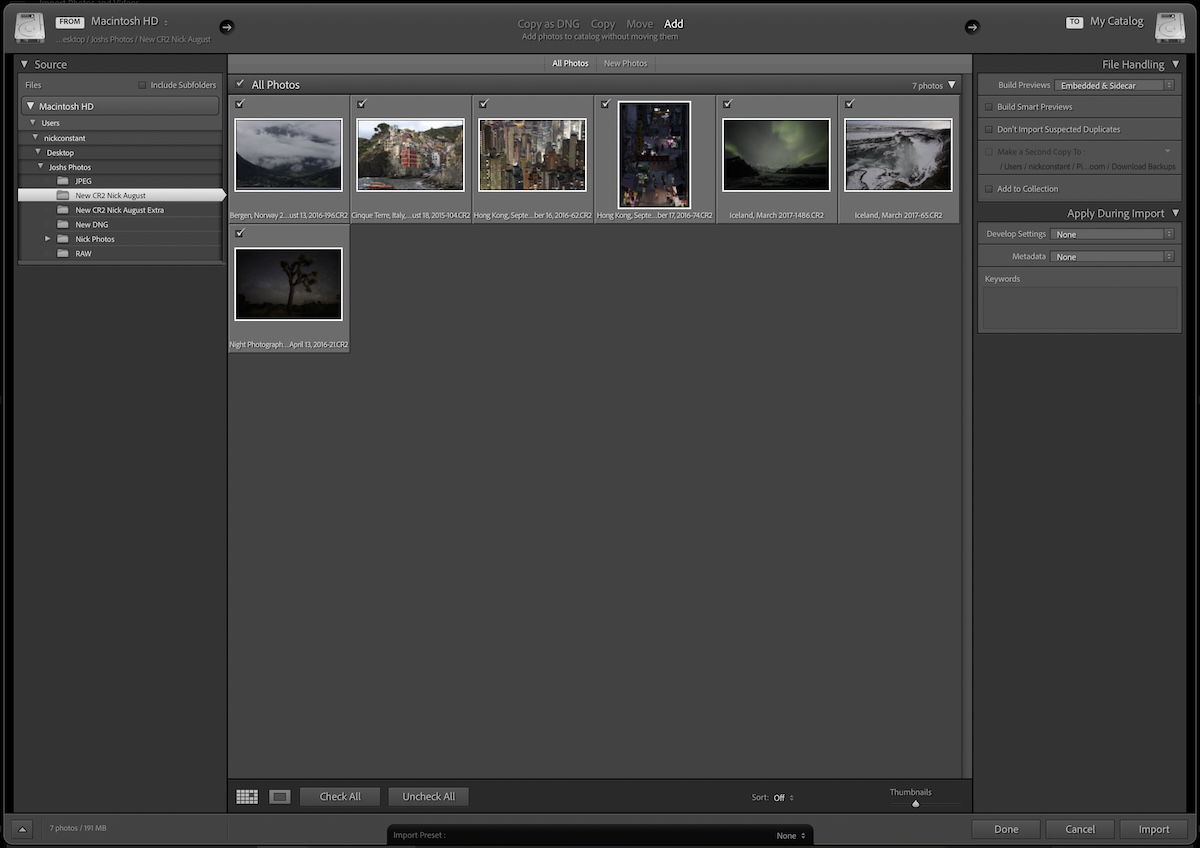
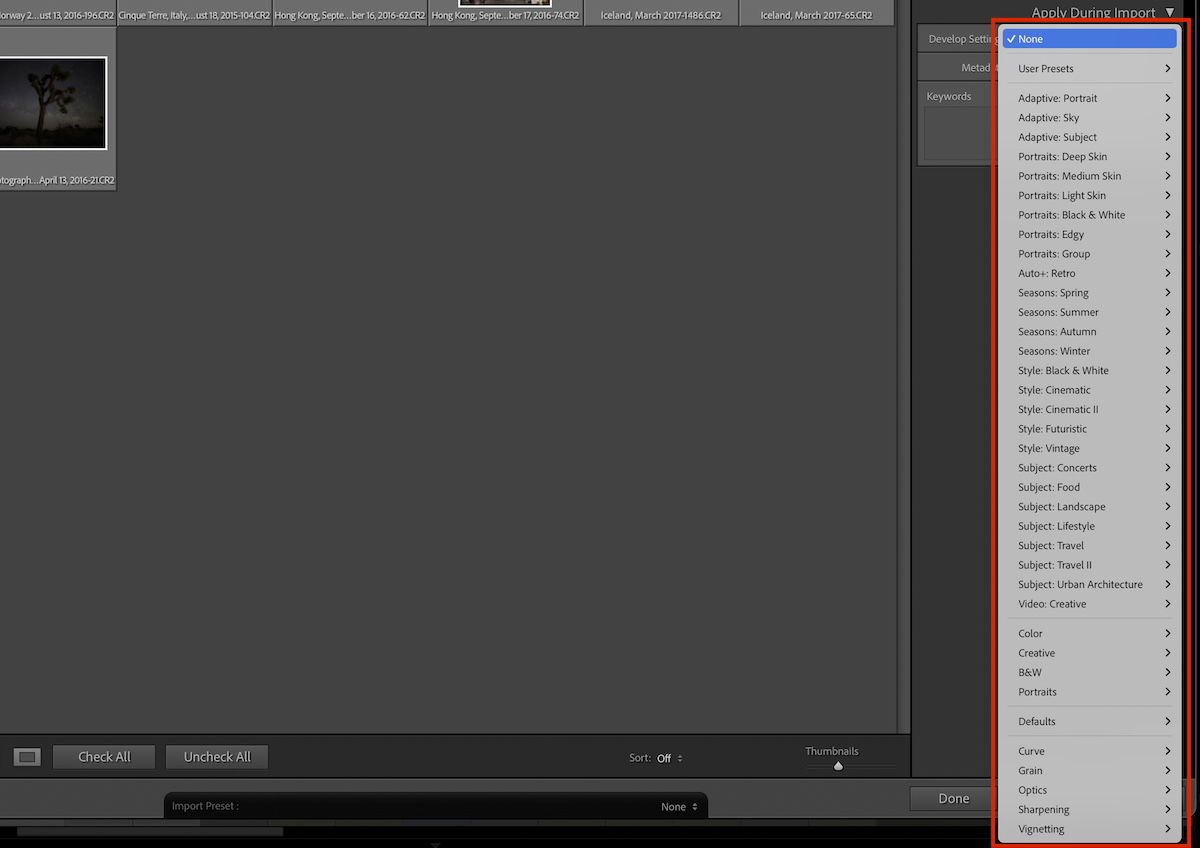
Adobe Lightroom lets you apply batch edits to your photographs during import. This option is only available in Lightroom Classic.
Lightroom CC only saves photos to the program through the cloud. This means it operates with a different importing process where you don’t have to import your image to make edits.
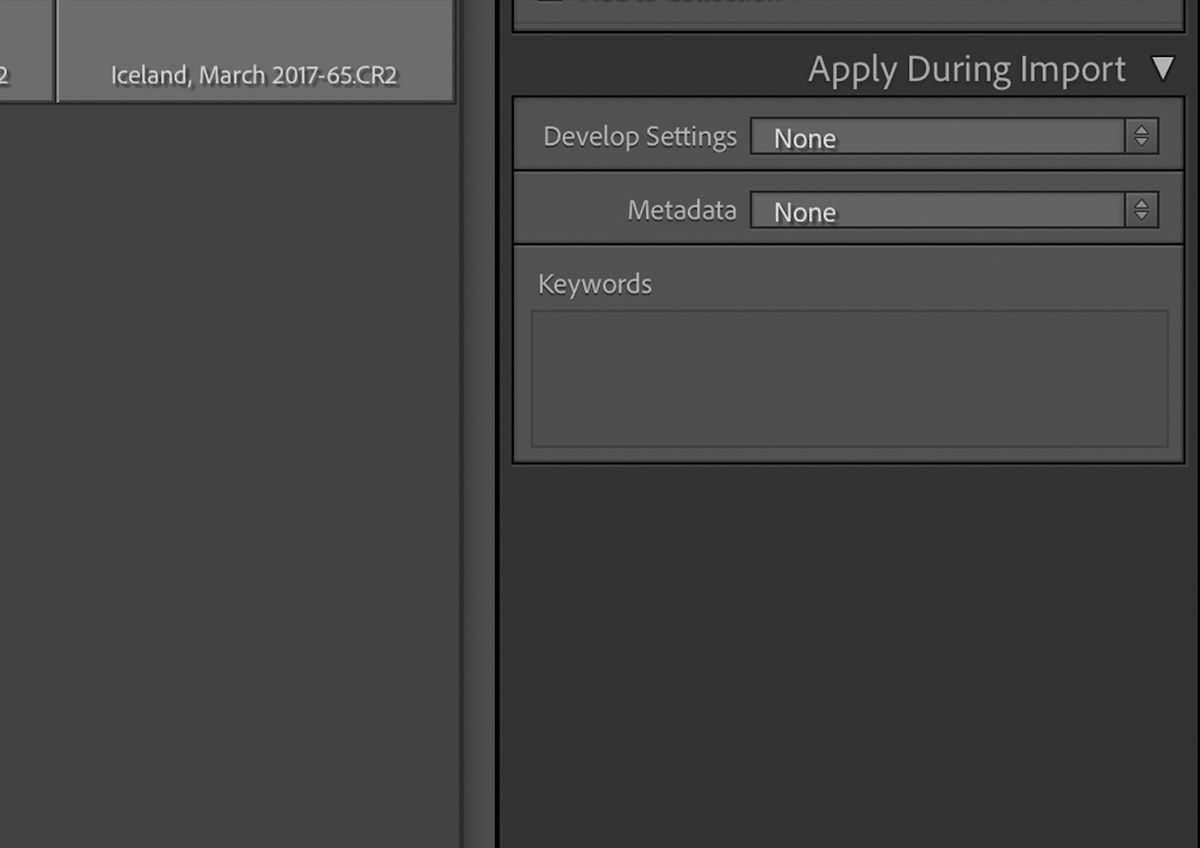
In Lightroom Classic, you must import your images directly to your catalog. In this process, Lightroom lets you edit the images you are importing. You can see this in the Apply During Import section in the right-hand panel of the import window.
Next to Develop Settings, there is a dropdown menu. This menu provides the full range of presets inside Lightroom, including your created and adaptive presets. To learn more about presets in Lightroom, read our dedicated article.
It is also worth considering the Lightroom presets toward the bottom of the table, which are easily overlooked. These presets produce color, tonal, and textural adjustments we often do not use in Lightroom.
They make much more sense to add when importing images. They apply a simple adjustment to all your photos in seconds. You can edit these adjustments further after your photos are in the Adobe Lightroom catalog.
Do you want to leave the batch editing until your photos are in Lightroom? Then, you will want to learn how to apply presets to multiple images. This is another process that does not work in Lightroom CC due to how the program functions.
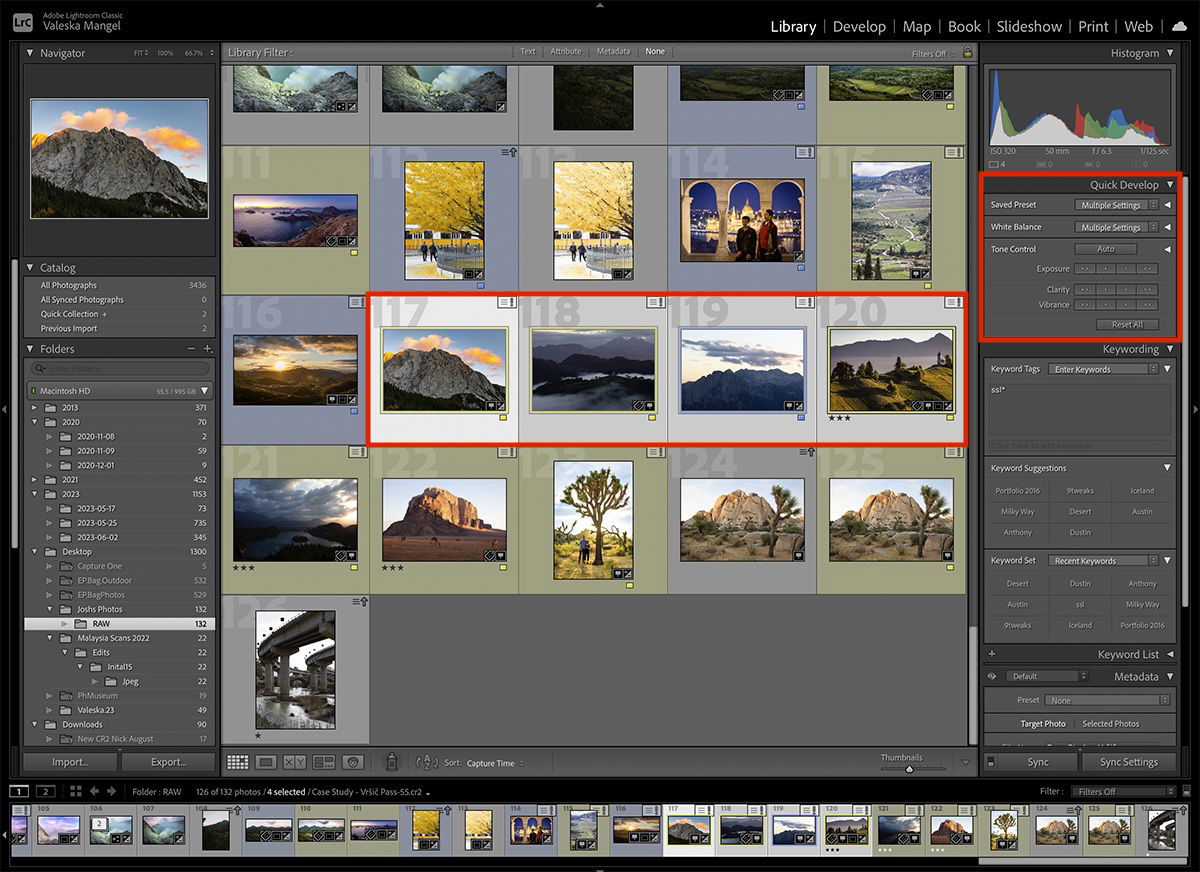
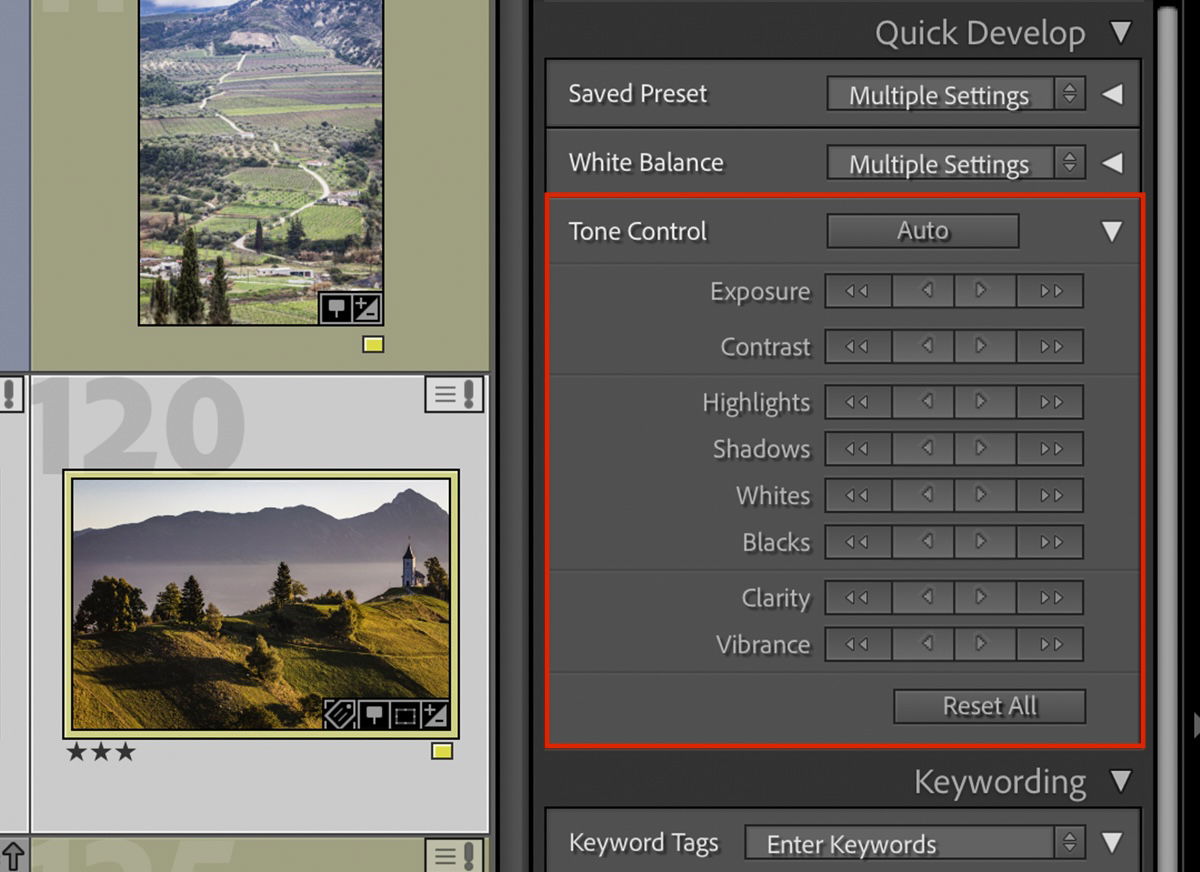
The Quick Develop panel is located at the right in the Library module of Lightroom Classic. This panel lets you apply a wide range of adjustments to your highlighted images. The best part is that the thumbnails change automatically. So you can see your edits in real time.
This Quick Develop panel has three sections to help you find your desired edit. These are Saved Preset, White Balance, and Tone Control. Let’s look at these in more detail.
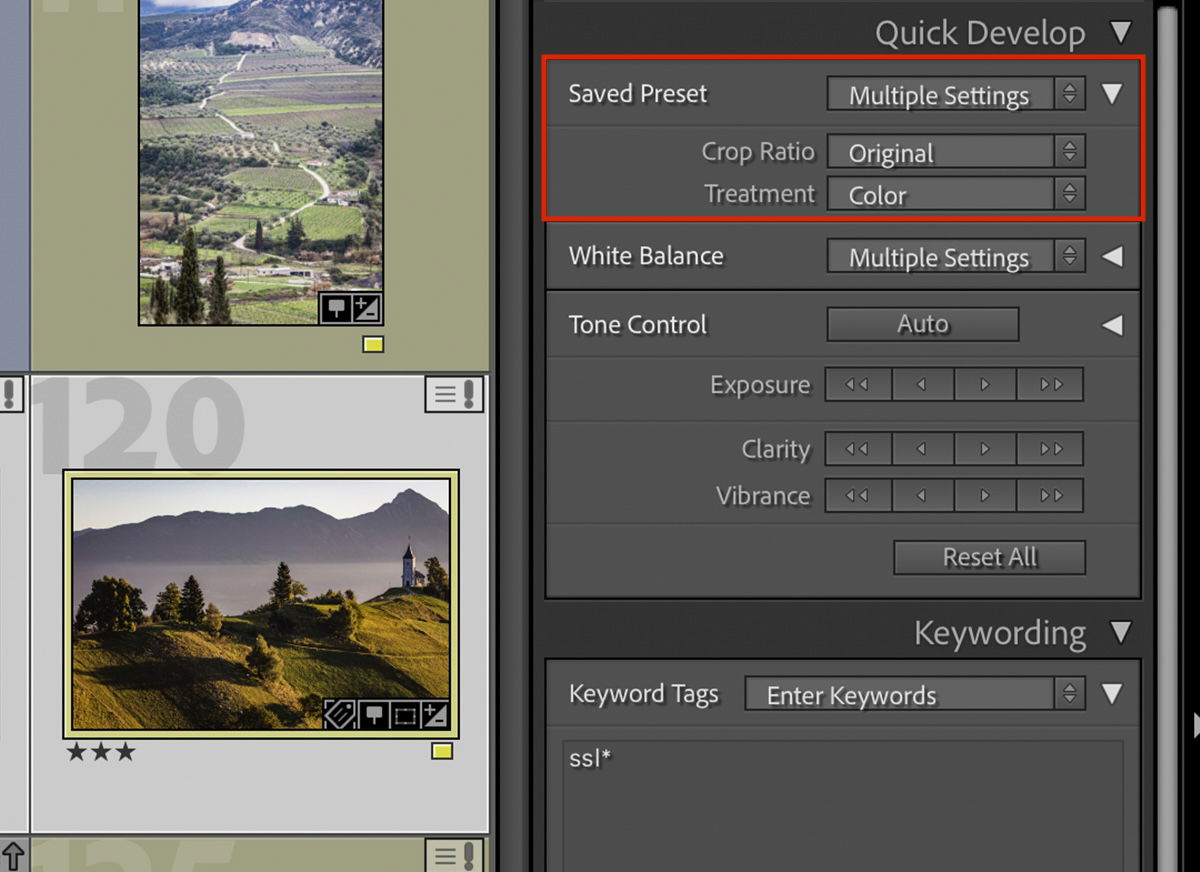
All the preset options available in Lightroom are inside the Saved Preset section. This is the same list you will find in the Preset section or the batch edit during the import process.
If you click the arrow to the right of the dropdown menu, there are two new selections—Crop Ratio and Treatment. These two sections drastically change our images. We can crop each photo to the same size or choose whether we want the images in black and white.
The Crop Ratio adjustment applies the crop toward the center of the image. If you want to be more specific about which areas are cropped, you must go into each image individually.
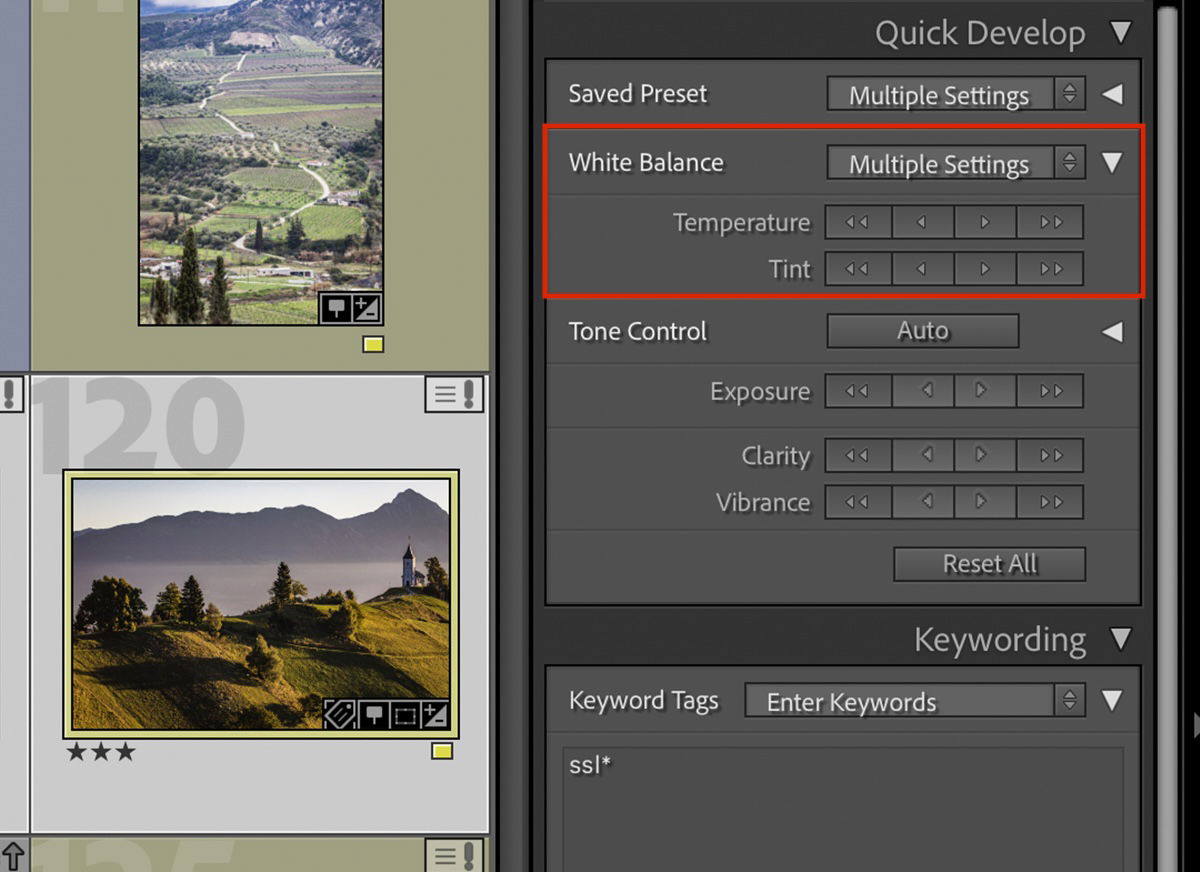
The White Balance section gives you a dropdown menu to choose from different color temperature adjustments. These are decided by the lighting conditions you may be shooting in, from daylight to tungsten light.
If you want to adjust the white balance manually, click on the arrow to the right of the dropdown menu. This reveals two more categories—Temperature and Tint.
In the Develop section (Edit in Lightroom CC), we are used to controlling these factors through a slider. Here, four buttons symbolize small or large jumps in increments.
These are incredibly helpful when making small adjustments to a wide range of images. You can also adjust the temperature to make a group of images seem warmer or colder rather than just color-correcting the white balance.
The first button in the Tone Control section is the Auto button. Pressing this button applies automatic tonal adjustments across all your selected images. Lightroom has a great automatic adjustment, so this may be a good starting point for beginners or people looking to save time.
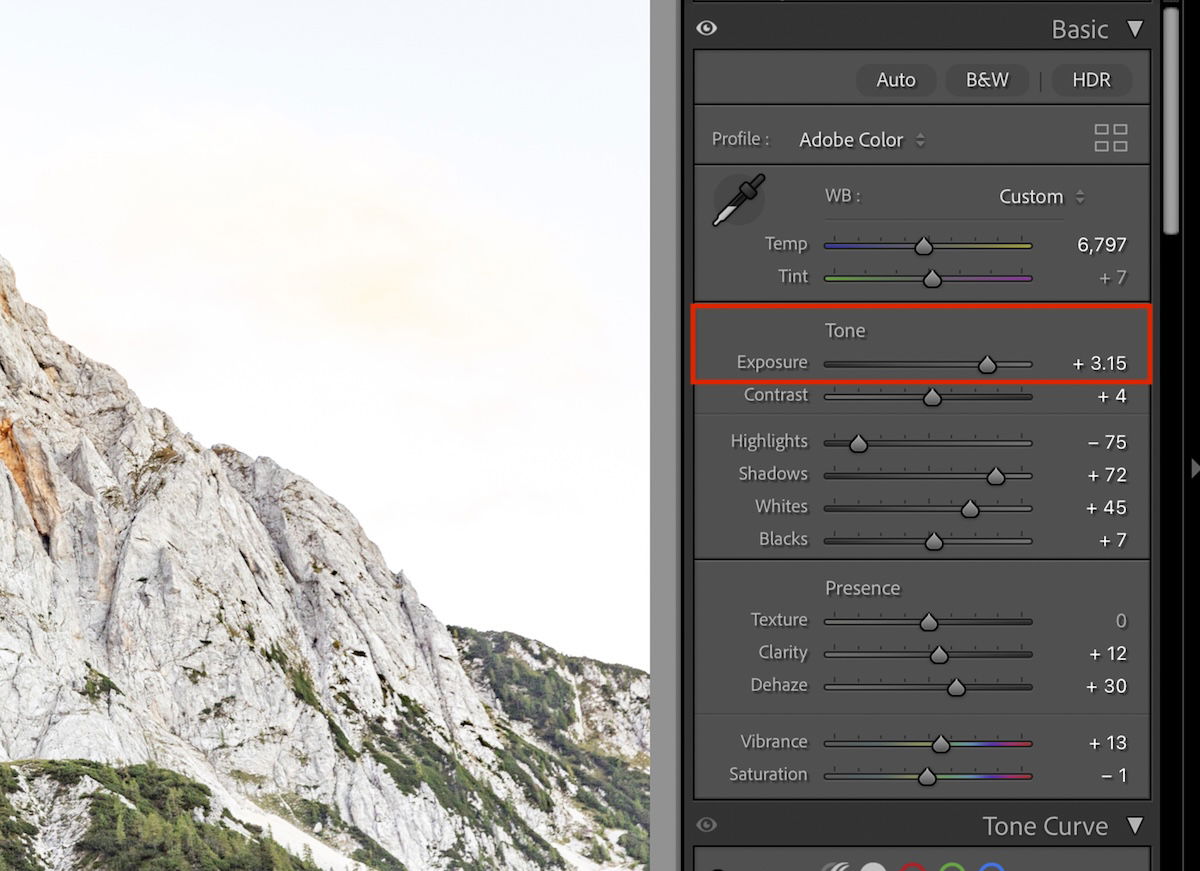
Below this, you get three different sections to control—Exposure, Clarity, and Vibrance. These are again adjusted through four buttons you can click to increase or decrease the adjustment in increments.
You will reveal five more sections if you click the arrow next to the Auto button. These are Contrast, Highlights, Shadows, Whites, and Blacks. Again, you can control this through buttons that move in incremental steps.
This wide range of Quick Develop adjustments is a brilliant way to quickly add your unique touch to a wide array of images.
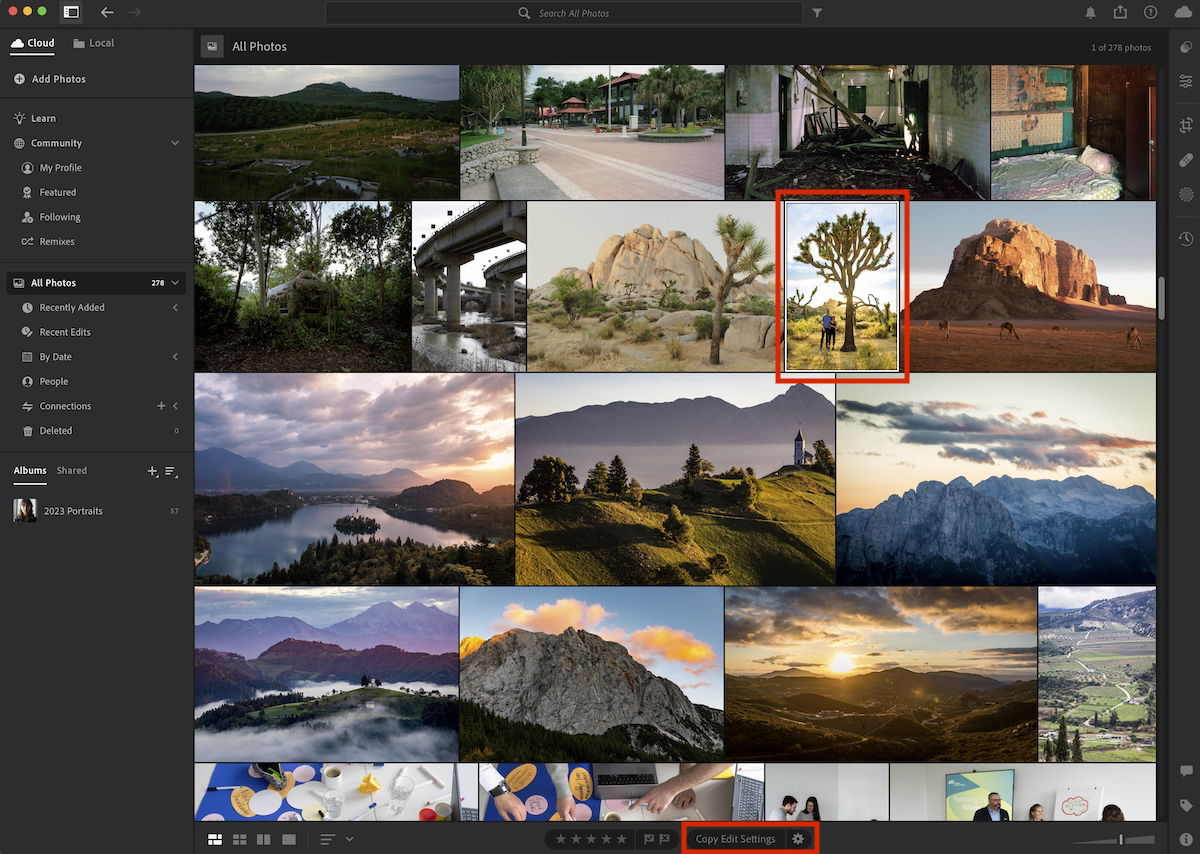
Here is the first batch editing technique unique to Lightroom CC. It uses a copy-and-paste format to quickly share your selected image adjustments.
To batch edit from a previous photo, you can find the Copy Edit Settings button at the bottom of your interface. This button is displayed in any viewing mode that features your images.
Lightroom understands how convenient it is to keep edits uniform. So you find this button right next to the ratings and flag buttons. The Copy Edit Settings button is a simple click-to-copy and click-to-paste format.
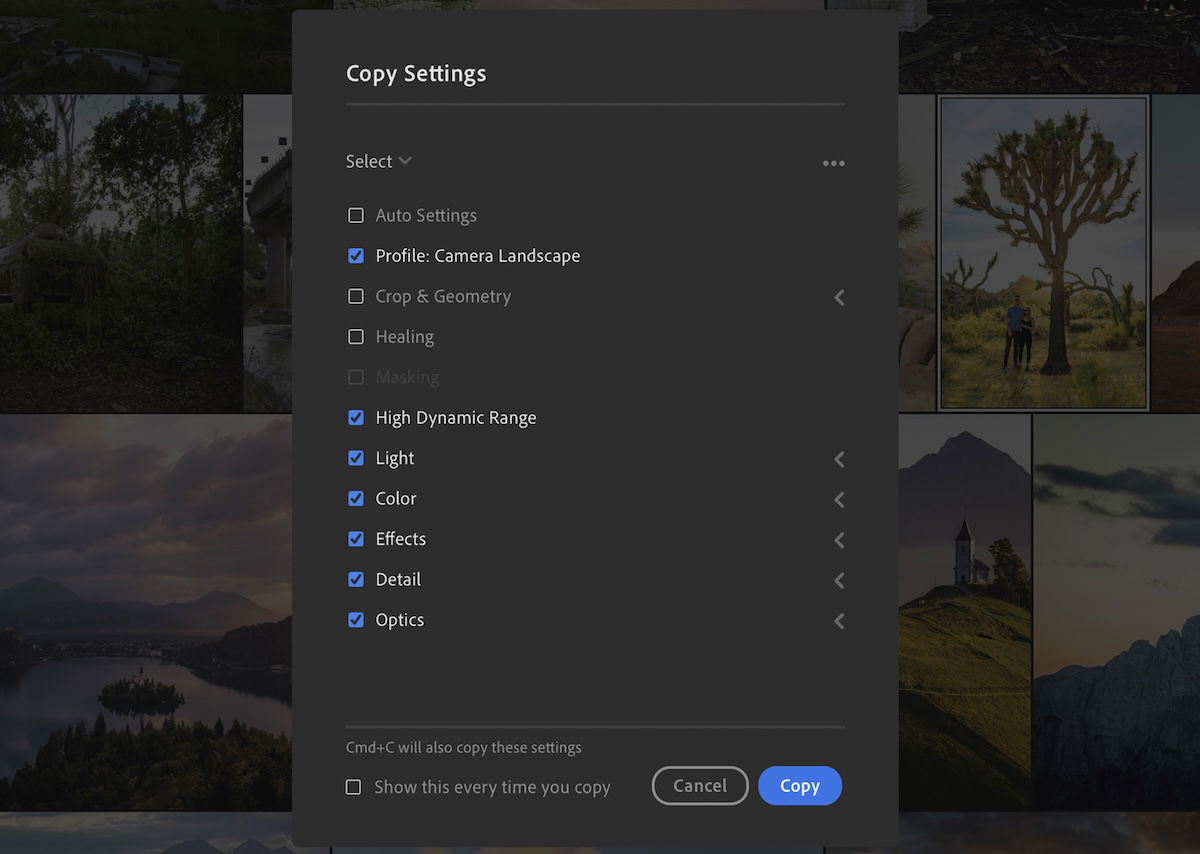
Next to the button, a cog icon for the settings is displayed. Clicking the Settings icon brings up a window highlighting which adjustment settings will be copied over. The Copy Edit Settings provide you complete control over which adjustments are copied.
Along with the individual tonal, color, and effects adjustments, you can copy a range of wider edits. These features include Automatic adjustment (if applied), Profile, Crop and Geometry, and Healing!
Including these options is an incredible feature in Lightroom. Copying over a similar crop can save hours. The best feature is the fact that it copies Healing adjustments! This is extremely helpful if you have a speck of dust on a lens or a scratch in the same place for every photo.
Below these first tick boxes is an extended range of adjustment options. Each of these adjustments is compiled in their edit categories.
You can click on and off each category depending on how relevant they are to your edit. For more control, click on the dropdown menu next to each category heading to manually select individual adjustments.
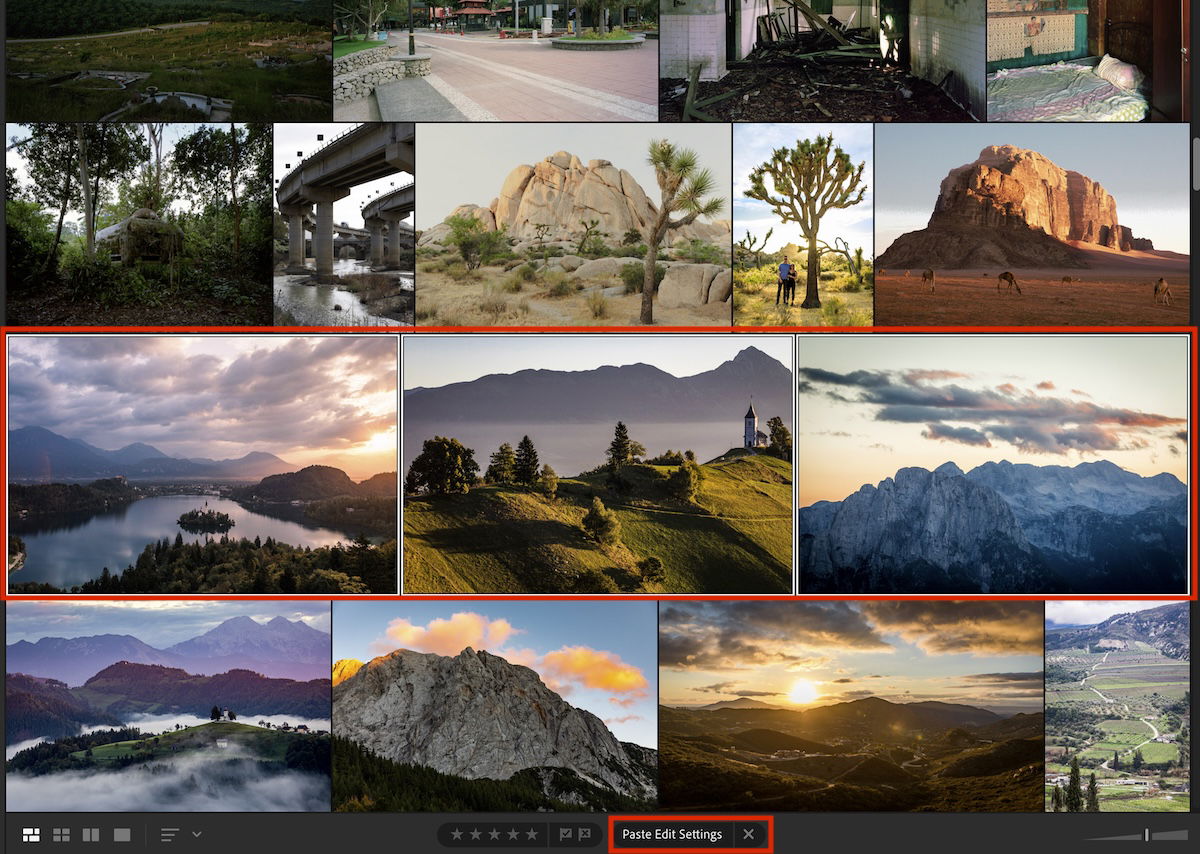
After you have clicked Copy Edit Settings, you can paste them into various photos. If they’re all in a line, you can Shift-click the range of photos or Command-click (Ctrl-click for Windows) each image you want to paste the settings onto.
After selecting your images, click the same button. Note that the button’s name will now be Paste Edit Settings.
A great feature is that you can use shortcuts to perform this action. So, Command-C (Ctrl-C for Windows) copies the edit settings, and Command-V (Ctrl-V for Windows) pastes them! This is a brilliant addition and makes batch editing simple and easy!

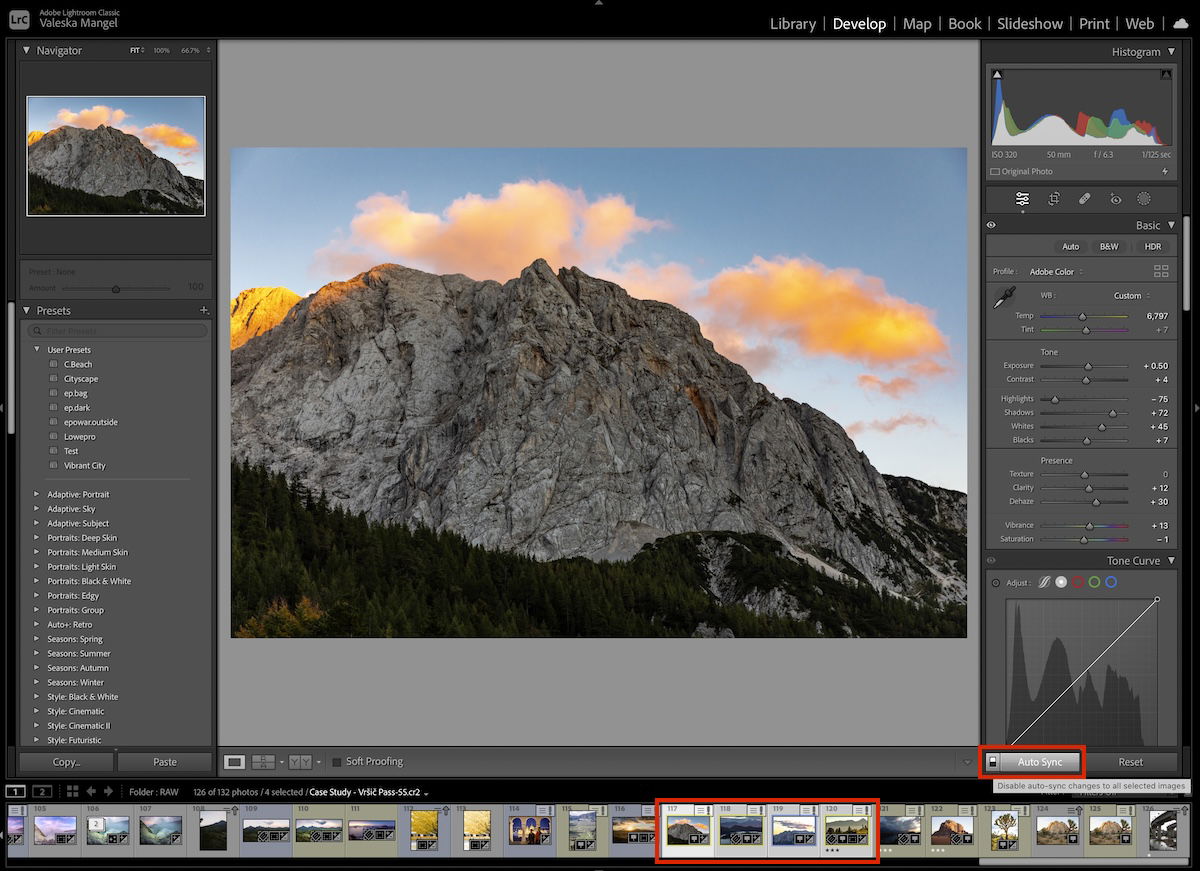
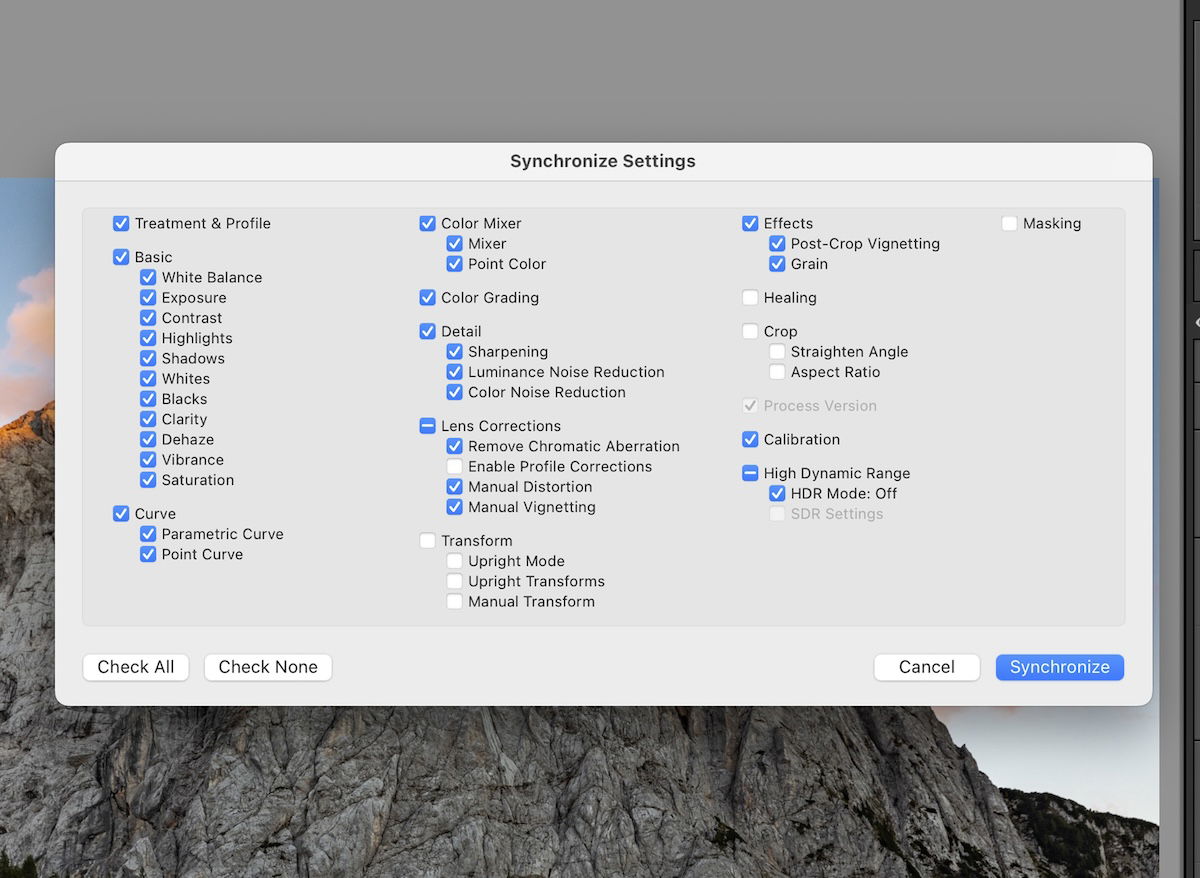
The Sync feature is like the Copy Edit Settings in Lightroom CC. And the Sync batch editing abilities are only in Lightroom Classic.
If you select multiple images, the Sync and Synch Settings buttons appear at the bottom right of the Library workspace. Sync copies metadata, which we will look at at the end. Click the Sync Settings buttons to copy the adjustments.
In Develop mode, the Synch button replaces the Previous button at the bottom of your Editing panel. Here, you click Sync.
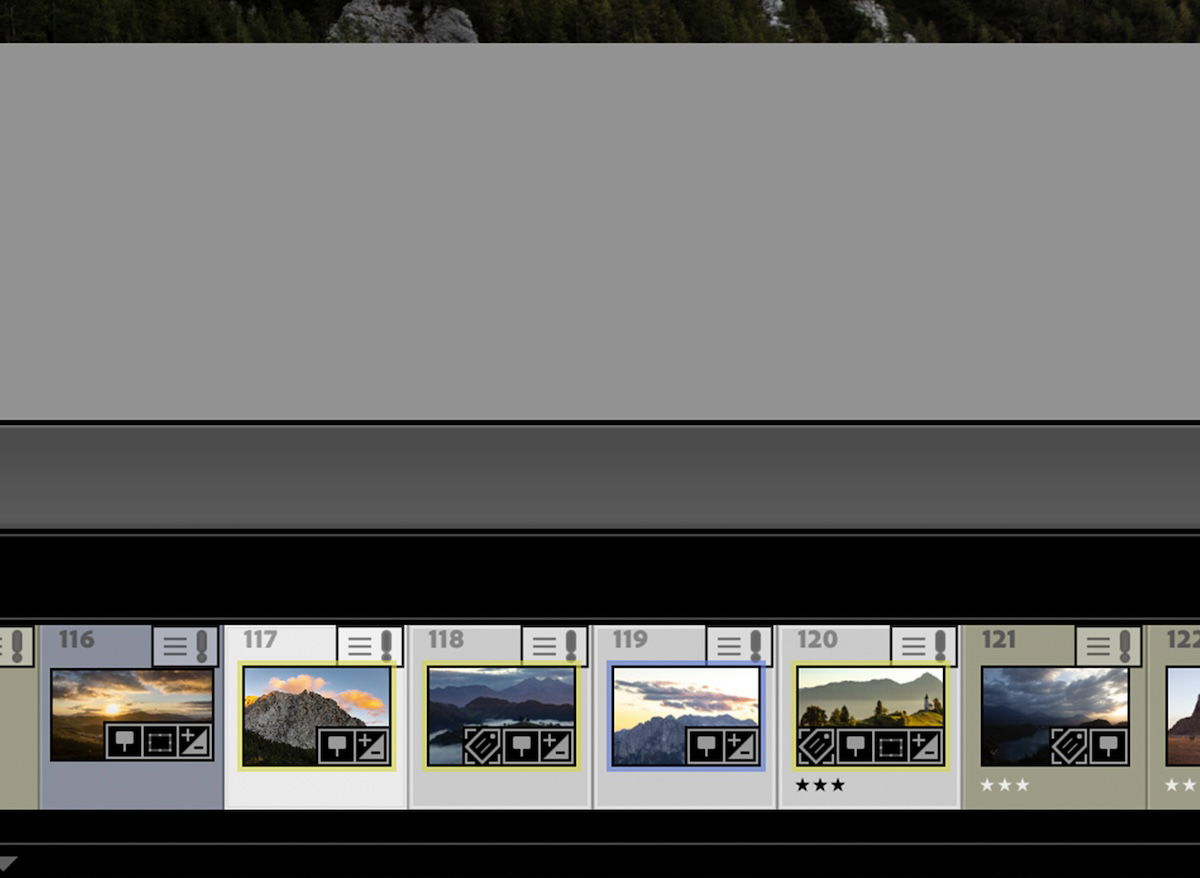
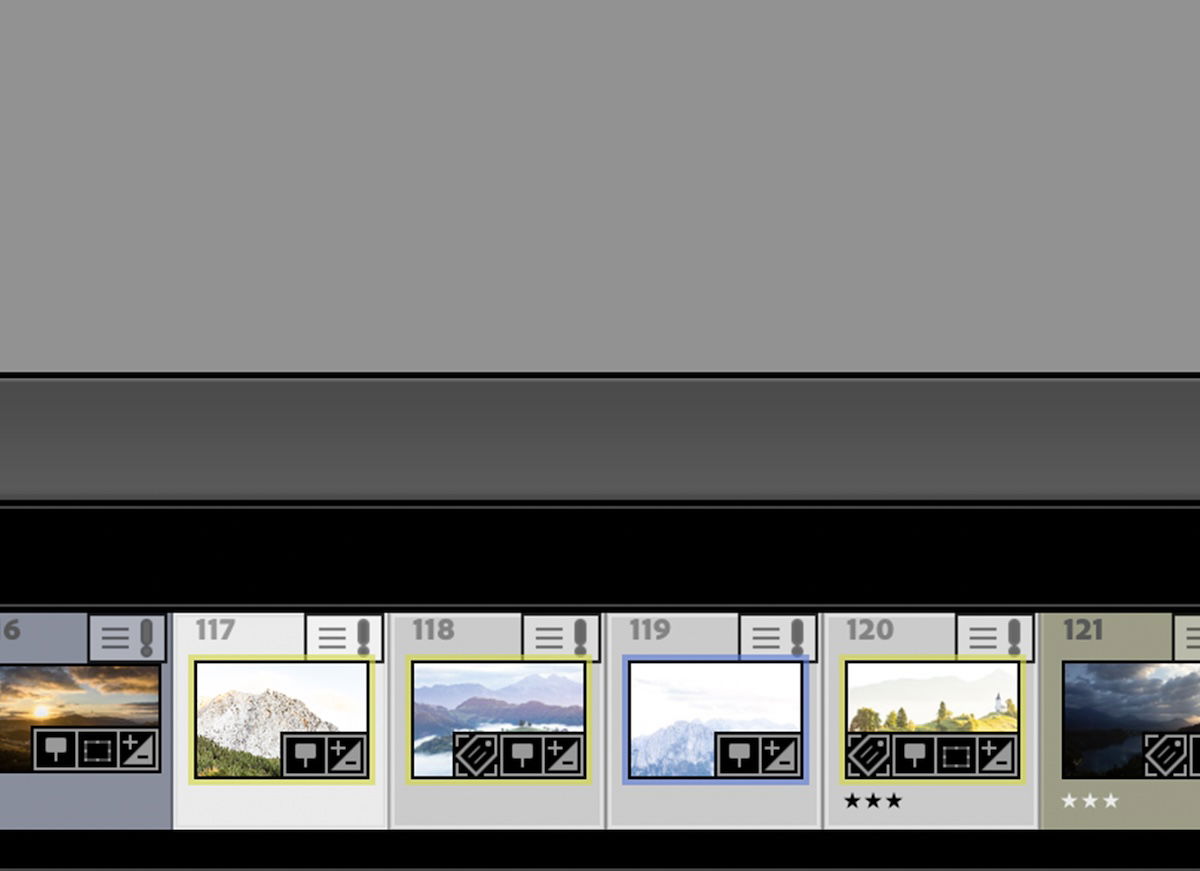
The Sync feature lets you quickly copy your settings from your current selected photo to any selection of photos. You can select these photos from the filmstrip bar at the bottom of the interface.
After you click Synch Settings in Library or the Sync button in Develop, a window appears. This window lets you select which adjustments to synchronize with other images. It also displays the full range of adjustments in Lightroom.
After you have selected all the relevant fields, click Synchronize. All selected photos change to match your selected photographs’ settings.


Auto Sync is an extra feature with the Sync button. This feature lets you adjust multiple images as you go! When you move one slider in one image, the same adjustment is applied automatically to all other selected photographs.
You can turn on the Auto Sync function by toggling the switch beside the Sync button. For the Sync button to appear, you must have multiple images selected. You can do this by Shift-clicking or Command-clicking (Ctl-click for Windows) images from the filmstrip along the bottom.
After switching to Auto Sync, you can move the sliders, and the exact increments are copied to each photo. The settings applied are visible through the thumbnails in the filmstrip. At any point, you can make changes to any of these photos and continue your Auto Sync editing.
The Auto Sync does not make your images look the same from the get-go. Rather, it automatically applies any settings you edit from that point on. If you want your images to look similar, sync them before auto-syncing.
The easiest way to batch edit in Lightroom is to create your own preset. By creating a preset, you can copy your favorite photo settings and apply them to photographs even when returning to the software in the future.
To create a preset, you first want to set your adjustments to be copied over. If you are doing this for the first time, pick an image that looks the most like your other images in terms of tones and colors. Then, apply all the relevant edits you want.
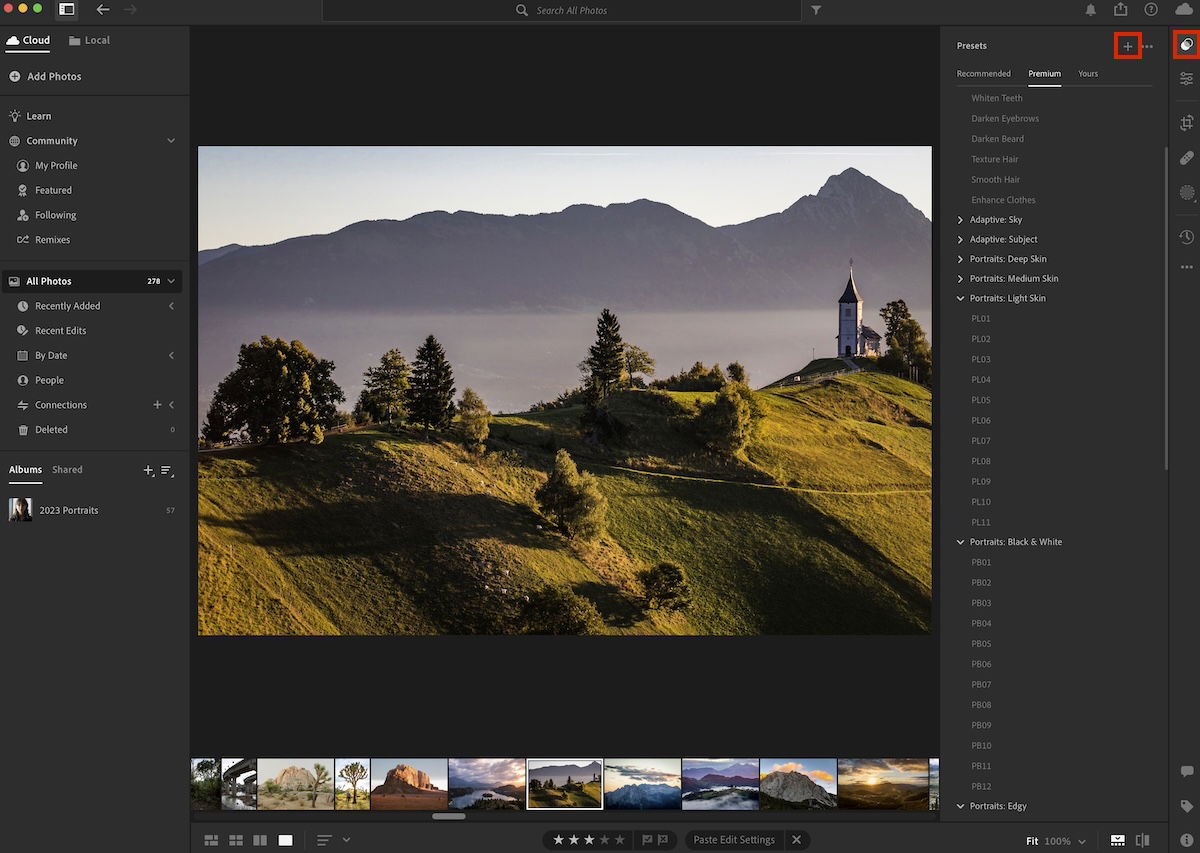
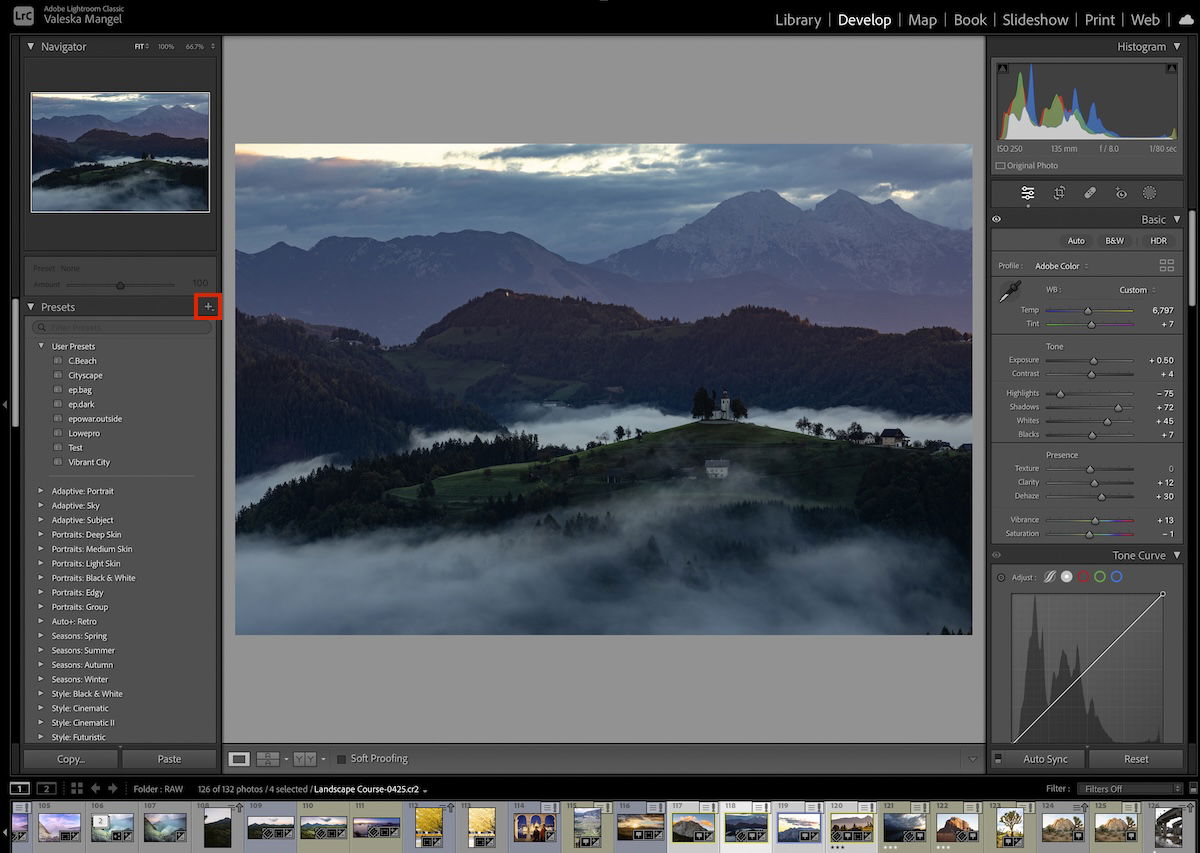
Next, find the Preset panel. This is on the left-hand panel in Lightroom Classic. In Lightroom CC, you must click the icon of two overlapping circles in the right-hand toolbar.
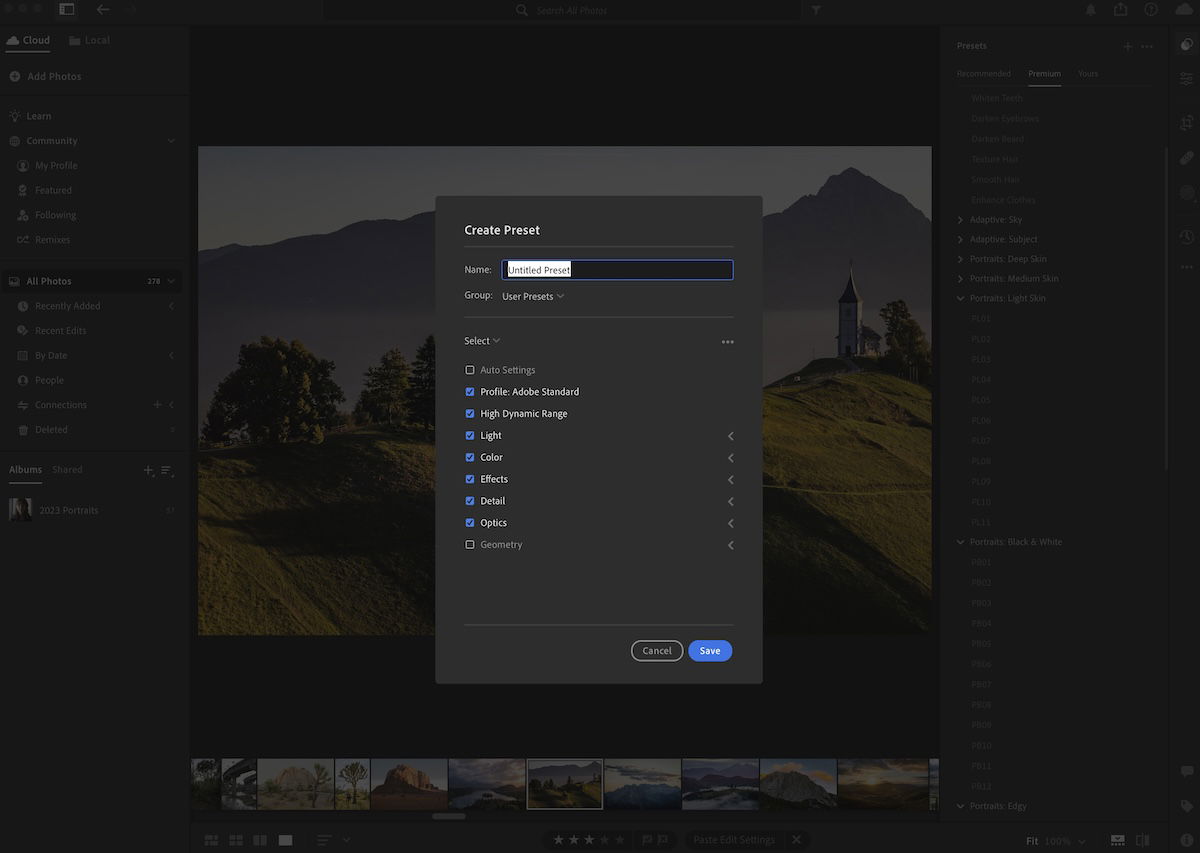
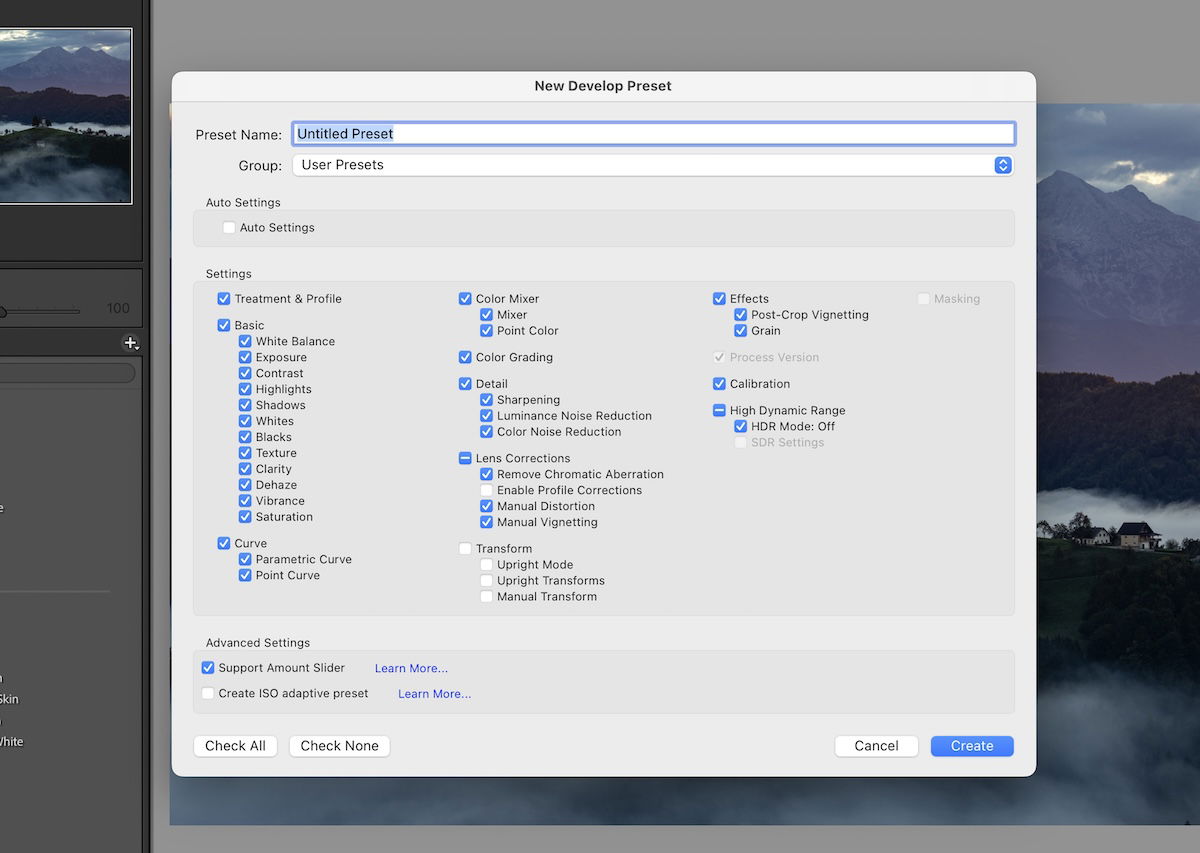
After locating and opening these panels, you will see a plus (+) sign at the top right of each section. Click this to create your own preset. You then see a window to select all the relevant adjustments you want to copy to the preset.
At the top, you can name your preset. It is easiest to name your preset with the type of mood you are setting in the image or the photoshoot date. Below this, you can add it to a preset group, making it easy for photographers who regularly create presets.
Lightroom Classic gives you a window where all options are laid out. Lightroom CC uses the same option as the Copy Edit Settings, with all adjustments in the dropdown menus of its editing section.
A great feature to be aware of is that Lightroom lets you copy masks! This is available for the AI masks that Lightroom produces.
You can then apply your preset to any photograph inside your Library. You can also send and share presets. Read our article on how to install and import presets in Lightroom.
The last batch editing technique we examine is metadata batch editing. The Lightroom Classic version creates a Metadata preset, which you can then paste into any batch of photographs. The Lightroom CC version selects images in grid view.
Batch editing metadata in Lightroom is useful for photographers who want to organize their photo library and image info. It is especially useful for photographers who are sending their images to clients.
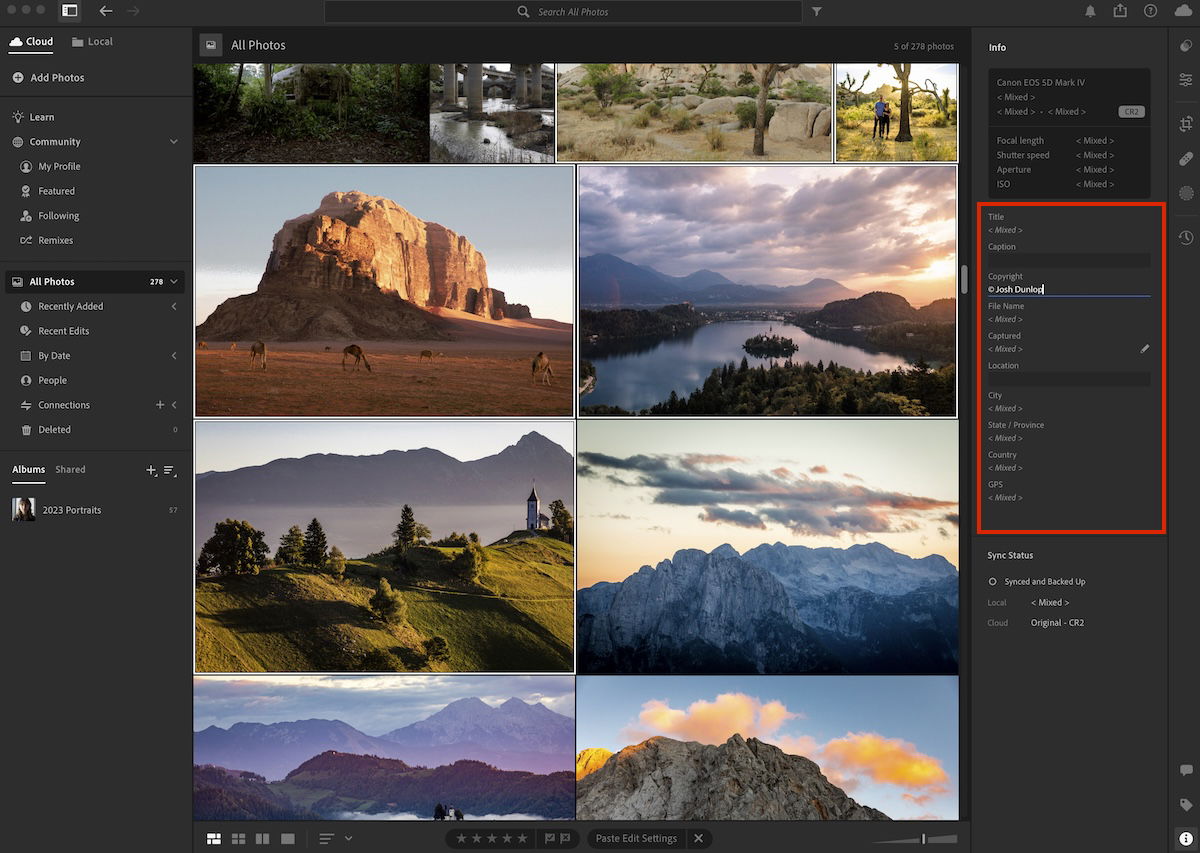
To edit metadata in Lightroom CC, select your images in grid view. Then, click the Info icon at the bottom right. Once in this view with multiple images, you can edit the custom fields to apply the information to all images. It is that simple!
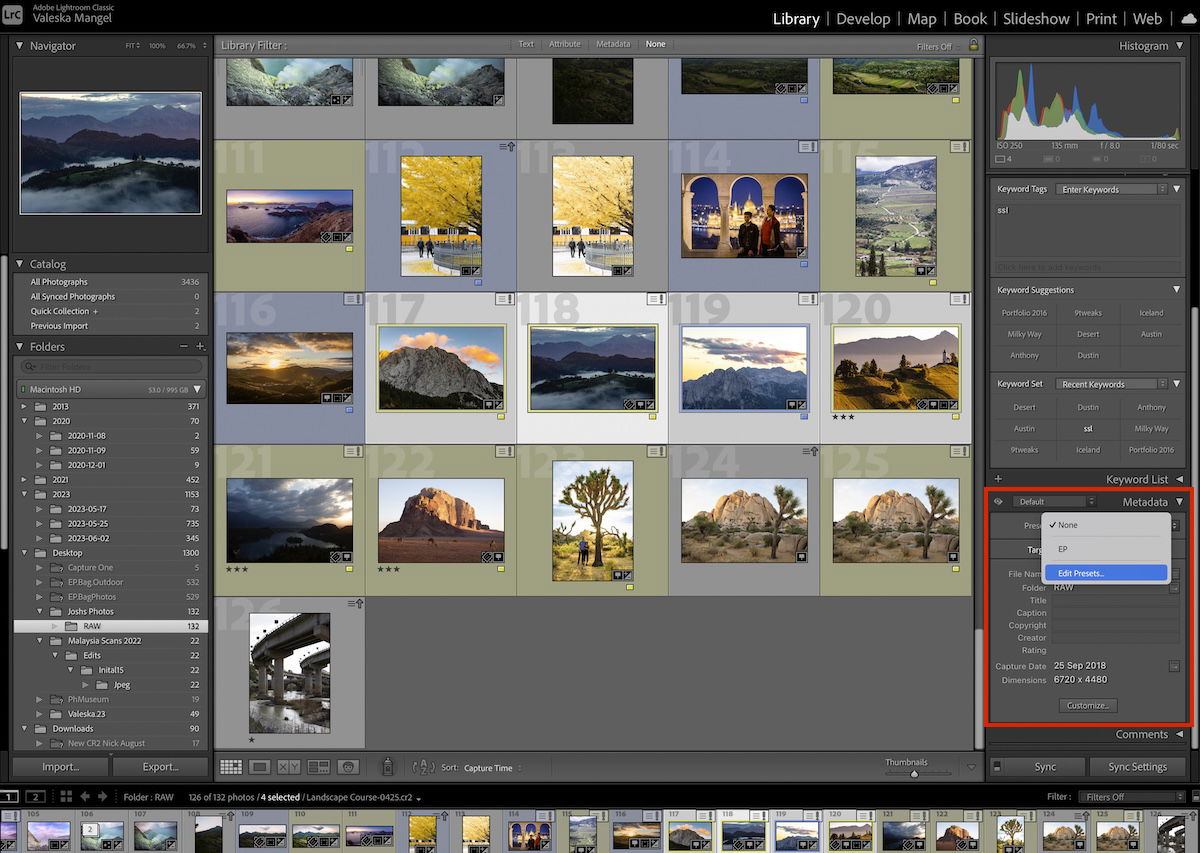
To create a metadata preset in Lightroom Classic, you must be in the Library module. Scroll down in the right-hand panel to find the Metadata section. This section shows you all the main Metadata for your currently selected image.
At the top of this is a Preset category with a dropdown menu next to it. Click this dropdown and select Edit Presets.
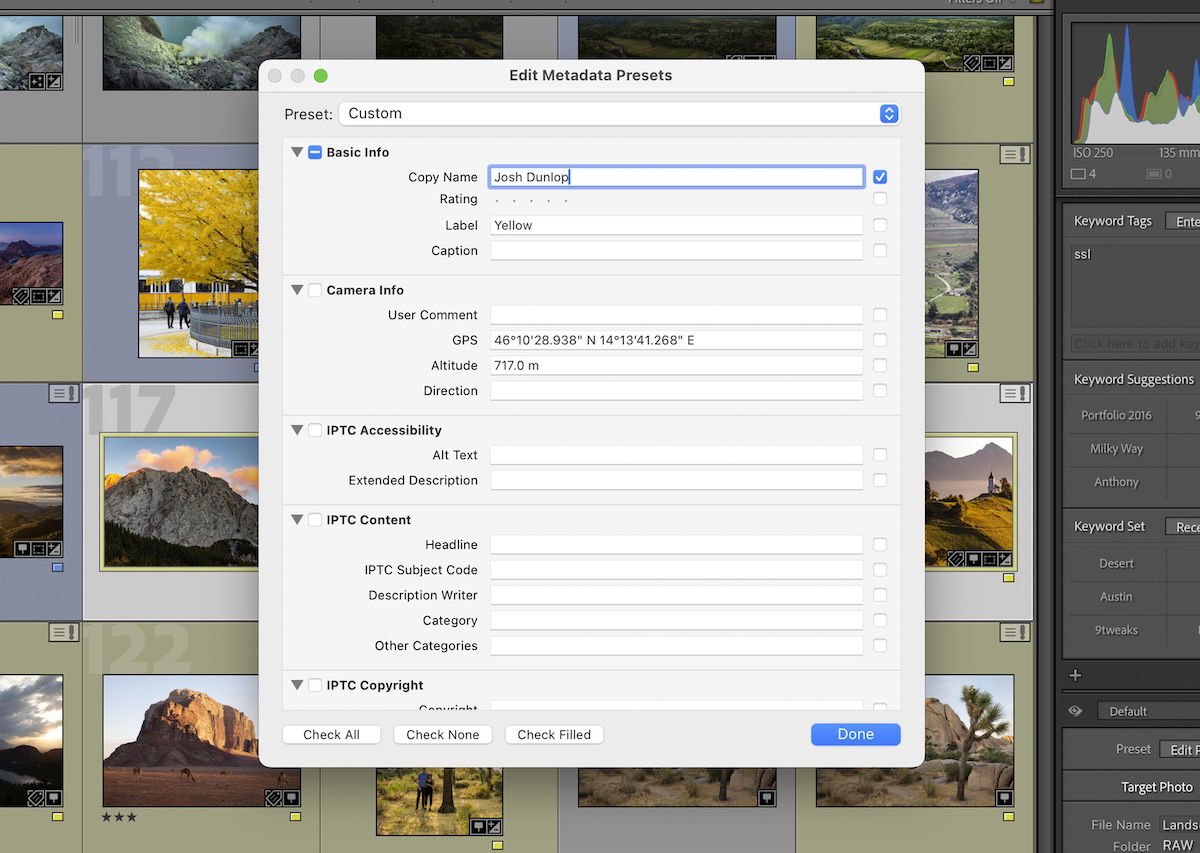
When you click Edit Presets, a window with a wide range of data entry options opens. Work down this list to set the relevant information you want to include in your preset for your batch of images.
After you have done this, click Done, and you can name your preset. You can then select a wide range of images, go to the Metadata section, and apply your preset to all of them!
This method is extremely helpful to ensure certain information is saved into the image metadata. This is particularly important for copyright information.

Now, you have multiple ways to batch edit in Lightroom for both software versions. These techniques are included in the software to help save you time. So, try out each technique to see how it could speed up your editing workflow.
These techniques are especially useful for event or wedding photography. But any photographer will find them helpful. You could use them to make a sequence of images look uniform or speed up the first editing step before you go into detail in each image!


![P08 [Lead Gen] Product Sidebar_v2_date_20230223](https://expertphotography.b-cdn.net/wp-content/uploads/2023/02/P08-Lead-Gen-Product-Sidebar_v2_date_20230223-300x295.jpg)
![P08 [Lead Gen] Sidebar Banner 2_date_20230223](https://expertphotography.b-cdn.net/wp-content/uploads/2023/02/P08-Lead-Gen-Sidebar-Banner-2_date_20230223-300x245.png)
![P08 [Lead Gen] Sidebar Banner 3_date_20230223](https://expertphotography.b-cdn.net/wp-content/uploads/2023/02/P08-Lead-Gen-Sidebar-Banner-3_date_20230223-300x245.png)