Image stacking is the starting point in the editing workflow of any of your deep space images. One photo stacking software you can use is the Deep Sky Stacker, also known as DSS.
With this Deep Sky Stacker tutorial, you will be using photo stacking to obtain a final image. This will have more details and less noise than the initial photos, which is what we’re after.
Deep Sky Stacker Tutorial: What is Deep Sky Stacker?
Deep Sky Stacker is a free software that makes it easy to pre-process deep sky astrophotography. You can download it here.
DSS is available for Windows. The most recent version is 64-bit only. But you can still download older 32-bit versions from the official website.
Interface
DSS is easy to use and the interface is simple and intuitive.
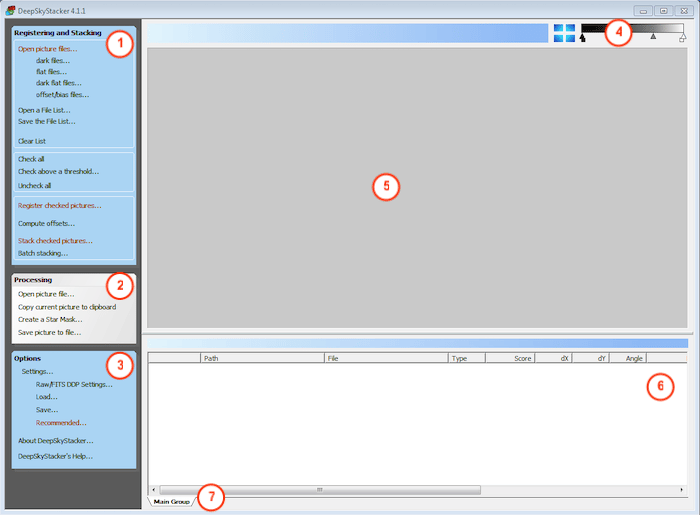
DSS interface is divided in 7 main sections and no menu bar.
The interface has seven main sections:
- Registering and Stacking;
- Processing;
- Options;
- Zoom and display stretching;
- Image viewer;
- image list and info;
- Group tabs.
1. Registering and Stack
In the first section you can find the controls to Register and Stack your light frames. This means you can load all your images and calibration files.
Then you tell DSS to calibrate, align and stack your images. And you will end up with a single image.
After the process is complete, DSS will save the output image as a 32-bit .tif file called Autosave.tif. You can find it in your image directory.
The resulting image is automatically loaded in the Processing section.
2. Processing
The Processing section allows you to load an image or to work with the current one. Here you can balance the channel, change luminosity and increase saturation.
You can also create a star mask and save your work as a .tif file.
3. Options
In the Option section you can tweak the register and staking settings. You can see the different menus for these settings in the images below.
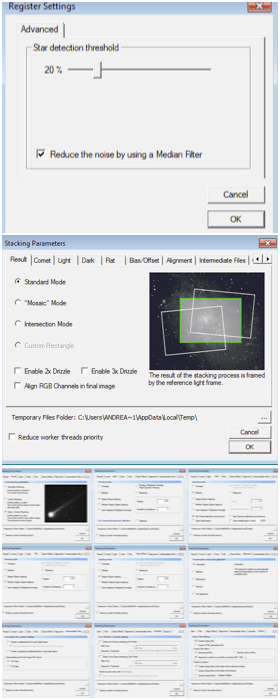
The Register Settings window (top) and the 10 menus for the Stacking Settings.
Here, you can define a default threshold for star detection.
The Stacking settings panel is composed by 10 tabs. These are comet mode, stacking mode, and other options.
Placing the cursor on the options will make an info window pop out. This includes a short description of what the option does. Most of the time, the recommended settings work well enough, so you will not have to do much tweaking.
The RAW/FITS DPP settings allow you to specify how RAW files are read. And which settings to apply to them, (e.g. debayer method or white balance).
You can also load and save settings.
4. Zoom and Visual Stretching
The icon splits your image view in four panels. These show parts of the image zoomed in.
The slider will brighten the image so that details hidden in the dark will become visible.
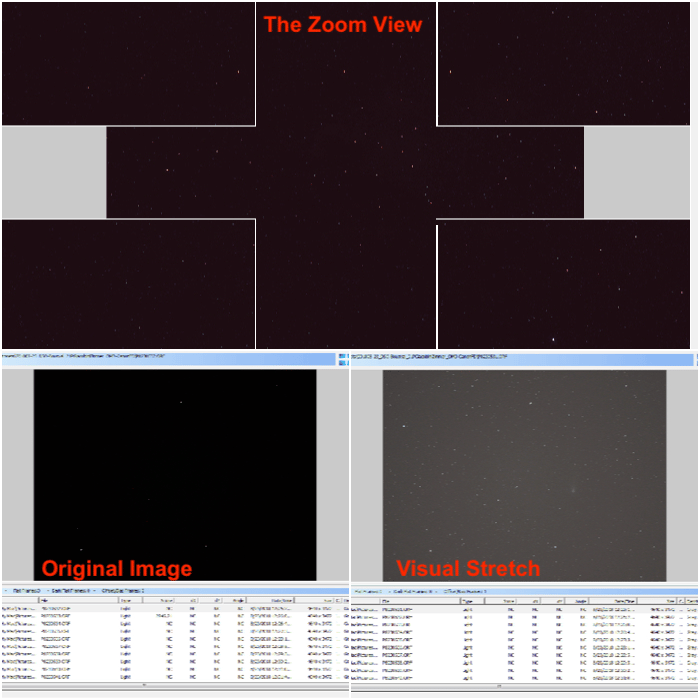
Deep Sky Stacker interface -Magnified panels in the zoomed view (top) and the effect of the visual stretching (bottom).
This does not affect the original image. It’s for display purposes only.
5. Image viewer
When you select an image from the images list, Deep Sky Stacker will show it in this section. A small menu will also appear. You can further manipulate the image here. The most important option is comet mode.
Comet mode allows you to select the position of a comet in the image. More about this later.
6. Image List
The image list shows all the loaded images, as well as calibration frames. If the images have already been registered and graded by quality, this info appears next to the names.
Here you can also check the files you want to work with.
7. Group Tab
The group tab allows you to load images from different sessions, e.g. if you are imaging on several nights. This allows you to calibrate each set with the proper calibration files. Remember, for example, that darks are taken in the field and are temperature dependent.
DSS will then combine all the sets into a final image.
DSS on Mac OS or Linux
As said before, DSS is Windows only. But there are two ways to use it on a computer running Mac OS or Linux:
- Use WineHQ or a wine wrapper such as Wineskin (Mac OS). This will emulate a Windows environment just for DSS. You can then launch it like any other application. While it is a free solution, at the moment you have to use the older 32-bit version of DSS. The program will run slower than expected.
- If you use DSS a lot, the best solution is to run Windows on a virtual machine. You can use VMware Fusion ($, Mac Only), Parallel ($, Mac Only) or Virtual Box (free and multi platform).
Example Using Photos of the 21P Giacobini Zinner Comet
Let’s go through a practical example. I’ll use the data I took to photograph comet 21P Giacobini Zinner. This way you’ll see how all the DSS functions work together. And what the classic workflow for this program looks like.
Step 1: RAW/Fits DPP Settings
Before loading your RAW files into DSS, go to RAW/Fits DPP settings… and be sure to check the option “Camera White Balance” and uncheck “Set the black point”.
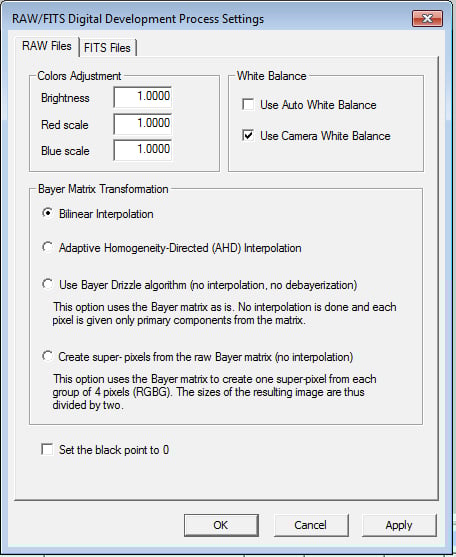
Most of the stars out there are yellow, like our Sun. Your camera white balance should be set to Sun.
Step 2: Load Your Images And Calibration Frames
In the Registering and Stacking section, you should click on Open picture files… and select all your light frames. If you have any, this is the time to load the calibration frames. These include Darks, Flats, Dark Flats and Offset/Bias files.
If this terminology is confusing and you don’t know what calibration frames are, check our Useful Glossary Of Astrophotography Terms.
Once you load your images and calibration frames into DSS, their file name and EXIF data will be in the previously empty image list.
You might have data from different sessions that you want to combine. Load them in different groups, one for each data set.
If you want you can save the file list, in case you should start over. Click on the Check all… link: this will select all loaded images.
Step 3: Select the Comet Position
This step is only if you have a comet in your image. If this is not the case, you can jump to the next step.
This is the most tedious part. You have to manually specify the position of the comet in all your images by clicking on it. To do this, start by selecting the first image in your list.
Then click on the green comet icon in the small menu that appears on the right side of DSS windows.
When you run the mouse on the image, you’ll see a small zoomed in view. This will appear on the left of the image. Use that to place your cursor on the comet nucleus.
If you cannot see the comet, move the middle cursor in the Visual Stretch bar to the left. This will brighten the image.
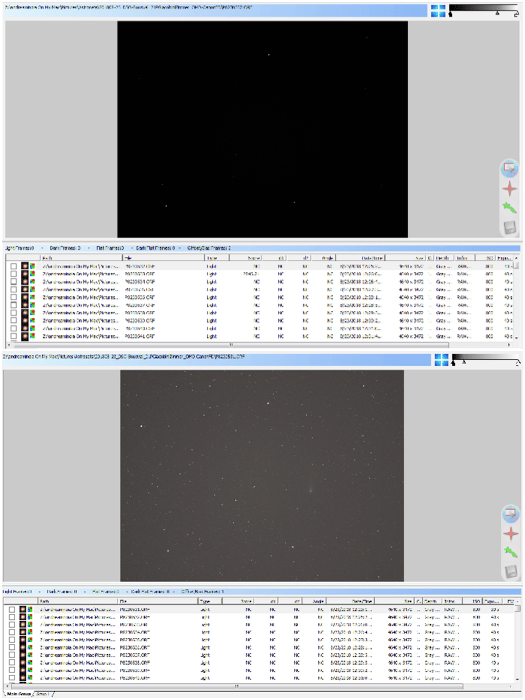
By using the visual stretching, the image brightens enough to easily spot the comet. On the right side of the window, the small menu to manipulate the image is visible.
If you have not registered the images before, a message window will pop up when you click on the comet. I usually choose to continue without registering the images.
When done, click the disk icon on the small menu that appeared at the bottom right of the image when you selected it. It should be blue now.
Here’s the catch. From now on, every time you select the next image, a pink circle will indicate the position of the comet in the previous image.
This is unrelated to the currently selected image. You have to click to deselect the old position and click again to set the new one.
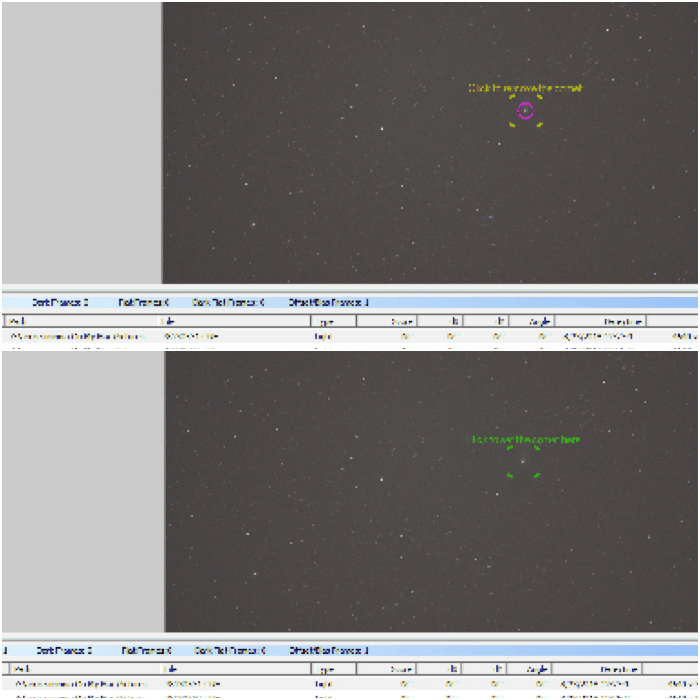
A pink circle (top) shows where the comet was located in the previous image. Click on the comet to deselect the old position (the cursor becomes green) and click again on the center of the comet to select the new position (bottom). Save and move to the next image.
Save and move to the next image. Repeat until you have marked the comet position on all images.
Sometimes, Deep Sky Stacker does not automatically detect the comet under your cursor. If that’s the case, keep pressing the Shift key while moving the cursor on the comet and clicking. This will force DSS to record the position.
Lastly, go to the Settings… ->Stacking Parameters… ->Comet tab to select the proper way to stack the images considering you have a comet there.
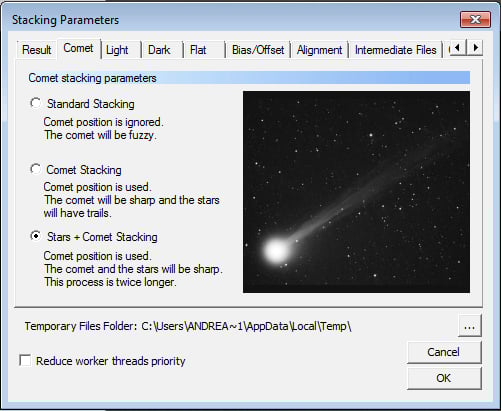
The Comet tab in the Stacking Parameters panel.
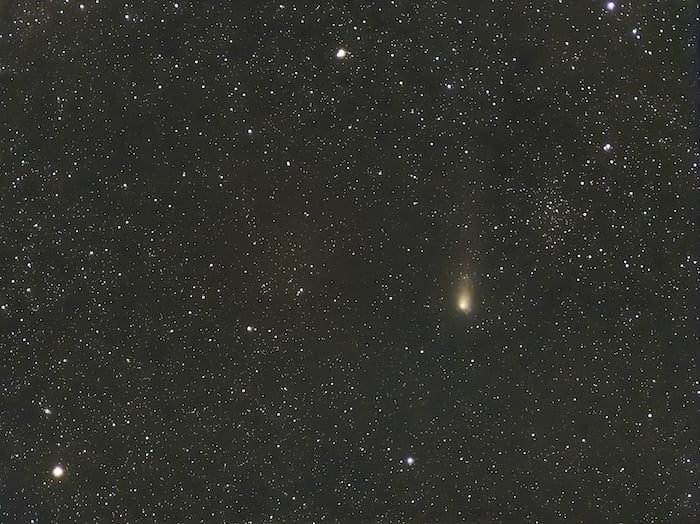
If you check the Standard Stacking, the comet will be ignored. The stars will be aligned but the comet will appear as a smudge.
The Standard Stacking method will turn the comet to a smudge.
The Comet Stacking mode will only align the comet. This will turn the stars into streaks of light, which can convey a feeling of motion for the comet.
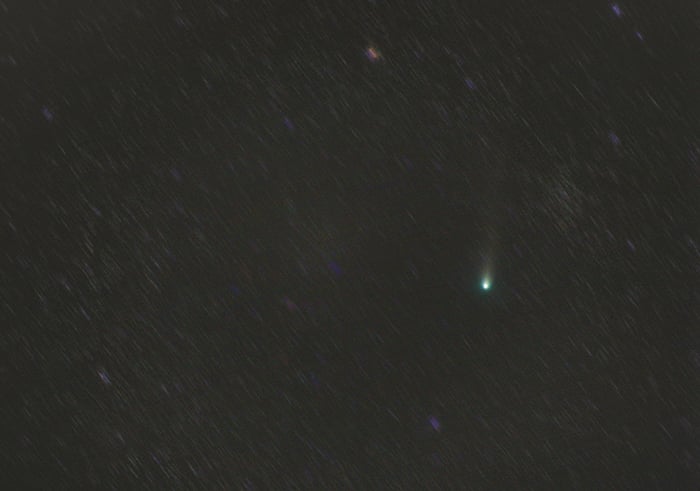
The Comet Stacking mode will convey a feel of motion, as only the comet is aligned across the images.
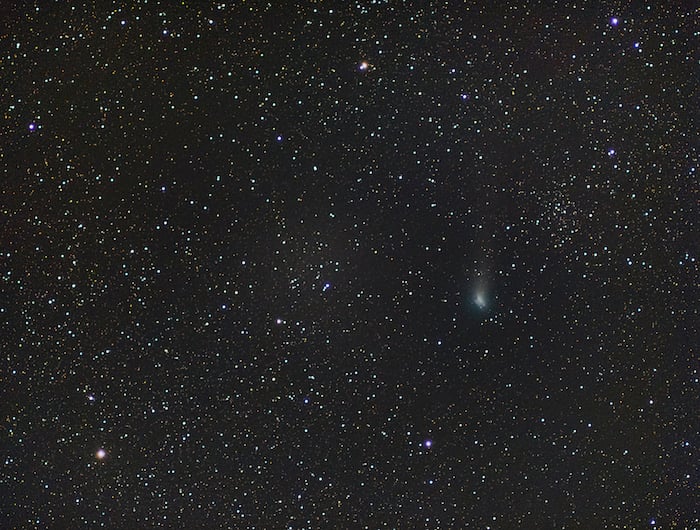
Finally, by selecting Stars + Comet Stacking, both stars and comet will be aligned. You will have a nice comet against a starry background.
Step 4: Register and Stack Your Images
It is now time to register, aka align, and stack your images. To do so, click on Register checked pictures… link in the left menu. The window shown below will pop out.

The Register Settings panel.
This panel allows you to manually tweak the register settings and/or the stacking settings. Or you can use the recommended parameters.
If you want Deep Sky Stacker to stack your registered images, check the Stack after the registering box. Specify the % of images to stack.
In the example above, the best 90% of the images will be used.
Go to the Advanced tab and check the number of stars DSS detects in your images. Change the threshold so you have a number of detected stars between 100 and 400.
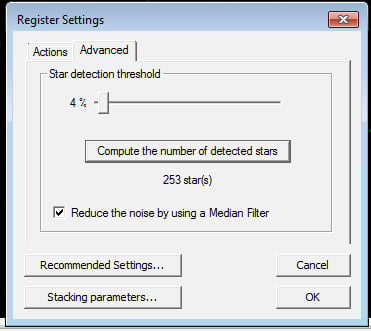
With a 4% threshold, DSS detected 253 stars in my images.
Since Deep Sky Stacker works rather well with recommended parameters, I suggest you to click on the Recommended Settings… button and to select the recommended parameters if needed.
Those suggested parameters depend on the images you want to use and the stacking method selected.
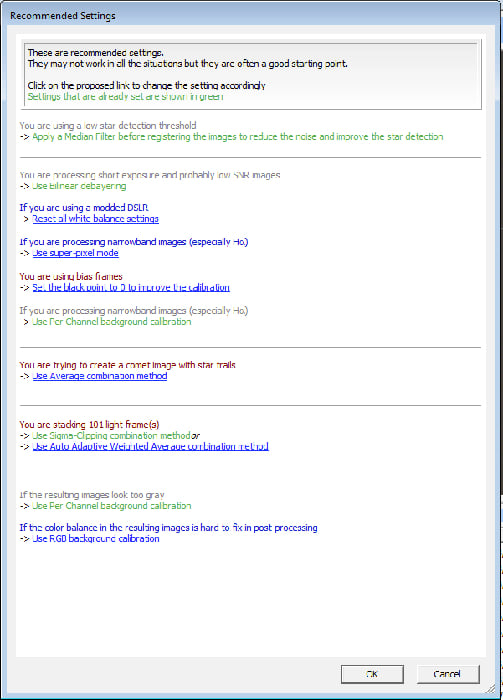
The Suggested parameters are based on the provided images.
When ready, click OK. DSS will show a last information window. If all looks good, click on OK to begin the registering and stacking process.
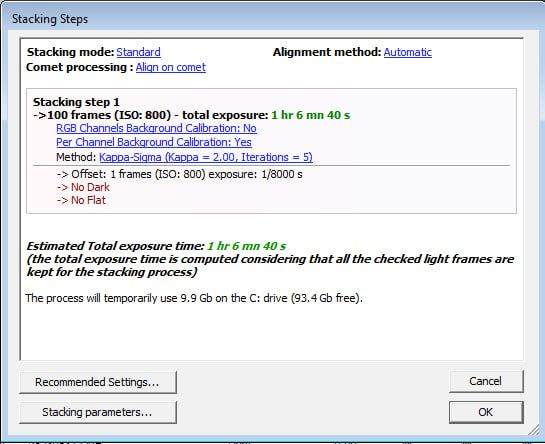
The Stacking Steps windows gives you some info on the tasks DSS is about to perform.
Once the procedure begins, you will have some messages popping in and out keeping you updated on the progress.
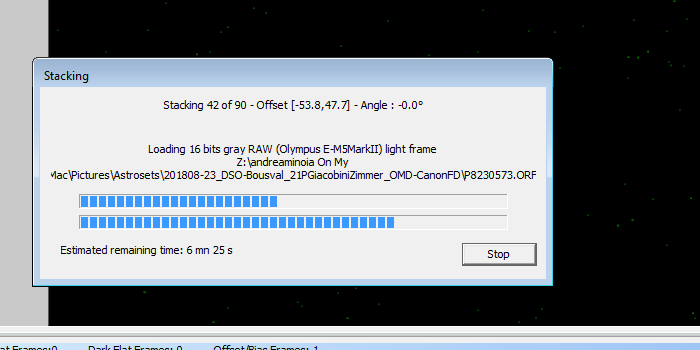
During the stacking, DSS keeps you updated on the progresses it is making.
Step 5: Image Processing
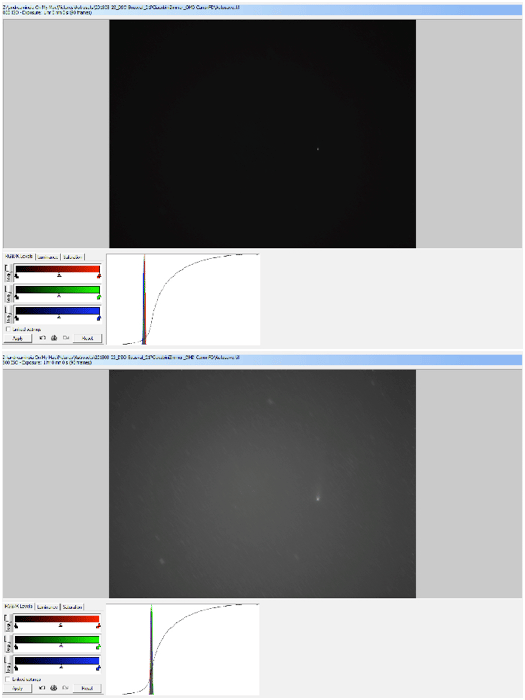
After the stacking is complete, Deep Sky Stacker will save the resulting image. After that DSS will enter in Processing mode, showing you the final image and a number of ways to tweak it.
Most people don’t like to process the stacked image in DSS. They prefer to do everything using more powerful software such as Pixinsight or even Photoshop.
You may be struck by the darkness of the final image and lack of color, but this is rather normal. Play with the parameters and try to tweak the image.
Below the image you have a set of tabs and a chart showing a global luminance curve and the histograms for the different channels.
The Image Processing controls in DSS.
I like to start from the second tab to shape the luminance curve by tuning the parameters for Darkness, Midtone and Highlight. To get a nice S-curve, my go-to parameters are:
- Darkness: 0º ; 86.1
- Midtone: 6º ; 30.1
- Highlight: 0º ; 56.1
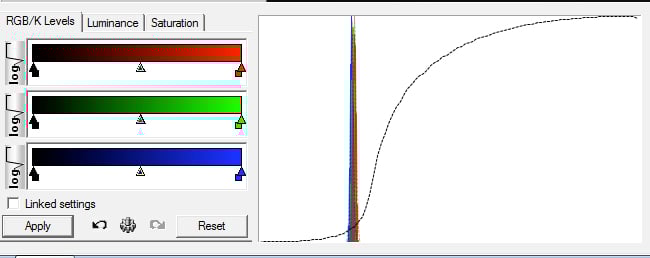
Next, I jump to the first tab. You can move the histograms of the individual channel left or right on the graph.
Try to align the histogram peaks somewhere near the point where the S curve starts rising steeply, as in the image below.
This should brighten the image quite a bit and details will start to be visible.
Finally I add some saturation (third tab) and apply these changes to the image.
When happy, click on the link Save picture to file… in the Processing section of the left menu and save the image as .tif 16-bit.
Be sure to check the box to apply the modifications to the image, as opposed to embedding but not applying them.
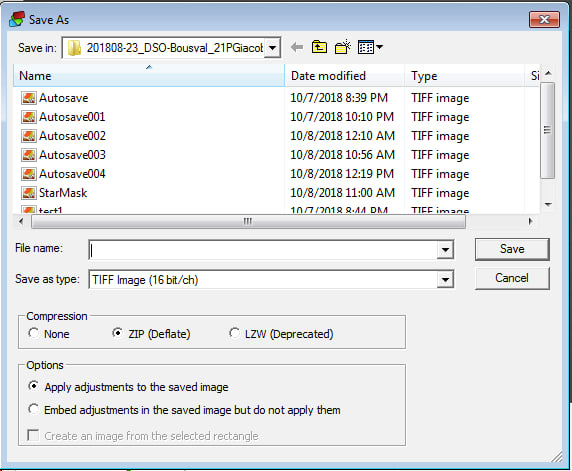
In the Save image window.
Conclusion: Deep Sky Stacker Tutorial
Deep Sky Stacker is a rather easy to use but powerful free software. You can use it to pre-process your astronomy images. This short tutorial showed you how to start working with DSS. But it is far from a complete description of what Deep Sky Stacker can do.
The manual is a good place to go looking for specific info, and don’t be afraid to experiment. Try different settings and see how your photos turn out!
We have a great post on astrophotography software resources to check out next!