Night sky photography is one of the most beautiful fields of photography. Turning your camera towards the skies to photograph stars is, however, no easy feat.
We’re here to share all the basics you need from adjusting your settings to buying camera accessories for astrophotography.
Night Sky Photography Equipment For Astrophotography
Camera
When it comes to night sky photography, you need either a DSLR or mirrorless camera. Options with high ISO capabilities are not necessary. What you need are options that are considered ISO invariant.
Also, your camera must allow you to shoot in RAW format. Why? Because RAW allows you to edit your files without losing any quality.
An entry-level model such as the Canon 1300D is usually good enough for astrophotography.
Mirrorless M4/3 cameras such as the Olympus OM-D EM-10 MK III are impressive because of their 2x crop factor. It allows you to close in on targets with shorter and cheaper telephoto lenses than those with full frame cameras.
You can check our post on the best astrophotography cameras here.
Lenses
You don’t need to have the latest pro-graded lens to do night sky photography. For the most part, autofocus or in-lens/in-camera stabilization aren’t necessary in astrophotography.
The truth is, I use old manual lenses from the film photography era.
What you need is a lens without too much chromatic aberration at relatively wide apertures. This is where modern ED lenses and APO refractors using low dispersion glass often have the edge over many old legacy lenses.
A great way to check if you can use your lens in astrophotography is to search it on Astrobin. It’s a great free site and image database where photographers like you can contribute.
Finally, you should go for lenses that perform well with apertures in the range of f/2.8 to f/5.6 for deep-sky astrophotography. Slower lenses require longer exposures and even more images for stacking.
Typical focal lengths for the full frame camera are:
- 50mm for wide star field images;
- 135mm for closing in on small constellation or narrower starfields;
- longer telephoto for nebulae and galaxies close-ups;
- Teleconverters to extend your lens’s reach. It tends to cut some light coming into your camera. Nevertheless, It’s ideal for Moon Sun photography. You can also use them to capture other celestial objects such as the Orion Nebula and the Pleiades.
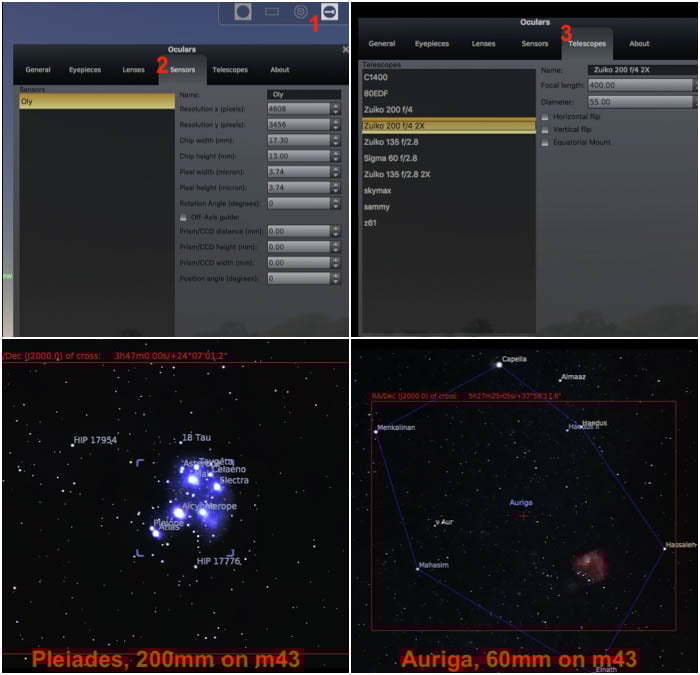
If you want to see how big a target will be in the field of view of your camera-lens system, you can use the free software Stellarium. Just insert the info for the camera sensor and lens (telescope).
A word of advice. Don’t get stuck with filling the frame at all costs. Very long focal lengths and high magnifications are challenging. Cropping your image is perfectly acceptable in astrophotography.
Must-Have Accessories
If you don’t have the luxury of doing night sky photography from your garden and have to backpack like me, you’ll be out in the field for a while. You’ll need to carry your gear and things to make your Astro trips more comfortable. I prefer to use backpacks similar to those for mountaineers, such as those in the F-stop mountain series.
Below is a shortlist of the essential photography accessories you should have with you:
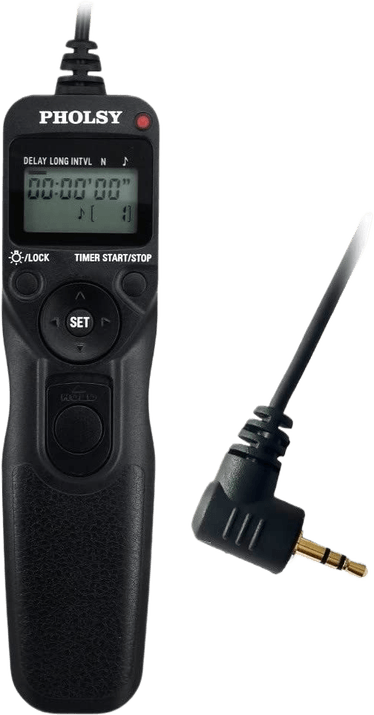
- Remote shutter with an intervalometer;
- Sturdy tripod;
- Camera backpack with some room for your stuff;
- Lightweight equatorial mount with accessories;
- A classic compass is more reliable than the one on your smartphone, and it is essential for an excellent polar alignment of the mount;
- UHC and LPR filters (Baader, Hoya, etc.) to boost contrast in the images and fight light pollution;
- USB dew strip heater to prevent your lens from fogging in cold and humid conditions. A power bank to power it;
- Lens hood;
- Spare batteries and a high capacity memory card;
- Headlamps with a red light to see what you are doing without spoiling your night adaptation;
- Tea/kitchen sieve to help you focusing on stars;
- Smartphone with astronomy apps;
- Post-processing software, such as Photoshop;
- Noise Reduction software, such as Noise Ninja.
Subjects for DSLR Astrophotographers
There is no shortage of subjects for astrophotography. There’s the Moon, Sun, constellations, stars, and countless deep-sky objects. You can keep yourself busy for many years to come.
The Moon and the Sun
You can capture the Moon and the Sun with a long telephoto lens. You don’t even need a tripod if you have image stabilization.
Warning! DO NOT attempt to observe the Sun or photograph it without using a properly designed filter. They are cheap and will save your eyes and your gear.
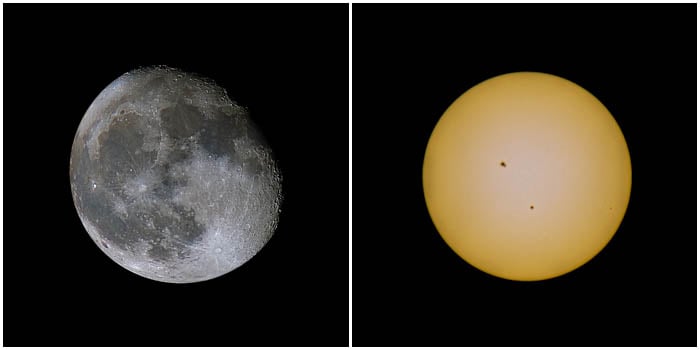
This article deals with Moon and Sun photography in detail. It’s a great place to start on how to take night photos.
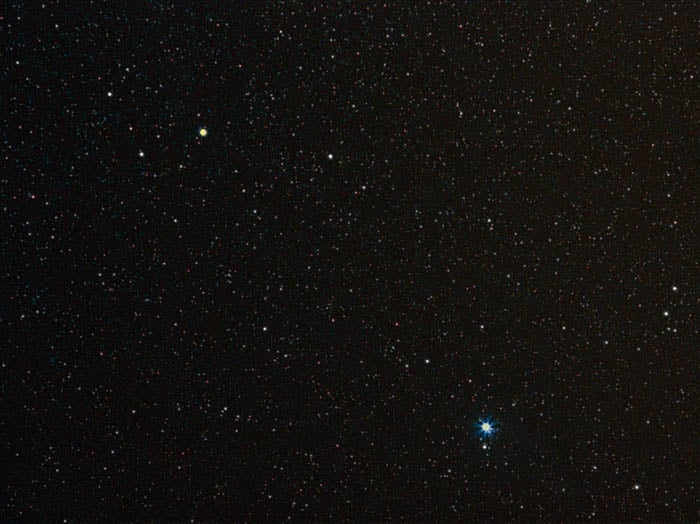
Stars and Star Clusters
Apart from photographing the Sun and the moon, you can also try shooting the stars. Sirius and Betelgeuse are ideal, especially if you have a long telephoto lens and teleconverter.
Some celestial pairs are famous in star photography. Pollux and Castor or Procyon and Gomeisa are a great example, where one star is orange (“cold”) and the other blue (“hot”).
Clusters of stars are beautiful too.
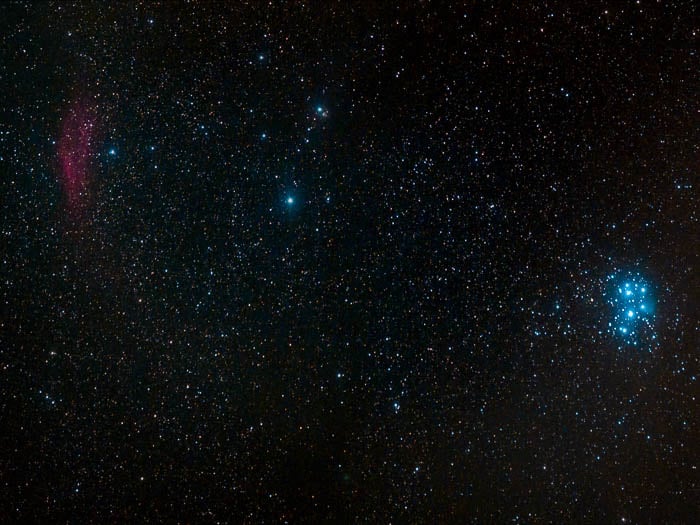
The Pleiades is a region of bright, hot (hence the blue color) and young stars soaked in dust clouds. They give it a classic blue nebulosity.
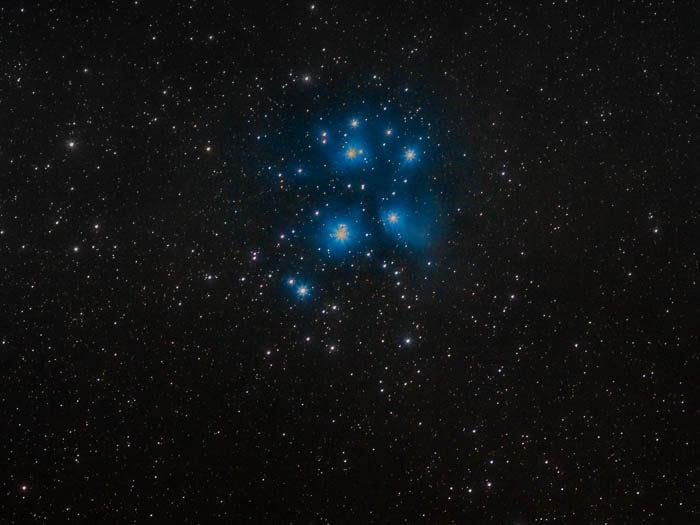
This cluster is very bright (apparent magnitude 1.6) and large (apparent size of about 2º). You can spot it from a large city.
Constellations and Star Fields
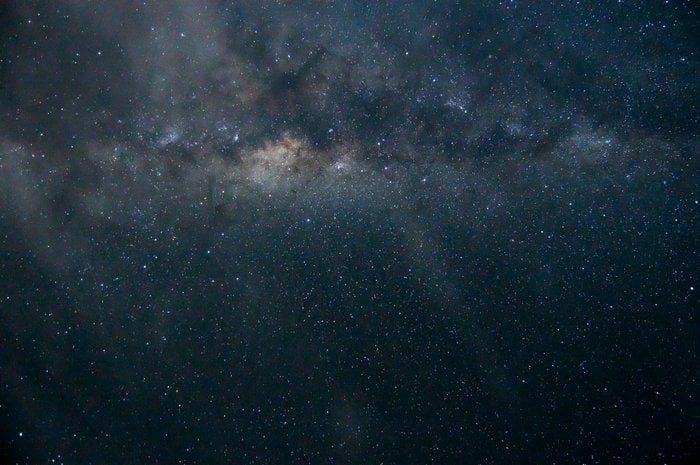
With a wide-angle lens, you can photograph constellations at night with the Milky Way shining over a landscape. I discussed it in this article.
You can also take pictures of star constellations as part of wide star fields. The aim here is to capture the many nebulae and dust clouds that are part of the constellation.
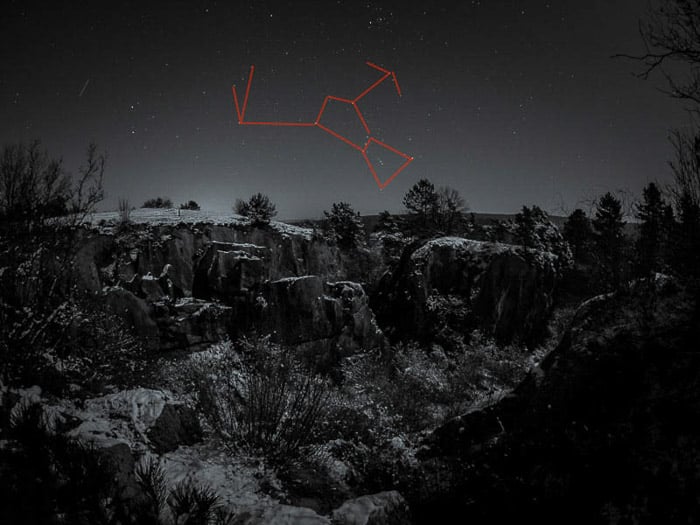
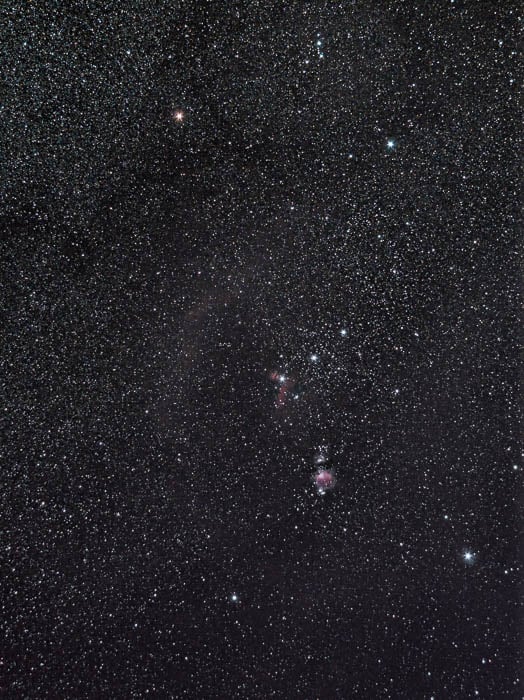
If you are in the Northern hemisphere, one of the best targets is the Orion Constellation. Its shape is so unique that you can see it high on the winter horizon.
Thanks to the three stars in line forming the belt of Orion, this constellation is a great place to start taking stars pictures.
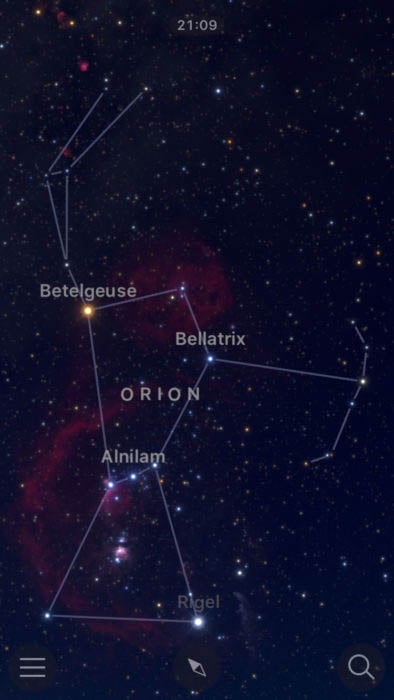
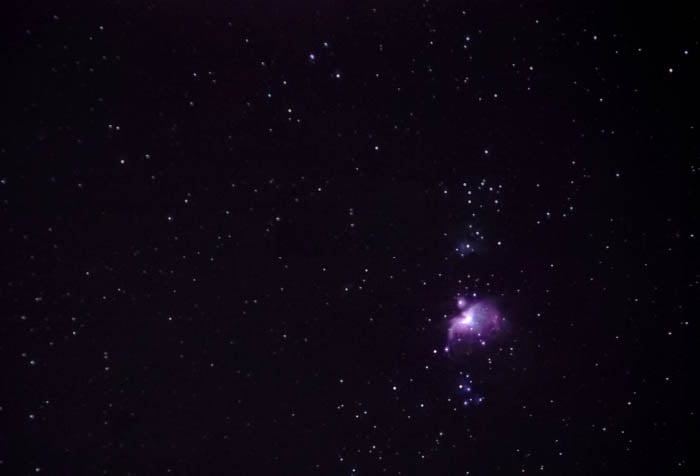
This region is rich and complex, with plenty of bright nebulae. There’s the famous Orion Nebula (M42). And then the Flame Nebula, Horsehead Nebula, Running Man Nebula, and Barnard’s Loop.
It also contains the bright and colorful stars of Betelgeuse (red) and Rigel (blue).
On the right of Rigel, there is the darker Witch Head Nebula. On the left of Betelgeuse, there is the Rosette Nebula.
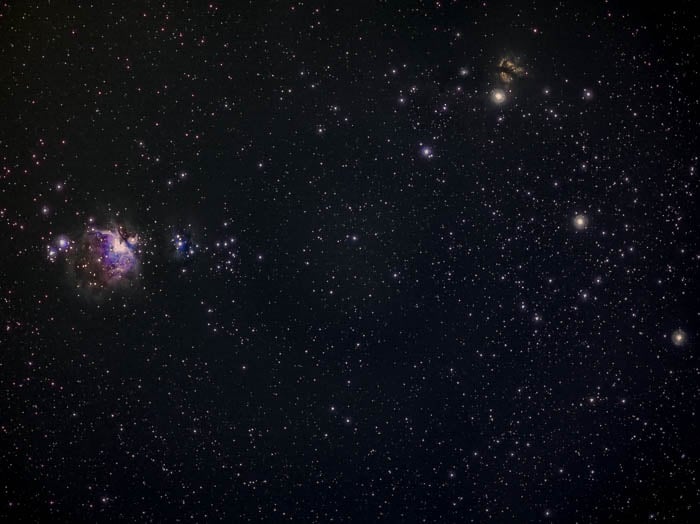
With a 300mm lens on a full frame camera, you can close in on the belt and sword of the Orion constellation. Like this, you’ll get a family portrait of the Orion, Running Man, Flame and Horsehead Nebulae.
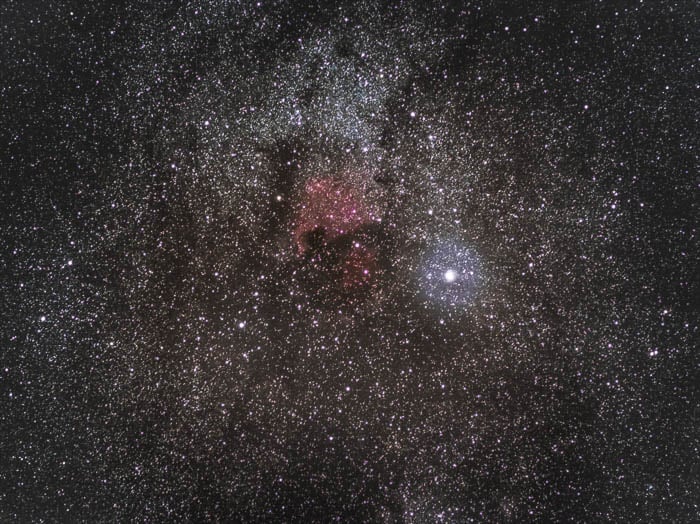
Other notable targets are Auriga. It contains the Flaming Star Nebula, and the dense region of Deneb (here below).
You can see bright North America and Pelican Nebulae in the Cygnus Constellation.
Finally, we have a picture of stars containing the Pleiades and the California Nebula.
Galaxies
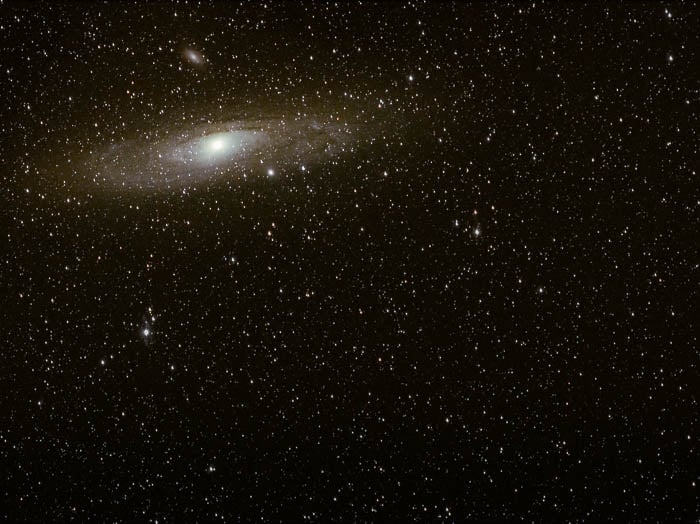
There are many galaxies you can photograph. The easiest one is Andromeda and its M110 and M32 satellite galaxies.
The Pinwheel Galaxy and Triangulum Galaxy are bright. You can capture them without a telescope. They will be rather small in the field of view of a telephoto lens on a DSLR camera, though.
How to Do Night Sky Photography: Basic Rules
Now that you have an idea about what you can photograph, it is time to discuss how to do it.
An astrophotography session is not quick. Even experienced astrophotographers still need to set up their gear.
On top of this, they need to find and frame the target and get the star in focus.
And then you have to wait to get tens (or hundreds) of exposures of the same target before you move on.
Let’s now discuss some of those steps in detail.
How to Frame Your Target
How do you frame a target you can’t see? When you have to use a telephoto lens with a narrow field of view?
There are three ways:
- Buy a (rather expensive) computerised GoTo mount. It has the coordinates of many deep-sky objects. Once you set it up, it will point the camera at the desired target;
- Trial and error: try your best to frame your target. Exhausting at best;
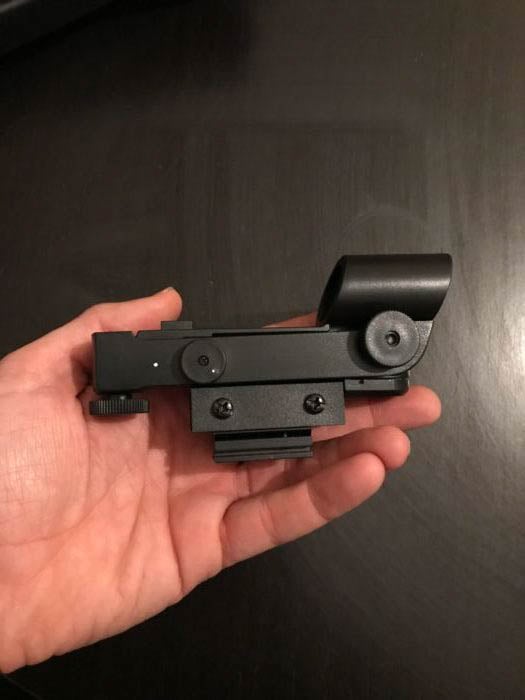
- Buy a cheap red dot star pointer and hot-shoe adapter. It’s the perfect choice for beginners.
A red dot star pointer usually comes with most telescopes. You can buy it with an adapter to mount it on the camera hot shoe.
The idea is simple. A laser hits the screen of the pointer so that a red dot becomes visible. It’s then superposed to the unmagnified view of the horizon.
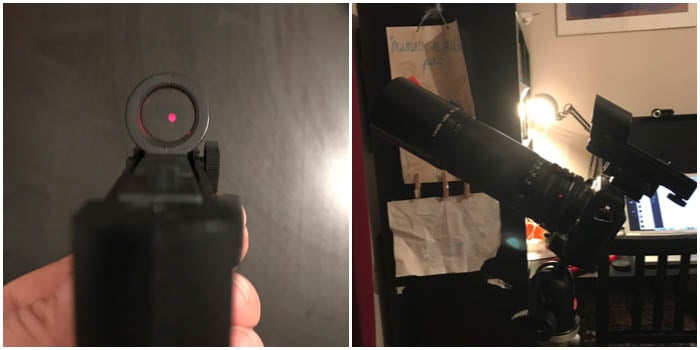
If you align the pointer, it superimposes the dot to a target, so it’s center in the frame.
In the image below, I used my Micro Four-Thirds camera with a 300mm lens to frame the moon.
The lens gives me a field of view of only 3.3ºx2.5º, which makes it challenging to find and frame the bright moon.
By superposing the red dot to the moon, I can find and center it in the frame in no time.
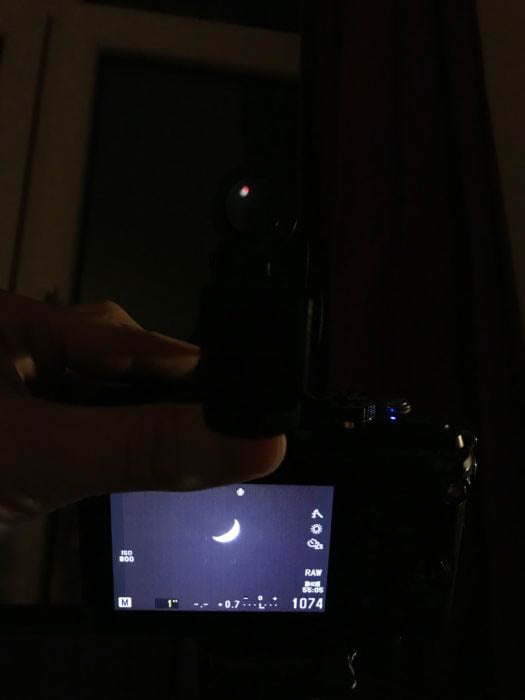
Put your pointer on the camera hot shoe, and switch it on. Then, use the knobs to align it to your gear from time to time.
If you cannot see your target and you have no GoTo mounts, you have to become fluent in the star-hopping technique.
Nothing keeps you from aiming your camera at a random direction in the sky. This is how I took my first Astro image, the one that opens this article.
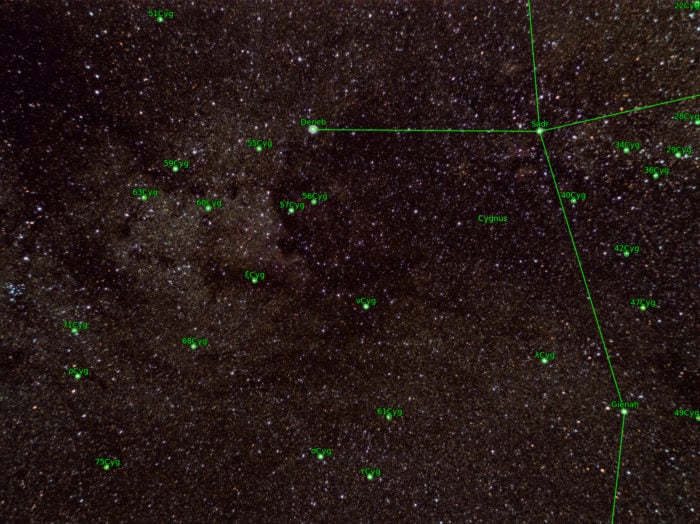
If you want to know what you have photographed, you can upload your final image on Astrometry for free. This process is “plate solving.” It will return your copy with annotations for all identified objects.
It turned out I had photographed the Deneb/Sadr region in the Cygnus Constellation. The North America Nebula is visible near the star S7Cyg, below Deneb.
This image consists of 30 pictures taken on a fixed tripod using my old Olympus Zuiko OM 50 f/1.4 on OM-D EM 10 m43 camera.
How to Focus on Stars
Forget using autofocus for astrophotography. Also, don’t trust the infinite mark on your lens. Instead, use your live view at high magnification and frame a bright star at night.
The more you focus in, the smaller the star will become, and more of the faintest stars will begin to come into view. Turn your focusing ring slowly back and forth to find the sweet spot.
The problem is that every time you touch the camera, the image will blur due to camera shake. It makes the whole process a bit random.
You can buy a Bahtinov mask, but I like DIY solutions when possible. Placing a kitchen sieve on the front of my lens will create diffraction spikes around the stars when the focus is correct.
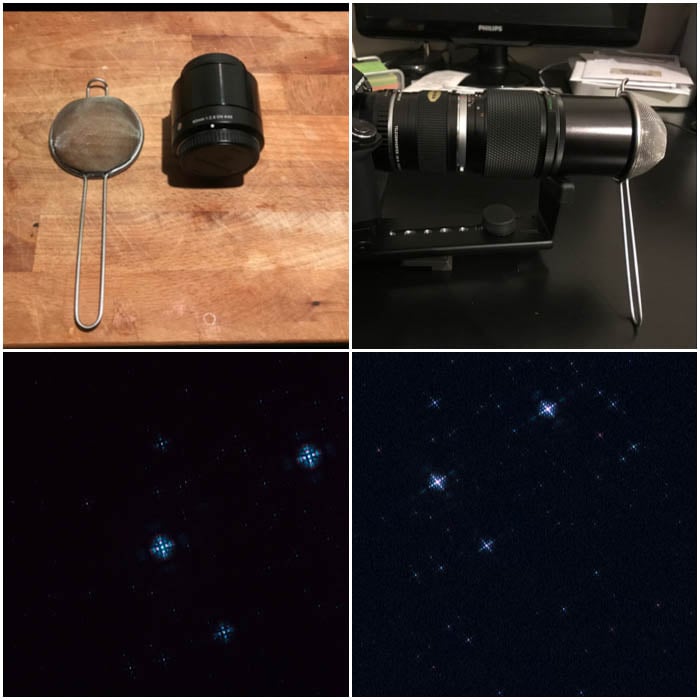
I found this method very reliable and fast. If you have difficulties to see the spikes on your live view, try to do your best to focus and take a test shot. When you see you have sharp diffraction spikes, your focus is perfect.
You can also mark the actual infinite on your lens with a marker to make the whole process even faster in the future. Use a bit of gaffer tape to lock down your focus.
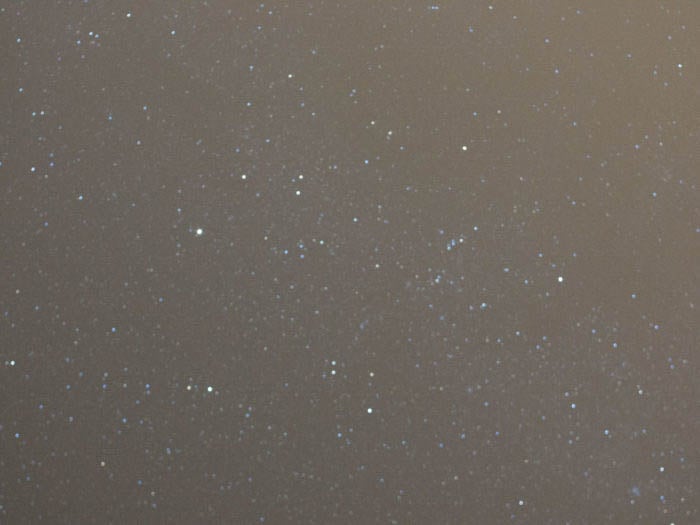
How to Freeze the Stars
In night sky photography, except for star trails, you want to have stars like points of light. But stars move across the horizon at, on average, about 15º/ hour because of Earth’s rotation.
That does not seem much when we stargaze. But consider that a 100mm lens on a full frame camera gives you a field of view of only about 20º x 15º.
The photo below shows how the stars will look after three-minute-long exposure.
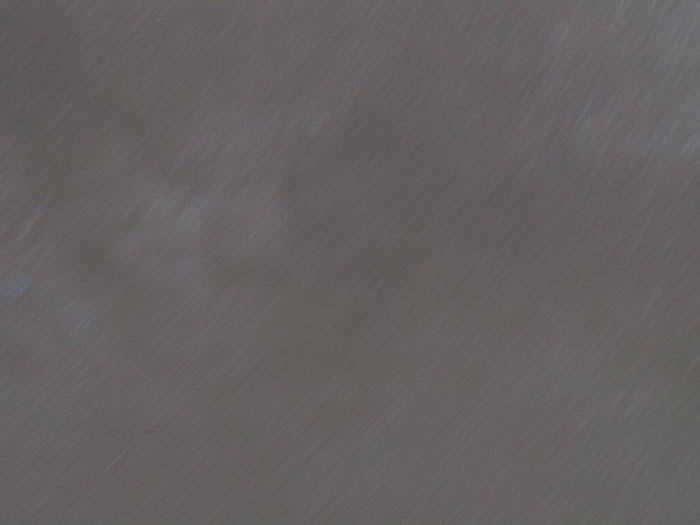
There are only two ways to freeze those stars:
- Take very short exposures on a fixed tripod;
- Use an equatorial mount. Rotate the camera around the celestial pole to counteract Earth’s rotation.
Astrophotography With a Fixed Tripod
On a fixed tripod, you have to take very short exposures. A rule of thumb, also known as 500 rule, is the following:
ET= 500 /(FL*CF)
ET is the longest exposure time (in seconds) before you start seeing star trails. FL is the focal length, and CF is the crop factor of your camera sensor.
My M43 camera has a crop factor 2. With a 50mm lens, I could expose for max 5 seconds before I start noticing the star trails.
Rules like 400-500-600 are qualitative. I was able to expose the Orion Nebula for 3 seconds on a 150mm lens with decent results.
This image is the result of aligning and stacking 50 exposures.
In 2 minutes, this is how much the nebula moved in the field of view.
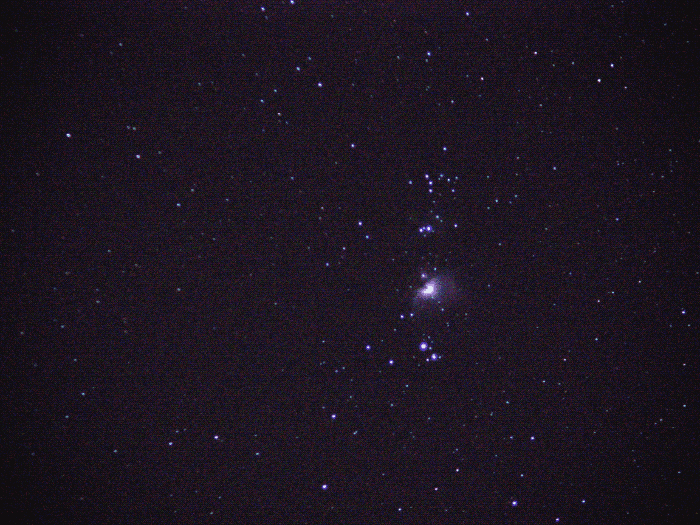
You cannot expose the stars for much longer than the value calculated with the 500 rule.
Astrophotography With an Equatorial Mount
An equatorial mount is a motorised head. Once you align it to the celestial pole, it will rotate the camera to counteract the Earth’s rotation.
Doing so negates the apparent motion of the star on the horizon.
In 45 minutes, this is how much the Orion Nebula moves in the field of view of a 270mm lens (EFL 540mm).
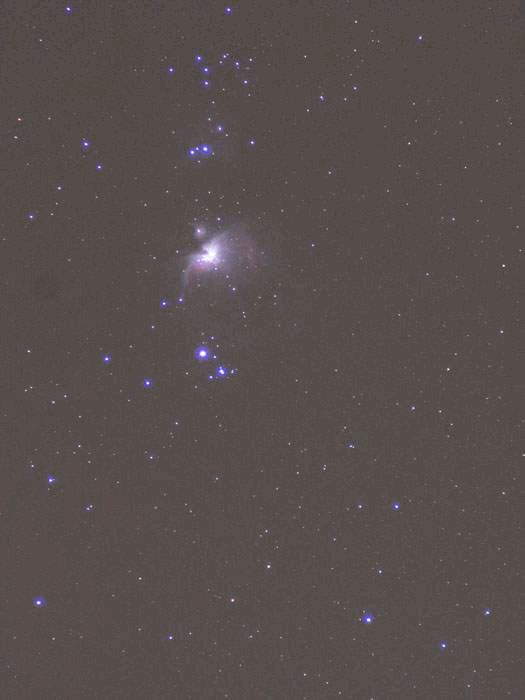
The tracking is not perfect, but I could expose each image for 40 seconds without getting star trails.
My gear sat on the Skywatcher Star Adventurer, which is excellent for DSLR work. It also comes with some interesting functions for photographers such as automated time-lapse and pano capabilities.
As you can see, an equatorial mount is a crucial piece of equipment. It’s the first one you should buy if you are serious about astrophotography.
If you don’t plan to use large telescopes and long focal lengths, you can buy a lightweight mount for photographic tripods.
Examples include my Skywatcher Star Adventurer, iOptron Skyguider, etc.
ISO and ISO Invariance
Look at the ISO invariant regime. Brightening your scene by +1 EV is comparable to shooting at a double ISO value in the first place.
So in the invariant regime, there is no “noise” advantage to shoot at higher ISO. And you will reduce your sensor’s performance by reducing the dynamic range you can capture.
You should find online which ISO values make your camera ISO invariant. Use the lower ISO in this regime to maximise the dynamic range of the sensor.
You might find the cramped histogram in the top right-hand corner. The critical thing to remember is not to clip the highlights.

Conclusion
There are still things for you to research on your own, how to find a dark sky and how to fight light pollution, for instance. But this guide will help you get started. We also have a useful glossary of astrophotography terms you can check here.
You can learn how to take breathtaking night sky images with our course – Milky Way Mastery!