Photography is all about light, and that light is often sunlight. Even at night, when you photograph the Moon and the planets, you are working with sunlight.
But have you ever tried to take pictures of the Sun itself? This article will introduce you to the many wonders of sun photography in an easy way and on a budget.
The greatest thing about solar photography is that the Sun is up there during the daytime hours. This, in fact, is the only kind of astrophotography that is convenient for everybody.
There’s no need to pull the night in the field or to spend long hours to collect data to create a single image.
Solar Photography: Safety First
Not to scare you, but solar photography is not without risks. It is important to use your good judgment and use caution when observing the Sun.
Dangers come from having an optical system concentrating sunlight in one point.
Without a proper filter, this can cause serious damages. From burning a hole in your camera system to burning it on your eye’s retina.
To play it safe, here is a list of rules you should follow:
- Never allow children to set up and use your photographic equipment without supervision.
- Do not improvise. ND filters do not make for adequate protection from sunlight. At best, they may reduce the brightness. They will not cut down Infrared and UV light. Instead, invest in a solar filter for cameras.
- Do not look at the sun through your optical viewfinder or star finder. Never look at it with binoculars or telescope without having the solar filter firmly in place.
- Never use scratched or damaged filters, even if the damage is small. Inspect your filter before each observation or photography session.
Play by these rules, and you will enjoy sun photography without risks.
Must-Know Sun Facts Relevant to Solar Photography
Here are a few astronomical facts related to solar photography, to spark your curiosity.
You Are Living in the Age of Total Solar Eclipses
The apparent size of the Sun in our sky is very close to that of the Moon. When the Moon transits between us and the Sun we can witness a full solar eclipse.
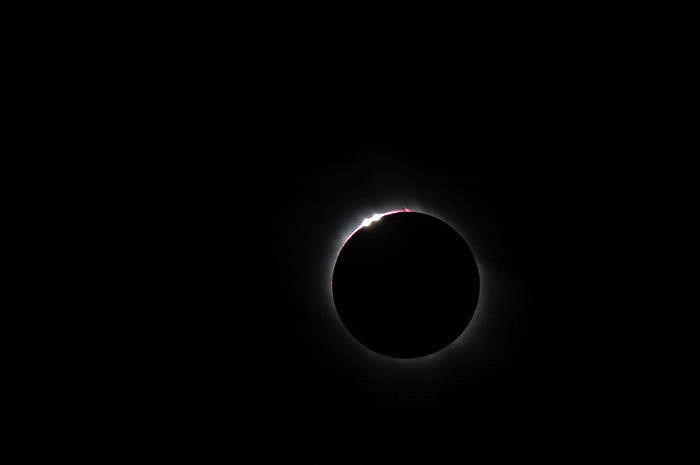
If you are in the right place at the right time, the Moon will completely block the Sun. Image Credit: Marco Bruno.
But the Moon is moving away from us of about 3 cm/year. In a distant future, people here on Earth will only get to see a partial solar eclipse.
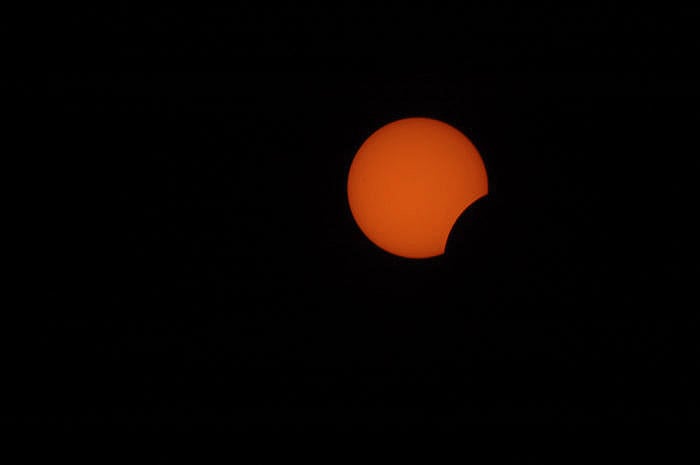
If you are not at the right location, you will witness a partial solar eclipse. In this case, the Moon covers the Sun partially. Image Credit: Marco Bruno.
The Cycle of The Sun
Every second, the Sun produces the same energy as about a trillion 1 megaton nuclear bombs. Per comparison, the Hiroshima bomb had the power of 0.015 megatons.
The Sun is not a quiet place. Its activity is not constant and follows an 11-years long cycle. Within this period, the solar activity increases to hit its max after about 5.5 years from the beginning of the cycle, before dropping to its minimum.
For us photographers, periods of high solar activity are great. We can photograph sunspots and solar flares more often.
At the time of this article, the Sun is at its lowest activity. This site from NASA will show you what is going on with the Sun almost in real time.
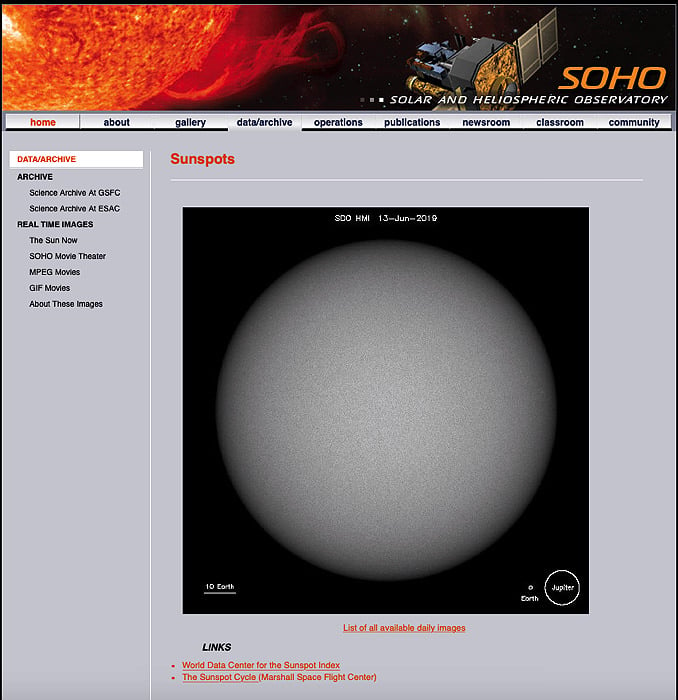
The website of the SOHO Nasa mission. Here you can see on a daily base how the Sun looks like. It is great to know if there are sunspots visible.
Planetary Transits
We are living on the third planet from the Sun. Both Mercury and Venus are on inner orbits with respect to us.
On rare occasions, those planets transit between us and the Sun. When this happens, the planet transiting in front of the Sun is visible in silhouette.
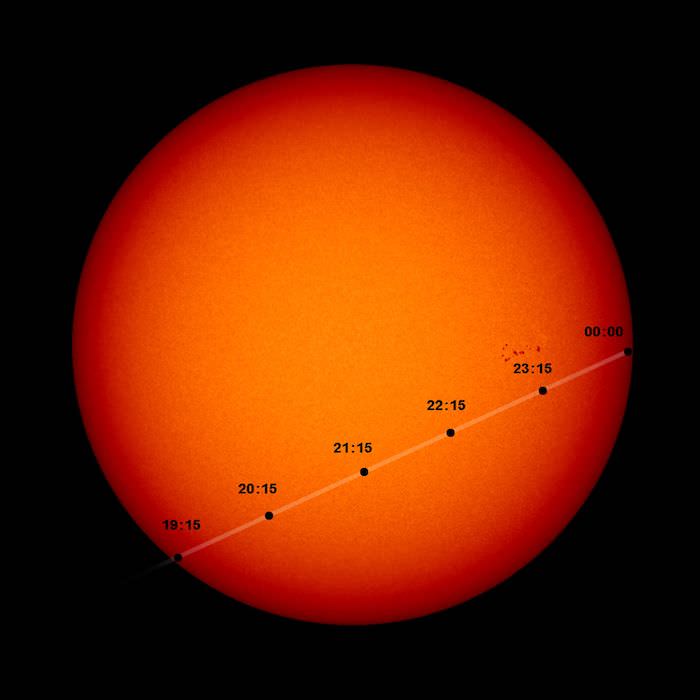
Mercury’s Transit from 8 November 2006. Image Credit: Nasa.
On November 11 this year (2019) Mercury will transit in front of the Sun. The event will be visible from most of Europe, the Middle East, North and South America, Africa, New Zeland, and Antartica.
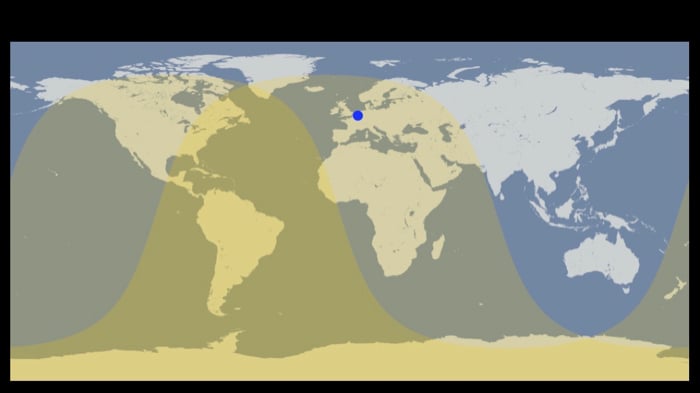
In the regions in dark yellow, the whole transit will be visible, while in the light yellow areas, only a part of the transit will be visible.
ISS Transits and Planes
Finally, you can photograph man-made objects transiting in front of the Sun.
Planes are the obvious candidates for this type of photography. Way more interesting, and challenging, is to photograph the transit in front of the Sun of the International Space Station (ISS).
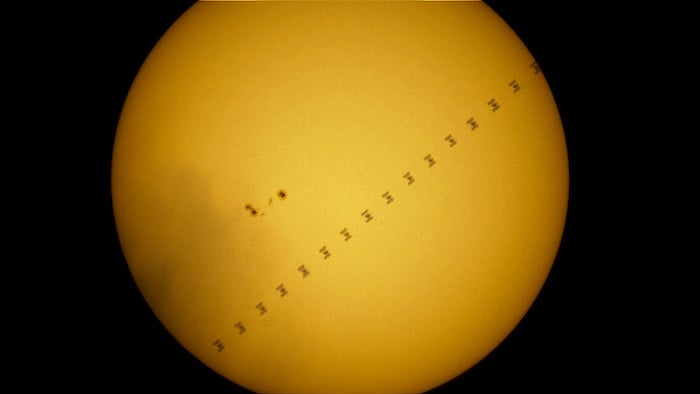
The ISS transiting in front of the Sun, passing next to a group of sunspots. Image Credit: Rob Pettengill.
This website can help you to find out when the ISS will transit over your location.
How to Photograph the Sun Without Breaking the Bank: White Light Solar Photography
The simplest and cheapest way to photograph the Sun is by using a white light filter.
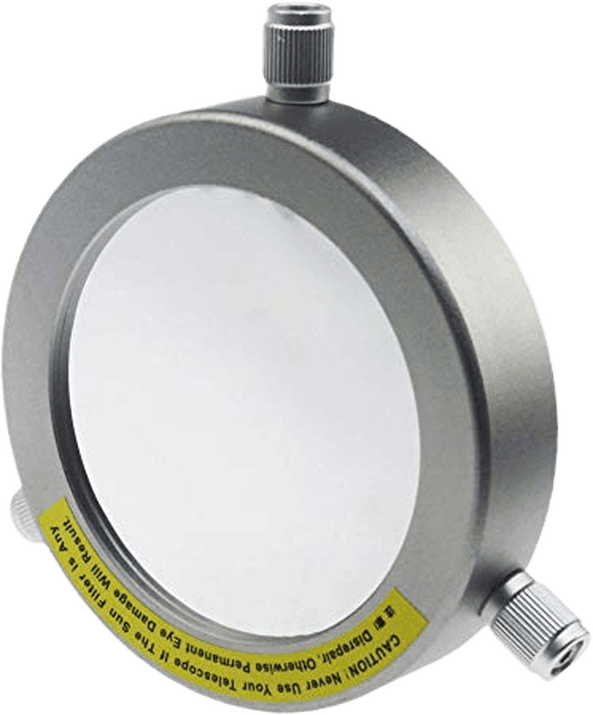
The Sun in White Light: Solar Filters
The Sun is not yellow. Its light is actually white. For white light solar photography, you only need a classic solar filter placed in front of a normal lens or telescope.
The cheapest white light filters are made of a special film (Mylar) mounted on a rigid support.
Glass filters are also available, but they are pricey. You should consider starting with mounted foil filters.
As opposed to common photography filters, most solar filters are not the screw-on type. Instead, the filter is mounted using thumb screws pushing on the lens or telescope body.
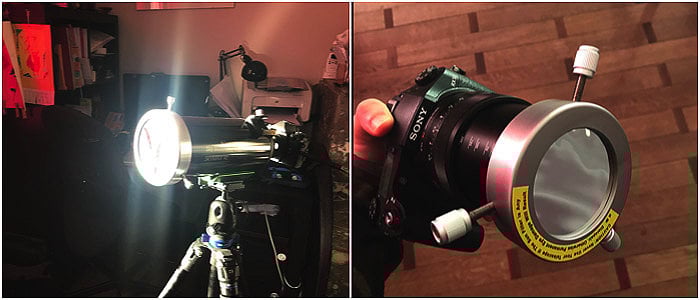
Be careful or you may knock the filter off from your equipment.
The big advantage of this system is that one filter fits equipment of different diameters.
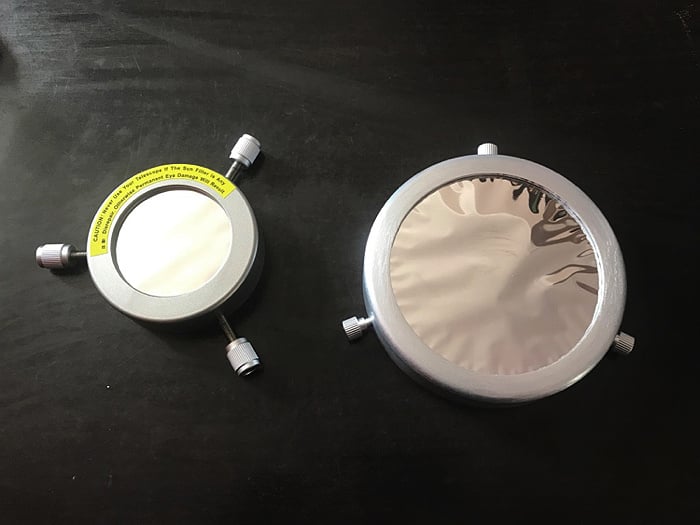
My two solar filters: the small fits on several lenses, while the large one is for telescopes.
Easy Targets for White Light Solar Photography
You need a white light filter to safely photograph planetary transits and Solar eclipses, as well as Sun details and features.
Some features, such as Surface Granulation, are best imaged using a telescope.
There are many interesting things you can still observe and photograph using a classic telephoto lens of a focal length longer than 400mm.
Limb Darkening
With classic photographic gear, because of the low magnification, you will always photograph the entire solar disk.
One thing you’ll notice is that the Sun is not evenly bright. The solar disk appears brighter in the center than around the limb.
What you are seeing is the limb darkening effect.
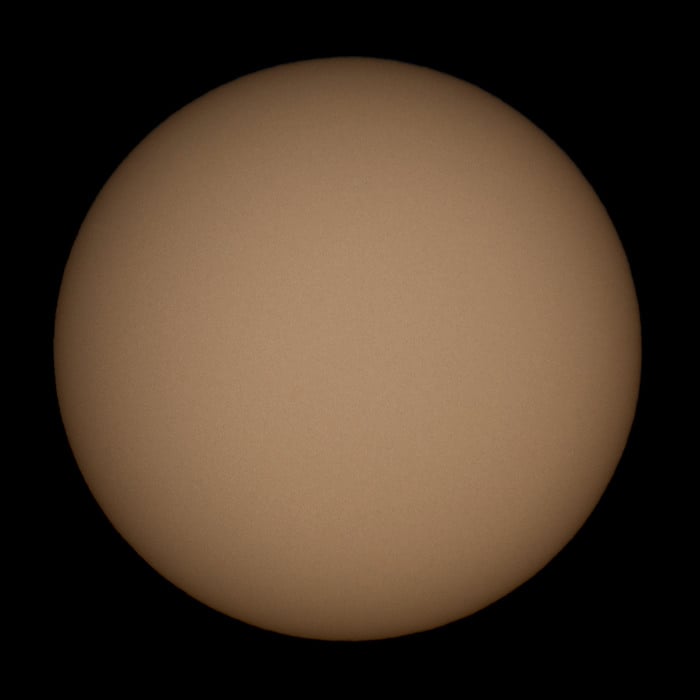
The Sun on December 9, 2018. Olympus OM-D EM-5 Mk ii with old Zuiko OM 200 f/4 and it’s Zuiko OM 2X-A teleconverter. Single image handheld.
When we look to the edge of the Sun, in fact, we can’t see to the same depth as we can when looking squarely at its center.
With less bright material for us to see, the solar rim looks dimmer.
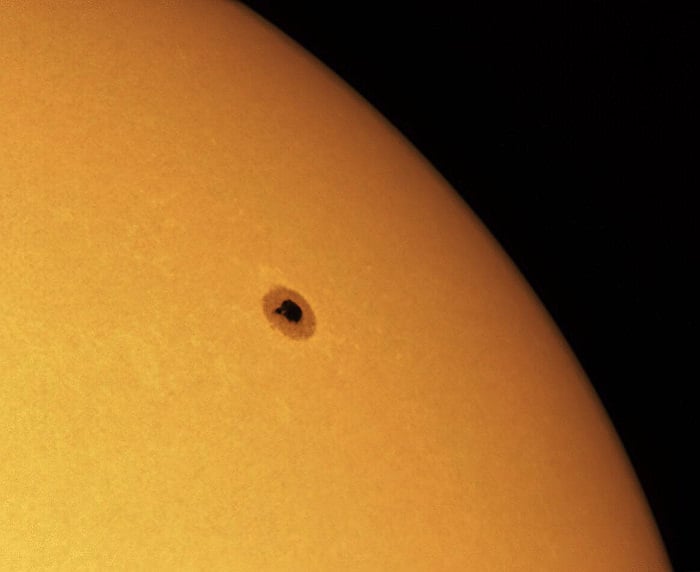
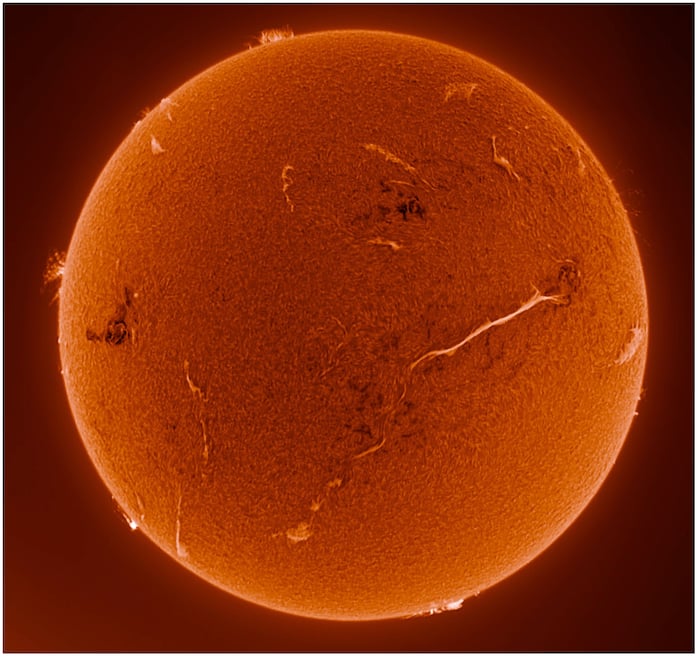
Sunspots
Sunspots appear as dark spots on the Sun surface. They originate in the active regions. Their numbers wax and wane within the Sun’s 11-year solar cycle.
Sunspots are one consequence of the Sun’s magnetic field. These are areas of the photosphere of lower temperatures, thus their dark color.
Sunspots can grow massive enough they could contain our Earth several times. Some can grow to the point to become visible even to the naked eye.
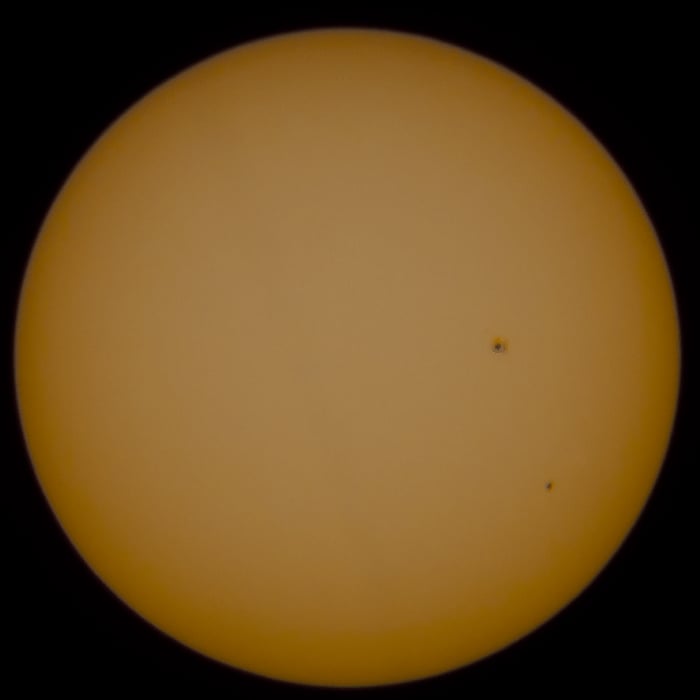
Sunspots on the Sun. Olympus OM-D EM-5 Mk ii with Olympus Zuiko OM 200 f/4 and Its Olympus Zuiko 2X-A teleconverter (equivalent focal length of 800mm).
Sunspots are long lasting features on the Sun surface and you can usually image them for several days as they migrate.
The NASA Soho website is a precious resource to know when spots are visible.
A sunspot often begins its life as a tiny, black pore. Should it continue to grow, it develops a dark core (or cores) called an umbra. The umbra is often surrounded by a pale, skirt-like penumbra.
Those features can be photographed with a telephoto lens. A telescope will give you a far more detailed image.
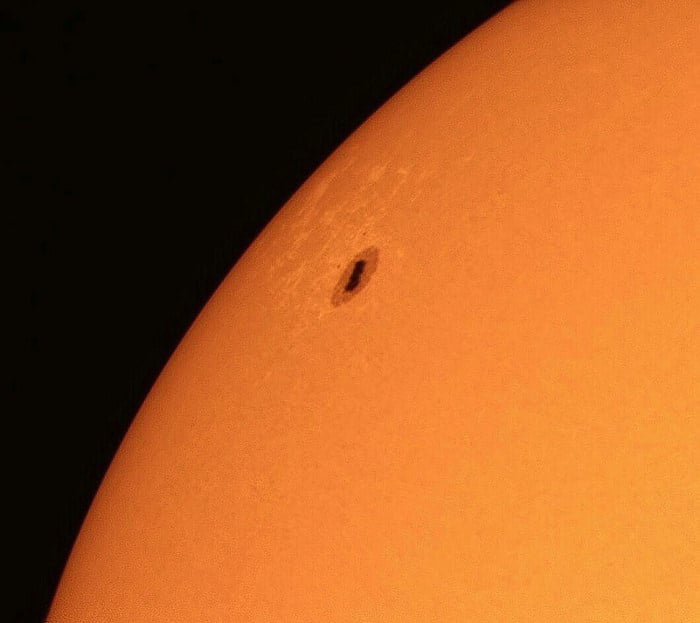
Sunspot taken with a Celestron 6SE telescope and ZWO ASI 120 MC planetary camera. The sunspot Umbra and the surrounding Penumbra is clearly visible. This sunspot is also surrounded by white lines, called feculae. Image Credit: Rich Addis.
Surface Granulation
Even without sunspots in view, the Sun is interesting. With a fairly long focal length, you can look for granulation.
This is the subtle, granular appearance of the Sun’s photosphere.
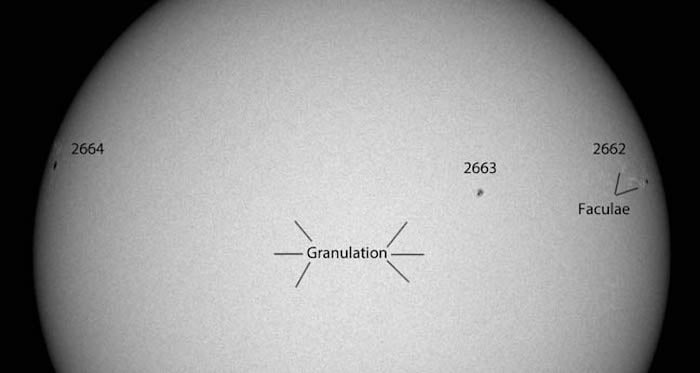
With a good telescope, you can magnify a small region of the sun’s surface, to make granulation more clear. Or you can shoot a video, as the sun’s surface is always changing.
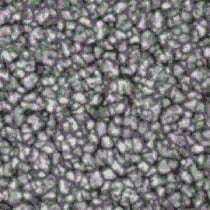
A time-lapse video shows solar granules bubbling up from beneath the photosphere. Image Credit: University of Alabama.
What Camera Should You Use to Take Pictures of The Sun
Sun photography is not demanding when it comes to the camera. As long as you can secure a solar filter in front of your lens, you are good to go.
A bridge camera is a great camera to start photographing the Sun. The Nikon Coolpix P900 (2000mm) and P1000 (3000mm), with their massive zoom lenses, can capture great solar (and moon) images.
Even with the filter in place, the Sun is so bright that low light performances are not important.
Nonetheless, there are few functions your camera should have to make your life easier:
- Being able to shoot in RAW format is always preferable to JPEG;
- Built-in intervalometers make it easier to shoot for image stacking;
- Manual shooting mode is a must, to ensure consistent exposures for image stacking.
- Cropped sensor cameras have the advantage over full frame ones of a narrower field of view. For any given focal length, cropped sensor cameras get you closer to the sun than full frame cameras.
This is the reason why planetary cameras have small sensors. Cameras like the ZWO ASI 120MC and 224MC have a crop factor of about 7.
The Sun photographed using a planetary camera and a telescope. Only a region of the Sun fits in the field of view. Image Credit: Rich Addis.
What Lens for Sun Photography?
As mentioned before, the Sun has the same apparent size of the full moon. Any telephoto lens that works on the Moon, will work for the Sun too.
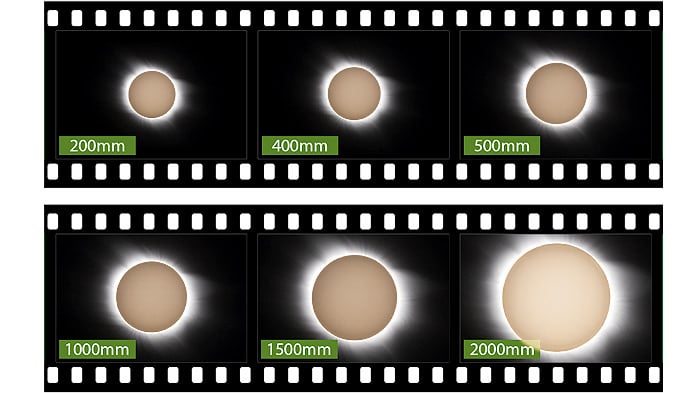
How the Sun will fit the frame using different focal lengths.
Particularly for sun spots, you don’t need a fast lens, as the Sun is bright enough even with the filter.
A telescope will bring you closer to the sun’s surface. Couple that with a planetary camera and you can shoot close-ups of sunspots and surface granulation.
Camera Lens Tip. Autofocus has no use in Sun Photography. If you don’t have a long telephoto lens, you could tap into the vintage market.
Before getting a telescope, my go-to lens for lunar and solar photography was a 40-years-old Olympus Zuiko OM 200 f/4.
Some old lenses have great optics even by today’s standards. You can find old lenses in mint condition, at a cheaper price than modern counterparts.
Go-To Camera Settings for Photographing The Sun
To help you start off, here a list of settings you can use for a basic setup in sun photography.
- Focus mode: Manual;
- Shooting mode: Manual;
- ISO: lowest native ISO (typically ISO 100 or 200);
- Image format: RAW;
- Image Stabilization: Off for tripod, On if shooting handheld;
- Light Metering Mode: Spot;
- Shutter Speed: 1/320th of second is a good starting point;
- Aperture: start with f/5.6 (or the sweet spot for your lens). Keeping the Sun in the center of the frame, set the aperture to get the proper exposure;
You may need to tweak the settings to compensate for:
- the type of filter and its strength;
- the brightness of the sun due to sky conditions (thin clouds and haze);
- the time of year, since during winter months, the sun is lower in the sky;
- the gear you use: teleconverters often reduce lens’ aperture by one or two stops.
Since the ISS is moving fast, its transit in front of the Sun (or Moon) will last a seconds or less. To capture it, you have to shoot in Burst mode. You’ll take as many images as possible during the very short lasting event.
Tip on Focus. To focus on the Sun, zoom on a sunspot using the live view. Try to make it as detailed as possible. If no spots are visible, zoom on the solar disk edge and aim to make it as sharp as possible.
Few Useful Accessories For Your Sun Photography
Solar filter aside, there are few accessories you may want to consider when taking photos of the Sun.
Tripod and Intervalometer
While not necessary, a tripod will improve the quality of your solar photography.
With medium telephoto lenses, you can get a good ‘casual’ shoot of the Sun handheld. But with longer lenses or when shooting for image staking, the tripod is a must.
An intervalometer is also a good thing, as it automatically captures a series of images. This accessory is great for capturing multiple images to be stacked later. Or to photograph the transit of a planet in front of the Sun or during a Solar eclipse.
Get Even Closer With a Teleconverter or Barlow Lens
There are several accessories that let you get even closer to the Sun, to capture better details.
Some telephoto lenses, even the old ones from the film era, can take a teleconverter. This is an extra optical element that multiplies the lens focal length.
Common teleconverters have a multiplying factor of 1.4x or 2x. The downside of using teleconverters is that you will lose 1 or 2 stops worth of light.
All major camera makers (Canon, Nikon, Olympus, Sony) sell teleconverters for some of their lenses. Third party (e.g., from Sigma) teleconverters are also available at a lower price.
With telescopes, a Barlow lens will double or triple your telescope focal length. The higher the magnification, the darker the image will be.
Teleconverters and Barlows are useful for moon and planets photography too.
If you don’t have a telescope yet, you can still mount a cheap planetary camera to your telephoto lens. There are adaptors available to use those cameras with Canon and Nikon lenses.
Frame the Sun With Ease Using a Solar Finder for Your Camera Hot-shoe
With a long focal length and narrow field of view, it can be difficult to frame the Sun.
The solution is buying a Solar finder. The finder sits on your camera hot-shoe and has a wide field of view.
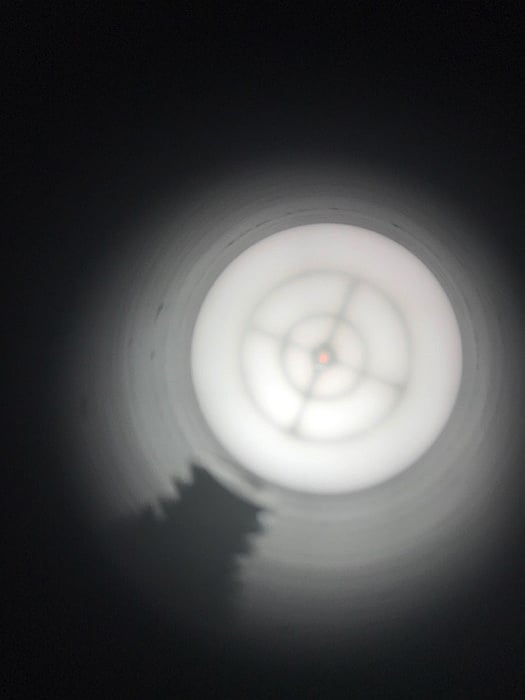
Looking inside a solar finder will allows you to comfortably frame the Sun (the red dot in the middle of the reticle).
The finder dims down the Sun. With its wide field of view, finding and centering the Sun in the frame will be a breeze.
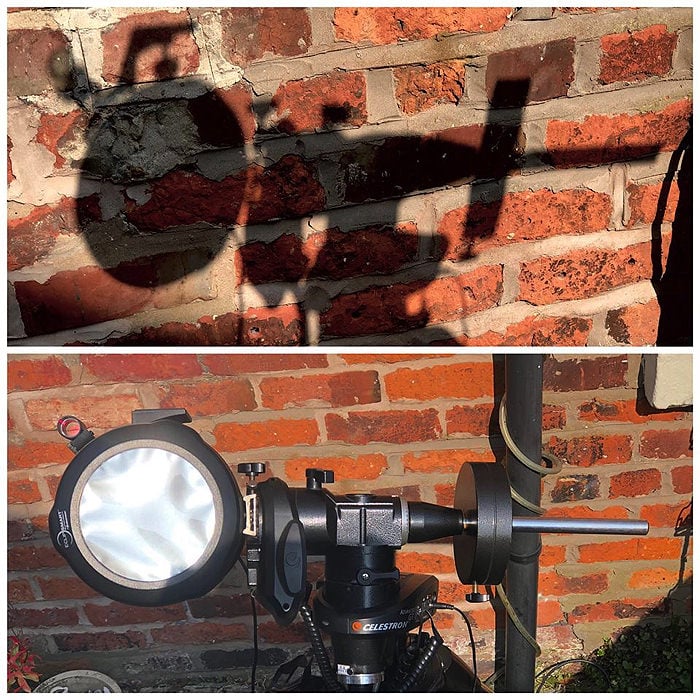
If you don’t have a Solar finder, consider to set up your gear close to a wall. Orient your camera in the direction of the Sun.
When the shadows it projects on the wall are the smallest possible, you should have the Sun in the frame.
A Tracking Mount
With a telescope, you need a tracking mount. The field of view is so narrow that with a tripod, the Sun will soon move out the frame.
A tracking mount will make it easier to record videos or shoot for image stacking. It follows the Sun.
A Skywatcher Star Adventurer is strong enough to carry a small telescope. It also has a dedicated solar tracking speed.
Daylight Polar Alignment. To track the movement of the Sun, an equatorial mount needs to be aligned with the celestial pole. In the Northern hemisphere, that means to align the mount to Polaris, the North Star.
This is not too difficult at night. In daylight, things are less obvious, as Polaris is not visible.
The easiest solution is to use the ‘daylight polar alignment’ function found in some apps. PS Align Pro iOS app as such function.
All you need to do is to point the mount North using a compass. Set your latitude. Then refine the mount alignment by centering the crosshair on the reticle shown in the app.
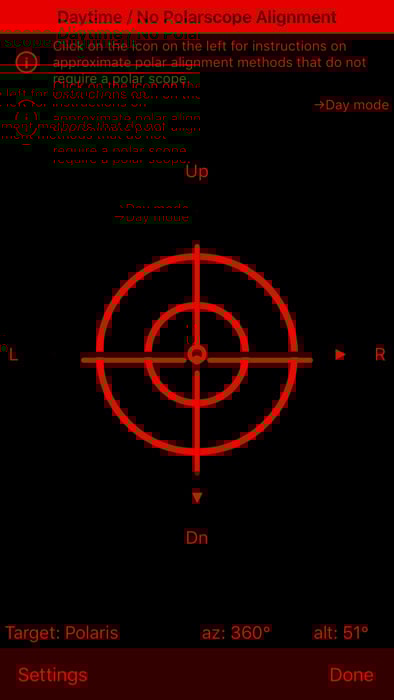
The tricky part is that your phone must go on the mount with the proper orientation.
Consider screening the phone by the metal of the mount. It can interfere with the phone compass.
The app comes with some useful insights about the setup.
Bring a Pair of Sunglasses and a Hat
Even if you are not staring at the Sun, it will be bright out there and sunglasses will give you more comfort.
A hat is great to protect you from the Sun. It also shades your camera LCD screen, so that it will be easier to see it.
The Sun in H-alpha
Imaging the Sun on H-alpha will give you much more dynamic and interesting images. It’ll allow you to photograph solar flares, coronal ejecta and more.
These events can’t be clearly seen in white light. Use dedicated solar scopes, such as Lunt and Coronado.
The Sun in H-alpha. Solar flares and prominences and granulation are much more visible than in white light.
A solar telescope is expensive. Because of this, discussing H-alpha photography is beyond the scope of this article.
Conclusion
Solar photography is a very interesting, easy and affordable experience.
A cheap white light filter on a superzoom bridge camera is all you need to peak into the sun’s secrets.