Creating a Photoshop panorama is easy once you know the steps.
A panorama is a picture made up of smaller images. The image below is a 10-image panorama of the Chicago skyline.
How to Create a Panorama in Photoshop
Here’s our step-by-step guide to creating a panorama in Photoshop.
Step 1. Shoot for Photoshop Panorama
Creating a successful panorama depends a lot on how you've shot the individual images. You’ll need to plan the panorama in advance.
Shoot the images in portrait orientation. This seems counterintuitive since your final product will be in landscape orientation. But portrait orientation captures more vertical information.
I created this landscape-oriented panorama from four images created in portrait orientation. My settings were 1/2 s at f/11, ISO 250.
Keep the camera level. It's a good idea to use a tripod and make sure it's level. Any curve between images, even a few degrees, will show in the panorama.
Overlap frames by a 1/3 to 1/2 of an inch—about 40%. I try to find natural landmarks that guide my overlaps. I'd rather have too many images than too few, but Photoshop will need some separation between the images.
Standardize camera settings. Before you start taking a panorama, take one image in the center of the composition. This is your settings guide. Use the focal length, focus, exposure, and white balance of this image as the standard.
Once you decide on camera settings, switch to manual mode. Lock in these settings before you take the panorama images.
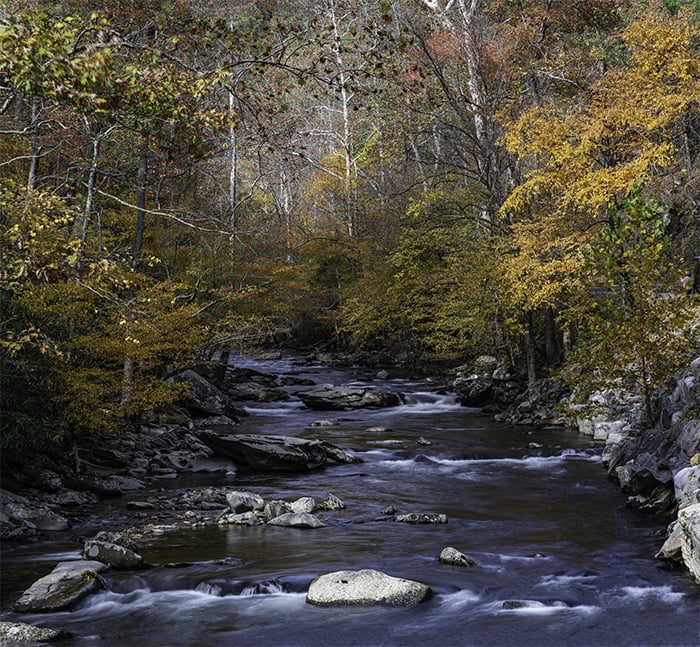
I created this panorama of the Smokey Mountains from three images. I wanted a wider angle than my lens could deliver. My settings were 0.8 s at f/11, ISO 400.
Now that you have images, let's move on to how to stitch the pictures together in Photoshop.
Step 2. Open the Images in Photoshop
Once you've decided which images you want to stitch together, open them in Photoshop. I'd suggest closing any other open files. Making panoramas takes a lot of processing power.
If your files are in Lightroom, there is a special “Export to Panorama” option. Select your photos and choose the Photo drop-down menu. Select “Edit In” and click “Merge to Panorama in Photoshop.” This will take you to the panorama options screen in Photoshop.
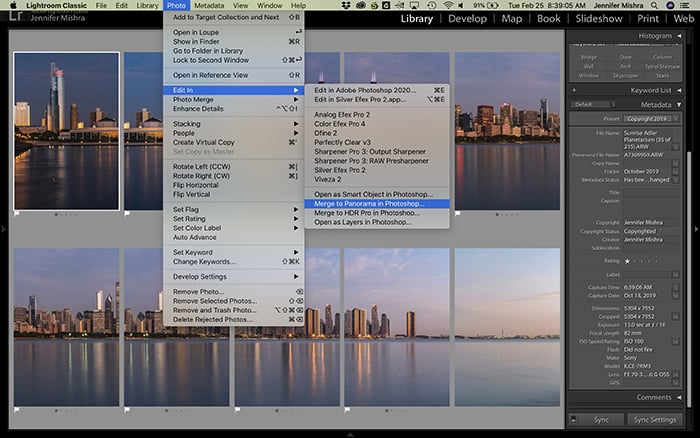
Screenshot showing the procedure for merging panoramas in Photoshop from Lightroom.
If your files are already in Photoshop, select the File drop-down menu, then Automate. Click “Photomerge.”
This will open the Photomerge window.
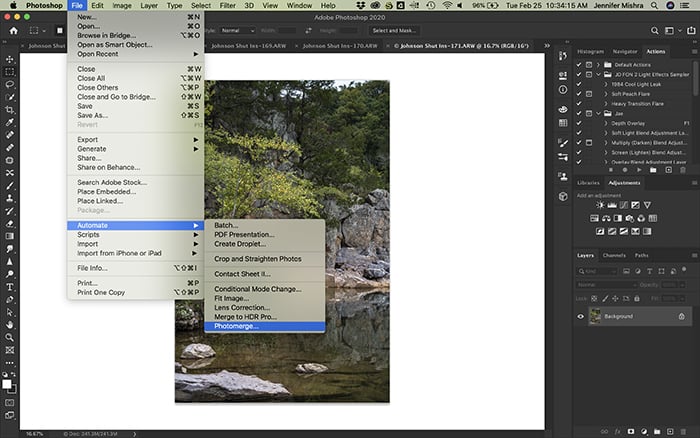
Screenshot showing the procedure for opening the Photomerge window in Photoshop.
Step 3. Select Panorama Options
You have some options in the Photomerge window.
If the only files you have open in Photoshop are those you want to merge, then select “Add Open Files.” If you opened the files from Lightroom, the individual files should already be listed.
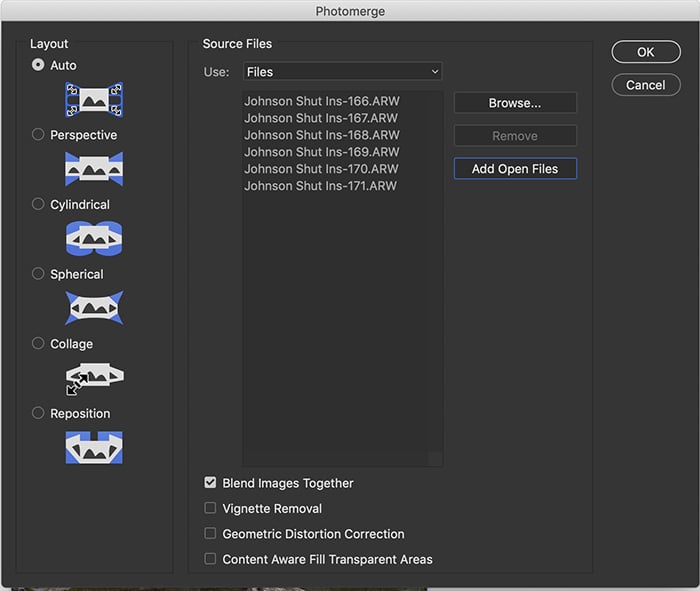
Screenshot of the Photomerge window in Photoshop showing panorama options.
You have some layout options in the left column and some checkboxes at the bottom.
Always start with the Auto Layout option on the left. Photoshop is usually good at figuring out how to stitch the images together. If you don't like the result, try the other layout options.
- Perspective uses the center image as the reference and fits all the other images around this one.
- Cylindrical tries to reduce the common "bow tie" shape of wide panoramas.
- Spherical creates 360-degree panoramas. It can reduce distortion on other types of panoramas.
- Collage aligns the images and may rotate or scale the images to fit together.
- Reposition aligns images but does not distort or reshape them to create the panorama.
Layout options may be similar, especially if your camera was level when you took the component images.
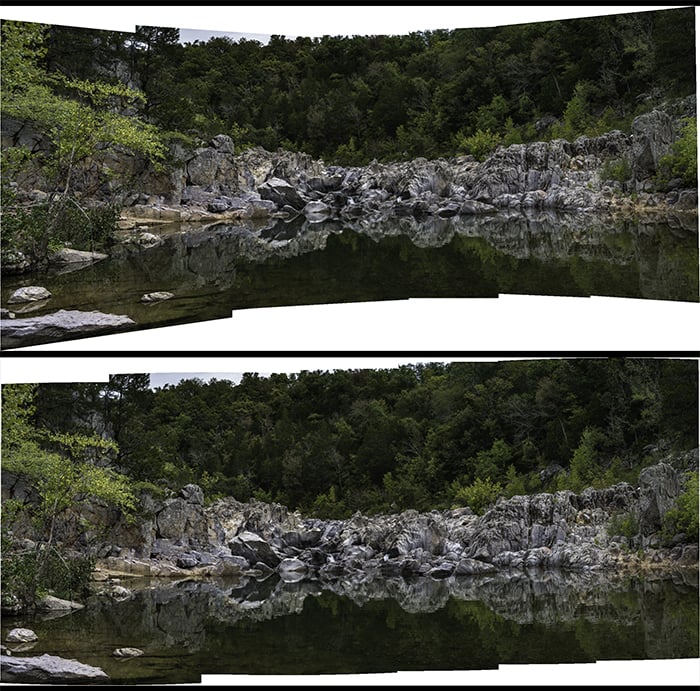
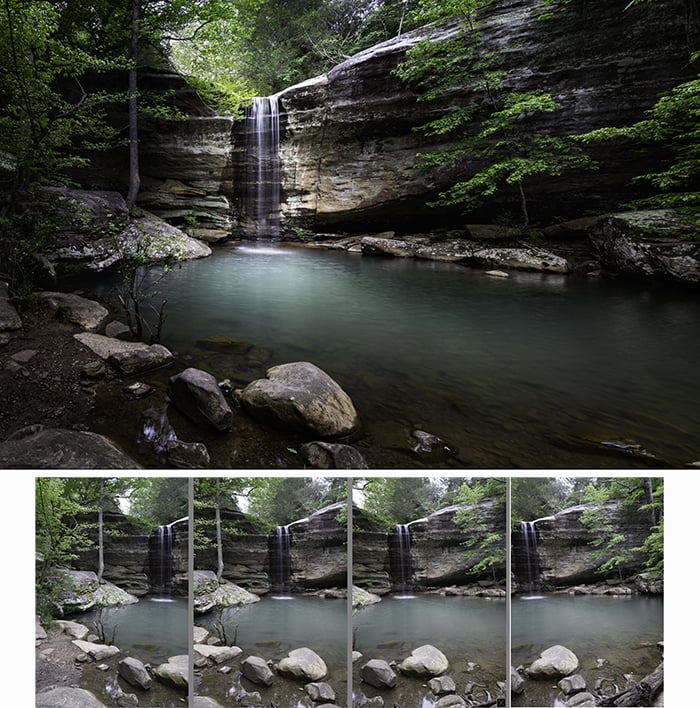
This is a 6-image panorama of a stream in the Missouri Ozarks. There are only slight differences between Auto (top) and Cylindrical (bottom) mode. My settings were 1/100th s at f/13, ISO 400.
The checkboxes at the bottom of the Photomerge window allow you to adjust the panorama.
By default, the checkbox next to "Blend Images Together" is checked. I leave it checked. Photoshop generally makes good decisions about how to blend the images.
I don't check the "Vignette Removal" box. But do so if you are using a lens that you know creates a vignette around each image.
I also don't check the "Geometric Distortion Correction" box. I apply a distortion correction in Lightroom as part of my import preset. If you haven't applied distortion correction, consider checking this box.
I sometimes check the "Content-Aware Fill Transparent Areas" box. Photoshop will fill in blank areas around the panorama. Photoshop is generally good at selecting content to use as fill. But leave this box unchecked if you do not want Photoshop to add content or if Photoshop isn't guessing well.
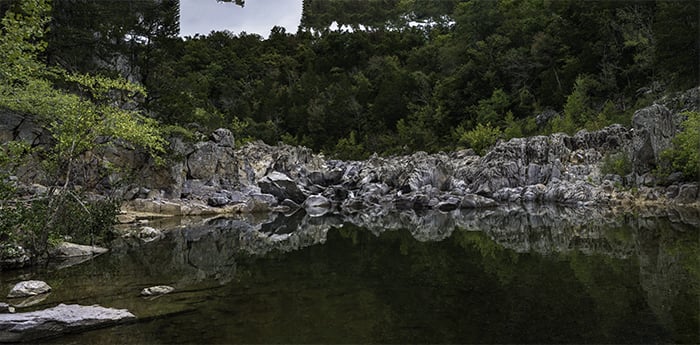
The result of checking the Content-Aware Fill Transparent Areas box for this 6-image panorama. Content-aware fill isn't perfect. The sky and trees need a bit of work. My settings were 1/100th s at f/13, ISO 400.
When you’re ready, click OK.
Step 4. Wait for Photoshop to Create a Panorama
Photoshop will look at the individual images and find overlaps. Then the program will create a new file. The parts taken from each image will show up as individual layers in this new file.
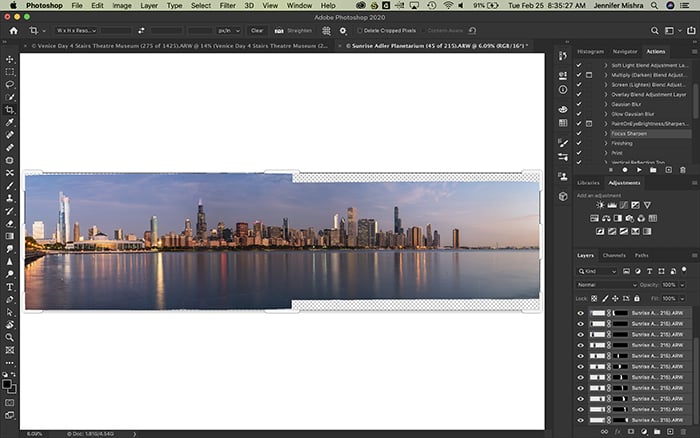
Photoshop creates a new panorama image. You can see the layers and layer masks created from individual images in the bottom right. My settings were 15 seconds at f/16, ISO 250.
It takes some time for Photoshop to create a panorama. The amount of time depends on:
- How many photos you are stitching together
- How many checkboxes you select in the Photomerge window
- The processing power of your computer
This might take a little while, so it’s best to take a little break.
Step 5. Save and Edit Your Panoramic Pictures
Once Photoshop creates a new panorama image, you can start post-processing. First, merge the layers together. This gives you a clean image to work with.
If you didn't ask Photoshop to content-aware fill, you will have some white space around the image. Fill in the space with the Clone or Patch tool, or crop in to remove white space.
Now, you’re ready to start post-processing the image. You can do this in Photoshop or import the image back into Lightroom.
I save the panorama file as a tiff and import it into my Lightroom catalog. If my file is too large to save, I have the option to discard layers and save a copy when I save it as a tiff file. This is one way to reduce the size of the file.
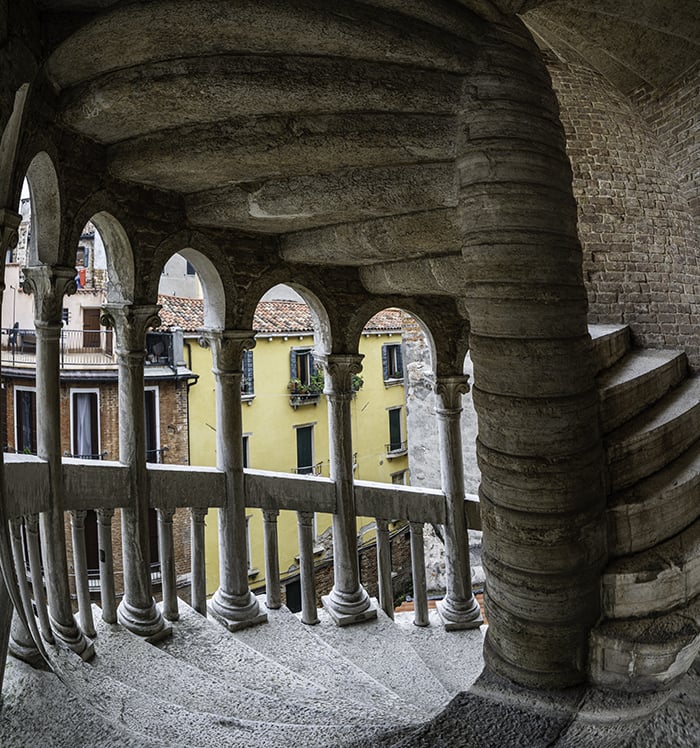
Fisheye effect created in Photoshop using a 4-image panorama and various distortion tools. My settings were 1/30th s at f/8.0, ISO 800.
Conclusion: Creating a Panorama in Photoshop
Creating a panoramic picture in Photoshop is easy.
The most difficult part is creating images that will seamlessly stitch together for a successful panorama. Remember to keep your camera level and settings the same between images. Overlap images by about 40%.
Photoshop will give you some options for it to create the panorama for you. I usually start with the Auto Layout option and ask Photoshop to blend the images.
Once Photoshop creates the panoramic picture, I merge the layers. Then I start post-processing my new panoramic creation.


