When it comes to photography, there are three main image filetypes: JPEG, RAW and TIFF. Each one has its own benefits and drawbacks, so which is the best for you? Let’s take a closer look at RAW vs TIFF.
Raw vs Tiff: Comparing JPEG to Other Image Formats
JPEG is the most commonly used of the three camera formats mentioned above. This is because it produces the smallest files.
Now, of course, you can produce smaller files by using fewer megapixels. But that is not the point behind using JPEG.
This is about the compression of the file. You can produce the same quality level image but in far smaller file sizes.
So far so good right? So what’s the catch? With JPEG files, which is an acronym for Joint Photographic Expert Group, the file type is described as lossy.
That’s because data was lost in the formatting of this file type.
Where Has the Data Been Lost?
The data is mainly lost from areas of the frame where you would not notice the loss of that data. That means areas of the photo like blue sky can have pixels removed without it affecting the overall quality of the image.
Essentially areas of the frame that have a uniform color and tone can have some pixels removed. And they’ll still display well on a computer screen.
What Are the Consequences of Using JPEG?
If you can get everything correct in-camera, using JPEG format can be a good option. You will save space on your memory card and your hard drive.
If you’re a photographer who likes to post-process their work photographing in JPEG has consequences.
- Data loss – The first is that every time you make an edit on this file type you lose yet more data. If you do choose to edit a JPEG file, duplicate it first before you begin to edit. This way you’ll keep a file with the original data on it.
- Temperature – The lost pixel data means when you change the color temperature of your image, you’re changing the actual image. You’re not changing just the metadata. Those changes are also harsher in look, with RAW you can make more subtle adjustments.
- Noise – There are some situations where you will need to use a higher ISO to take your photo. This will be in low light situations, so more often than not at night. There are noise reduction programs out there. When they only have a JPEG file to work with they’re not as effective. Data is again lost on the file each time you attempt to reduce the noise.
RAW files take up more hard drive space. You retain maximum choice when it comes to editing though.
What Is RAW?
This is the camera format that most professional photographers use. With a few exceptions, they’ll always use RAW when possible.
The RAW file format is sometimes described as a digital negative. With JPEG being the printed photo. This analogy describes the ability of a RAW file to keep producing JPEGs. This is much like a negative would keep producing printed images in a darkroom.
The quality of content a RAW file has is as close as digital gets to a negative as well.
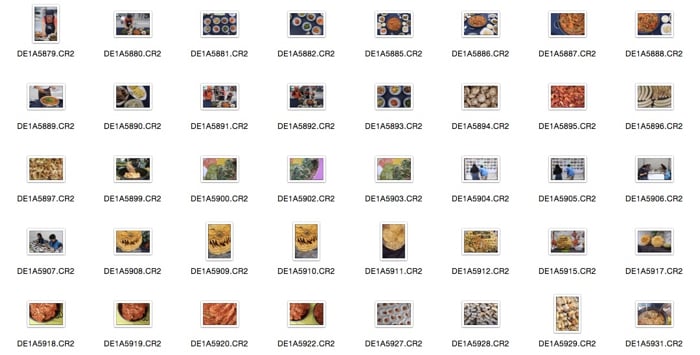
File Names
Different camera manufacturers have different names for their RAW files. These files are all very similar to one another. The extensions to these files are CR2 (Canon), NEF (Nikon), with other file types being DNG, RW2, CRW, and RAF.
These files will all open in the post-processing programs designed to open them. They will all work in the same way for your workflow.
Post-Processing With RAW
The most common program to open RAW files in is Adobe Camera Raw. There are other options available as well. Adobe Camera Raw is often the first step in the post-processing that photographers will undertake.
You can make quite a lot of changes to the RAW file in this first step. The most common adjustments are color temperature, contrast, saturation and noise reduction. You might sharpen the image here as well.
The file can then be saved and exported to the next post processing package you wish to use it with.
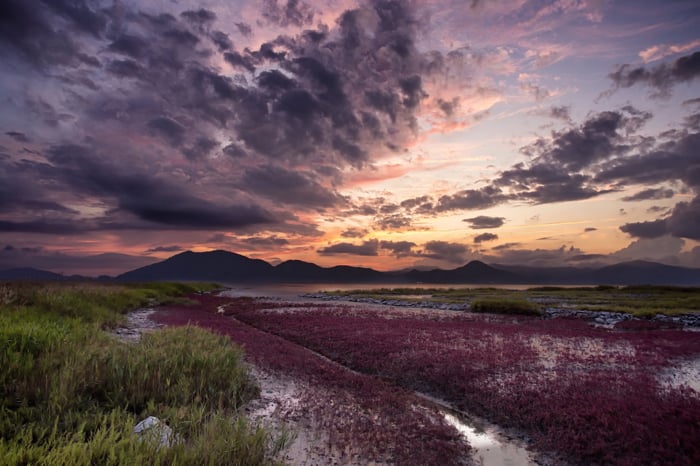
Landscape photos like this use digital blending to produce them. They need to be photographed using RAW.
How to Deal With Large File Size?
The downside with RAW is that the file size is large. You can quickly fill hard drive space when photographing in this format. When it comes to sharing your photos on a personal website or social media, these file sizes will slow the website down.
The RAW format isn’t the file type that websites use anyway.
It’s for this reason that once you have finished editing your photo you’ll save it as a JPEG image. This means you’ll need plenty of hard drive space to store those RAW files, but the finished product will be a JPEG.
What Is TIFF?
TIFF file format is not common in digital photography. This is because the majority of cameras don’t have the ability to take photos in TIFF format.
TIFF is an acronym for Tagged Image File Format, and this particular file format is lossless format. That means it won’t lose image data when edited and manipulated in post processing.
If most photographers don’t use TIFF format, where is it found? You can save files you’re working on in Photoshop in the TIFF format. In the camera, it’s more often found in medical or scientific imaging. It’s also used a lot in graphic publishing.
TIFF files are likely to be used for digital prints, when it comes to displaying on the web using different more compressed file types is a better idea.
When would you use TIFF?
Unless your camera supports it you’ll probably not need to take photos in TIFF format. Some camera’s will support it though, and as with the logic behind photographing in RAW the more data retained from an image the better. Of course you’ll need lots of hard drive space if you photograph a lot in TIFF!
Where TIFF is used more often is during post processing. You might take the photo in RAW or even JPEG, but when you then come to work on in you could use TIFF as a format. TIFF is supported by many post processing programs including Photoshop, Lightroom and NIK efex. As the format is lossless you can work on your edits safe in the knowledge your not losing information when you make changes to the file.
JPEG vs RAW or Even TIFF?
Now you know what each of these file types is, so you can make an informed decision on which type to use. Let’s look at these three file types.
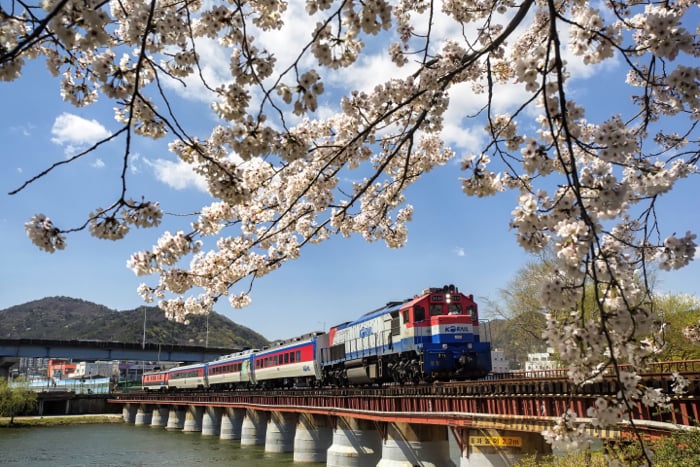
Photographs like this one on a nice sunny day with the sun behind could be photographed in either RAW or JPEG with little difference in the end result.
When to Use JPEG?
There are some camera devices that don’t support RAW photo files. If you’re using one of these you’re going to have to use JPEG. That’s typically smartphones. Those who use drones will also encounter the same issue.
The latest version of DJI’s Mavic drone does support a RAW file type though. Going forward this may become more of an option.
Let’s assume your camera can take both RAW and JPEG though, when is a good time to use a JPEG?
- Limited editing – The photo you’re taking requires limited editing. You might need a little extra contrast and saturation, but that’s it. The image is more or less straight out of the camera and ready for display.
- Save storage – You’re taking lots of photos per day and have a limited amount of storage available. Switching to JPEG could help here. It’s best to use the largest and best quality JPEG file that the camera can make. If you wish, you could save even more disk space by using a smaller JPEG file.
- Easy image – These are images that the camera can easily handle, photographed at a low ISO. They’ll usually be taken outdoors and in good light. This will mean the image doesn’t need extra editing for noise in the file. The file should be ready for use on your website or social media straight away.
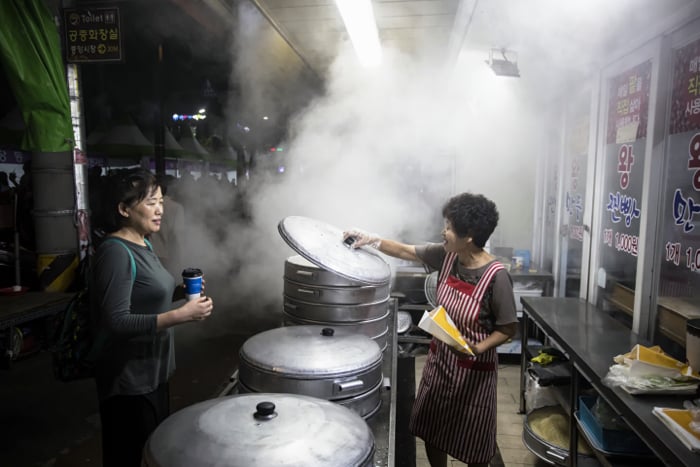
Nighttime street photography should be photographed in RAW. This type of photo stretches the camera and needs a high ISO, which will result in more noise.
When to Use RAW
When you’re looking to produce a photograph of the highest quality, it’s best to use the RAW format.
The primary reason for this is that you’re going to edit the photos in post-processing. You need all the available data to get the best result.
- Low light photography – Whether you’re using a high ISO for faster shutter speed, or using a long exposure to expose your photo, it’s best to use RAW. These types of photos stretch the capabilities of your camera. You’ll need some editing to polish the photos for viewing.
- Digital blending – This involves bracketing several images, and then blending them together. You can use luminosity masks to balance light across the frame. If you want the best results with this technique it’s best to use RAW files.
- Portrait work – Portrait work done in the studio will often have a lot of post-processing done on it. Things like skin softening are editing techniques that would lead to a loss of image data with a JPEG.
- Commercial work – Still life and food photography or any form or commercial work should be photographed in RAW. You can then edit them to get the best results possible.
Conclusion
The choice in image format rests on how much post-processing you do. And to what extent you work commercially as a photographer.
It’s possible to get some great results photographing in JPEG alone. And you’ll save some time on post-processing as it’s not possible to work on these files quite so much.
We’d love to hear your opinion on when it’s best to photograph in RAW or JPEG. If you have the time, it would be great to hear about your workflow using these files.


