A slow shutter speed has many uses, from creating motion blur to panning to long exposures. These can help you improve your photos by adding interesting effects.
Read on to find out how slowing down your shutter will speed up your creative photography.
Using a Tripod to Achieve Slow Shutter Speed: Do You Need One?
You’ll need a tripod once the shutter speed drops below a level where you can hold your camera in hand, without camera shake. It’s better to use a tripod even at these relatively faster slow shutter speeds, with the exception being camera rotation.
You can take handheld slow shutter photos too, but just keep in mind the following thing. The focal length you’re photographing at determines the slowest shutter speed you can use handheld.
At 20mm you can photograph at 1/20th second, and at 200mm you’ll need to photograph at 1/200th. You can follow this correlation as you change your focal length.
Some lenses have image stabilization, and this might allow you to use a slightly slower shutter speed.
Creative Photography Techniques With Slow Shutter Speed
You can create much more dynamic photos by using shutter speeds between 1/40th of a second down to 1/2 a second.
Depending on several factors you might photograph slightly faster or slower. But most photos in this category will be taken somewhere between these two shutter speeds.
7. Motion Blur
This is what happens when you keep the camera completely still, but there are moving elements around the camera. Use a tripod for best results.
With this type of photo you might be attempting to capture the motion of passing pedestrians, a train as it pulls into a station, or perhaps a drummer beating his drum. In all cases, there is a moving element in the frame, and you’re aiming to give the photo more of a narrative by showing movement.
The exact shutter speed you’ll use will depend on how fast the object happens to be moving. To add extra interest it’s great to have static elements in the frame, such as a stationary pedestrian.
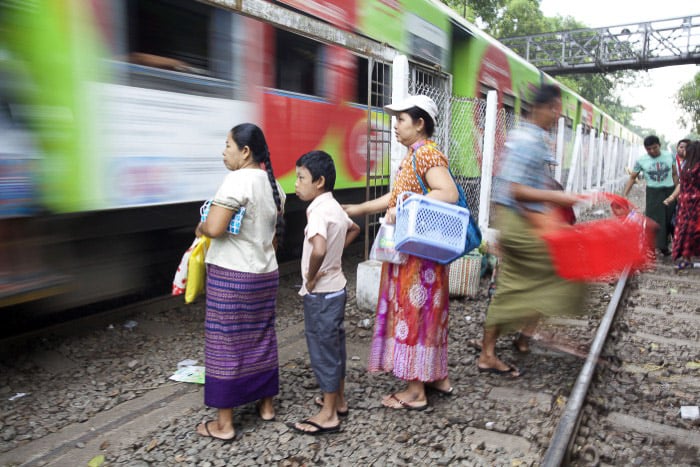
A good location to try motion blur is a train station, as people are waiting for the train.
6. Panning
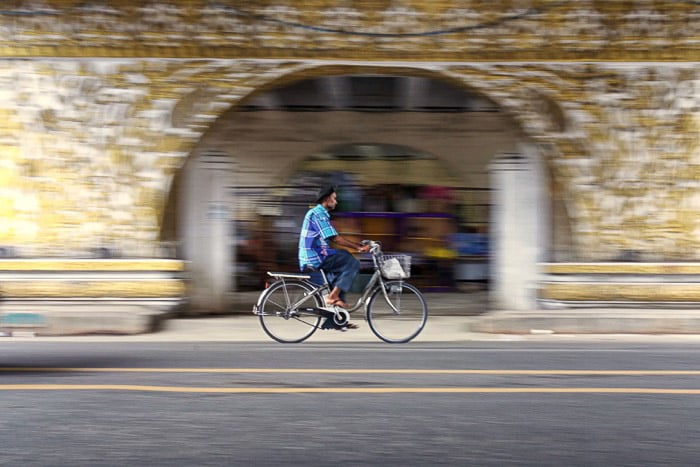
Panning differs from motion blur in that you follow the moving object with your camera. In this case, the moving object will be sharp, and there will be motion blur that surrounds the object.
Panning is a great technique and a lot of fun to practice. You can pan any object that moves, from a pedestrian to a fast moving racing car.
You’ll need to adapt the shutter speed to the object you’re panning. Where 1/100th may produce motion blur when following a racing car, it will be far too fast for a walking person.
Those wishing to learn this technique, and practice it should begin by panning a cyclist.
- Find a place where cyclists are riding in a line parallel to where you’re standing. Keep the parallel line around 20 to 50m away.
- Adjust your exposure time to around 1/30th.
- Follow the cyclist as they approach the area you wish to photograph them in.
- Keep the motion nice and smooth, and at the same speed the cyclist is moving at.
- Press the shutter in a nice smooth motion as the cyclist is passing.
- Check your results and repeat the process if necessary.
5. Kinetic Camera Movement
Kinetic camera movement means zoom burst and camera rotation, both of which you’ll learn more about when you find out how they apply to light painting. The blur in the image is created by the camera’s movement, not by objects moving in front of the camera.
- Camera rotation – This is a difficult technique to do well, not only because you’ll have to do it handheld. The aim is to rotate the camera in a smooth motion while aiming at a central point of interest in your photo. A shutter speed of around 1/20th is ideal, with as wide a focal length as you can get.
- Zoom burst – In this case, you’re going to change the focal length of a zoom lens during exposure of around 1/20th. A simple kit lens is great to practice with, and for this type of zoom, it works best when you zoom in.
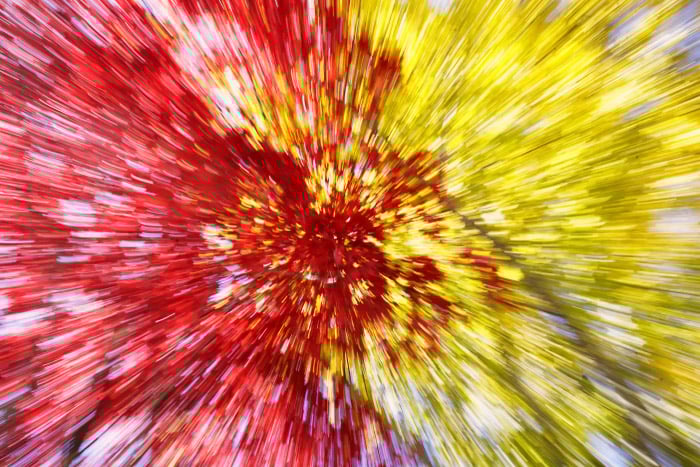
This image is an abstract zoom burst of leafs during autumn.
4. Daytime Long Exposure
Taking daytime long exposures is a lot of fun, and is a way to create compelling images. Slowing everything down can create dramatic effects. During the day moving elements such as clouds and water will be affected.
The first thing to bear in mind is that you’ll need specific equipment to take daytime long exposures. A tripod is necessary because exposure times will be more than one second.
How do you expose for longer though, during the bright daylight? The answer is by using an ND filter. If you want exposures beyond 10 seconds you’ll need the strongest there is. The strongest ND filter is ND1000, which will appear as an opaque piece of black glass.
Those who photograph infra-red photos with a filter will also use daytime long exposure, and those exposure times can run into the minutes.
You’ll often need to use an ND filter to take a long exposure during the day.
3. Photographing Cloud Movement
Getting cloud movement in your photo can add a lot of interest to your photo. That’s because clouds moving across your scene will at the very least provide a smooth and interesting texture to the sky.
If the clouds are moving in a vertical direction too of from where you’re stood, they’ll provide a leading line to your main subject.
The faster the cloud moves across the sky the better, so windy days often work well. You’ll also need a day where the cloud has gradation in intensity, and perhaps some breaks in the cloud as well.
On a day where the above conditions are favourable, you’ll still need to expose for a long time. Getting cloud movement in your photo often requires exposure times of 30 seconds or longer.
If you need to expose longer you’ll need to switch to bulb mode, and use an external shutter release to manually set the exposure length.
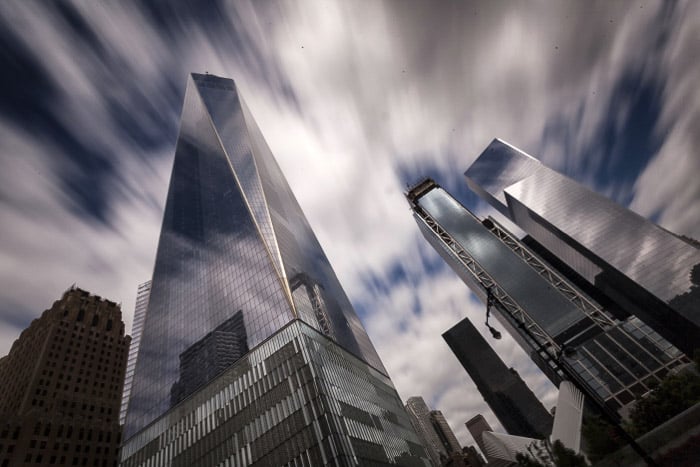
Clouds moving across the sky at the One World Trade Center in New York.
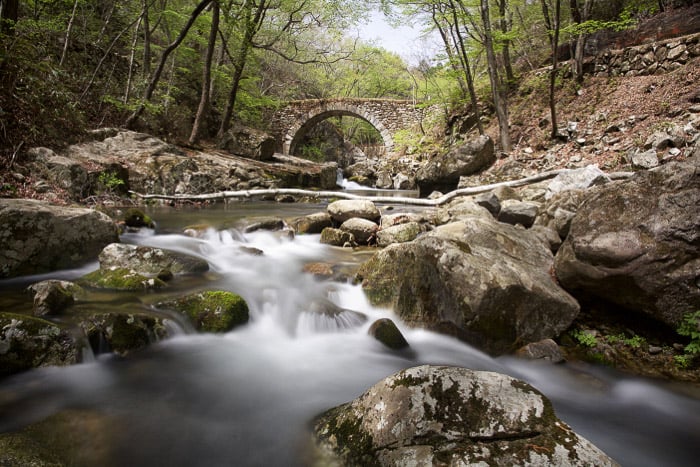
2. Photographing Water Movement
Photographing water movement is easier than clouds, as water movement is regular and easier to predict. You’ll not need long exposures either. Through a range of different exposure lengths, you can photograph water movement in different ways.
Focusing on slow shutter speeds and photographing water, you’ll want to photograph places like rivers, waterfalls and coastlines.
- Rivers and waterfalls – You’re looking for white water here. Use a slow shutter speed of between one and five seconds. This fast-moving water will then be flattened out, and the white water will appear like threads of silk.
- Coastline – Look for rocky areas, where waves crash against the rock. Keep an eye out for how the surf comes up the beach, and then recedes. These kinds of places will work very well for photographs with slower shutter speeds. The shutter speed you’ll use will vary a fair amount though.
Capturing the movement of the surf as it’s receding, for instance, is best captured at around half a second.
You’ll want to expose for longer when photographing the sea, especially if you want to flatten it. An exposure time of around 15 seconds will be needed to flatten the sea, and create a dreamscape mood to your photo.
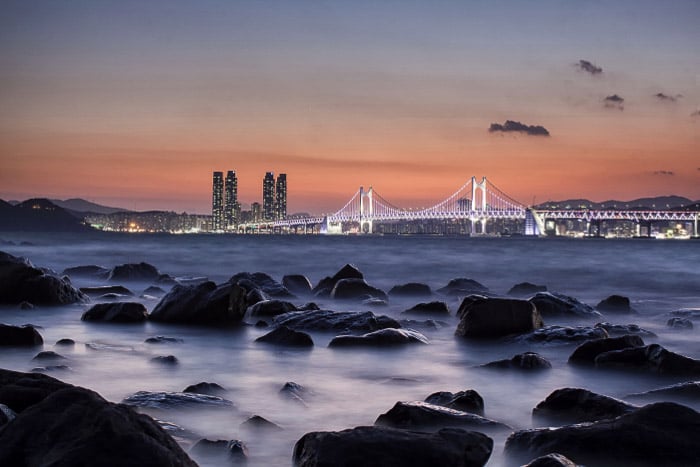
Rocky coastlines are excellent places to use a slow shutter speed, and can give excellent results.
1. Light Painting
Last and by no means least is the light painting technique. This fascinating field requires long exposure photos.
The genre can be divided into two separate areas, so let’s look at those in turn. In all cases, you’ll need to secure your camera in position with a tripod.
Regular Light Painting
This form of light painting involves moving a light source in front of the camera, while the camera remains still. There are quite a few applications for this.
- Simple light painting – Using an object such as a torch or a sparkler, you “write” across the frame. It’s popular to spell names of people or countries. These type of exposures won’t usually be longer than 30 seconds.
- Wire wool – You can use wire wool to create a Catherine wheel light painting, with burning wire wool shards propelled away from a central spin. Use a whisk to secure the wire wool, and a cord attached to the whisk so you can spin it. The wool is then lit, and burns quickly when spun.
- LED light stick – In recent years a much more sophisticated form of light painting has developed using an LED light stick. Products like the pixelstick, and the magilight are great examples.
- Illuminating an object – Instead of pointing the light source towards the camera, point it away. Now light up a point of interest in your frame, to literally highlight that point of interest.
- Traffic light trails – Find a busy road in a city and an elevated point that overlooks it. You can then use exposure times of between 5 to 30 seconds to capture the scene.
- Star light trails – You can use long exposure to capture the movement of stars. To do this with one frame means exposure times of around 20 minutes. It’s better to take a sequence of 30 second exposures, and then stack these exposures together.
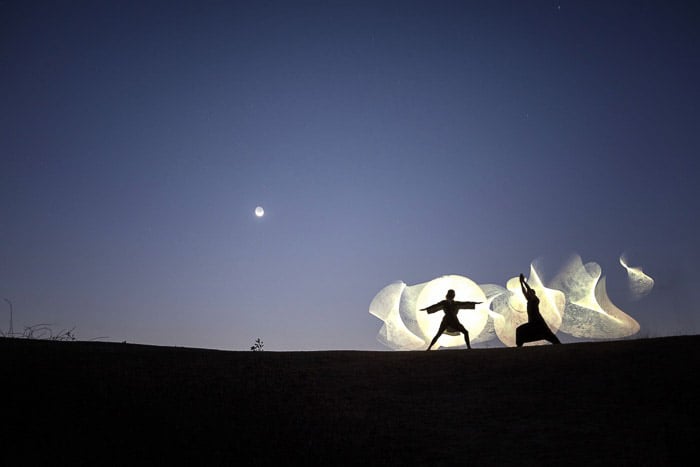
Light painting is a really interesting technique with a huge amount of creative potential.
Kinetic Light Painting
In contrast to regular light painting, kinetic light painting involves moving the camera. There are two main techniques you can try that use this technique.
- Zoom burst – Zoom burst means changing the focal length of a zoom lens attached to your camera. When photographing at night it’s best to zoom out, and finish on the widest focal length.
- Camera rotation – In this case you’ll be moving the entire camera body, by rotating the tripod head. The tripod itself should always stay still. This technique works best with a worm’s eye view, in a city with tall buildings.
In both cases you can create an abstract looking photo using both rotation and zoom. It’s also possible to capture structures, and all this can be achieved in a single exposure.
To do this you’ll need to divide your exposure into two parts. Let’s assume you’re exposing for 30 seconds. During this exposure, the first three seconds of the exposure will be the zoom, or the camera rotation.
When carrying out either technique you’ll need to be fast, smooth, and avoid moving the tripod. Now lock the camera in position for the remainder of the exposure. The structures in the scene will be captured along with the light painting.
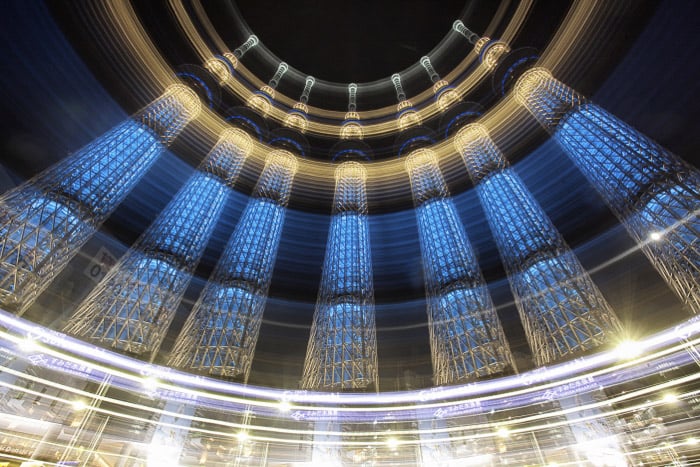
This photo was taken with one exposure. The camera was rotated to create the light painting. The camera was then locked in seven different position, and this captured the tower multiple times within the same image.
Conclusion: Slow Shutter Speed
Slow shutter speed photography is a truly vast area, with immense creative potential. There are many possibilities for you, as set out in this article.
Have you ever tried slow shutter speed techniques like the ones mentioned here? Do you have a use for slow shutter speed that’s unique, and hasn’t been mentioned in this article?
As always we’d love to know about your experiences, by sharing them in them in the comments section. Try some of the ideas in this article, and share your photos in the comments section!